
Popular categories
Looking for a yarn?


Comments / Questions (15)
![]() Serniguet wrote:
Serniguet wrote:
Bonjour.Le début de la vidéo ne correspond pas à la photo du châle.Sur la vidéo on augmente au début et fin du rang.tandis que sur la photo on augmente au début du rang (donc biais)et pas en fin de rang , ligne droite Bonne journée
29.01.2020 - 09:07DROPS Design answered:
Bonjour Mme Serniguet, le principe de ce châle est le même: on tricote 2 fois le même diagramme avec 1 m lis de chaque côté et 1 m au milieu, quand le 1er diagramme et fait, on a approximativement la même forme. Pour toute assistance personnalisée, n'hésitez pas à contacter votre magasin DROPS, même par mail ou téléphone, ce sera fort probablement plus simple pour vous pour obtenir une aide plus efficace sur ce châle. Bon tricot!
29.01.2020 - 09:36
![]() Serniguet wrote:
Serniguet wrote:
D'accord si vous augmentez en début et fin de chaque rang A1 le tricot va en biais sur le côté droit et gauche,ce que nous n'avons pas sur la photo. Vous serait il possible de me répondre sur ma boite mail. Merci
27.01.2020 - 17:55DROPS Design answered:
Bonjour Mme Serniguet, nous ne pouvons répondre que via cet espace, pour toute aide personnalisée en revanche, votre magasin pourra vous aider, même par mail ou téléphone. Regardez cette vidéo, le châle est semblable (le point ajouré est différent) mais la technique sera la même. Bon tricot!
28.01.2020 - 10:30
![]() Serniguet wrote:
Serniguet wrote:
Bonjour Pourriez vous me dire si le motif 2 se met à côté du motif 1. j'ai fait le motif 1 et le motif 2 je le mets de chaque côté du motif 1 cela ne donne pas la même chose que le châle sur la photo. L'angle droit du rectangle est le motif 1. Merci par avance pour les explications .
25.01.2020 - 17:35DROPS Design answered:
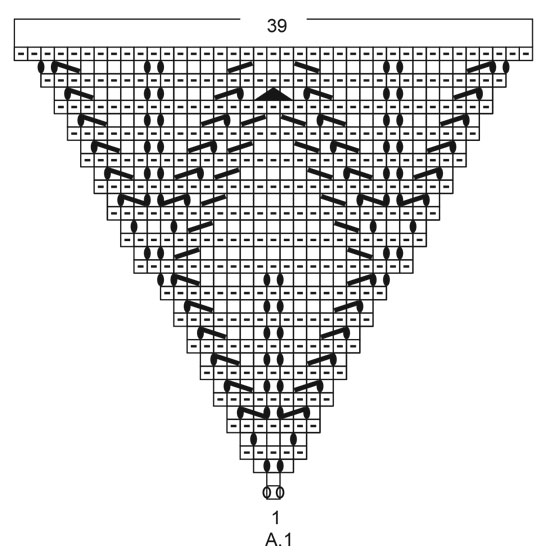
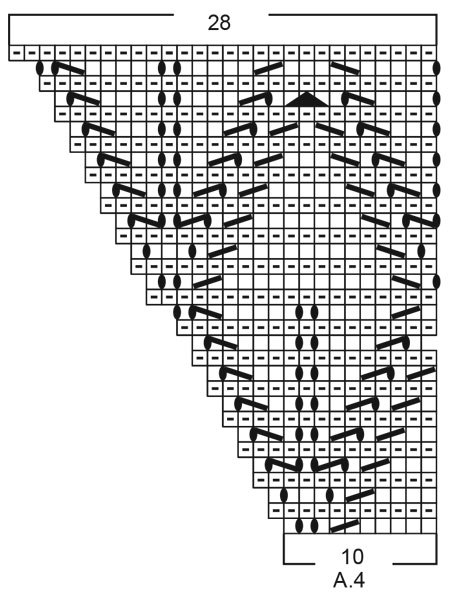
Bonjour Mme Serniguet, au tout début du châle, vous ne devez tricoter que le diagramme A.1 ainsi: 1 m point mousse, A.1, 1 m point mousse (= m centrale, celle qui être au niveau de l'angle), A.1, 1 m point mousse. Vous augmentez au début et à la fin de chaque A.1 pour former un triangle. Bon tricot!
27.01.2020 - 08:43
![]() Alexandra wrote:
Alexandra wrote:
Bonjour, il y a une différence entre l'explication écrite et le diagramme A.1. Dans l'explication, il est indiqué de tricoter 1 fois A.1 en hauteur pour avoir 81 mailles, or sur le diagramme, si on le tricote 1 fois en hauteur, on a 39 mailles, pas 81. Je ne comprends pas comment faire ni comment arriver à 81 mailles.
15.01.2020 - 18:49DROPS Design answered:
Bonjour Alexandra, vous tricotez 2 fois A.1 sur le même rang ainsi (sur la base des 5 mailles montées): 1 maille lisière au point mousse, A.1 (= 1 m au 1er rang), 1 m point mousse (m centrale), A.1 (= 1 m au 1er rang), 1 m lis au point mousse. Quand A.1 est terminé, vous avez: 1 m lis, A.1 (= 39 m), 1 m centrale, A.1 (= 39 m), 1 m lis = 1+39+1+39+1=81 m. Bon tricot!
16.01.2020 - 09:00
![]() Pernille Villumsen wrote:
Pernille Villumsen wrote:
Der står i opskrift 201/17 lilla sjal i alpacka, at sjalet strikkes oppefra og ned. Jeg kan ikke få det til at give mening, hvis altså oppefra er det brede stykke? Vh Pernille
02.10.2019 - 20:16DROPS Design answered:
Hej Pernille, jo men det stemmer, du kan se systemet efter at du har strikket A.1. Du strikker diagrammet og tager ud ifølge det, på hver side af midterste maske. God fornøjelse!
03.10.2019 - 11:36
|
||||||||||||||||||||||
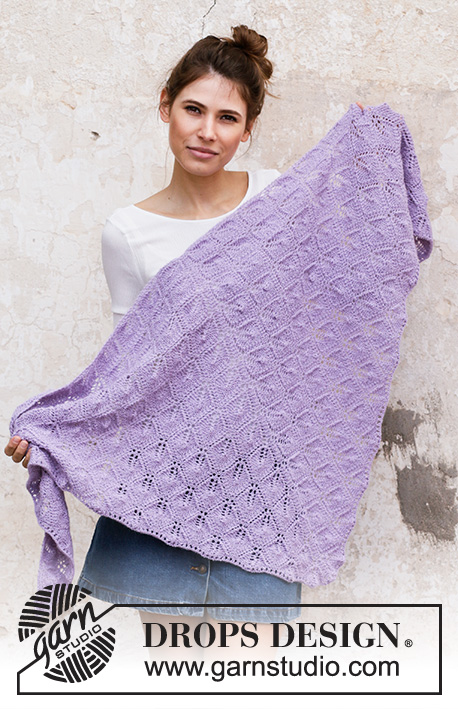
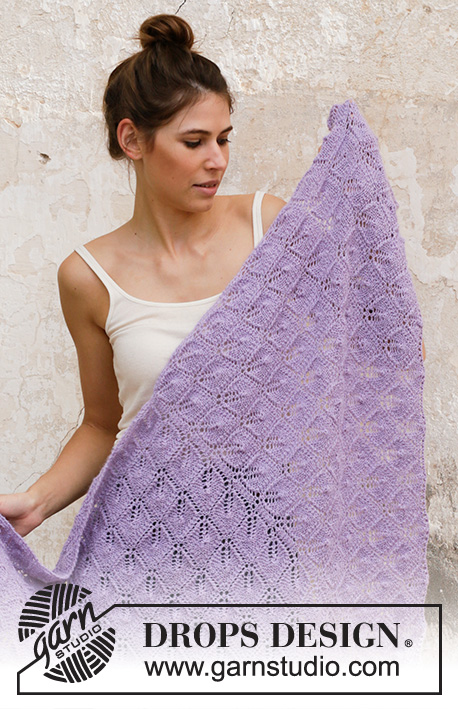
Lilac Bouquet#lilacbouquetwrap |
||||||||||||||||||||||
 |
 |
|||||||||||||||||||||
Knitted shawl in DROPS Alpaca. Piece is knitted top down with lace pattern and garter stitch.
DROPS 201-17 |
||||||||||||||||||||||
|
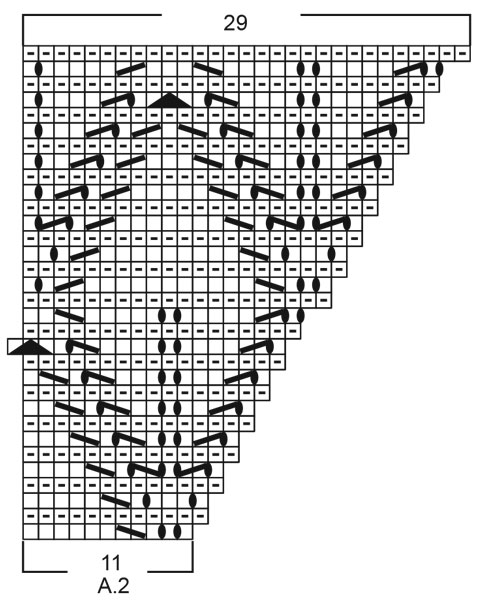
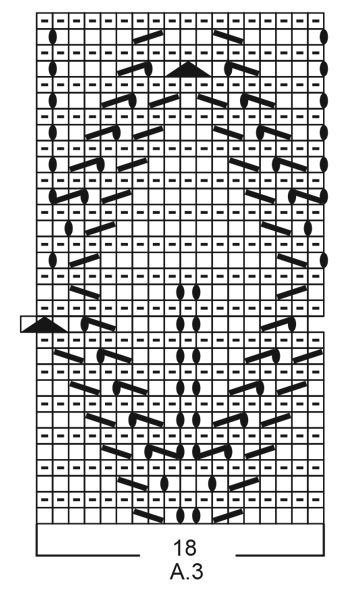
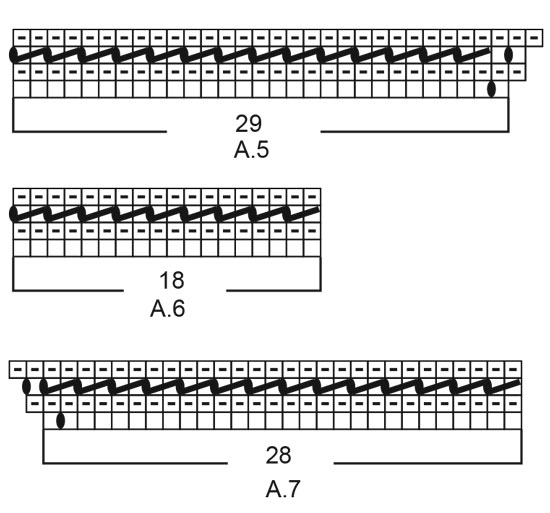
---------------------------------------------------------- EXPLANATION FOR THE PATTERN: ---------------------------------------------------------- GARTER STITCH (back and forth): Knit all rows. 1 ridge vertically = knit 2 rows. PATTERN: See diagrams A.1 to A.7. Diagrams show all rows in pattern seen from the right side. ---------------------------------------------------------- START THE PIECE HERE: ---------------------------------------------------------- SHAWL - SHORT OVERVIEW OF THE PIECE: Work piece back and forth on circular needle. SHAWL: Cast on 5 stitches on circular needle size 3 mm with Alpaca. Work pattern as follows: 1 edge stitch in GARTER STITCH – read explanation above, A.1 over next stitch (= 1 stitch), 1 stitch in garter stitch (= middle stitch), A.1 over next stitch, 1 edge stitch in garter stitch. Insert a marker thread in the middle stitch on row (= middle stitch and marker thread follow upwards in piece). Continue pattern back and forth like this until A.1 has been worked vertically = 81 stitches. REMEMBER THE KNITTING TENSION! Now work pattern as follows: 1 edge stitch in garter stitch, A.2 over the next 11 stitches, A.3 over the next 18 stitches, A.4 over the next 10 stitches, 1 stitch in garter stitch (= middle stitch), A.2 over the next 11 stitches, A.3 over the next 18 stitches, A.4 over the next 10 stitches, 1 edge stitch in garter stitch. Continue back and forth until A.2, A.3 and A.4 have been worked vertically = 153 stitches. Then continue pattern and increase outwards the same way but every time the diagrams have been worked vertically there is room for 2 repetitions more of A.3 between A.2 and A.4 in each side of piece. When piece measures approx. 71 cm measured along middle stitch - adjust to finish after a whole leaf (i.e. finish after 16th row or 32nd row in A.2 to A.4), work an edge as follows: 1 edge stitch in garter stitch, A.5 over the next 29 stitches, A.6 until 28 stitches remain before middle stitch, A.7 over the next 28 stitches, 1 stitch in garter stitch (= middle stitch), A.5 over the next 29 stitches, A.6 until 29 stitches remain on row, A.7 over the next 28 stitches, 1 edge stitch in garter stitch. When A.5 to A.7 have been worked vertically, 8 stitches have been increased on row. Piece measures approx. 72 cm along middle stitch. Cast off. Make sure to avoid a tight cast-off edge, cast off with 1 larger needle size if needed. |
||||||||||||||||||||||
Diagram explanations |
||||||||||||||||||||||
|
||||||||||||||||||||||
 |
||||||||||||||||||||||
 |
||||||||||||||||||||||
 |
||||||||||||||||||||||
 |
||||||||||||||||||||||
 |
||||||||||||||||||||||
Have you finished this pattern?Tag your pictures with #dropspattern #lilacbouquetwrap or submit them to the #dropsfan gallery. Do you need help with this pattern?You'll find 15 tutorial videos, a Comments/Questions area and more by visiting the pattern on garnstudio.com. © 1982-2026 DROPS Design A/S. We reserve all rights. This document, including all its sub-sections, has copyrights. Read more about what you can do with our patterns at the bottom of each pattern on our site. |
||||||||||||||||||||||


With over 40 years in knitting and crochet design, DROPS Design offers one of the most extensive collections of free patterns on the internet - translated to 17 languages. As of today we count 324 catalogues and 12290 patterns translated into English (UK/cm). 12290
We work hard to bring you the best knitting and crochet have to offer, inspiration and advice as well as great quality yarns at incredible prices! Would you like to use our patterns for other than personal use? You can read what you are allowed to do in the Copyright text at the bottom of all our patterns. Happy crafting!
Post a comment to pattern DROPS 201-17
We would love to hear what you have to say about this pattern!
If you want to leave a question, please make sure you select the correct category in the form below, to speed up the answering process. Required fields are marked *.