
Popular categories
Looking for a yarn?


Comments / Questions (15)
![]() Anne Marie Smith wrote:
Anne Marie Smith wrote:
Når jeg har strikket mønster 1 i opskriften lilac bouqueten gang i højden har jeg 41masker og ikke hvad i skriver og kan derfor ikke komme videre med mønster 2
25.09.2024 - 17:04
![]() Iole De Angelis wrote:
Iole De Angelis wrote:
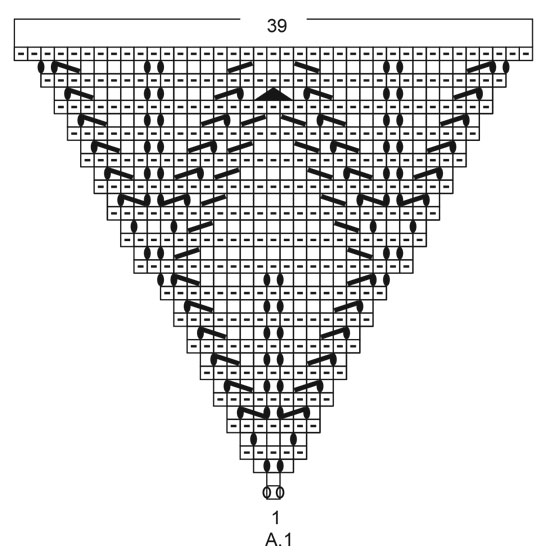
Alla fine dello schema A1 ho 39 maglie, ma nella spiegazione dice che ne devo avere 81. Dove sbaglio? Grazie
23.02.2024 - 16:00DROPS Design answered:
Buonasera Iole, il motivo A.1 si lavora 2 volte sulle prime 5 maglie. Buon lavoro!
25.02.2024 - 16:16
![]() Looklady wrote:
Looklady wrote:
J'ai abandonner le tuto une catastrophe impossible a realisé mal expliquer shema bizarre et faux impossible de faire le debut sur le rang 15 comment faire un jeté en debut de rang je comprend pas
20.01.2023 - 18:11
![]() BIRGIT DANNEMAND LARSEN wrote:
BIRGIT DANNEMAND LARSEN wrote:
Når jeg starter sjalet med 5 masker og strikker mønster A.1 færdig i højden, så står der i opskriften, at jeg skal have 81 masker. HVORDAN? Jeg har 39 masker, som der står over mønsteret. Jeg kan ikke gennemskue det, så jeg har givet op lige nu. Håber, I kan hjælpe mig. Mvh Birgit
04.09.2021 - 14:43DROPS Design answered:
Hej. Du ska sticka A.1 2 ganger på pinnen; "1 kantmaske retstrik, A.1 over næste maske (= 1 maske), 1 maske retstrik (= midtermasken), A.1 over næste maske, 1 kantmaske retstrik". Du har alltså 1 kantmaske, 39 m (=A.1), 1 m (= midtermasken), 39 m (=A.1), 1 kantmaske = 81 m när du är färdig med A.1. Lycka till!
07.09.2021 - 09:11
![]() Claudia wrote:
Claudia wrote:
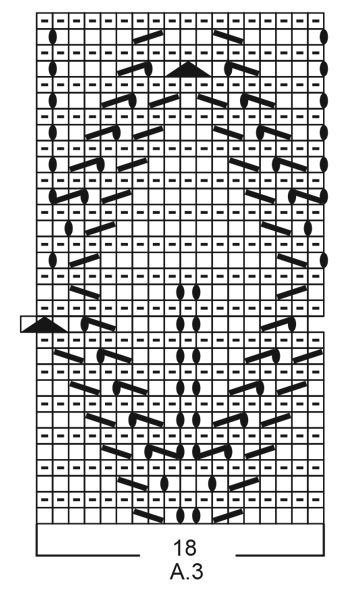
Buongiorno, potreste aiutarmi a comprendere cosa vuol dire la frase seguente: "Poi continuare il motivo e aumentare verso l’esterno nello stesso modo ma ad ogni ripetizione verticale dei diagrammi c’è spazio per 2 ripetizioni in più di A.3 tra A.2 e A.4 a ogni lato del lavoro". Grazie
22.04.2021 - 14:24DROPS Design answered:
Buonasera Claudia, questo passaggio significa che ogni volta che vengono completati i diagrammi, ci sarà spazio per altri 2 ripetizioni di A.3 ai lati del lavoro. Buon lavoro!
24.04.2021 - 22:02
![]() Sigrid wrote:
Sigrid wrote:
Ich habe A1 fertig und 39 Maschen auf der Nadel, laut Beschreibung sollen es 81 Maschen sein, wie geht das?
01.09.2020 - 13:06DROPS Design answered:
Liebe Sigrid, wenn A.1 fertig ist, sind es 39 M in A.1, aber Sie stricken 2 Mal A.1 in der Breite mit 1 Randmasche beidseitig und 1 mittlere Masche kraus rechts, dh so: 1 Randmasche kraus rechts, A.1, 1 Masche krausrechts, A.1, 1 Randmasche (= 5 M bei der 1. Reihe und (1+39+1+39+1=) 81 M wenn A.1 fertig ist). Viel Spaß beim stricken!
01.09.2020 - 13:27
![]() Geeske wrote:
Geeske wrote:
Dankuwel voor uw uitleg. Ik zie het nu. Met vriendelijke groet, Geeske
23.02.2020 - 17:39
![]() Geeske wrote:
Geeske wrote:
Telpatroon A1 heb ik nu gebreid volgens patroon.Als ik de beschrijving lees, zie ik dat ik dit toch dubbel had moeten hebben (maar dan zouden het toch 80 steken moeten zijn?) . Ik zie nergens aangegeven hoe ik dat dan had moeten doen!Ik hoop dat u mij verder kunt helpen. Bij voorbaat dank. Met vriendelijke groet, Geeske Plaisier
23.02.2020 - 13:39
![]() Geeske wrote:
Geeske wrote:
Nog een vraag: In de omschrijving staat dat je na patroon A1 81 steken hebt. In het telpatroon zie ik 39 steken staan. Kunt u me uitleggen wat er precies bedoeld wordt? Alvast hartelijk dank!! Met vriendelijke groet, Geeske Plaisier
22.02.2020 - 16:56DROPS Design answered:
Dag Geeske,
Je breit 1 kantsteek, A.1, 1 steek in ribbelsteek, A.1 en 1 kantsteek, wat neer komt op 2 keer A.1 en daarnaast nog 3 steken (1 in het midden en aan elke zijkant 1 steek). Hierdoor kom je op een totaal van 81 steken.
23.02.2020 - 13:47
![]() Geeske wrote:
Geeske wrote:
Goedemiddag, Klopt het dat er in dit patroon alleen 2 omslagen tussen 2 steken zitten? In de verklaring van het telpatroon staat n.l. ook een teken voor een enkele omslag tussen 2 steken, maar ik zie dit teken niet terug in de telpatronen. Alvast dank voor uw reactie. Met vriendelijke groet, Geeske Plaisier
22.02.2020 - 16:48DROPS Design answered:
Dag Geeske,
In de eerste naald van A.1 zijn de enkele omslagen verwerkt. Voor de rest zijn het allemaal dubbele omslagen.
23.02.2020 - 13:45
|
||||||||||||||||||||||
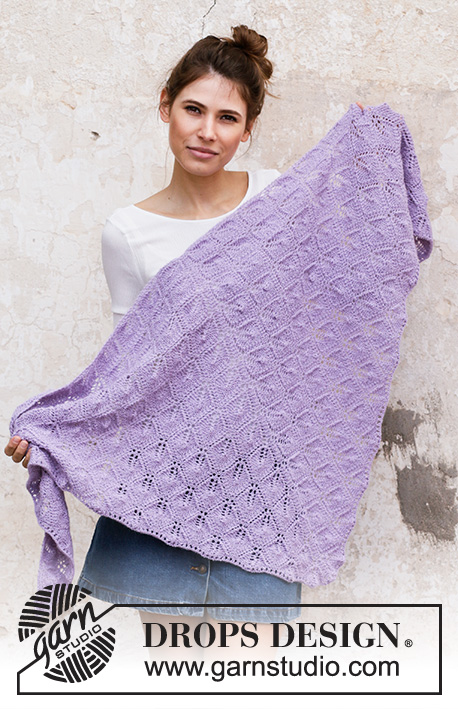
Lilac Bouquet#lilacbouquetwrap |
||||||||||||||||||||||
 |
 |
|||||||||||||||||||||
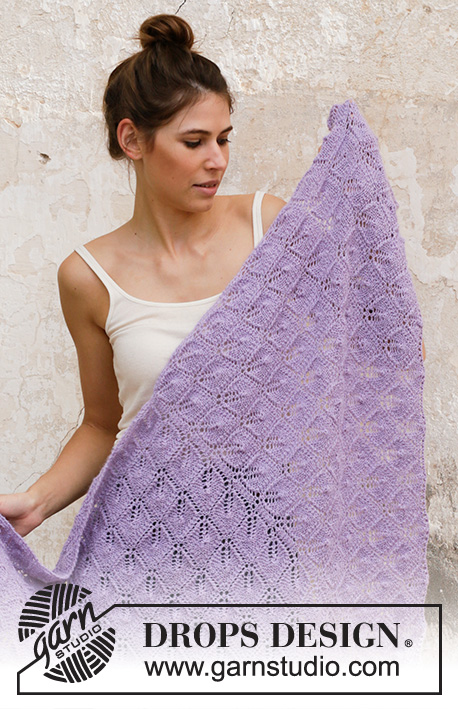
Knitted shawl in DROPS Alpaca. Piece is knitted top down with lace pattern and garter stitch.
DROPS 201-17 |
||||||||||||||||||||||
|
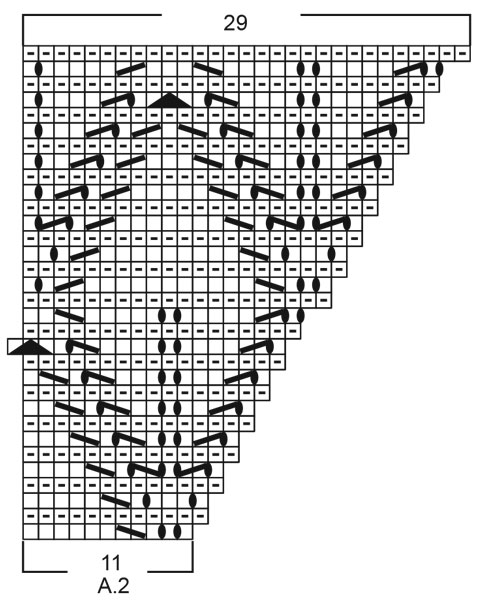
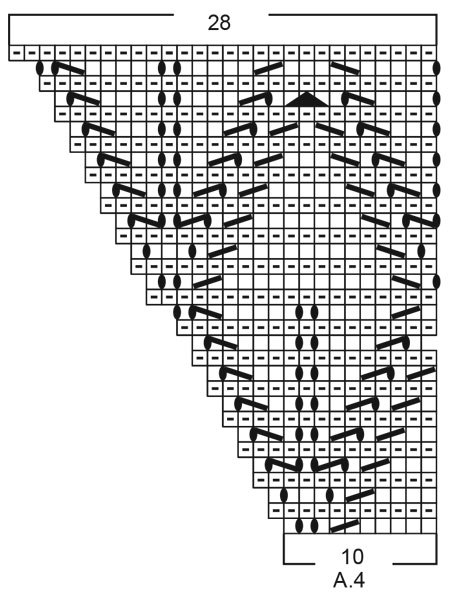
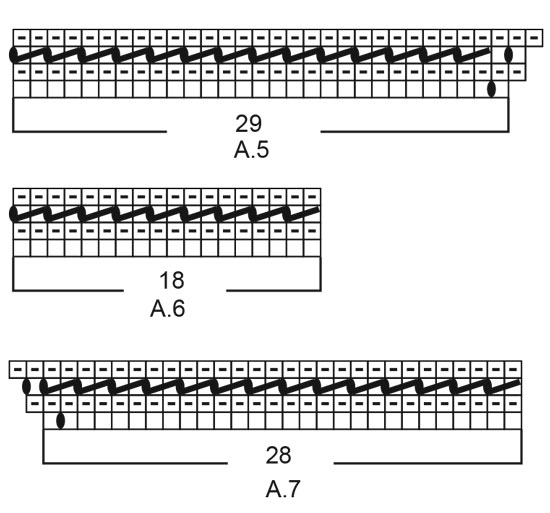
---------------------------------------------------------- EXPLANATION FOR THE PATTERN: ---------------------------------------------------------- GARTER STITCH (back and forth): Knit all rows. 1 ridge vertically = knit 2 rows. PATTERN: See diagrams A.1 to A.7. Diagrams show all rows in pattern seen from the right side. ---------------------------------------------------------- START THE PIECE HERE: ---------------------------------------------------------- SHAWL - SHORT OVERVIEW OF THE PIECE: Work piece back and forth on circular needle. SHAWL: Cast on 5 stitches on circular needle size 3 mm with Alpaca. Work pattern as follows: 1 edge stitch in GARTER STITCH – read explanation above, A.1 over next stitch (= 1 stitch), 1 stitch in garter stitch (= middle stitch), A.1 over next stitch, 1 edge stitch in garter stitch. Insert a marker thread in the middle stitch on row (= middle stitch and marker thread follow upwards in piece). Continue pattern back and forth like this until A.1 has been worked vertically = 81 stitches. REMEMBER THE KNITTING TENSION! Now work pattern as follows: 1 edge stitch in garter stitch, A.2 over the next 11 stitches, A.3 over the next 18 stitches, A.4 over the next 10 stitches, 1 stitch in garter stitch (= middle stitch), A.2 over the next 11 stitches, A.3 over the next 18 stitches, A.4 over the next 10 stitches, 1 edge stitch in garter stitch. Continue back and forth until A.2, A.3 and A.4 have been worked vertically = 153 stitches. Then continue pattern and increase outwards the same way but every time the diagrams have been worked vertically there is room for 2 repetitions more of A.3 between A.2 and A.4 in each side of piece. When piece measures approx. 71 cm measured along middle stitch - adjust to finish after a whole leaf (i.e. finish after 16th row or 32nd row in A.2 to A.4), work an edge as follows: 1 edge stitch in garter stitch, A.5 over the next 29 stitches, A.6 until 28 stitches remain before middle stitch, A.7 over the next 28 stitches, 1 stitch in garter stitch (= middle stitch), A.5 over the next 29 stitches, A.6 until 29 stitches remain on row, A.7 over the next 28 stitches, 1 edge stitch in garter stitch. When A.5 to A.7 have been worked vertically, 8 stitches have been increased on row. Piece measures approx. 72 cm along middle stitch. Cast off. Make sure to avoid a tight cast-off edge, cast off with 1 larger needle size if needed. |
||||||||||||||||||||||
Diagram explanations |
||||||||||||||||||||||
|
||||||||||||||||||||||
|
||||||||||||||||||||||
|
||||||||||||||||||||||
|
||||||||||||||||||||||
|
||||||||||||||||||||||
|
||||||||||||||||||||||
Have you finished this pattern?Tag your pictures with #dropspattern #lilacbouquetwrap or submit them to the #dropsfan gallery. Do you need help with this pattern?You'll find 15 tutorial videos, a Comments/Questions area and more by visiting the pattern on garnstudio.com. © 1982-2025 DROPS Design A/S. We reserve all rights. This document, including all its sub-sections, has copyrights. Read more about what you can do with our patterns at the bottom of each pattern on our site. |
||||||||||||||||||||||


With over 40 years in knitting and crochet design, DROPS Design offers one of the most extensive collections of free patterns on the internet - translated to 17 languages. As of today we count 314 catalogues and 11822 patterns translated into English (UK/cm).
We work hard to bring you the best knitting and crochet have to offer, inspiration and advice as well as great quality yarns at incredible prices! Would you like to use our patterns for other than personal use? You can read what you are allowed to do in the Copyright text at the bottom of all our patterns. Happy crafting!
Post a comment to pattern DROPS 201-17
We would love to hear what you have to say about this pattern!
If you want to leave a question, please make sure you select the correct category in the form below, to speed up the answering process. Required fields are marked *.