
Popular categories
Looking for a yarn?


Comments / Questions (37)
![]() Jeannie wrote:
Jeannie wrote:
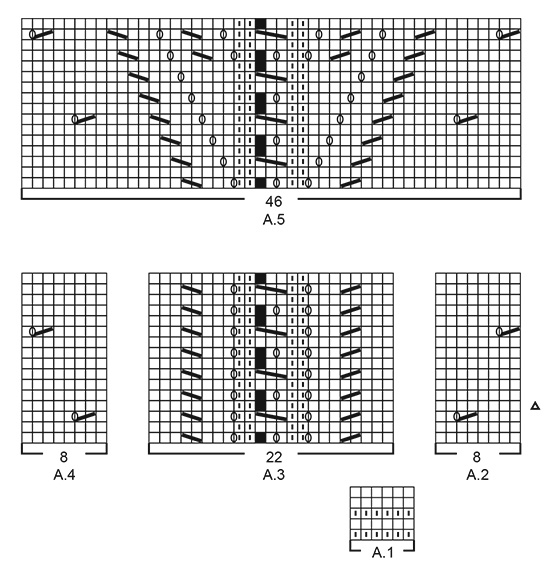
Thank you for your answer to my other question. I have another one. Chart A5 is supposed to have 46 stitches, I only have 40. Where are the other 6 stitches? If you take the 22 stitches from A3 and add the other 8 stitches from half of the 16 stitches from the deciding at the beginning of the pattern, there are only 40 stitches. Also, when the 11 stitches are added every 4th row, where are they added, at the side next to the 2 edge stitches or somewhere else. These charts are confusing.
09.01.2021 - 05:33DROPS Design answered:
Dear Jeannie, A.5 is worked over the middle 46 stitches (= the 22 sts from A.3 worked before + 12 stitches on each side of A.3) , on either side of A.5 you work A.2 as before (= at the beginning of the row after the 2 sts in garter stithc) before A.5 and A.4 as before after A.5 (before the last 2 sts in garter stitch). Happy knitting!
11.01.2021 - 07:59
![]() Jeannie wrote:
Jeannie wrote:
When does A5 start? At the triangle on A2 or when the 4th time in height is done? The directions are very confusing and there are too many charts to keep tract of.
05.01.2021 - 01:48DROPS Design answered:
Dear Jeannie, after you have worked A.2 and A.4 a total of 3 times in height + one more time to row 4 including = approx. 25 cm in height, now work as explained with A.5 in the middle and A.2/A.4 on each side as before. Happy knitting!
05.01.2021 - 11:29
![]() Charlotte wrote:
Charlotte wrote:
Another question from me, is A1 worked over 6 rows? I’ve done one row for each row of A1 and it doesn’t look right when looking at the photos of the sweater. Sorry to be a bother.
19.06.2020 - 03:09DROPS Design answered:
Dear Charlotte, first row of A.1 is worked from WS, ie work: R1 (WS): knit- R2 (RS): knit - R3: knit - R4: knit - R5: purl. Happy knitting!
19.06.2020 - 07:54
![]() Charlotte wrote:
Charlotte wrote:
Thanks, what does 2 edge stitches in garter stitch mean? The video you have did not help me.
17.06.2020 - 16:05DROPS Design answered:
Dear Charlotte, the firsts 2 stitches on each row + the last 2 stitches on each row will be worked in garter stitch (= they will be knitted on every row) while the other stitches will be worked in rib K2/P2. Hope this helps. Happy knitting!
18.06.2020 - 09:16
![]() Charlotte wrote:
Charlotte wrote:
Hello, very interesting pattern but I’m confused with the beginning. I cast on then purled one row. After that I did 2 edge stitches then k2 p2 until the last 2 stitches which were another 2 edge stitches. I hope that’s right so far. But then it says “Continue this rib for 4 cm = 1 1/2”. So I just keep doing 2 edge stitch followed by k2 p2 until the end with edge stitches? Is this the sleeve? I’m afraid I will be back with more questions. Thank you.
16.06.2020 - 18:11DROPS Design answered:
Dear C harlotte, you are doing it right, you are first working the ribbed edge for the bottom of the sleeve. Happy knitting!
17.06.2020 - 07:42
![]() Karin Bubelach wrote:
Karin Bubelach wrote:
Hi, das ist ein tolles Teil, falls es fertig wird. Ich hänge auch gerade am Ende von A6 fest. Alles stimmt soweit, aber ich habe - trotz völlig korrektem Ende von A6 im Übergang zu A7 nach den 2 Krausmaschen eine Masche zu wenig und vor A9 eine Masche zu viel. Auf dem Teil links der Mitte ist alles richtig. Ich finde den Fehler nicht, was kann es sein? Füge ich einfach vorne eine Masche ein und stricke vor A9 zwei zusammen? Das sieht blöd aus. Vielen Dank
05.05.2020 - 15:42DROPS Design answered:
Liebe Frau Bubelach, es ist etwas schwierig zu beantworten, wo der Fehler liegen kann - die Maschenanzahl muss immer dasselbe sein denn es ist 1 Umschlag für jede Abnahme, vielleicht ist hier irgendwie etwas falsch gegangen? Bringen Sie Ihr Strickstück Ihren DROPS Laden oder zeigen Sie Ihnen ein foto per E-Mail, sie werden Ihnen sicher weiterhelfen können. Viel Spaß beim stricken!
05.05.2020 - 17:06
![]() Melanie Moreau wrote:
Melanie Moreau wrote:
Pour Bri: Oui, le motif ajouré est orienté dans l\'autre sens apres A6, c\'est normal. On le voit un tout petit peu sur la photo du model (1 ou 2 rang avant le point mousse). Et si vous cherchez ce projet sur ravelri vous le verrez aussi (ravelri avec un y mais apparemment c'est un mot "défendu")
18.08.2019 - 11:24
![]() Bri wrote:
Bri wrote:
Bonjour, je suis également stoppée après A6. Si je suis vos explications, mon dessin part de l'autre côté. Je ne comprends pas non plus comment on peut terminer par 2 mailles ensemble, un jeté avant les mailles envers à chaque rang impair, à moins, encore une fois, que le dessin parte dans l'autre sens. C'est pour moi incompréhensible. J'ai lu les réponses que vous avez données en anglais et en allemand mais elles ne m'ont rien apporté. Merci de m'aider
28.07.2019 - 17:13DROPS Design answered:
Bonjour Mme Bri, quand A.6 a été tricoté 1 fois en hauteur, vous continuez à tricoter le motif central comme avant = les 2 m ens à l'end vont se faire 1 m plus tôt tous les 2 rangs comme avant et on va ainsi augmenter le nombre de mailles en point ajouré de part et d'autre de la petite torsade. Quand ces 2 m ens à l'end (et le surjet simple en fin de rang) arrive au tout début du rang, A.6 est terminé. Bon tricot!
06.08.2019 - 10:49
![]() Kasia wrote:
Kasia wrote:
Hi there. What a lovely pattern. O have some troubles with it maybe my mistake but with the middle of A3 and A6. I suppose to make 3 together so it comes one but on the next row on the left side it appears to be two stitches ? How come ? If I make yo kn1 yo in the middle that would make more sense not k1 yo k1 as there is only 1 left after joining 3 tog?
18.06.2019 - 22:23DROPS Design answered:
Dear Kasia, in the middle of A.3, A.5 and A.6 you will work a small lace cable: on first row (over 2 sts): K1, YO, K1 (= 3 sts), on row 2, P3 - on row 3: knit these 3 sts, then pass the first of these 3 sts worked over the 2 others = 2 sts remain. Happy knitting!
19.06.2019 - 07:25
![]() Melanie wrote:
Melanie wrote:
My previous question wasn't really answered :/ I have worked A6 correctly, until it reaches the sides. My question is, why don't we see the transition from A6 to A7-A11 in the model picture ? If you look at the picture of the back, it seems to me it stops after completing A6 (after A6 reaches the sides). The yo and decrease are aligned diagonally in A6, and on top of each other in A8 and A10. It produces a different look, that I just don't see in the picture.
07.06.2019 - 10:23DROPS Design answered:
Dear Melanie, after you have worked A.6 until it reaches the sides, all stitches are now worked in lace pattern: the first 2 sts are in garter st, then the next 11 sts should be the same as A.11, then the next stitches to the last 13 sts are worked as in A.8, then A.9 (middle) and A.10, and the next 11 sts should be the same as A.11, and 2 garter st. You continue like this (= as you worked the last row from RS in A.6) until piece reaches the right measurment for your size. Happy knitting!
07.06.2019 - 10:46
|
|||||||||||||||||||||||||||||||
Alas de Libelula#alasdelibelulacardigan |
|||||||||||||||||||||||||||||||
 |
 |
||||||||||||||||||||||||||||||
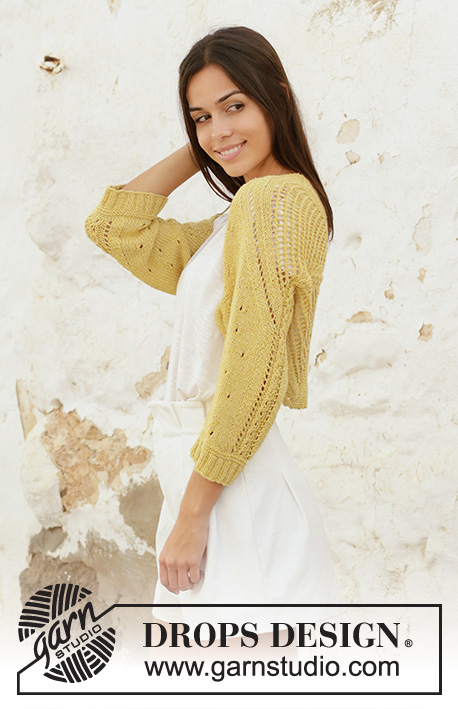
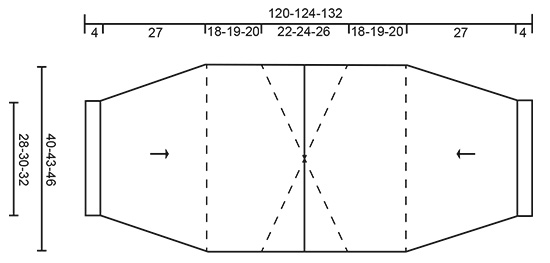
Knitted bolero in DROPS Belle. The piece is worked from the sleeve to mid-back in lace pattern. Sizes S - XXXL.
DROPS 200-25 |
|||||||||||||||||||||||||||||||
|
------------------------------------------------------- EXPLANATIONS FOR THE PATTERN: ------------------------------------------------------- RIDGE/GARTER STITCH (worked back and forth): Knit all rows. 1 ridge in height = Knit 2 rows. DECREASE TIP (evenly spaced): To work out how to decrease evenly, count the total number of stitches on needle (e.g. 70 stitches) minus the edge stitches (e.g. 4 stitches) and divide the remaining 66 stitches by number of decreases to be made (e.g. 12) = 5.5. In this example decrease by knitting together alternately each 4th and 5th stitch and each 5th and 6th stitch. Do not decrease over the edge stitches PATTERN: See diagrams A.1 to A.11. The diagrams show all rows in pattern seen from the right side. INCREASE TIP (for each side of sleeve): All increases are worked from the right side! Increase on each side of sleeve by making 1 yarn over inside the 2 edge stitches in garter stitch on each side. On the next row (wrong side) purl the yarn overs twisted to avoid holes. Then work the new stitches in stocking stitch until they fit into A.2/A.4. TURNING TIP: When turning in the middle of the piece on short rows slip the first stitch as if to knit, tighten the strand and knit the next stitch (a bit tightly). This is to avoid a hole when turning. ------------------------------------------------------ START THE PIECE HERE: ------------------------------------------------------- BOLERO - SHORT OVERVIEW OF THE PIECE: The piece is worked back and forth with circular needle in 2 sections from each sleeve to mid-back. Then the piece is sewn together mid-back and under the sleeves. SLEEVE AND HALF BACK PIECE (read the whole section before working): Cast on 70-74-78 stitches with circular needle size 3.5 mm and Belle. Purl 1 row (= wrong side). The next row is worked as follows from the right side: 2 edge stitches in GARTER STITCH – read description above, * Knit 2, purl 2 *, work from *-* until there are 4 stitches left on row, knit 2 and finish with 2 edge stitches in garter stitch. Continue this rib for 4 cm. Knit 1 row from the right side where you decrease 12 stitches evenly spaced in all sizes – read DECREASE TIP = 58-62-66 stitches. Work A.1 with 2 edge stitches in garter stitch on each side (row 1 in A.1 is worked from the wrong side). When A.1 has been completed change to circular needle size 4.5 mm. The next row is worked as follows from the right side: 2 edge stitches in garter stitch, 0-2-4 stitches in stocking stitch, work A.2 over the next 16 stitches (= 2 repeats of 8 stitches), work A.3 (= 22 stitches), A.4 over the next 16 stitches (= 2 repeats of 8 stitches), work 0-2-4 stitches in stocking stitch and finish with 2 edge stitches in garter stitch. Continue this pattern. REMEMBER THE KNITTING TENSION! AT THE SAME TIME when the piece measures 6-6-7 cm, increase 1 stitch on each side – read INCREASE TIP (= 2 stitches increased). Increase like this every 2½-2½-2 cm a total of 11-11-13 times on each side = 80-84-92 stitches (when the last increase on each side has been worked the piece measures approx. 31 cm from the cast-on edge. Insert 1 marker on each side of this row; they show where the sleeve-seam stops. NOTE: The lace pattern described below is worked well before the last increase). AT THE SAME TIME when A.2 to A.4 have been worked a total of 3 times in height, work them 1 more time in height but finish the repeats after row 4 (i.e. after the row marked with a triangle in A.2). The piece now measures approx. 25 cm from the cast-on edge. Insert 1 marker thread in the middle of the row (i.e. middle of A.3). Allow the thread to follow your work onwards. Now the lace pattern in A.3 will «grow» out towards the sides; i.e. on the next row work as follows from the right side: 2 edge stitches in garter stitch, continue A.2 as before until there are 23 stitches left before the marker thread in the middle, work A.5 (= 46 stitches – marker thread now sits in the middle of A.5), continue A.4 as before until there are 2 stitches left on row and finish with 2 edge stitches in garter stitch. Continue this pattern. When A.5 has been completed, work the next row from the right side as follows: 2 edge stitches in garter stitch, continue A.2 as before until there are 31 stitches left before the marker thread, work A.6 (= 62 stitches), continue A.4 as before until there are 2 stitches left on row and finish with 2 edge stitches in garter stitch. Continue this pattern until the stitches marked with a star in A.6 are worked over all stitches on the row as far as the 2 edge stitches in garter stitch on each side. The next row is worked as follows from the right side: 2 edge stitches in garter stitch, work A.7 (= 11 stitches), A.8 until there are 3 stitches left before the marker thread (= 12-13-15 repeats of 2 stitches), work A.9 (= 6 stitches), A.10 until there are 13 stitches left on row (= 12-13-15 repeats of 2 stitches), work A.11 (= 11 stitches) and finish with 2 edge stitches in garter stitch. Continue this pattern until the piece measures 49-49-51 cm from the cast-on edge (Due to the pattern the piece will measure longer along the middle than on the sides - measure along the side where the piece is shortest). Then work short rows in garter stitch as described below. SHORT ROWS: Change to circular needle size 3.5 mm. Start from the right side and work garter stitch with short rows back and forth over the stitches as far as the marker thread; i.e. work the first ridge back and forth over 40-42-46 stitches, then 1 ridge back and forth over 38-40-44 stitches, etc. Work 1 ridge over 2 fewer stitches each time – read TURNING TIP. AT THE SAME TIME on every 2nd ridge (i.e. every 4th row) decrease 1 stitch at the beginning of the row from the right side by knitting together the first 2 stitches. This avoids a point mid-back. Continue with short rows and decreases every 4th row until you have worked back and forth over the last 2 stitches on this side. Knit 1 row from the right side over all stitches. Turn the piece, start from the wrong side and work short rows back and forth over the stitches as far as the marker thread in the same way as on the first side of the piece; i.e. the first ridge is worked over 40-42-46 stitches, then 1 ridge over 38-40-44 stitches, etc. AT THE SAME TIME on every 2nd ridge (i.e. every 4th row) decrease 1 stitch at the beginning of the row from the wrong side by knitting together the first 2 stitches. Continue with short rows and decreases every 4th row until you have worked back and forth over the last 2 stitches on this side. Knit 1 row from the wrong side, knit 1 row from the right side and knit 1 row from the wrong side over all stitches. Place the stitches on 1 thread or change to circular needle size 4.5 mm and loosely cast off with knit from the right side. Work the other sleeve and half back piece in the same way. ASSEMBLY: Sew the 2 sections together mid-back with grafting stitches, or sew inside the cast-off edge if the stitches have been cast off. Sew sleeve seams – start at bottom of sleeve and sew edge to edge in the outermost loop of the outermost stitch as far as the markers. |
|||||||||||||||||||||||||||||||
Diagram explanations |
|||||||||||||||||||||||||||||||
|
|||||||||||||||||||||||||||||||
 |
|||||||||||||||||||||||||||||||
 |
|||||||||||||||||||||||||||||||
 |
|||||||||||||||||||||||||||||||
Have you finished this pattern?Tag your pictures with #dropspattern #alasdelibelulacardigan or submit them to the #dropsfan gallery. Do you need help with this pattern?You'll find 23 tutorial videos, a Comments/Questions area and more by visiting the pattern on garnstudio.com. © 1982-2026 DROPS Design A/S. We reserve all rights. This document, including all its sub-sections, has copyrights. Read more about what you can do with our patterns at the bottom of each pattern on our site. |
|||||||||||||||||||||||||||||||


With over 40 years in knitting and crochet design, DROPS Design offers one of the most extensive collections of free patterns on the internet - translated to 17 languages. As of today we count 324 catalogues and 12290 patterns translated into English (UK/cm). 12290
We work hard to bring you the best knitting and crochet have to offer, inspiration and advice as well as great quality yarns at incredible prices! Would you like to use our patterns for other than personal use? You can read what you are allowed to do in the Copyright text at the bottom of all our patterns. Happy crafting!
Post a comment to pattern DROPS 200-25
We would love to hear what you have to say about this pattern!
If you want to leave a question, please make sure you select the correct category in the form below, to speed up the answering process. Required fields are marked *.