
Popular categories
Looking for a yarn?


Comments / Questions (37)
![]() Pernille Scheuer wrote:
Pernille Scheuer wrote:
Hello. Is the knitting sample made on needles 3.5 mm?? My knitting sample of 10x10cm is 9.5 x 9 at 20 stitches in width and 26 rows ... what should I do??? Kind regards, Pernille Scheuer
03.03.2025 - 19:45DROPS Design answered:
Hi Pernille, The swatch is worked with needle size 4.5 mm (the main needle). This will get you closer to the correct width and height of the swatch. However, we always say that needle size is only a guide so if necessary, you can increase the needle size again to get the correct knitting tension. Happy knitting!
04.03.2025 - 06:42
![]() Pernille Scheuer wrote:
Pernille Scheuer wrote:
Hej. Er strikkeprøven lavet på pinde 3,5 mm?? Min strikkeprøve på 10x10cm er 9,5 x 9 ved 20 masker i bredden og 26 pinde i højden med glatstrik ... hvad skal jeg så??? Venlig hilsen Pernille Scheuer
27.02.2025 - 12:39DROPS Design answered:
Hej Pernille, så skal du strikke på tykkere pinde. Vi har strikket hulmønsteret på pind 4,5 :)
06.03.2025 - 11:10
![]() Maria Raposo Marques wrote:
Maria Raposo Marques wrote:
Good evening, I have a question regarding the "short rows" part of the pattern. Should I decrese the number of stitches I'm knitting every 2nd row or every 4th row? (I think I'm confused by the terms "ridge" and "row") Thank you in advance.
11.03.2024 - 00:07DROPS Design answered:
Dear Maria, as indicated in the GARTER STITCH tip above: 1 ridge = 2 garter stitch rows. Since you decrease every 2 ridges then you decrease on every 4th row. Happy knitting!
11.03.2024 - 00:35
![]() Monica wrote:
Monica wrote:
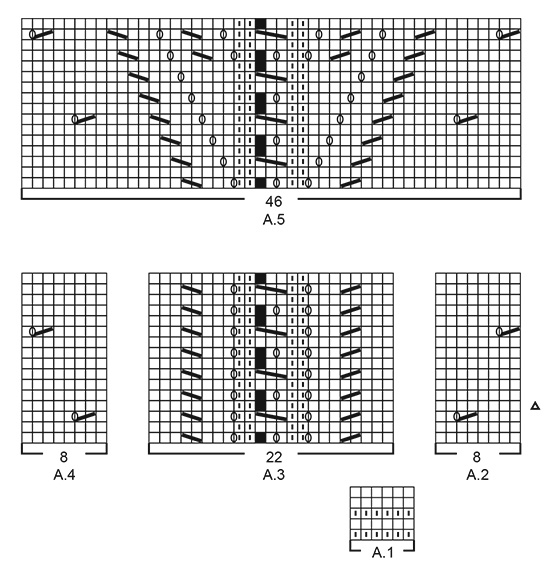
Hola! En las instrucciones dice que la marca para coser las mangas es a los 31 cm, tras completar 4 veces A3 y haber aumentado 22 puntos. Entiendo que llegas a A5 con 80 puntos, pero 80 menos 46 puntos de A5 son 34, 17 puntos a cada lado para hacer A2 y A4, me falta uno para poder hacer las dos repeticiones de 8 puntos + 2 del borde. No hay que hacer dos repeticiones? Cuando repites desde el triángulo 4 veces en total solo se hacen los agujeritos de la tercera línea una vez? Gracias!
28.11.2023 - 19:53DROPS Design answered:
Hola Monica, no tienes que trabajar repeticiones completas de A.2 y A.4, puedes trabajar estos diagramas sobre los puntos que tengas en ese momento entre los puntos del borde y los 46 puntos centrales. Ten en cuenta que comenzarás a trabajar A.5 cuando la labor mida 25 cm desde el borde de montaje (por lo que aún no has terminado los aumentos). Los puntos aumentados después de empezar con A.5 se trabajarán en A.2/ A.4.
11.12.2023 - 00:37
![]() Karen wrote:
Karen wrote:
Good morning. Thank you for your quick response regarding "Short Rows". I understand however I still don't get how you can decrease 1 stitch at the beginning of every forth row on the right side as the forth row will be on the wrong side (and centre of piece) given the two row "ridge". Do you mean every fifth row?
20.04.2023 - 16:49DROPS Design answered:
Hi Karen, You start the first decrease from a right side row and repeat the decrease every 4th row after that. Happy knitting!
21.04.2023 - 07:36
![]() Karen wrote:
Karen wrote:
Ok, pattern going great until short rows. If one ridge = 2 rows and you only decrease 1 stitch at the beginning of 2nd ridge (every 4 th row) * which is a wrong side row , how do you work each ridge (2 rows knit) over 2 fewer stitches each time and on the “right” side. Thanks
18.04.2023 - 23:01DROPS Design answered:
Dear Karen, starting from RS you will work 1 ridge over 40-42-46 sts, then work 1 ridge over 2 sts less = over 38-40-44 sts; then work 1 ridge over the same number as before, and work 1 ridge over 2 sts less (36-38-42) and continue like this, always starting each ridge from RS. Happy knitting!
19.04.2023 - 07:53
![]() Annemarie wrote:
Annemarie wrote:
Liebes Drops Team Ich beziehe mich auf den Teil der Anleitung VERKÜRZTE REIHEN. Nachdem die erste Hälfte der Arb. gearbeitet wurde soll ich eine Hin-Reihe mit 84M sticken (Gr. L-XL) Wie ist das möglich? Ich habe ja zuvor in jeder 4. R 1 M abgenommen. 🤔 Ist die Angabe von 84 M korrekt? Danke für eine Antwort. Und danke für Eure tollen Anleitungen. Liebe Grüsse Annemarie.
01.03.2021 - 11:56DROPS Design answered:
LIebe Annemarie, also ja stimmt, das muss weg von den deutschen Anleitung, Sie stricken jetzt nur noch 1 Hin-Reihe rechts über alle Maschen, und dann stricken Sie verkürzten Reihen, die mit einer Rückreihe anfangen. Viel Spaß beim stricken!
01.03.2021 - 13:31
![]() Jeannie wrote:
Jeannie wrote:
Still having problem with the increases. If the increases are at each side of sleeve by the garter stitches, are A2 and A4 adjusted for the increases so that when I get to A5 the extra stitches needed are there? If they are adjusted, then the knit 2 together with the yarn overs would be in different places each time the repeats are done. Or are A2 and A4 worked straight up and all increases are just in stockinette next to the edge stitches? If that is so, when are the increases worked into A5?
29.01.2021 - 19:37DROPS Design answered:
Dear Jeanny, I'm sorry I don't understand your question. You have to increase on each side, so that the new stitches will be worked in A.2 and in A.4 as far as there are enough stitches to be worked in pattern (you always have to have enough stitches to work 1 dec + 1 yarn over in the lace pattern row in diagram). When piece measures 25 cm then you will work A.5 over A.3 to let this pattern be worked over more stitches on each side- but the number of stitches don't increase anymore. Hope this helps. Happy knitting!
01.02.2021 - 07:59
![]() Jeannie wrote:
Jeannie wrote:
I still do not know where the increases are. Are they between A2 and A3?
18.01.2021 - 20:24DROPS Design answered:
Dear Jeannie, you have to increase on each side of piece, after the first 2 edge stitches in garter stitch and before the last 2 stitches in garter stitch = 2 sts increased on each row, these increased are worked in A.2 /A.4. Happy knitting!
19.01.2021 - 07:15
![]() Jeannie wrote:
Jeannie wrote:
Sorry, I have another question. Is A2 and A4 only worked over the first 8 stitches or over the whole 16 stitches? ( 8 x 2) . In the size that I am making, I have to knit the 2 edge stitches and then add 2 stitches before I start A2 , so where do I start the increase stitches? Before the A2 stitches or at the beginning of A3? The directions do not say where these start, it just says to increase 11 stitches.
17.01.2021 - 01:34DROPS Design answered:
Dear Jeanie, in 2nd size work: 2 sts in garter st, 2 sts in stocking st, A.2 over the next 16 sts, A.3, A.4 over the next 16 sts, 2 sts stocking st, 2 sts garter st. Diagrams are worked from bottom up, starting on the corner on the right side from RS, work diagram A.2 and A.4 a total of 2 times (= 8 sts x 2 = 16 sts). Happy knitting!
18.01.2021 - 09:20
|
|||||||||||||||||||||||||||||||
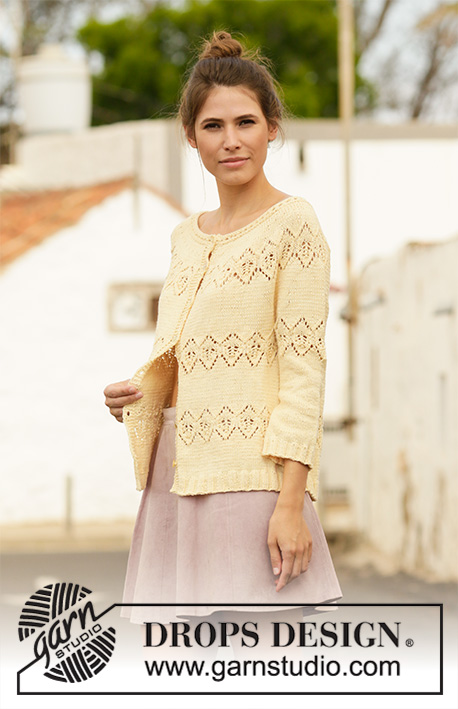
Alas de Libelula#alasdelibelulacardigan |
|||||||||||||||||||||||||||||||
 |
 |
||||||||||||||||||||||||||||||
Knitted bolero in DROPS Belle. The piece is worked from the sleeve to mid-back in lace pattern. Sizes S - XXXL.
DROPS 200-25 |
|||||||||||||||||||||||||||||||
|
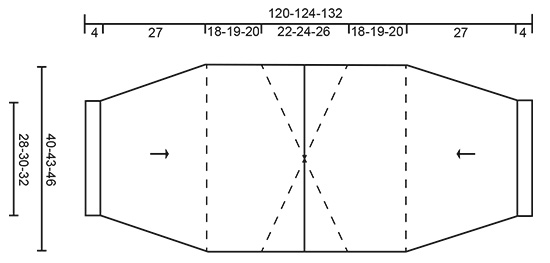
------------------------------------------------------- EXPLANATIONS FOR THE PATTERN: ------------------------------------------------------- RIDGE/GARTER STITCH (worked back and forth): Knit all rows. 1 ridge in height = Knit 2 rows. DECREASE TIP (evenly spaced): To work out how to decrease evenly, count the total number of stitches on needle (e.g. 70 stitches) minus the edge stitches (e.g. 4 stitches) and divide the remaining 66 stitches by number of decreases to be made (e.g. 12) = 5.5. In this example decrease by knitting together alternately each 4th and 5th stitch and each 5th and 6th stitch. Do not decrease over the edge stitches PATTERN: See diagrams A.1 to A.11. The diagrams show all rows in pattern seen from the right side. INCREASE TIP (for each side of sleeve): All increases are worked from the right side! Increase on each side of sleeve by making 1 yarn over inside the 2 edge stitches in garter stitch on each side. On the next row (wrong side) purl the yarn overs twisted to avoid holes. Then work the new stitches in stocking stitch until they fit into A.2/A.4. TURNING TIP: When turning in the middle of the piece on short rows slip the first stitch as if to knit, tighten the strand and knit the next stitch (a bit tightly). This is to avoid a hole when turning. ------------------------------------------------------ START THE PIECE HERE: ------------------------------------------------------- BOLERO - SHORT OVERVIEW OF THE PIECE: The piece is worked back and forth with circular needle in 2 sections from each sleeve to mid-back. Then the piece is sewn together mid-back and under the sleeves. SLEEVE AND HALF BACK PIECE (read the whole section before working): Cast on 70-74-78 stitches with circular needle size 3.5 mm and Belle. Purl 1 row (= wrong side). The next row is worked as follows from the right side: 2 edge stitches in GARTER STITCH – read description above, * Knit 2, purl 2 *, work from *-* until there are 4 stitches left on row, knit 2 and finish with 2 edge stitches in garter stitch. Continue this rib for 4 cm. Knit 1 row from the right side where you decrease 12 stitches evenly spaced in all sizes – read DECREASE TIP = 58-62-66 stitches. Work A.1 with 2 edge stitches in garter stitch on each side (row 1 in A.1 is worked from the wrong side). When A.1 has been completed change to circular needle size 4.5 mm. The next row is worked as follows from the right side: 2 edge stitches in garter stitch, 0-2-4 stitches in stocking stitch, work A.2 over the next 16 stitches (= 2 repeats of 8 stitches), work A.3 (= 22 stitches), A.4 over the next 16 stitches (= 2 repeats of 8 stitches), work 0-2-4 stitches in stocking stitch and finish with 2 edge stitches in garter stitch. Continue this pattern. REMEMBER THE KNITTING TENSION! AT THE SAME TIME when the piece measures 6-6-7 cm, increase 1 stitch on each side – read INCREASE TIP (= 2 stitches increased). Increase like this every 2½-2½-2 cm a total of 11-11-13 times on each side = 80-84-92 stitches (when the last increase on each side has been worked the piece measures approx. 31 cm from the cast-on edge. Insert 1 marker on each side of this row; they show where the sleeve-seam stops. NOTE: The lace pattern described below is worked well before the last increase). AT THE SAME TIME when A.2 to A.4 have been worked a total of 3 times in height, work them 1 more time in height but finish the repeats after row 4 (i.e. after the row marked with a triangle in A.2). The piece now measures approx. 25 cm from the cast-on edge. Insert 1 marker thread in the middle of the row (i.e. middle of A.3). Allow the thread to follow your work onwards. Now the lace pattern in A.3 will «grow» out towards the sides; i.e. on the next row work as follows from the right side: 2 edge stitches in garter stitch, continue A.2 as before until there are 23 stitches left before the marker thread in the middle, work A.5 (= 46 stitches – marker thread now sits in the middle of A.5), continue A.4 as before until there are 2 stitches left on row and finish with 2 edge stitches in garter stitch. Continue this pattern. When A.5 has been completed, work the next row from the right side as follows: 2 edge stitches in garter stitch, continue A.2 as before until there are 31 stitches left before the marker thread, work A.6 (= 62 stitches), continue A.4 as before until there are 2 stitches left on row and finish with 2 edge stitches in garter stitch. Continue this pattern until the stitches marked with a star in A.6 are worked over all stitches on the row as far as the 2 edge stitches in garter stitch on each side. The next row is worked as follows from the right side: 2 edge stitches in garter stitch, work A.7 (= 11 stitches), A.8 until there are 3 stitches left before the marker thread (= 12-13-15 repeats of 2 stitches), work A.9 (= 6 stitches), A.10 until there are 13 stitches left on row (= 12-13-15 repeats of 2 stitches), work A.11 (= 11 stitches) and finish with 2 edge stitches in garter stitch. Continue this pattern until the piece measures 49-49-51 cm from the cast-on edge (Due to the pattern the piece will measure longer along the middle than on the sides - measure along the side where the piece is shortest). Then work short rows in garter stitch as described below. SHORT ROWS: Change to circular needle size 3.5 mm. Start from the right side and work garter stitch with short rows back and forth over the stitches as far as the marker thread; i.e. work the first ridge back and forth over 40-42-46 stitches, then 1 ridge back and forth over 38-40-44 stitches, etc. Work 1 ridge over 2 fewer stitches each time – read TURNING TIP. AT THE SAME TIME on every 2nd ridge (i.e. every 4th row) decrease 1 stitch at the beginning of the row from the right side by knitting together the first 2 stitches. This avoids a point mid-back. Continue with short rows and decreases every 4th row until you have worked back and forth over the last 2 stitches on this side. Knit 1 row from the right side over all stitches. Turn the piece, start from the wrong side and work short rows back and forth over the stitches as far as the marker thread in the same way as on the first side of the piece; i.e. the first ridge is worked over 40-42-46 stitches, then 1 ridge over 38-40-44 stitches, etc. AT THE SAME TIME on every 2nd ridge (i.e. every 4th row) decrease 1 stitch at the beginning of the row from the wrong side by knitting together the first 2 stitches. Continue with short rows and decreases every 4th row until you have worked back and forth over the last 2 stitches on this side. Knit 1 row from the wrong side, knit 1 row from the right side and knit 1 row from the wrong side over all stitches. Place the stitches on 1 thread or change to circular needle size 4.5 mm and loosely cast off with knit from the right side. Work the other sleeve and half back piece in the same way. ASSEMBLY: Sew the 2 sections together mid-back with grafting stitches, or sew inside the cast-off edge if the stitches have been cast off. Sew sleeve seams – start at bottom of sleeve and sew edge to edge in the outermost loop of the outermost stitch as far as the markers. |
|||||||||||||||||||||||||||||||
Diagram explanations |
|||||||||||||||||||||||||||||||
|
|||||||||||||||||||||||||||||||
 |
|||||||||||||||||||||||||||||||
 |
|||||||||||||||||||||||||||||||
 |
|||||||||||||||||||||||||||||||
Have you finished this pattern?Tag your pictures with #dropspattern #alasdelibelulacardigan or submit them to the #dropsfan gallery. Do you need help with this pattern?You'll find 23 tutorial videos, a Comments/Questions area and more by visiting the pattern on garnstudio.com. © 1982-2026 DROPS Design A/S. We reserve all rights. This document, including all its sub-sections, has copyrights. Read more about what you can do with our patterns at the bottom of each pattern on our site. |
|||||||||||||||||||||||||||||||


With over 40 years in knitting and crochet design, DROPS Design offers one of the most extensive collections of free patterns on the internet - translated to 17 languages. As of today we count 324 catalogues and 12290 patterns translated into English (UK/cm). 12290
We work hard to bring you the best knitting and crochet have to offer, inspiration and advice as well as great quality yarns at incredible prices! Would you like to use our patterns for other than personal use? You can read what you are allowed to do in the Copyright text at the bottom of all our patterns. Happy crafting!
Post a comment to pattern DROPS 200-25
We would love to hear what you have to say about this pattern!
If you want to leave a question, please make sure you select the correct category in the form below, to speed up the answering process. Required fields are marked *.