
Popular categories
Looking for a yarn?


Comments / Questions (11)
![]() Teresa wrote:
Teresa wrote:
Hi, I have a big head! How would you recommend making this larger? Use larger needles or cast on more stitches? If the latter, how would I keep the shape correct? Thanks.
15.07.2022 - 19:06DROPS Design answered:
Hi Teresa, The easiest way is to increase the needle size, but if you have to increase too much your knitting will be too loose. You will then have to increase your stitch number and row number as well. The shape will be maintained as long as you use the same ratios all the way through. Happy crafting!
18.07.2022 - 07:01
![]() Beatrice wrote:
Beatrice wrote:
J'aurais voulu tricoter ce modèle pour ma petite fille qui a 6 ans. Avez-vous une adaptation des mailles et hauteur à proposer ? Ou bien si j'utilise des aiguilles 3,5 ou 3 au lieu des aiguilles 4 préconisées je réduirais un peu la taille ? Merci de votre réponse.
30.06.2022 - 17:04DROPS Design answered:
Bonjour Béatrice, nous ne sommes malheureusement pas en mesure de pouvoir adapter chacun de nos modèles à chaque demande, toutefois, ce modèle de chapeau enfant pourra peut-être vous aider à recalculer et à faire les ajustements nécessaires. Bon tricot!
01.07.2022 - 07:57
![]() Berbett wrote:
Berbett wrote:
Bonjour, Est-il possible de tricoter de modèle en rond avec une aiguille circulaire ? Si oui, comment procéder ? Merci d'avance. Cordialement. Berbett.
09.05.2022 - 22:28DROPS Design answered:
Bonjour Mme Berbett, probablement, il vous faudra juste ajuster les explications, autrement dit, tricoter le point mousse en alternant 1 tour endroit, 1 tour envers - cf vidéo. Bon tricot!
10.05.2022 - 08:43
![]() Christine wrote:
Christine wrote:
Malheureusement je ne l'ai plus je l'ai offert
22.04.2021 - 17:51
![]() Christine wrote:
Christine wrote:
Bonjour, J'ai déjà tricoter ce bonnet avec les 3 couleurs. Vous dites que c'est vieux mais vous pourriez au moins me dire combien de grammes pour ce bonnet Merci
22.04.2021 - 10:49DROPS Design answered:
Bonjour Christine, nous n'avons pas la quantité en une seule couleur car ce chapeau a été tricoté avec 3 couleurs et nous n'avons plus ce modèle pour le peser et donner cette indication. Si toutefois vous l'avez déjà réalisé, alors vous pouvez le peser pour savoir combien de pelotes il vous faudra approximativement (divisez le poids total par 50 g = le poids d'une pelote). Bon tricot!
22.04.2021 - 13:20
![]() Christine wrote:
Christine wrote:
Bonjour, Si je désire faire ce bonnet d'une seule couleur combien de laine faudra-t-il ? Merci
20.04.2021 - 21:03DROPS Design answered:
Bonjour Christine, nous ne sommes malheureusement pas en mesure de pouvoir adapter chacun de nos modèles à chaque demande et n'avons plus ce modèle pour vérifier. Additionnez la quantité requise pour chaque couleur, il vous en faudra probablement un peu moins, votre magasin pourra vous aider si nécessaire, même par mail ou téléphone. Bon tricot!
21.04.2021 - 07:37
![]() Noeleen Baxter wrote:
Noeleen Baxter wrote:
Hi, I was wondering how much yarn of each colour is needed? Thank you. Noeleen
15.02.2021 - 21:26DROPS Design answered:
Hi Noeleen, You will need 50 g of each of the main colours. Happy knitting!
16.02.2021 - 07:50
![]() Annie Regan wrote:
Annie Regan wrote:
After the first decreasing row of 2stitches to the right of the marker I don’t understand the next two instructions. Could you explain please? Thank you
28.08.2019 - 17:56DROPS Design answered:
Dear Mrs Regan, to decrease for the top of hat, you insert 10 markers in total with 8 sts after the first one then 9 sts between each markers, then work as before (with stripes) and decrease by K2 tog on the right side of every marker (= before each marker) a total of 4 times every 4th row then 4 times every 2nd row. You decrease a total of 10 sts on each decrease row. Happy knitting!
29.08.2019 - 09:42
![]() Hannah wrote:
Hannah wrote:
Tof en makelijk patroon voor een leuk hoedje! Volgens mij staat er één foutje in bij de minderingen voor de bovenkant, dat moet denk ik zijn: 4 x in elke 4e en dan 4 x in elke 2e nld (ipv elke nld). De minderingen komen dan allemaal aan de goede kant, dit komt ook overeen met het Engelse patroon. Groetjes
24.08.2019 - 13:44
![]() CHRISTINE DINOUART wrote:
CHRISTINE DINOUART wrote:
Faut-il changer de couleur tous les rangs ? Merci
28.04.2019 - 12:26DROPS Design answered:
Bonjour Mme Dinouart, chaque couleur se compose de 2 rangs endroit (= 1 côte mousse), cf RAYURES. Bon tricot!
29.04.2019 - 10:20
|
|
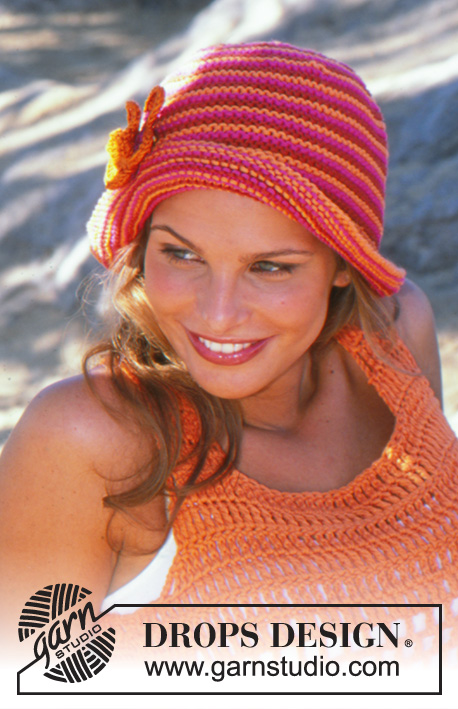
Just Peachy Hat |
|
 |
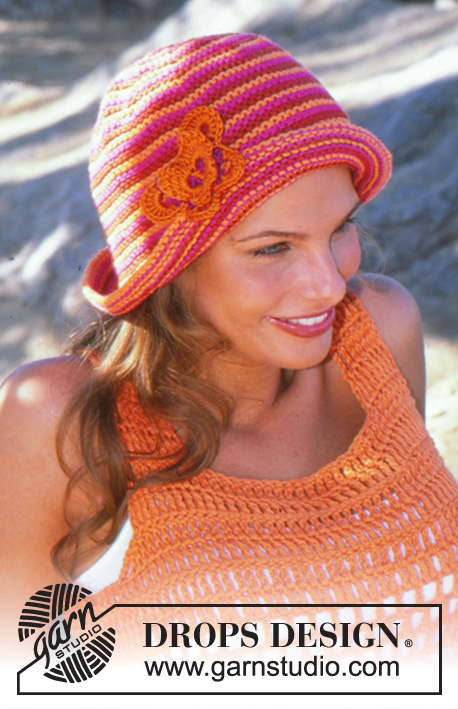 |
Knitted hat in DROPS Paris. With garter stitch and crocheted butterfly pin in DROPS Muskat. One-size.
DROPS 82-34 |
|
|
Hat: Knitting tension: Remember needle size is only a guide! 18 stitches x 36 rows with needle size 4 mm and garter stitch = 10 x 10 cm. Ridge/Garter stitch (back and forth on needle): 1 ridge = Knit 2 rows. Stripes * 1 ridge shocking pink, 1 ridge orange, 1 ridge rust *, repeat from *-*. Hat: The hat is worked back and forth on needle and sewn mid back to finish. Cast on 120 stitches with needle size 4 mm and orange. Knit 1 row from the wrong side. Continue with garter stitch and Stripes - see description above. Remember the knitting tension - if the work is too loose, the hat will be too big! When piece measures 5 cm work the next row as follows from right side (with the colour you have reached): * K2, K2 together *, repeat from *-* to end of row = 90 stitches. Continue the stripes. When piece measures 17 cm insert 10 marker threads in the piece with 9 stitches between each - first marker thread inserted after 8 stitches, and there should be 1 stitch after the last marker thread. Continue the stripes, at the same time as you decrease from the right side by knitting 2 together on right side of all marker threads every 2nd ridge 4 times and then every ridge 4 times = 10 stitches left on needle. Cut strand and pull it through the remaining stitches, tighten and fasten well. Sew the hat together mid back in the outermost loop of the outermost stitch. The hat measures approx. 23 cm in height. Butterfly brooch: Butterfly: The butterfly is worked in 2 parts which are sewn together to finish - i.e. it has 2 pairs of wings. Bottom pair of wings: Work 5 chain stitches with hook size 3.5 mm and heather and form them to a ring with 1 slip stitch. Row 1: 3 chain stitches, 2 treble crochets around chain-space, * 2 chain stitches, 3 treble crochets around chain-space *, repeat from *-* a total of 4 times (= 5 treble crochet-groups), turn piece. Row 2: 4 chain stitches, 3 treble crochets around chain-space, 5 chain stitches, 3 treble crochets around same chain-space,* 3 treble crochets around next chain-space, 4 chain stitches, 3 treble crochets around same chain-space *, repeat from *-* 1 more time, then 3 treble crochets around next chain-space, 5 chain stitches and 3 treble crochets in same chain-space. Finish with 1 chain stitch and 1 treble crochet in the 3rd chain stitch from previous round, turn piece. Row 3: Change to dark orange, skip the first treble crochet-group, work 12 treble crochets around first chain-space (= space with 5 chain stitches), 1 double crochet between the treble crochet-groups, 10 half- treble crochets around next chain-space, 1 double crochet between the treble crochet-groups, 10 half- treble crochets around next chain-space, 1 double crochet between the treble crochet-groups, 12 treble crochets around next chain-space, skip the last treble crochet-group and finish with 1 slip stitch in 3rd chain stitch from the previous row, cut strand. Top pair of wings: Work 10 chain stitches with crochet hook size 3.5 mm and dark orange and form them to a ring with 1 slip stitch. Row 1: * 1 double crochet, 1 treble crochet, 1 double- treble crochet, 1 treble crochet and 1 double crochet around chain-space, then work 1 half- treble crochet, 2 treble crochets, 1 double- treble crochet, 2 triple-double- treble crochets, 2 double- treble crochets, 2 treble crochets and 1 double crochet around same chain-space *, 5 chain stitches, 1 slip stitch in first double crochet on the row, turn piece (half the pair of wings is now finished). Repeat from *-* in the other chain-space and finish with 1 slip stitch in the first double crochet. Assembly: Sew the top pair of wings to the bottom - sew in middle of butterfly so that the wings are free. Fasten a small saftey pin to the back. |
|
Have you finished this pattern?Tag your pictures with #dropspattern or submit them to the #dropsfan gallery. Do you need help with this pattern?You'll find 19 tutorial videos, a Comments/Questions area and more by visiting the pattern on garnstudio.com. © 1982-2026 DROPS Design A/S. We reserve all rights. This document, including all its sub-sections, has copyrights. Read more about what you can do with our patterns at the bottom of each pattern on our site. |
|


With over 40 years in knitting and crochet design, DROPS Design offers one of the most extensive collections of free patterns on the internet - translated to 17 languages. As of today we count 324 catalogues and 12290 patterns translated into English (UK/cm). 12290
We work hard to bring you the best knitting and crochet have to offer, inspiration and advice as well as great quality yarns at incredible prices! Would you like to use our patterns for other than personal use? You can read what you are allowed to do in the Copyright text at the bottom of all our patterns. Happy crafting!
Post a comment to pattern DROPS 82-34
We would love to hear what you have to say about this pattern!
If you want to leave a question, please make sure you select the correct category in the form below, to speed up the answering process. Required fields are marked *.