
Popular categories
Looking for a yarn?


Comments / Questions (38)
![]() Aubrey wrote:
Aubrey wrote:
Is this pattern available with written instructions or just charts? I love it i just don't do well knitting from charts
30.10.2019 - 00:03DROPS Design answered:
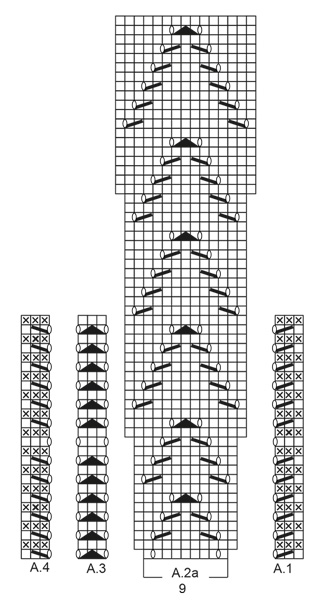
Hi Aubrey, This pattern is only found in this form. When working from diagrams, work bottom right to left and upwards. When working the wrong side you work back from left to right. Row 1 of M1 = K8, slip 1 stitch, K2 together and pass the slipped stitch over, K8. Row 2 = purl (working back). In M2, row 1 = K1, 1 yarn over, K6, slip 1, K2 tog and pass the slipped stitch over, K6, 1 yarn over and K1. Then purl back. Hope this helps and happy knitting!
30.10.2019 - 07:19
![]() Marinette wrote:
Marinette wrote:
Bonjour, je l'ai déjà tricoté sans encombre , c 'est pour quoi je le refais dans un autre coloris , ce modèle est facile a réaliser , bien, expliqué , de bonne taille , que vouloir de plus !
05.09.2019 - 07:17
![]() María José wrote:
María José wrote:
Hola otra vez He visto el video explicativo y ya me queda claro. Así que olviden mi pregunta anterior. Gracias
26.05.2019 - 08:11
![]() María José wrote:
María José wrote:
Buenos días En la fotografía aparecen los calados bien definidos, con agujeros. Si en las vueltas impares se trabaja la hebra echada retorcida ¿no se pierde este efecto?
26.05.2019 - 08:06
![]() Maryvonne wrote:
Maryvonne wrote:
Bonjour. Je suis a tricoter ce.châle. je galère !! Pour les explication c\'est mal expliqué. !! Mais je vais réussir.
03.05.2019 - 04:44DROPS Design answered:
Bonjour Maryvonne, nous sommes désolés d'apprendre que vous avez quelques soucis de compréhension, n'hésitez pas à utiliser cet espace pour poser vos questions si besoin, et rappelez-vous que votre magasin DROPS se tient à votre disposition - même par mail ou téléphone - pour toute assistance individuelle. Bon tricot!
03.05.2019 - 09:03
![]() Marina Löbel wrote:
Marina Löbel wrote:
Hallo, ich habe eine Frage zu A3 in der 13. Reihe wird ja, je A3 immer 2Maschen zugenommen, ist klar. Aber es steht dann, dies in der 26. Reihe arbeiten. Im Diagramm ist da nix eingezeichnet. 🤔HILFE - Danke im voraus
30.04.2019 - 15:18DROPS Design answered:
Liebe Frau Löbel, die Zunahmen sind bei der 13. Reihe in A.3/A.1 und A.4 gezeichnet, und diese Maschen sieht man dann in A.2a bei der nächsten Reihe (= 14. Reihe), dh bei der 13. Reihe nehmen Sie wie in den Diagramme gezeigt, und ab 14. Reihe stricken Sie die A.2a über 11 M. Viel Spaß beim stricken!
30.04.2019 - 16:49
![]() Jocelyne Bellerive wrote:
Jocelyne Bellerive wrote:
Bonjour, question 1: Quand on commence le diagramme, est-ce qu’on tricote encore toutes les jetés en maille torse comme au début? Question 2: au 1er rang du diagramme, A.2 et A.3 sont répétés 16 fois au total. J’arrive alors à 239 mailles (207 +32) à la fin du rang au lieu de 241 mailles. Merci à l’avance.
09.04.2019 - 22:13DROPS Design answered:
Bonjour Mme Bellerive, vous augmentez 2 m dans chaque A.2, à la fin du 1er rang on a: 3 m dans A.1, 16 x (11 m dans A.2 (on a fait 2 jetés), 3 m dans A.3), 11 m dans A.2 et 3 m dans A.4 = 241 m. Bon tricot!
10.04.2019 - 10:14
![]() Elizabeth Caron wrote:
Elizabeth Caron wrote:
This is a beautiful pattern. Thank you for making it available.
12.03.2019 - 18:56
![]() Colleen wrote:
Colleen wrote:
I have done the first row from the chart and pearled back. Do I assume each subsequent row is done with A2 repealing 16 times like the first row?
02.02.2019 - 16:59DROPS Design answered:
Dear Colleen, start reading diagram from the bottom corner on the right side towards the left on every RS row (A.2 = row 1 = K1, YO, K7, YO, K1 - Row 3 = K2, YO, dec, K3, dec, YO, K2 and so on). Every WS row in A.2 will be worked purl from WS as shown in diagram. Happy knitting!
04.02.2019 - 11:35
![]() Schaufelberger wrote:
Schaufelberger wrote:
Ha voilà !!! merci de cette explication et de votre patience !
13.12.2018 - 07:37
|
|||||||||||||||||||
Calendula#calendulashawl |
|||||||||||||||||||
 |
 |
||||||||||||||||||
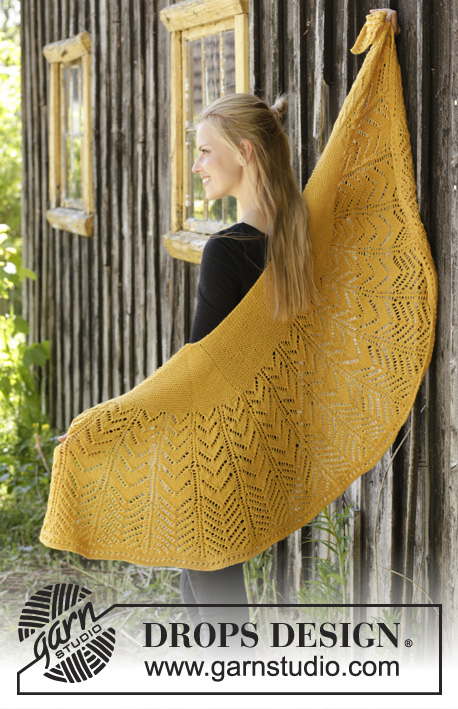
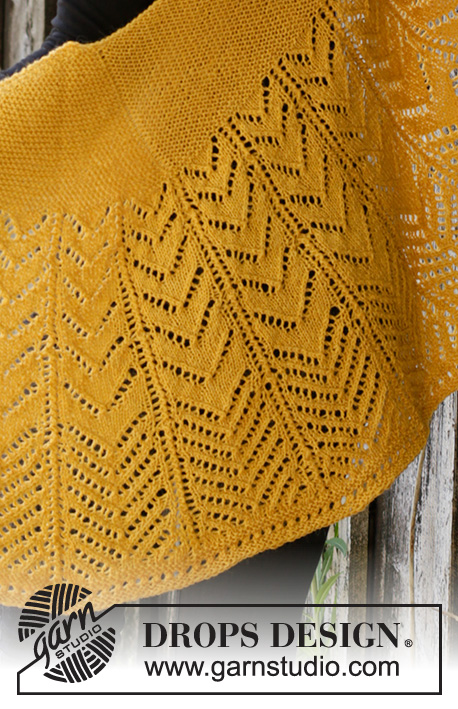
Knitted shawl with lace pattern and garter stitch in DROPS Nord.
DROPS 195-4 |
|||||||||||||||||||
|
EXPLANATIONS FOR THE PATTERN: ------------------------------------------------------- RIDGE/GARTER STITCH (worked back and forth): 1 ridge = Knit 2 rows. PATTERN: See diagrams A.1 to A.6. The diagrams show all the rows in the pattern seen from the right side. INCREASE TIP (evenly spaced): To work out how to increase evenly, count the total number of stitches on the needle (e.g. 185 stitches) and divide by the number of increases to be made (e.g. 18) = 10.27. In this example, increase after approx. every 10th stitch by making 1 yarn over. On the next row, work the yarn overs twisted to avoid holes. ------------------------------------------------------- START THE PIECE HERE: ------------------------------------------------------- SHAWL - SHORT SUMMARY OF THE WORK: The piece is worked back and forth with circular needle, top down. SHAWL: Cast on 61 stitches with circular needle size 4mm and Nord. Insert 1 marker 4 stitches in from each side (= 53 stitches between the markers). Work as follows: ROW 1 (= from the right side): Work 3 stitches in GARTER STITCH – read description above, 1 yarn over (= 1 stitch increased), work garter stitch to the first marker, 1 yarn over (= 1 stitch increased), work 53 stitches in garter stitch (the 2nd marker sits here), 1 yarn over (= 1 stitch increased), work garter stitch until there are 3 stitches left, 1 yarn over (= 1 stitch increased), finish with 3 stitches in garter stitch (= a total of 4 stitches increased on the row). ROW 2 (= from the wrong side): Work garter stitch over all stitches, yarn overs are worked twisted to avoid holes. Repeat rows 1 and 2. In other words, each row from the right side increases 1 stitch inside the 3 edge stitches in each side and 1 stitch on each side of the 53 middle stitches. REMEMBER THE KNITTING TENSION! Work a total of 31 ridges (= a total of 62 rows), i.e. you have increased 31 stitches on each side of the middle stitches and 31 stitches inside the 3 edge stitches in each side of the piece (= 124 stitches increased in total) = 185 stitches. Work 1 ridge and increase as usual (= 4 stitches) AT THE SAME TIME as you increase 18 stitches evenly spaced on the row from the right side – read INCREASE TIP = 207 stitches. The piece measures approx. 15 cm, measured in the knitting direction. The next row is worked as follows from the right side: Work A.1 over the first 3 stitches, * A.2a (= 9 stitches), A.3 (= 3 stitches) *, work from *-* a total of 16 times, A.2a over the next 9 stitches, A.4 over the last 3 stitches. On the first row you increase 2 stitches in each A.2a = 241 stitches. It is increased 1 stitch in A.1 and A.4 and 2 stitches in each A.3 on the 13th row, when repeating these diagrams in height there will be an increase every 26th row. You increase 34 stitches on each increase-row. The increased stitches are worked (and drawn) into pattern A.2a. Continue the pattern like this; A.1, A.3 and A.4 are repeated in height. When A.2a has been completed 1 time in height there are 309 stitches on the needle. Work A.2b (= 15 stitches) over A.2a. When A.2b has been worked 1 time in height there are 377 stitches on the needle. The piece measures approx. 53 cm, measured in the middle of the shawl. The next row is worked as follows from the right side: Work 2 edge stitches in garter stitch, work A.5 (= 2 stitches) until there are 3 stitches left (= 186 times in width), work A.6 (= 1 stitch) and finish with 2 edge stitches in garter stitch. On the 7th row in A.6 increase 1 stitch as shown in the diagram = 378 stitches. When A.5 and A.6 have been worked 1 time in height, cast off with knit. The shawl measures a total of approx. 55 cm, measured in the middle. |
|||||||||||||||||||
Diagram explanations |
|||||||||||||||||||
|
|||||||||||||||||||
 |
|||||||||||||||||||
 |
|||||||||||||||||||
Have you finished this pattern?Tag your pictures with #dropspattern #calendulashawl or submit them to the #dropsfan gallery. Do you need help with this pattern?You'll find 20 tutorial videos, a Comments/Questions area and more by visiting the pattern on garnstudio.com. © 1982-2026 DROPS Design A/S. We reserve all rights. This document, including all its sub-sections, has copyrights. Read more about what you can do with our patterns at the bottom of each pattern on our site. |
|||||||||||||||||||


With over 40 years in knitting and crochet design, DROPS Design offers one of the most extensive collections of free patterns on the internet - translated to 17 languages. As of today we count 324 catalogues and 12290 patterns translated into English (UK/cm). 12290
We work hard to bring you the best knitting and crochet have to offer, inspiration and advice as well as great quality yarns at incredible prices! Would you like to use our patterns for other than personal use? You can read what you are allowed to do in the Copyright text at the bottom of all our patterns. Happy crafting!
Post a comment to pattern DROPS 195-4
We would love to hear what you have to say about this pattern!
If you want to leave a question, please make sure you select the correct category in the form below, to speed up the answering process. Required fields are marked *.