
Popular categories
Looking for a yarn?


Comments / Questions (38)
![]() Karin Pettersen wrote:
Karin Pettersen wrote:
Skal avslutte calendula etter 53 cm og 377 masker,men forstår ikke siste avsnittet.Finnes det en enklere forklaring?
22.04.2022 - 10:42DROPS Design answered:
Hej Karin, jo når du har 377 m strikker du næste pind fra retsiden: 2 kantmasker, 373 m ret, 2 kantmasker og næste fra vrangen: 2 kantmasker 373 m ret, 2 kantmasker. på 7:e varv fra retsiden strikker du 2 räta tillsammans,1omslag, 2 räta tillsammans, 1omslag osv. God fornøjelse!
22.04.2022 - 14:22
![]() Verna Wilkin wrote:
Verna Wilkin wrote:
Lovely pattern, thank you for posting it. I am 85 years old and have been knitting for 80 years. I live in Fort Worth Texas.
11.08.2021 - 18:19
![]() Christiane Fouere wrote:
Christiane Fouere wrote:
Je l'ai terminé en suivant scrupuleusement les instructions et suis très contente. Je suis fière du résultat. Bravo à la créatrice de ce modèle.
14.05.2021 - 19:01
![]() Christiane Fouere wrote:
Christiane Fouere wrote:
Au rang 13, au lieu d'augmenter 2 m. dans chaque A3 ce qui occasionne une rupture dans le point fantaisie , ne pourrait on pas faire ces aug. dans A2 en faisant 1 jeté entre la 1ere et la 2eme maille, puis 1 jeté entre la 10eme et la 11eme m que l'on tricoterai torse le rang suivant ? Je n'ose pas tenter le coup..... merci. Merci
13.04.2021 - 22:29DROPS Design answered:
Bonjour Mme Fouere, ces augmentations se font dans A.1, A.3 et A.4, autrement dit de part et d'autre de chaque A.2a, au rang suivant, ces mailles appartiennent à A.2a. Bon tricot!
14.04.2021 - 07:30
![]() Minarro wrote:
Minarro wrote:
Bonjour, je suis entrain de tricoter A2a. On voit qu’il y a une augmentation au rang 39. Rien est indiqué pour le réaliser. Dois-je le faire comme le rang 13 ? Merci d’avance pour votre réponse.
11.04.2021 - 19:25DROPS Design answered:
Bonjour Mme Minarro, ces augmentations figurent dans A.1, A.3 et A.4 = comme au rang 13 effectivement. En répétant ces diagrammes en hauteur, vous répétez naturellement les augmentations. Bon tricot!
12.04.2021 - 11:01
![]() Christiane Fouere wrote:
Christiane Fouere wrote:
Je suis étonnée que dans la 1ere partie du châle (Point mousse) les 3 mailles du bord sont au point mousse , alors qu'après lorsqu'on passe dans la partie fantaisie les 3 mailles du bord ne sont plus en point mousse mais en point fantaisie ( voir diagramme) .est ce que ça ne fait pas bizarre que cette bordure ne soit pas identique sur toute la longueur.. .? Merci
26.03.2021 - 13:53DROPS Design answered:
Bonjour Mme Fouere, une fois que l'on commence les points jourés, la bordure se tricotera presque de la même façon autrement dit, au point musse avec 1 jour (= à l'endroit sur l'endroit, on diminue 1 m compensée par 1 jeté; et à l'endroit sur l'envers). Si vous le souhaitez, vous pouvez commencer le point ajouré de suite, même dans le point mousse sans point fantaisie, à vous de voir. Bon tricot!
26.03.2021 - 14:31
![]() Kari Marki Bjorli wrote:
Kari Marki Bjorli wrote:
Hvordan kan man få 62 omganger til å bli 15cm langt? Strikker på pinne 4, tror ikke pinne 5 gjør det 15 cm.
26.06.2020 - 17:11DROPS Design answered:
Hei Kari. Det strikkes ikke omganger på dette sjalet, men rader/pinner. Når det er strikket 32 riller (64 pinner), vil arbeidet måle ca 15 cm. Strikkefastheten med rillestrikk i DROPS Nord på pinne 4 er 21 masker x 40 pinner = 10 x 10 cm. Hvilken strikkefasthet får du? mvh DROPS design
29.06.2020 - 11:49
![]() Beata wrote:
Beata wrote:
Hello. When we start to process A2b, do the A1, A3 and A4 schematics also be worked?
10.03.2020 - 12:51DROPS Design answered:
Dear Beata, when you start working A.2, you first work A.2a then A.2b, when working A.2b continue other diagrams as before (= A.1, A.3 and A.4). Happy knitting!
10.03.2020 - 13:18
![]() Beata wrote:
Beata wrote:
Hello. When we start to process A2b, do the A1, A3 and A4 schematics also be worked?
10.03.2020 - 12:39
![]() Beata wrote:
Beata wrote:
Witam. Czy jak zaczynamy przerabiać A2b to też przerabiany jest schemat A1,A3 i A4 ?
07.03.2020 - 23:02DROPS Design answered:
Hi Beata, please write your question in english :)
10.03.2020 - 10:12
|
|||||||||||||||||||
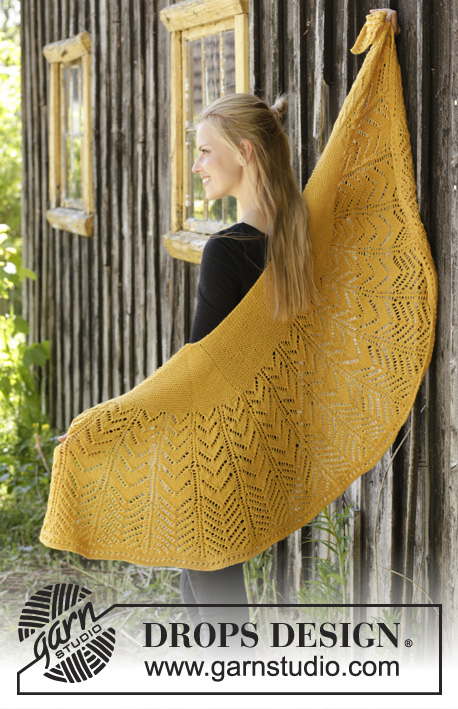
Calendula#calendulashawl |
|||||||||||||||||||
 |
 |
||||||||||||||||||
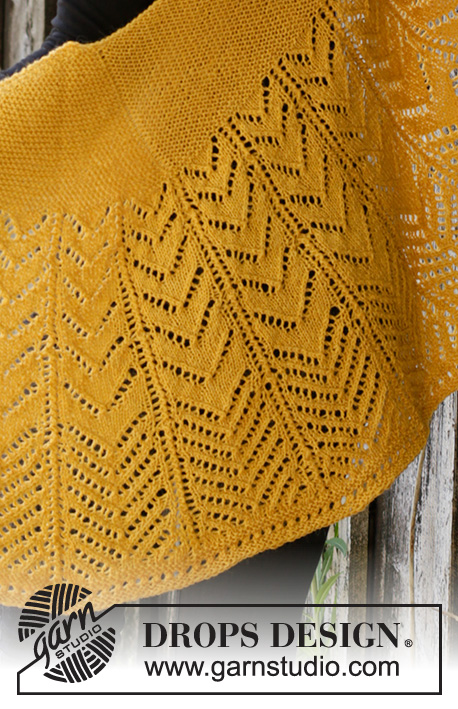
Knitted shawl with lace pattern and garter stitch in DROPS Nord.
DROPS 195-4 |
|||||||||||||||||||
|
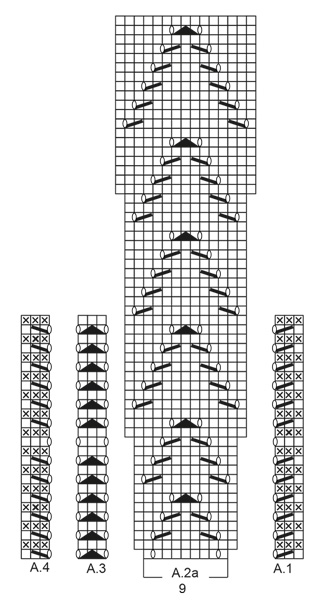
EXPLANATIONS FOR THE PATTERN: ------------------------------------------------------- RIDGE/GARTER STITCH (worked back and forth): 1 ridge = Knit 2 rows. PATTERN: See diagrams A.1 to A.6. The diagrams show all the rows in the pattern seen from the right side. INCREASE TIP (evenly spaced): To work out how to increase evenly, count the total number of stitches on the needle (e.g. 185 stitches) and divide by the number of increases to be made (e.g. 18) = 10.27. In this example, increase after approx. every 10th stitch by making 1 yarn over. On the next row, work the yarn overs twisted to avoid holes. ------------------------------------------------------- START THE PIECE HERE: ------------------------------------------------------- SHAWL - SHORT SUMMARY OF THE WORK: The piece is worked back and forth with circular needle, top down. SHAWL: Cast on 61 stitches with circular needle size 4mm and Nord. Insert 1 marker 4 stitches in from each side (= 53 stitches between the markers). Work as follows: ROW 1 (= from the right side): Work 3 stitches in GARTER STITCH – read description above, 1 yarn over (= 1 stitch increased), work garter stitch to the first marker, 1 yarn over (= 1 stitch increased), work 53 stitches in garter stitch (the 2nd marker sits here), 1 yarn over (= 1 stitch increased), work garter stitch until there are 3 stitches left, 1 yarn over (= 1 stitch increased), finish with 3 stitches in garter stitch (= a total of 4 stitches increased on the row). ROW 2 (= from the wrong side): Work garter stitch over all stitches, yarn overs are worked twisted to avoid holes. Repeat rows 1 and 2. In other words, each row from the right side increases 1 stitch inside the 3 edge stitches in each side and 1 stitch on each side of the 53 middle stitches. REMEMBER THE KNITTING TENSION! Work a total of 31 ridges (= a total of 62 rows), i.e. you have increased 31 stitches on each side of the middle stitches and 31 stitches inside the 3 edge stitches in each side of the piece (= 124 stitches increased in total) = 185 stitches. Work 1 ridge and increase as usual (= 4 stitches) AT THE SAME TIME as you increase 18 stitches evenly spaced on the row from the right side – read INCREASE TIP = 207 stitches. The piece measures approx. 15 cm, measured in the knitting direction. The next row is worked as follows from the right side: Work A.1 over the first 3 stitches, * A.2a (= 9 stitches), A.3 (= 3 stitches) *, work from *-* a total of 16 times, A.2a over the next 9 stitches, A.4 over the last 3 stitches. On the first row you increase 2 stitches in each A.2a = 241 stitches. It is increased 1 stitch in A.1 and A.4 and 2 stitches in each A.3 on the 13th row, when repeating these diagrams in height there will be an increase every 26th row. You increase 34 stitches on each increase-row. The increased stitches are worked (and drawn) into pattern A.2a. Continue the pattern like this; A.1, A.3 and A.4 are repeated in height. When A.2a has been completed 1 time in height there are 309 stitches on the needle. Work A.2b (= 15 stitches) over A.2a. When A.2b has been worked 1 time in height there are 377 stitches on the needle. The piece measures approx. 53 cm, measured in the middle of the shawl. The next row is worked as follows from the right side: Work 2 edge stitches in garter stitch, work A.5 (= 2 stitches) until there are 3 stitches left (= 186 times in width), work A.6 (= 1 stitch) and finish with 2 edge stitches in garter stitch. On the 7th row in A.6 increase 1 stitch as shown in the diagram = 378 stitches. When A.5 and A.6 have been worked 1 time in height, cast off with knit. The shawl measures a total of approx. 55 cm, measured in the middle. |
|||||||||||||||||||
Diagram explanations |
|||||||||||||||||||
|
|||||||||||||||||||
 |
|||||||||||||||||||
 |
|||||||||||||||||||
Have you finished this pattern?Tag your pictures with #dropspattern #calendulashawl or submit them to the #dropsfan gallery. Do you need help with this pattern?You'll find 20 tutorial videos, a Comments/Questions area and more by visiting the pattern on garnstudio.com. © 1982-2026 DROPS Design A/S. We reserve all rights. This document, including all its sub-sections, has copyrights. Read more about what you can do with our patterns at the bottom of each pattern on our site. |
|||||||||||||||||||


With over 40 years in knitting and crochet design, DROPS Design offers one of the most extensive collections of free patterns on the internet - translated to 17 languages. As of today we count 324 catalogues and 12290 patterns translated into English (UK/cm). 12290
We work hard to bring you the best knitting and crochet have to offer, inspiration and advice as well as great quality yarns at incredible prices! Would you like to use our patterns for other than personal use? You can read what you are allowed to do in the Copyright text at the bottom of all our patterns. Happy crafting!
Post a comment to pattern DROPS 195-4
We would love to hear what you have to say about this pattern!
If you want to leave a question, please make sure you select the correct category in the form below, to speed up the answering process. Required fields are marked *.