
Popular categories
Looking for a yarn?


Comments / Questions (56)
![]() Inge Koomen wrote:
Inge Koomen wrote:
Ik snap het begin van het patroon niet. Je breidt 2 ribbels. Dan komt de uitleg van de verdeling. Is dat naald 5 of naald 1? Vervolgens staat er dat je naalden 3 t/m 10 1x moet breien. Zijn dat dan de naalden in de beschrijving van de raglan? Of is dat 1 ribbel en dan raglan?
29.05.2025 - 22:17
![]() Ana Miranda wrote:
Ana Miranda wrote:
O número de malhas a levantar nas laterais dos dominós não correspondem ao número de fileiras e consequentemente aos buracos disponiveis. Como fazer?
02.01.2024 - 22:51DROPS Design answered:
Bom dia, Levanta-se sempre uma malha a mais. Aconselhamos a que veja a galeria de vídeos ao dfundo da página do modelo onde poderá ver melhor como levantar as malhas nos dominós. Bons tricôs!
09.01.2024 - 10:15
![]() Andreea wrote:
Andreea wrote:
Hello,i need your help again, please, with domino square 2.2, I don't understand how to do it so that I can do the first row on the wrong side. If I pick up 20 stitches and then slip the next 19 st. the thread stay in the middle, between them. What am I doing wrong? Thank you
01.11.2023 - 16:24DROPS Design answered:
Dear Andrea, all stitches for each domino will be picked up from the right side of piece, you will pick up 16-27 sts along the right side of domino 1.1 starting from middle of the side of 1.1 towards tip work the 15-26 sts on the stitch holder along the side - see chart. Insert a marker in the middle stitch of domino and work a domino: Turn and work first row from WS. Happy knitting!
02.11.2023 - 17:22
![]() Andreea wrote:
Andreea wrote:
Thanks for the answer, but it was about the part after the division of the sleeves. I don't understand how to put st. on holder1 and holder 2, to work domino squares. Thank you
25.10.2023 - 16:04DROPS Design answered:
Dear Andrea, you will slip on a thread the stitches on mid front/mid back (including the tip with increases) and keep on needles the stitches on each side of piece (beg + end of the round for right sleeve and mid of the round for left sleeve). Happy knitting!
26.10.2023 - 06:33
![]() Andreea wrote:
Andreea wrote:
Thank you for your ansewere,but it was about the part after the division for sleves(this part i understand)end before began making the domino squars. I don't understand how to put st.on holders., for the domino squares. Thank you.
25.10.2023 - 15:59DROPS Design answered:
Dear Andrea, you will work the sts at the same time: work (incl. inc) the first 21-29 sts on the round for 1st domino, then work and slip the next 109-157 sts on a thread, work (incl. inc) and slip the next 41-57 sts on a thread for under left sleeve, work and slip the next 109-157 sts on a thread and work and keep on needle the last 20-28 sts. You will now work the first domino over the first + last sts on the round= 41-57 sts. Happy knitting!
26.10.2023 - 06:32
![]() Andreea wrote:
Andreea wrote:
Pleas explain to me this part because i do not understand how to do it.The part i don't understan it's start here:" Now slip stitches on 2 stitch holders while at the same time working them as follow....... Until the end wher the domino squares began. Thank you.
25.10.2023 - 15:10DROPS Design answered:
Dear Andrea, work the row described below this sentence: you will now divide piece for body and sleeve, work just as explained slipping the stitches mentioned for your size on the stitch hoders so that they will be worked later for the sleeves. And then continue working dominos as explained, starting mid under right sleeve with domino 1.1. Happy knitting!
25.10.2023 - 15:30
![]() Ninna wrote:
Ninna wrote:
Når man måler ærmets længde, er det så langs der hvor man har taget ind eller på oversiden af ærmet ?
07.02.2023 - 10:00DROPS Design answered:
Hej Ninna, du måler ovenpå ærmet - prøv gerne blusen inden du lukker af, så ærmet passer dig :)
08.02.2023 - 07:29
![]() Anni K wrote:
Anni K wrote:
Hej Forstår ikke, hvordan dette slå masker jævnt ud strikkes: Strik 1maske retstrik, sæt første mærke,slå om, strik 22 masker retstrik og tag 0~0~2~2~0~0 masker ud jævnt? Er det på samme omgang, eller skal man strikke over 6 omgange?
19.10.2021 - 15:52DROPS Design answered:
Hej Anni, det er kun i størrelse L og XL du tager 2 masker ud samtidig som du strikker de 22 masker retstrik (de andre størrelser står det 0). God fornøjelse!
21.10.2021 - 09:23
![]() Helle wrote:
Helle wrote:
Det hjalp at åbne siden på ny i en anden fane - så bare se bort fra kommentaren ang manglende diagram…
06.08.2021 - 21:36
![]() Helle wrote:
Helle wrote:
Jeg syntes at diagrammet er væk?
06.08.2021 - 21:33DROPS Design answered:
Hej Helle, det finder du nederst i opskriften :)
11.08.2021 - 15:59
|
|||||||||||||
Atlantis Sweater#atlantissweater |
|||||||||||||
 |
 |
||||||||||||
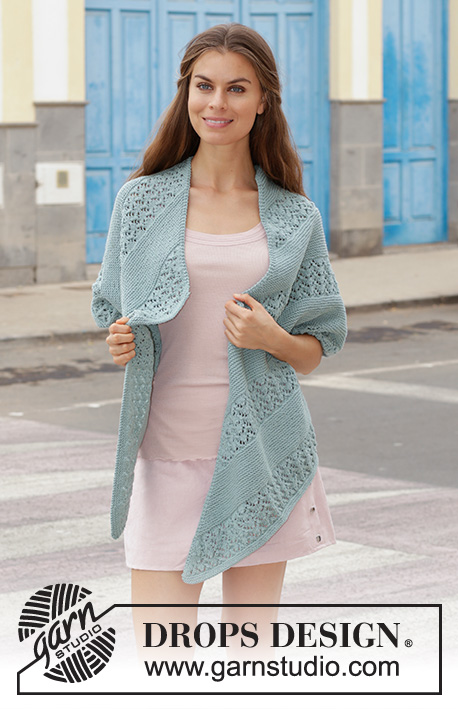
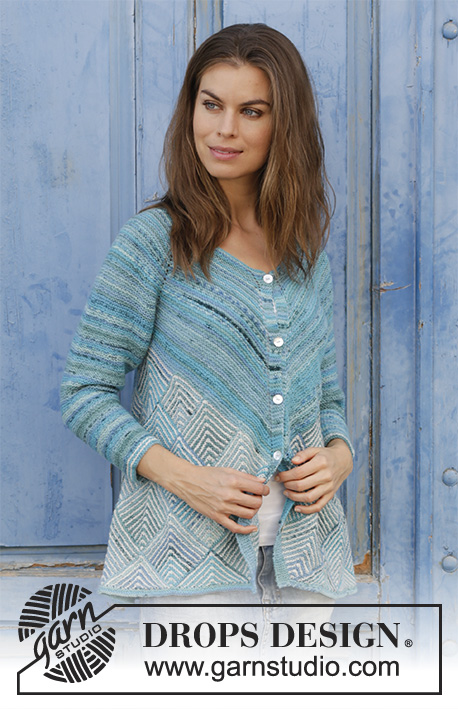
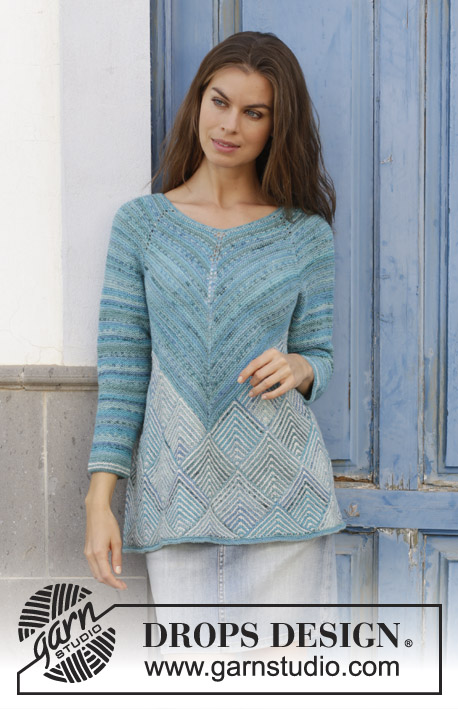
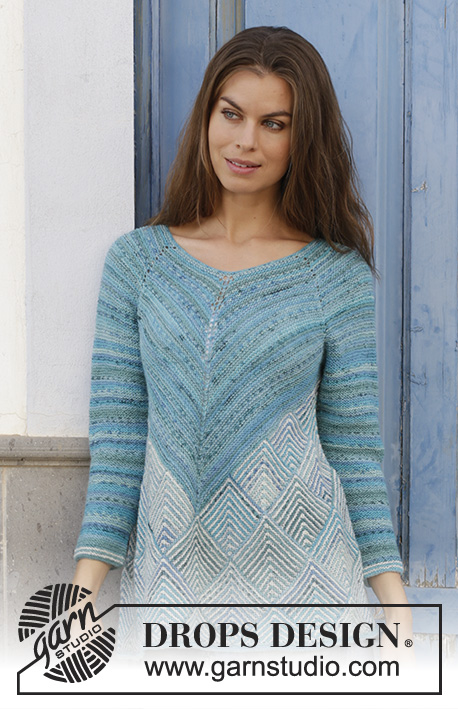
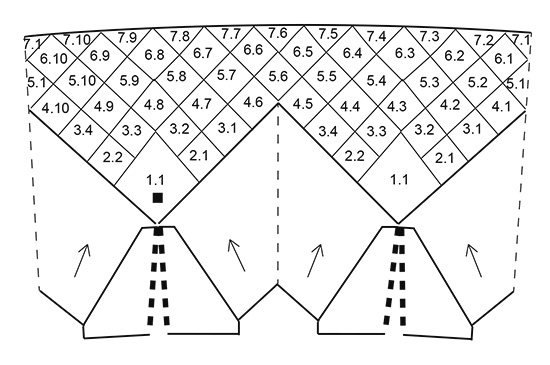
Jumper with domino squares, garter stitch, stripes and raglan, knitted top down. Size: S - XXXL Piece is knitted in DROPS Fabel.
DROPS 188-15 |
|||||||||||||
|
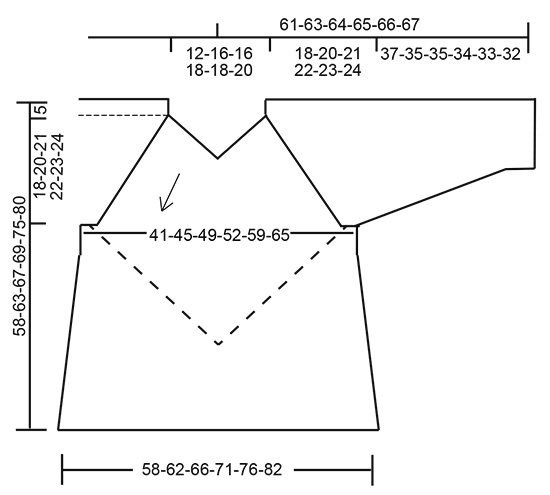
INFORMATION FOR PATTERN: GARTER STITCH (back and forth - applies to domino squares): 1 ridge = knit 2 rows. GARTER STITCH (worked in the round): 1 ridge = 2 rounds. Knit 1 round and purl 1 round. RAGLAN (applies to yoke): SIZE S-M-L-XL: ROUND 1: Purl all stitches. ROUND 2: Make 1 yarn over after 1st-3rd-4th-6th marker and 1 yarn over before 2nd-3rd-5th-6th marker (= 2 stitches increased on each sleeve, 2 stitches increased on front and back piece = 8 stitches increased in total on round). ROUND 3 (and all rounds purled): Purl all stitches, do not work yarn overs twisted; they should make holes. ROUND 4: Increase 4 stitches on front and back piece as follows: Make 2 yarn overs after 3rd and 6th marker as follows: Work to and with stitch with marker, 1 yarn over, knit 1, 1 yarn over. Make 2 yarn overs before 3rd and 6th marker as follows: Work until 1 stitch remains before stitch with marker, 1 yarn over, knit 1, 1 yarn over (= 4 stitches increased on front and back piece = 8 stitches increased in total on round). ROUND 6: Work as 2nd round (= 2 stitches increased on each sleeve, 2 stitches increased on front and back piece = 8 stitches increased in total on round). ROUND 8: Make 1 yarn over after 3rd and 6th marker and 1 yarn over before 3rd and 6th marker (= 2 stitches increased on front and back piece = 4 stitches increased in total on round). ROUND 10: Work as 2nd round (= 2 stitches increased on each sleeve, 2 stitches increased on front and back piece = 8 stitches increased in total on round). SIZE XXL-XXXL: ROUND 1: Purl all stitches. ROUND 2: Make 1 yarn over after 1st-3rd-4th-6th marker and 1 yarn over before 2nd-3rd-5th-6th marker (= 2 stitches increased on each sleeve, 2 stitches increased on front and back piece = 8 stitches increased on round). ROUND 3 (and all rounds purled): Purl all stitches, do not work yarn overs twisted; they should make holes. ROUND 4: Increase 4 stitches on front and back piece as follows: Make 2 yarn overs after 3rd and 6th marker as follows: Work to and with stitch with marker, 1 yarn over, knit 1, 1 yarn over. Make 2 yarn overs before 3rd and 6th marker as follows: Work until 1 stitch remains before stitch with marker, 1 yarn over, knit 1, 1 yarn over (= 4 stitches increased on front and back piece = 8 stitches increased in total on round). ROUND 6: Work as 2nd round (= 2 stitches increased on each sleeve, 2 stitches increased on front and back piece = 8 stitches increased on round). ROUND 8: Work as 4th round (= 4 stitches increased on front and back piece = 8 stitches increased in total on round). ROUND 10: Work as 2nd round (= 2 stitches increased on each sleeve, 2 stitches increased on front and back piece = 8 stitches increased on round). ROUND 12: Work as 2nd round (= 2 stitches increased on each sleeve, 2 stitches increased on front and back piece = 8 stitches increased on round). INCREASE TIP-1: Work 2 stitches in 1 stitch. INCREASE TIP-2: Increase with 1 yarn over between 2 stitches. Knit yarn over twisted on next round to avoid hole. DECREASE TIP (applies to mid under sleeve): All decreases are made on a round with knit. Decrease on each side of marker as follows: Begin 4 stitches before marker, knit 2 together, knit 4 (marker is in the middle of these stitches), slip 1 stitch knitwise, knit 1, pass slipped stitch over stitch worked (= 2 stitches decreased). KNITTING TIP (applies to domino squares): Always pick up stitches from right side. STRIPES: Work first row in every stripe from right side (applies to domino squares). Knit first round in every stripe (applies to sleeves). Work 1 ridge with light pearl grey. Work 1 ridge with blue lagoon. WHOLE DOMINO SQUARE: Insert 1 marker thread in the middle stitch. ROW 1 (= wrong side): Knit all stitches. ROW 2 (= right side): Knit until 1 stitch remains before marker thread, slip 1 stitch knitwise, knit 2 together, pass the slipped stitch over stitches worked, knit the rest of row. Repeat 1st and 2nd row, i.e. decrease 2 stitches in the middle of the square on every other row until 1 stitch remains, cut the yarn and pull it through stitch. HALF DOMINO SQUARE (horizontal): Work as whole domino square but in addition to decreasing in the middle of square, slip last stitch at the end of every row on 1 stitch holder. Continue until 7-5-7-7-7-7 stitches remain on needle (= 9-10-10-11-12-13 stitches on stitch holder in each side). Knit 1 row from wrong side and slip last stitch at the end of row on stitch holder = 6-4-6-6-6-6 stitches on needle. Work next row (= from right side) as follows: Knit 1-0-1-1-1-1, slip 1 stitch knitwise, knit 2 together, pass slipped stitch over the 2 stitches worked together (= 2 stitches decreased), knit 1-0-1-1-1-1, slip last stitch at the end of row on stitch holder = 3-1-3-3-3-3 stitches. Slip these stitches on stitch holder as well. Cut and fasten the yarn. There are now 23-23-25-27-29-31 stitches in total on stitch holder. ---------------------------------------------------------- JUMPER: Work yoke in the round, top down. Increase out for raglan on each side of each sleeve and mid front and mid back. When yoke is done, work 1 and 1 domino square back and forth. Work sleeves in garter stitch in the round at the end. YOKE: Cast on 106-122-122-134-134-142 stitches on circular needle size 2.5 mm with blue lagoon. Work 2 ridges in GARTER STITCH - see explanation above. Switch to circular needle size 3.5 mm. Work next round as follows: Right sleeve: Work 1 stitch in garter stitch and insert 1st marker in this stitch, 1 yarn over, work 22 stitches in garter stitch and increase 0-0-2-2-0-0 stitches evenly, 1 yarn over, work 1 stitch in garter stitch and insert 2nd marker in this stitch (= 26-26-28-28-26-26 stitches). Front piece: Work 14-18-18-21-21-23 stitches in garter stitch and increase 0-0-4-0-2-7 stitches evenly, 1 yarn over, work 1 stitch in garter stitch and insert 3rd marker in this stitch (= mid front), 1 yarn over, work 14-18-18-21-21-23 stitches in garter stitch and increase 0-0-4-0-2-7 stitches evenly (= 31-39-47-45-49-63 stitches). Left sleeve: Work 1 stitch in garter stitch and insert 4th marker in this stitch, 1 yarn over, work 22 stitches in garter stitch and increase 0-0-2-2-0-0 stitches evenly, 1 yarn over, work 1 stitch in garter stitch and insert 5th marker in this stitch (= 26-26-28-28-26-26 stitches). Back piece: Work 14-18-18-21-21-23 stitches in garter stitch and increase 0-0-4-0-2-7 stitches evenly, 1 yarn over, work 1 stitch in garter stitch and insert 6th marker in this stitch (= mid back), 1 yarn over, work 14-18-18-21-21-23 stitches in garter stitch and increase 0-0-4-0-2-7 stitches evenly (= 31-39-47-45-49-63 stitches) = 114-130-150-146-150-178 stitches in total. Work and increase for RAGLAN - see explanation above, begin on 3rd round. REMEMBER THE KNITTING TENSION! Work 3rd to 10th-10th-10th-10th-12th-12th round 1 time = 142-158-178-174-190-218 stitches (= 30-30-32-32-32-32 stitches on each sleeve and 41-49-57-55-63-77 stitches on front and back piece). Repeat 1st to 10th-10th-10th-10th-12th-12th round 7-7-8-8-7-7 times = 394-410-466-462-526-554 stitches (= 72-72-80-80-88-88 stitches on each sleeve and 125-133-153-151-175-189 stitches on front and back piece). Then work the first 0-6-0-4-4-8 round 1 more time = 394-434-466-478-542-586 stitches (= 72-76-80-82-90-92 stitches on each sleeve and 125-141-153-157-181-201 stitches on front and back piece). Piece now measures approx. 18-20-21-22-23-24 cm measured along the shoulder. Purl 1 round. Now divide the piece on next round (knitted): Right sleeve: Slip the first 72-76-80-82-90-92 stitches (including stitches with 1st and 2nd marker) on a stitch holder for sleeve, cast on 8-8-8-12-12-12 stitches under sleeve (insert 1 marker thread in the middle of these new stitches). Front piece: Knit 2 together (= 1 stitch decreased), knit until 3rd marker (= 60-68-74-76-88-98 stitches), 1 yarn over (= 1 stitch increased), knit 1 (= stitch with 3rd marker), 1 yarn over (= 1 stitch increased), knit until 2 stitches remain before 4th marker (= 60-68-74-76-88-98 stitches), knit 2 together (= 1 stitch decreased = 125-141-153-157-181-201 stitches). Left sleeve: Slip the next 72-76-80-82-90-92 stitches (including stitches with 4th and 5th marker) on a stitch holder for sleeve, cast on 8-8-8-12-12-12 stitches under sleeve (insert 1 marker thread in the middle of these new stitches). Back piece: Knit 2 together (= 1 stitch decreased), knit until 6th marker (= 60-68-74-76-88-98 stitches), 1 yarn over (= 1 stitch increased), knit 1 (= stitch with 6th marker), 1 yarn over (= 1 stitch increased), knit until 2 stitches remain on needle (= 60-68-74-76-88-98 stitches), knit 2 together (= 1 stitch decreased = 125-141-153-157-181-201 stitches) = 266-298-322-338-386-426 stitches in total (= 133-149-161-169-193-213 stitches on front and back piece). Cut the yarn. Displace the round so that it begins mid under right sleeve (i.e. round is displaced to marker thread). Purl 1 round, do not work yarn overs twisted; they should make holes AT THE SAME TIME increase 5-0-0-0-0-0 stitches evenly before tip mid front – read INCREASE TIP-1, 5-0-0-0-0-0 stitches evenly before marker in the side under left sleeve, 5-0-0-0-0-0 stitches evenly before tip mid back and 5-0-0-0-0-0 stitches evenly before marker under right sleeve = 20-0-0-0-0-0 stitches increased in total = 286-298-322-338-386-426 stitches. Now slip stitches on 2 stitch holders while at the same time working them as follows: Work 2 stitches in next stitch (= 1 stitch increased), knit the next 19-19-22-20-23-27 stitches (leave stitch on needle, first domino square is worked over these stitches later), knit until 20-20-23-21-24-28 stitches remain before marker thread under left sleeve, then slip them on stitch holder number 1 (= 103-109-115-127-145-157 stitches on 1st stitch holder), knit 19-19-22-20-23-27, work 2 stitches in next stitch (= 1 stitch increased), knit 20-20-23-21-24-28 stitches, leave stitches on needle (work first domino square under left sleeve over these 41-41-47-43-49-57 stitches), knit until 20-20-23-21-24-28 stitches remain before marker thread under right sleeve, then slip them on stitch holder number 2 (= 103-109-115-127-145-157 stitches on 2nd stitch holder ), knit 20-20-23-21-24-28 and leave them on needle (= 41-41-47-43-49-57 stitches on needle under each sleeve). Cut and fasten the thread. DOMINO SQUARES: See chart below, numbers on chart describe which domino square you are working. First work 1 domino square mid under right sleeve (= 1.1). Then work 1 and 1 domino square. Work domino squares with 2 double pointed needles size 3.5 mm. Pick up stitch with blue lagoon. Work all domino squares in STRIPES and GARTER STITCH – see explanation above, (i.e. work first row in lagoon from wrong side, change colour to light pearl grey and then work stripes). RIGHT FRONT/BACK PIECE: 1ST ROW WITH DOMINO: DOMINO 1.1: Now work WHOLE DOMINO SQUARE – see explanation above, over the 41-41-47-43-49-57 stitches under right sleeve. 2ND ROW WITH DOMINO: DOMINO 2.1: Slip the last 15-16-17-19-24-26 stitches from stitch holder towards mid front/mid back back on double pointed needles 3.5 mm and pick up 16-17-18-20-25-27 stitches – read KNITTING TIP, on half right side of 1st domino square (pick up more stitches in right side of 1st domino square on 3rd row with domino square later) = 31-33-35-39-49-53 stitches. Work the whole domino square. DOMINO 2.2: Pick up 16-17-18-20-25-27 stitches from middle of left side (= half side) of 1st domino square (= towards mid front/mid back), and slip the first 15-16-17-19-24-26 stitches from stitch holder towards mid front/mid back back on double pointed needles size 3.5 mm = 31-33-35-39-49-53 stitches. Work the whole domino square. Now there is 2 whole domino squares on 2nd row with domino, i.e. 1 domino on each side of the 1st domino square has been worked. 3RD ROW WITH DOMINO: DOMINO 3.1: Slip the next 17-18-19-21-24-26 stitches from stitch holder towards mid back/mid front back on double pointed needles 3.5 mm and pick up 18-19-20-22-25-27 stitches in right side of domino square 2.1 = 35-37-39-43-49-53 stitches. Work whole domino square. DOMINO 3.2: Pick up 18-19-20-22-25-27 stitches in left side of domino square 2.1 and pick up 17-18-19-21-24-26 stitches on last half in right side of 1st domino square = 35-37-39-43-49-53 stitches. Work whole domino square. DOMINO 3.3: Pick up 17-18-19-21-24-26 stitches in last half on left side of 1st domino square and pick up 18-19-20-22-25-27 stitches in right side of domino square 2.2 = 35-37-39-43-49-53 stitches. Work whole domino square. DOMINO 3.4: Pick up 18-19-20-22-25-27 stitches in left side of domino square 2.2 and slip the next 17-18-19-21-24-26 stitches from stitch holder towards mid front/mid back back on double pointed needles size 3.5 mm = 35-37-39-43-49-53 stitches. Work whole domino square. 4 domino squares have been worked on 3rd row with domino. LEFT FRONT/BACK PIECE: Work 1st to 3rd row with dominos as on right front/back piece. Now work dominos over both left front/back piece and right front/back piece as explained below and as numbers on chart show. 4TH ROW WITH DOMINO: DOMINO 4.1: Slip the next 20-21-22-24-25-27 stitches from stitch holder towards mid front back on double pointed needles 3.5 mm and pick up 19-20-21-23-24-26 stitches in right side of domino square 3.1 = 39-41-43-47-49-53 stitches. Work whole domino square. DOMINO 4.2 TO 4.4: Pick up 19-20-21-23-24-26 stitches in one side of domino square from 3rd row and pick up 20-21-22-24-25-27 stitches in one side of next domino square from 3rd row = 39-41-43-47-49-53 stitches. Work whole domino square. DOMINO 4.5: Pick up 19-20-21-23-24-26 stitches in left side of domino square 3.4 and slip the next 20-21-22-24-25-27 stitches from stitch holder towards mid back back on double pointed needles size 3.5 mm = 39-41-43-47-49-53 stitches. Work whole domino square. DOMINO 4.6: Slip the last 19-20-21-23-24-26 stitches from stitch holder mid back back on double pointed needles 3.5 mm and pick up 20-21-22-24-25-27 stitches in right side of domino square 3.1 = 39-41-43-47-49-53 stitches. Work whole domino square. DOMINO 4.7 TO 4.9: Pick up 19-20-21-23-24-26 stitches in one side of domino square from 3rd row and pick up 20-21-22-24-25-27 stitches in one side of next domino square from 3rd row = 39-41-43-47-49-53 stitches. Work whole domino square. DOMINO 4.10: Pick up 20-21-22-24-25-27 stitches in left side of domino square 3.4 and slip the last 19-20-21-23-24-26 stitches from stitch mid front back on double pointed needles size 3.5 mm = 39-41-43-47-49-53 stitches. Work whole domino square. 10 domino squares have been worked on 4th row with domino. 5TH ROW WITH DOMINO: DOMINO 5.1 TO 5.10: Pick up 21-22-23-25-27-29 stitches in one side of domino square from 4th row and pick up 22-23-24-26-28-30 stitches in one side of next domino square from 4th row = 43-45-47-51-55-59 stitches. Work whole domino square. 10 domino squares have been worked on 5th row with domino. 6TH ROW WITH DOMINO: DOMINO 6.1 TO 6.10: Pick up 21-22-23-25-27-29 stitches in one side of domino square from 5th row and pick up 22-23-24-26-28-30 stitches in one side of next domino square from 5th row = 43-45-47-51-55-59 stitches. Work whole domino square. 10 domino squares have been worked on 6th row with domino. 7TH ROW WITH DOMINO: DOMINO 7.1 TO 7.10: Pick up 21-22-23-25-27-29 stitches in one side of domino square from 6th row and pick up 22-23-24-26-28-30 stitches in one side of next domino square from 6th row = 43-45-47-51-55-59 stitches. Work HALF DOMINO SQUARE (horizontal) - see explanation above. 10 half domino squares have been worked (horizontally) on 7th row with domino. On each domino 23-23-25-27-29-31 stitches have been slipped on a stitch holder (work an edge over these stitches). Fasten all yarns. EDGE: Work edge in the round in blue lagoon. Each domino has 23-23-25-27-29-31 stitches slipped on stitch holder = 230-230-250-270-290-310 stitches on stitch holders. Slip stitches back on circular needle size 3.5 mm. Work 2 ridges AT THE SAME TIME on first round increase 4-6-6-7-6-7 stitches evenly over every half domino square (= 27-29-31-34-35-38 stitches on every domino = 40-60-60-70-60-70 stitches increased in total) – read INCREASE TIP-2 = 270-290-310-340-350-380 stitches in total. NOTE! If the edge is tight, increase more stitches in every domino. Loosely cast off. SLEEVE: Work sleeves in blue lagoon. Slip the 72-76-80-82-90-92 stitches from stitch holder back on double pointed needles size 3.5 mm and pick up 1 stitch in each of the 8-8-8-12-12-12 stitches cast on under sleeve = 80-84-88-94-102-104 stitches. Insert 1 marker in the middle of the new stitches under the sleeve. Work sleeves in garter stitch in the round. When piece measures 2 cm, decrease 1 stitch on each side of marker (= 2 stitches decreased) - read DECREASE TIP. Decrease like this every 9th-8th-8th-7th-6th-5th round 16-17-17-19-22-22 times in total = 48-50-54-56-58-60 stitches. When piece measures 35-33-33-32-31-30 cm, adjust so that last round is purled. Work 4 ridges in stripes, work first stripes in light pearl grey. Cast off, make sure to avoid a tight cast-off edge, cast off with 1 larger needle size if needed. Sleeve measures approx. 37-35-35-34-33-32 cm from where sleeve was divided from body. Work the other sleeve the same way. |
|||||||||||||
Diagram explanations |
|||||||||||||
|
|||||||||||||
 |
|||||||||||||
 |
|||||||||||||
Have you finished this pattern?Tag your pictures with #dropspattern #atlantissweater or submit them to the #dropsfan gallery. Do you need help with this pattern?You'll find 26 tutorial videos, a Comments/Questions area and more by visiting the pattern on garnstudio.com. © 1982-2026 DROPS Design A/S. We reserve all rights. This document, including all its sub-sections, has copyrights. Read more about what you can do with our patterns at the bottom of each pattern on our site. |
|||||||||||||


With over 40 years in knitting and crochet design, DROPS Design offers one of the most extensive collections of free patterns on the internet - translated to 17 languages. As of today we count 324 catalogues and 12290 patterns translated into English (UK/cm). 12290
We work hard to bring you the best knitting and crochet have to offer, inspiration and advice as well as great quality yarns at incredible prices! Would you like to use our patterns for other than personal use? You can read what you are allowed to do in the Copyright text at the bottom of all our patterns. Happy crafting!
Post a comment to pattern DROPS 188-15
We would love to hear what you have to say about this pattern!
If you want to leave a question, please make sure you select the correct category in the form below, to speed up the answering process. Required fields are marked *.