
Popular categories
Looking for a yarn?


Comments / Questions (38)
![]() Henker Bettina wrote:
Henker Bettina wrote:
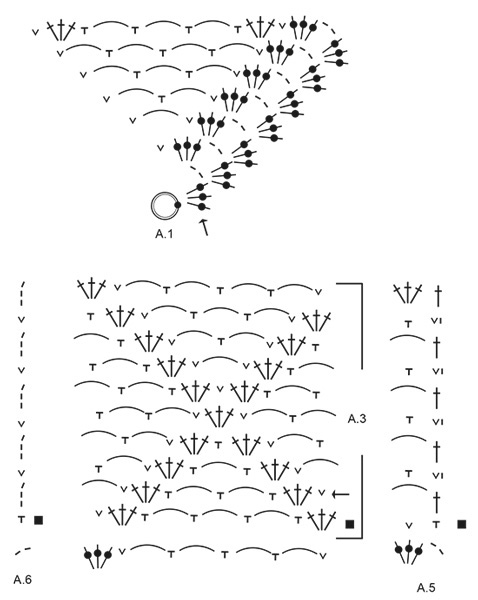
Hallo vielen Dank für Ihre Hilfe, bin auch gut vorwärts gekommen. Jetzt bin ich bei A5 und A6 angekommen und verstehe die Häkelschrift am Rand nicht. Bei A5 dieses Zeichen vI und bei A6 I und / . Außerdem ist beschrieben vom * -* Häkeln . Aber an den Diagrammen kann ich kein * finden? Bitte noch mal um Hilfe.
19.11.2018 - 17:55DROPS Design answered:
Liebe Frau Bettina, die Reihen in A.5 die mit vi anfangen sind diejenigen, die rechts nach links gehäkelt sind (Vorderseite): 1 Wendeluftmasche, 1 feste Masche in das Stäbchen, dann 1 fM um den LmBogen. In A.6 fangen alle Rückreihen mit 3 Luftmaschen, dann häkeln Sie das erste LmBogen usw. Am Ende der Hinreihen häkeln Sie 1 fM in das 3. Lm von der vorrigen Reihe. Die * sind nicht im Diagram nur in der schriftlichen Anleitung beschrieben, dh z.B. * A.2a, A.3, A.4a *, von *-* häkeln = die 3 Diagramme so häkeln, und die 3 so wiederholen. Viel Spaß beim häkeln!
20.11.2018 - 08:09
![]() Henker Bettina wrote:
Henker Bettina wrote:
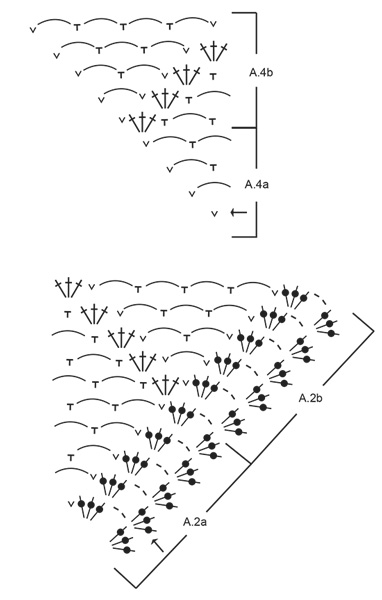
Alle Runden von A.2b, A.3 und A.4b in der Höhe wiederholen, dabei jedes Mal, wenn A.3 1 x in der Höhe gehäkelt wurde und A.2b und A.4b 2 x in der Höhe gehäkelt wurden, je 2 Rapporte mehr von A.3 in der Breite an allen 4 Seiten des Vierecks häkeln. Das verstehe ich nicht, weiß nicht weiter.
13.11.2018 - 22:54DROPS Design answered:
Liebe Frau Henker, wenn Sie die Diagramme häkeln, wird es in den Ecken zugenommen, dh Sie haben dann genügend Maschen um 2 Rapporte mehr von A.3 in der Breite zwischen den Ecken zu häkeln. Viel Spaß beim häkeln!
14.11.2018 - 08:33
![]() Henker Bettina wrote:
Henker Bettina wrote:
Hallo, das Muster lässt sich sehr einfach häkeln. Jedoch ist die Beschreibung zum Übergang der Ärmel schlecht verständliche. Mir hat am Anfang das Video sehr geholfen. Es wäre sehr hilfreich wenn es ein Video gibt, wie das mit den Ärmeln geht.
07.11.2018 - 20:41Elizabeth Arís wrote:
Las explicaciones no condicen con el modelo que se muestra que parece estar tejido a lo ancho y no desde en centro de la espalda como está dicho, saludos y gracias por las cosas hermosas que muestran y nos enseñan a hacer
27.09.2018 - 19:04
![]() Manon Cloutier wrote:
Manon Cloutier wrote:
Bonjour (merci)! Vous me dites que je fais les manches quand le gilet est terminer mais sur les 29 mailles emmanchures, je travail comment quand j'arrive là! Continuer en rond, comme avant, mais au-dessus des chaînettes des emmanchures, crocheter en brides et mailles serrées autour des mailles en l'air de ces chaînettes. La sorte de bride n'est pas écrite, ni la fréquence pour les mailles serrées! Je suis vraiment perdu
30.07.2018 - 18:11DROPS Design answered:
Bonjour Mme Cloutier, après avoir fait le tour des emmanchures (= 2 chaînettes de 29 ml et les mailles sautées dessous), crochetez le tour suivant comme avant, comme si vous n'aviez pas les ml: crochetez dans les chaînettes le même nombre de motifs (ml, brides) comme avant. Bon crochet!
31.07.2018 - 09:44
![]() Manon Cloutier wrote:
Manon Cloutier wrote:
Alors si je comprends vos explications, qui sont très appréciés en passant, je n'ai rien de plus à faire que de continuer et les nouveaux motifs en A.3 prendrons forme avec la progressions de mon travail????? Merci beaucoup pour votre précieuses aide, je serais vraiment mal prise si vous n'étiez pas là car au Québec, plus particulièrement dans ma région, c'est impossible de trouver quelqu'un pour de l'aide au crochet! Merci encore;-)
19.07.2018 - 20:02DROPS Design answered:
Bonjour Mme Cloutier, tout à fait, on continue simplement comme avant jusqu'à ce que le carré mesure les dimensions voulues pour la taille. Bon crochet!
20.07.2018 - 14:19
![]() Manon Cloutier wrote:
Manon Cloutier wrote:
Le modèle est vraiment géniale, ma fille a vraiment hâte de le porter;-)! J'aime le modèle mais j'avoue qu'à ma première lecture, j'ai eu le réflexe de cliquer sur le X! Il y a tellement de détail complexe à comprendre....moi à la fin de ma journée, j'ai le cerveau à off sinon je dors pas, je ne pense qu'aux explications...je déteste bloqué sur un ouvrage! Alors beau modèle mais explications compliqués... merci pour votre précieuse aide;-)
19.07.2018 - 13:54
![]() Manon Cloutier wrote:
Manon Cloutier wrote:
Répéter tous les tours de A.2b, A.3 et A.4b en hauteur, mais à chaque fois que l'on crochète 1 fois A.3 en hauteur et 2 fois A.2b et A.4b en hauteur, on a suffisamment de mailles pour crocheter 2 motifs de A.3 en plus le long de chaque côté du carré. Je ne comprends pas cette partie....je lis et relis mais malheureusement je n'ai pas de flash de génie.Je m'avoue vaincu, je suis nulle lol.SOS merci bcp bcp
19.07.2018 - 13:46DROPS Design answered:
Bonjour Mme Cloutier, A.2b montre les coins et le début de chaque motif avant A.3, A.4b montre la fin du motif après A.3 et juste avant A.2b, entre A.2b et A.4b on va crocheter A.3, à chaque fois que l'on crochète les diagrammes 1 fois en hauteur, on a plus de mailles dans A.2b et A.4b, ces "nouvelles" mailles vont se crocheter en A.3 juste après A.2b et juste avant A.4b = on a 2 motifs de A.3 en plus au motif suivant en hauteur. Bon crochet!
19.07.2018 - 14:37
![]() Isabel wrote:
Isabel wrote:
Hallo, ich verstehe leider den zweiten Absatz der Häkelinformation zu A.1 nicht ganz. Wie komme ich am Ende der 2. Runde von der festen Masche in das mittlere der 3 Stäbchen der vorherigen (=1.) Runde mit einer Kettmasche zum 3. Stäbchen der Runde? Können Sie das genauer erklären oder eben ein Video zu A.1 erstellen? Danke und mfg
01.05.2018 - 18:04Mária Schmidtova wrote:
Thank you very much. Will be the pattern translated to czech language? This is beautifull pattern and I am trying to work it but not fare than square 36 cm.
06.03.2018 - 17:15DROPS Design answered:
Dobrý den, ano - český překlad bude zveřejněn v nejbližších dnech. Hezký den! Hana
07.03.2018 - 07:26
|
|||||||||||||||||||||||||||||||||||||
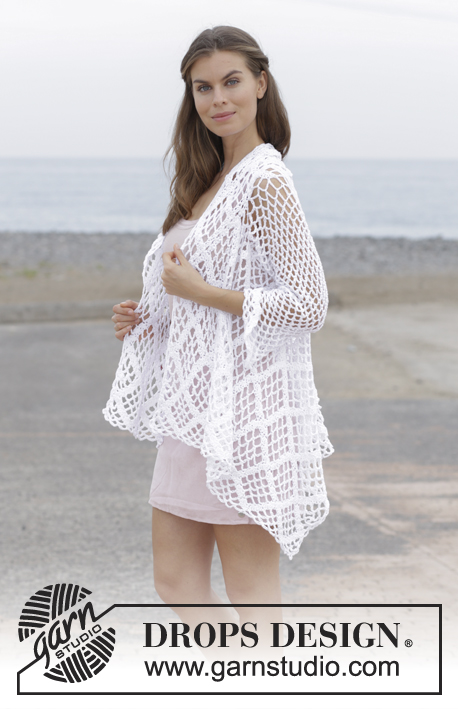
White Shore#whiteshorejacket |
|||||||||||||||||||||||||||||||||||||
 |
 |
||||||||||||||||||||||||||||||||||||
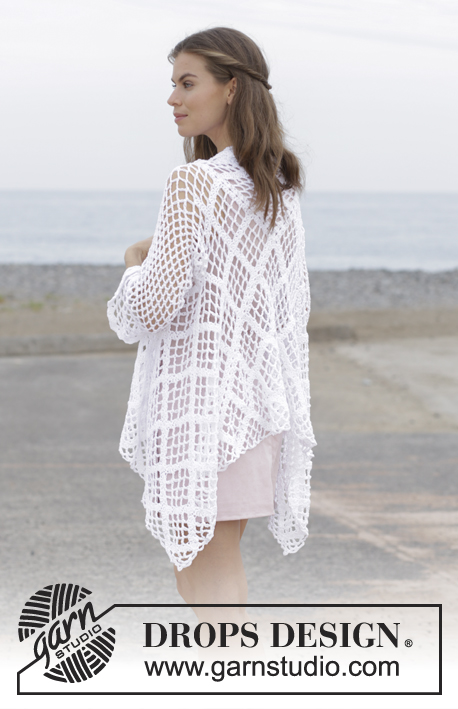
Crochet jacket with lace pattern, worked in a square from mid back outwards. Sizes S - XXXL. The piece is worked in DROPS Belle.
DROPS 187-7 |
|||||||||||||||||||||||||||||||||||||
|
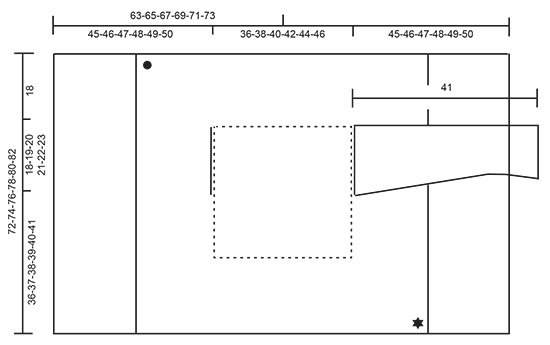
INFORMATION FOR THE PATTERN: PATTERN: See diagrams A.1 to A.6. CROCHET INFORMATION: At the beginning of each round with treble crochets replace first treble crochet with 3 chain stitches. The round finishes with 1 slip stitch in the 3rd chain stitch at the beginning of the round, then work slip stitches to the first chain-space on the round. DECREASE TIP (for sleeves): Work 1 double crochet around the next chain-space, but wait with the last pull through, work the next double crochet around the next chain-space (do not work the 6 chain stitches between the double crochets ), on the last pull through, pull the strand through all 3 loops on the hook. CROCHET TIP (for sleeves): After the last double crochet on the round, continue to the next round with 1 double crochet around the next chain-space (= the first chain-space on the next round). NOTE: Mark the beginning of the round with a marker thread between the last chain stitch on the round and the first double crochet on the next round; allow the marker thread to follow your work upwards. NOTE: Make sure the marker thread stays in the same place. ---------------------------------------------------------- JACKET: The piece is first crocheted in the round from mid back and outwards in a square, then continue back and forth on the front pieces in each side. The sleeves are crocheted in the round from the armholes down. SQUARE: Work 5 chain stitches with hook size 4.5 mm and Belle and form them into a ring with 1 slip stitch in the first chain stitch. Work pattern in the round from the round marked with an arrow in diagram A.1 a total of 4 repeats on the round – read CROCHET INFORMATION. REMEMBER THE CROCHET TENSION! When A.1 has been completed, the piece measures approx. 14 x 14 cm. Continue working in the round from the round with an arrow in each diagram as follows: * A.2a, A.3, A.4a *, work from *-* a total of 4 times in the round on each round. When A.2a and A.4a have been completed in height, work A.2b over A.2a and A.4b over A.4a. Repeat all rounds in A.2b, A.3 and A.4b in height, but for each time you finish A.3 once in height and A.2b and A.4b twice in height, work 2 more repeats of A.3 in width along each side of the square. When the piece measures 36-38-40-42-44-46 x 36-38-40-42-44-46 cm – adjust so that the last round worked is either round 2 or 4 in A.2b and A.4b, work the armholes as follows: Work pattern as before along the first side of the square (= towards the neck), work (3 treble crochets, 2 chain stitches, 3 treble crochets) around the chain-space in the corner, work 29-30-32-34-35-37 loose chain stitches, skip half the stitches/ chain-spaces along the next side of the square (= armhole) and work 1 double crochet around the next chain-space (= middle chain-space on the side), continue the pattern as before along the rest of this side and along the whole of the next side (= down along the body), work pattern as before as far as the middle chain-space along the next side, work 1 double crochet around the next chain-space (= the middle chain-space on the side), work 29-30-32-34-35-37 loose chain stitches, skip the remaining stitches/ chain-spaces along the side and finish with 1 slip stitch in the 3rd chain stitch at the start of the round, then work slip stitches as far as the chain-space in the corner. Continue with pattern in the round as before, but over the new chain stitches worked for the armholes, work treble crochets and double crochets around these chain stitches instead of in them. When the piece measures approx. 72-74-76-78-80-82 x 72-74-76-78-80-82 cm, the square is finished – adjust to after a complete repeat of A.2b, A.3b and A.4b in height. Cut the strand. Then finish working the front pieces separately back and forth. RIGHT FRONT PIECE: Start from the right side in the corner with a black star – see sketch, and work the same pattern back and forth as follows: Start on the row marked with a black square and work A.5 (= 1 double crochet around the chain-space in the corner and 1 double crochet in the 2nd treble crochet), work A.3 as before along the whole side, finish with A.6 (= 1 double crochet around the chain-space in the next corner). Turn and continue back and forth like this until the front piece measures 63-65-67-69-71-73 cm from the center of the square – adjust so that you finish after the last row in A.3. Cut and fasten the strand. LEFT FRONT PIECE: Left front piece is worked in the same way as the right front piece, but start from the right side by the corner marked with a black spot – see sketch. SLEEVE: The sleeves are worked in the round from the crochet square and down. Fasten the strand mid under the sleeve by working 1 double crochet. ROUND 1: Work * 6 chain stitches, 1 double crochet around the chain-space /row of chain stitches worked for the armhole *, work from *-* a total of 19-20-21-22-23-24 times around the armhole (= 19-20-21-22-23-24 chain-spaces). Read CROCHET TIP (for sleeves). Continue by working 6 chain stitches and 1 double crochet around each chain-space. When the piece measures 4 cm, decrease 1 chain-space before the marker thread – read DECREASE TIP! Decrease like this alternately on every other side of the marker thread, approx. every 8-8-7-6-6-6 cm a total of 4-4-5-6-6-6 times = 15-16-16-16-17-18 chain-spaces. When the piece measures 39 cm in all sizes, finish the round with 1 slip stitch in the first double crochet on round mid under sleeve. Now work an edge around the bottom of the sleeve as follows: Work 3 chain stitches at the beginning of the round, (3 treble crochets, 2 chain stitches, 3 treble crochets) around each of the chain-spaces, finish the round with 1 slip stitch in the 3rd chain stitch at the beginning of the round. Cut and fasten the strand. Work the other sleeve in the same way. CROCHET EDGE: Now work a finishing edge around the whole jacket as follows: Fasten the strand with 1 double crochet in the outermost stitch in the top corner on the right front piece. ROUND 1: Work * 6 chain stitches, 1 double crochet around the next chain-space /in the middle one of the 3 treble crochets in the treble crochet group between chain-spaces in the pattern *, work from *-* to end of round, but work an extra chain-space around the chain-space in each corner and when working along the sides of the front pieces, skip approx. 2 cm. Finish the round with 1 slip stitch in the first stitch on the round. |
|||||||||||||||||||||||||||||||||||||
Diagram explanations |
|||||||||||||||||||||||||||||||||||||
|
|||||||||||||||||||||||||||||||||||||
 |
|||||||||||||||||||||||||||||||||||||
 |
|||||||||||||||||||||||||||||||||||||
 |
|||||||||||||||||||||||||||||||||||||
Have you finished this pattern?Tag your pictures with #dropspattern #whiteshorejacket or submit them to the #dropsfan gallery. Do you need help with this pattern?You'll find 10 tutorial videos, a Comments/Questions area and more by visiting the pattern on garnstudio.com. © 1982-2026 DROPS Design A/S. We reserve all rights. This document, including all its sub-sections, has copyrights. Read more about what you can do with our patterns at the bottom of each pattern on our site. |
|||||||||||||||||||||||||||||||||||||


With over 40 years in knitting and crochet design, DROPS Design offers one of the most extensive collections of free patterns on the internet - translated to 17 languages. As of today we count 324 catalogues and 12290 patterns translated into English (UK/cm). 12290
We work hard to bring you the best knitting and crochet have to offer, inspiration and advice as well as great quality yarns at incredible prices! Would you like to use our patterns for other than personal use? You can read what you are allowed to do in the Copyright text at the bottom of all our patterns. Happy crafting!
Post a comment to pattern DROPS 187-7
We would love to hear what you have to say about this pattern!
If you want to leave a question, please make sure you select the correct category in the form below, to speed up the answering process. Required fields are marked *.