
Popular categories
Looking for a yarn?


Comments / Questions (38)
![]() Carolina Mancera wrote:
Carolina Mancera wrote:
Hola. Creo que si pusierais video/tutorial paso a paso de cada labor, seria de gran ayuda a la hora de llevar a cabo las labores tan hermosas que teneis aquí expuestas. Las labores son preciosas, pero sus instrucciones son escasas y dificiles al menos para mi. Tengo interés en varios modelos pero me es imposible de llevar a cabo. Mi enhorabuena por el trabajo. Daros las gracias de antemano. att
04.07.2020 - 22:15
![]() Carolina Mancera wrote:
Carolina Mancera wrote:
¿Podríais mandarme video tutorial de toda la labor paso a paso? no se como seguirlo. en Español. gracias. no soy muy docta en crochet/ganchillo. att.
04.07.2020 - 21:48DROPS Design answered:
Hola Carolina. No hacemos tutoriales personalizados. Todos los vídeos que te pueden ayudar en la elaboración del modelo los tienes bajo el patrón. Puedes también contactar con la tienda especializada de DROPS más cercana.
10.07.2020 - 20:34
![]() Dominique Davagle wrote:
Dominique Davagle wrote:
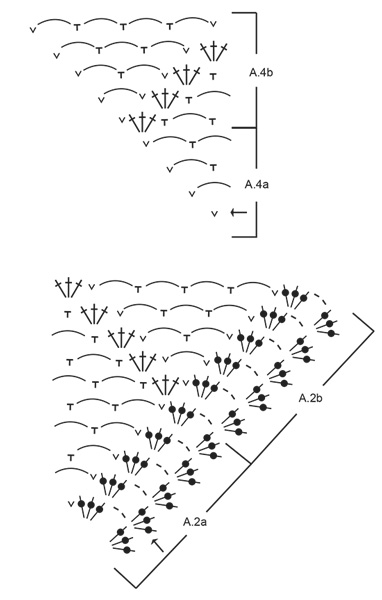
Désolée, je ne comprends toujours pas. J ai effectué une hauteur du diagramme et le dernier rang du A3, il n y a que des arceaux. Je débute le diagramme À 2b, j ai les 6 mailles en l air et je veux commencer le diagramme A3 et là, je suis sur un arceau, que faire ? Je dois bien avouer que je n ai pas compris votre réponse. Merci pour votre reponse
20.05.2020 - 16:19DROPS Design answered:
Bonjour Mme Davagle, quand A.3 (= 10 rangs) est terminé, la 1ère fois vous avez crocheté A.2a+A2b (5 rangs chacun). Reprenez maintenant au 1er rang de A.2b (répétez ces 5 rangs) et augmentez comme dans A.2b (les groupes de brides du coin), et crochetez maintenant A.3 en commençant par la rang avec le carré jusqu'au coin suivant, et terminez par A.4b (= 1 groupe de brides pour augmenter). Les losanges doivent continuer - essayez en reprenant les 10 rangs de A.2a/A.2b (A.4a, A.4b), ce sera probablement plus simple. Bon crochet!
22.05.2020 - 08:24
![]() DAVAGLE DOMINIQUE wrote:
DAVAGLE DOMINIQUE wrote:
Répéter tous les tours de A.2b, A.3 et A.4b en hauteur, mais à chaque fois que l'on crochète 1 fois A.3 en hauteur et 2 fois A.2b et A.4b en hauteur, on a suffisamment de mailles pour crocheter 2 motifs de A.3 en plus le long de chaque côté du carré. Lorsque l'on a fait une fois la hauteur, on doit recommencer A2b A3 et A4b mais le A3 va commencer dans un arceau ? Je dois bien avouer que je suis perdue
20.05.2020 - 15:19DROPS Design answered:
Bonjour Mme Davagle, quand A.2a et A.4a sont terminés, vous crochetez A.2b au-dessus de A.2a et A.4b au-dessus de A.4a, et vous continuez toujours ainsi = dans les coins, vous aurez A.2b et les côtés commencent par les premières mailles de A.2b puis vous répétez A.3 et vous terminez par A.4b avant le coin suivant. Comme vous augmentez à chaque motif en hauteur, vous pouvez répéter A.3 sur davantage de mailles à chaque fois entre les coins et le début/la fin des motifs. Bon croche!t
20.05.2020 - 15:53
![]() Laurent wrote:
Laurent wrote:
Bonjour’ Je trouve vos explications peu claires et confuses alors que je sais suivre un diagramme en crochet d art sans problème. Vous ne respectez pas les signes internationaux en matière de crochet. Pourquoi? Merci pour votre réponse. Cordialement.
17.04.2020 - 08:17DROPS Design answered:
Bonjour Mme Laurent, Les modèles DROPS sont réalisés par des milliers de personnes dans le monde entier. Nous comprenons toutefois qu’en fonction du pays, les explications puissent être formulées différemment. Nous faisons naturellement en sorte que nos modèles soient compréhensibles. Vous pouvez volontiers poser votre question ici, et pour toute assistance individuelle, vous adresser au magasin où vous avez acheté votre laine – même par mail ou téléphone. Bon crochet!
17.04.2020 - 09:22
![]() Carrole Lebel wrote:
Carrole Lebel wrote:
Bonjour! J’ai reçu un message courriel de votre part m’informant qu’une réponse à ma question a été donné . Par contre, aucune réponse n'a été donné à ma question. Pourriez-vous SVP me faire parvenir votre réponse à nouveau? Merci
23.09.2019 - 15:06DROPS Design answered:
Bonjour Mme Lebel, vos deux questions précédentes ont toutes deux reçu une réponse - cf ci-dessous. Bon crochet!
23.09.2019 - 15:25
![]() Carrole Lebel wrote:
Carrole Lebel wrote:
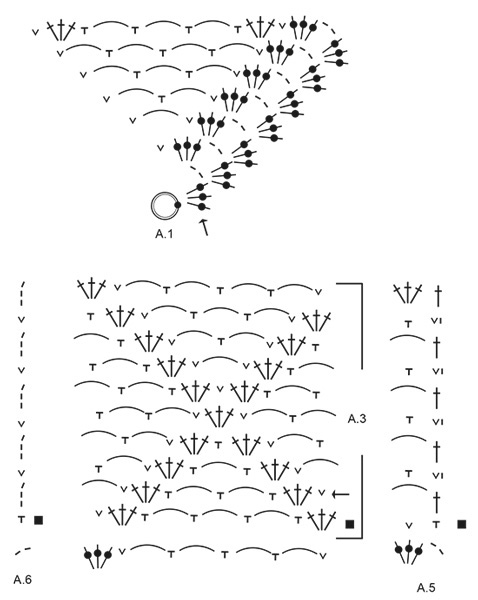
Merci pour votre réponse concernant le diagramme A5. C'est apprécié. . Ma question concerne le diagramme A.6. Est-ce que les trois symboles « l » illustrés verticalement dans le diagramme A.6 signifient 3 mailles en l'air (rangs 1, 3, 5, 7, 9, à partir de la flèche) même si leur graphie est différente? Merci!
23.09.2019 - 13:50DROPS Design answered:
Bonjour Mme Lebel, tout à fait, 1 tiret = 1 maille en l'air, donc dans A.5, on a 1 ml, 1 ms, et dans A.6, 1 ms en fin de rang et 3 ml en début de rang. Bon crochet!
23.09.2019 - 15:21
![]() Lebel, Carrole wrote:
Lebel, Carrole wrote:
Bonjour! J'ai deux questions. 1) Que veut dire le symbole « I » accompagnant VI que l'on retrouve dans A5 et le symbole « / » dans le diagramme A6? 2) Je n'arrive pas à repérer les endroits où il faut faire des double brides dans les schémas. Pourriez-vous m'indiquer où elles se trouvent SVP ? Mille mercis pour votre aide.
20.09.2019 - 21:29DROPS Design answered:
Bonjour Mme Lebel, le I correspond à 1 maille en l'air (= cf 2ème symbole de la légende) et le v à 1 maille serrée, vous allez ainsi commencer le rang par 1 maille en l'air, puis 1 maille serrée. Les diagrammes vont être vérifiés pour savoir si les double-brides sont utilisées, merci pour votre retour. Bon crochet!
23.09.2019 - 08:09
![]() Carrole Lebel wrote:
Carrole Lebel wrote:
Concernant la technique pour crocheter les emmanchures, vous avez proposé à une personne quelques photos expliquant une façon de faire sur le forum DROPS (DROPS Design 20.07.2018 kl. 14:26). Serait-il possible d’accéder à ces quelques photos car je suis perdue dans les explications écrites. Merci beaucoup pour m’aider dans la réalisation de ce projet.
13.09.2019 - 17:51DROPS Design answered:
Bonjour Mme Lebel, les photos sont momentanément indisponibles pour des raisons techniques. Pour crocheter les emmanchures, vous allez sauter des mailles du carré (côté carré = emmanchure dos) que vous allez remplacer par des mailles en l'air (= emmanchure coté devant). Au rang suivant, crochetez dans les chaînettes comme avant, autrement dit, comme s'il n'y avait pas eu ces deux "trous" pour les manches. Bon crochet!
16.09.2019 - 08:23
![]() Jean Whiting wrote:
Jean Whiting wrote:
I really don't understand this pattern! I've watched the video and completed the same as video and now it tell me to complete a2. But not sure where to start with it. Do I start from the arrow. And how many times do I have to do this pattern. I'm not sure how to follow on. This ain't a good guide.
14.07.2019 - 01:09DROPS Design answered:
Dear Mrs Whiting, after you have worked A.1, you now continue the same way but following new diagrams: A.2a in the corners, A.3 over the next stitches, and finish with A.4a before next corner. Continue that way following diagrams until the square has the right measurements. read more about diagrams here. Happy crocheting!
15.07.2019 - 11:38
|
|||||||||||||||||||||||||||||||||||||
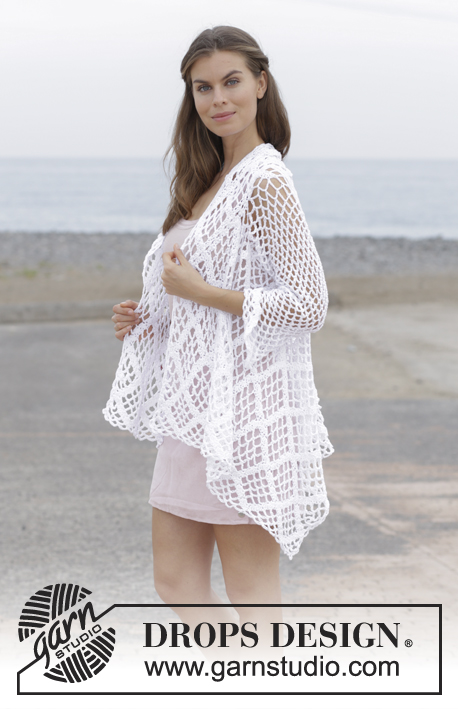
White Shore#whiteshorejacket |
|||||||||||||||||||||||||||||||||||||
 |
 |
||||||||||||||||||||||||||||||||||||
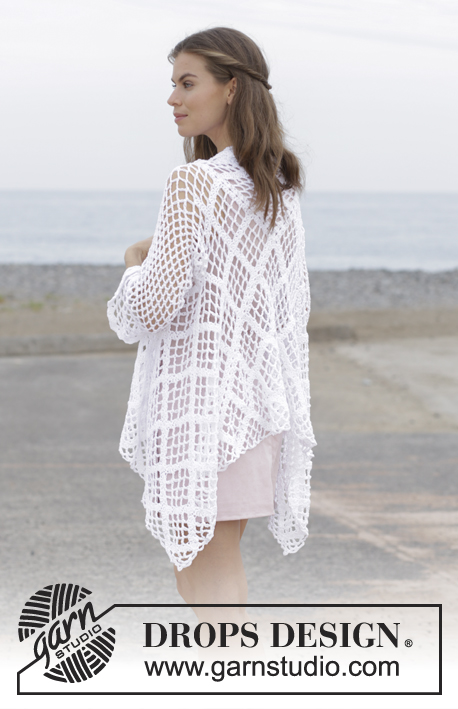
Crochet jacket with lace pattern, worked in a square from mid back outwards. Sizes S - XXXL. The piece is worked in DROPS Belle.
DROPS 187-7 |
|||||||||||||||||||||||||||||||||||||
|
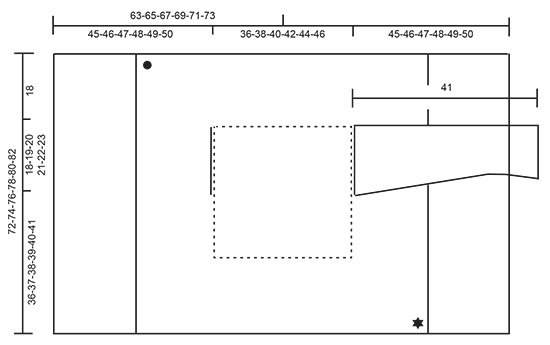
INFORMATION FOR THE PATTERN: PATTERN: See diagrams A.1 to A.6. CROCHET INFORMATION: At the beginning of each round with treble crochets replace first treble crochet with 3 chain stitches. The round finishes with 1 slip stitch in the 3rd chain stitch at the beginning of the round, then work slip stitches to the first chain-space on the round. DECREASE TIP (for sleeves): Work 1 double crochet around the next chain-space, but wait with the last pull through, work the next double crochet around the next chain-space (do not work the 6 chain stitches between the double crochets ), on the last pull through, pull the strand through all 3 loops on the hook. CROCHET TIP (for sleeves): After the last double crochet on the round, continue to the next round with 1 double crochet around the next chain-space (= the first chain-space on the next round). NOTE: Mark the beginning of the round with a marker thread between the last chain stitch on the round and the first double crochet on the next round; allow the marker thread to follow your work upwards. NOTE: Make sure the marker thread stays in the same place. ---------------------------------------------------------- JACKET: The piece is first crocheted in the round from mid back and outwards in a square, then continue back and forth on the front pieces in each side. The sleeves are crocheted in the round from the armholes down. SQUARE: Work 5 chain stitches with hook size 4.5 mm and Belle and form them into a ring with 1 slip stitch in the first chain stitch. Work pattern in the round from the round marked with an arrow in diagram A.1 a total of 4 repeats on the round – read CROCHET INFORMATION. REMEMBER THE CROCHET TENSION! When A.1 has been completed, the piece measures approx. 14 x 14 cm. Continue working in the round from the round with an arrow in each diagram as follows: * A.2a, A.3, A.4a *, work from *-* a total of 4 times in the round on each round. When A.2a and A.4a have been completed in height, work A.2b over A.2a and A.4b over A.4a. Repeat all rounds in A.2b, A.3 and A.4b in height, but for each time you finish A.3 once in height and A.2b and A.4b twice in height, work 2 more repeats of A.3 in width along each side of the square. When the piece measures 36-38-40-42-44-46 x 36-38-40-42-44-46 cm – adjust so that the last round worked is either round 2 or 4 in A.2b and A.4b, work the armholes as follows: Work pattern as before along the first side of the square (= towards the neck), work (3 treble crochets, 2 chain stitches, 3 treble crochets) around the chain-space in the corner, work 29-30-32-34-35-37 loose chain stitches, skip half the stitches/ chain-spaces along the next side of the square (= armhole) and work 1 double crochet around the next chain-space (= middle chain-space on the side), continue the pattern as before along the rest of this side and along the whole of the next side (= down along the body), work pattern as before as far as the middle chain-space along the next side, work 1 double crochet around the next chain-space (= the middle chain-space on the side), work 29-30-32-34-35-37 loose chain stitches, skip the remaining stitches/ chain-spaces along the side and finish with 1 slip stitch in the 3rd chain stitch at the start of the round, then work slip stitches as far as the chain-space in the corner. Continue with pattern in the round as before, but over the new chain stitches worked for the armholes, work treble crochets and double crochets around these chain stitches instead of in them. When the piece measures approx. 72-74-76-78-80-82 x 72-74-76-78-80-82 cm, the square is finished – adjust to after a complete repeat of A.2b, A.3b and A.4b in height. Cut the strand. Then finish working the front pieces separately back and forth. RIGHT FRONT PIECE: Start from the right side in the corner with a black star – see sketch, and work the same pattern back and forth as follows: Start on the row marked with a black square and work A.5 (= 1 double crochet around the chain-space in the corner and 1 double crochet in the 2nd treble crochet), work A.3 as before along the whole side, finish with A.6 (= 1 double crochet around the chain-space in the next corner). Turn and continue back and forth like this until the front piece measures 63-65-67-69-71-73 cm from the center of the square – adjust so that you finish after the last row in A.3. Cut and fasten the strand. LEFT FRONT PIECE: Left front piece is worked in the same way as the right front piece, but start from the right side by the corner marked with a black spot – see sketch. SLEEVE: The sleeves are worked in the round from the crochet square and down. Fasten the strand mid under the sleeve by working 1 double crochet. ROUND 1: Work * 6 chain stitches, 1 double crochet around the chain-space /row of chain stitches worked for the armhole *, work from *-* a total of 19-20-21-22-23-24 times around the armhole (= 19-20-21-22-23-24 chain-spaces). Read CROCHET TIP (for sleeves). Continue by working 6 chain stitches and 1 double crochet around each chain-space. When the piece measures 4 cm, decrease 1 chain-space before the marker thread – read DECREASE TIP! Decrease like this alternately on every other side of the marker thread, approx. every 8-8-7-6-6-6 cm a total of 4-4-5-6-6-6 times = 15-16-16-16-17-18 chain-spaces. When the piece measures 39 cm in all sizes, finish the round with 1 slip stitch in the first double crochet on round mid under sleeve. Now work an edge around the bottom of the sleeve as follows: Work 3 chain stitches at the beginning of the round, (3 treble crochets, 2 chain stitches, 3 treble crochets) around each of the chain-spaces, finish the round with 1 slip stitch in the 3rd chain stitch at the beginning of the round. Cut and fasten the strand. Work the other sleeve in the same way. CROCHET EDGE: Now work a finishing edge around the whole jacket as follows: Fasten the strand with 1 double crochet in the outermost stitch in the top corner on the right front piece. ROUND 1: Work * 6 chain stitches, 1 double crochet around the next chain-space /in the middle one of the 3 treble crochets in the treble crochet group between chain-spaces in the pattern *, work from *-* to end of round, but work an extra chain-space around the chain-space in each corner and when working along the sides of the front pieces, skip approx. 2 cm. Finish the round with 1 slip stitch in the first stitch on the round. |
|||||||||||||||||||||||||||||||||||||
Diagram explanations |
|||||||||||||||||||||||||||||||||||||
|
|||||||||||||||||||||||||||||||||||||
 |
|||||||||||||||||||||||||||||||||||||
 |
|||||||||||||||||||||||||||||||||||||
 |
|||||||||||||||||||||||||||||||||||||
Have you finished this pattern?Tag your pictures with #dropspattern #whiteshorejacket or submit them to the #dropsfan gallery. Do you need help with this pattern?You'll find 10 tutorial videos, a Comments/Questions area and more by visiting the pattern on garnstudio.com. © 1982-2026 DROPS Design A/S. We reserve all rights. This document, including all its sub-sections, has copyrights. Read more about what you can do with our patterns at the bottom of each pattern on our site. |
|||||||||||||||||||||||||||||||||||||


With over 40 years in knitting and crochet design, DROPS Design offers one of the most extensive collections of free patterns on the internet - translated to 17 languages. As of today we count 324 catalogues and 12290 patterns translated into English (UK/cm). 12290
We work hard to bring you the best knitting and crochet have to offer, inspiration and advice as well as great quality yarns at incredible prices! Would you like to use our patterns for other than personal use? You can read what you are allowed to do in the Copyright text at the bottom of all our patterns. Happy crafting!
Post a comment to pattern DROPS 187-7
We would love to hear what you have to say about this pattern!
If you want to leave a question, please make sure you select the correct category in the form below, to speed up the answering process. Required fields are marked *.