
Popular categories
Looking for a yarn?


Comments / Questions (14)
![]() Lena Jarl wrote:
Lena Jarl wrote:
Jag är så besviken. Jag har stickat en dam och en herr narviktröja i merino extra fine. När jag tvättat dem i maskin 40 grader blev de en till två storlekar större. Läste extra noga på er hemsida vad som gällde för garnet. Varför blir det så? Har ni något förslag på vad jag kan göra för att tröjorna ska kunna användas? /Lena
01.08.2021 - 20:12DROPS Design answered:
Hei Lena. Det var kjedelig å høre. Den spesielle oppbyggingen av DROPS Merino Extra Fine gjør garnet ekstra elastisk. Det er derfor viktig å ha riktig strikkefasthet for å unngå at plagget strekkes. Ved vask må også vaske anvisningen følges (ikke ullvask eller finvask) og den må tørkes flatt i fasong. Ha hørt at mange som har vasket plagg i Merino feil (har blitt for stor), har tørket den i tørketrommel. Har da fått størrelsen og fasong tilbake. Kanskje verdt et forsøk? mvh DROPS design
12.08.2021 - 07:25
![]() Gurli Rasmussen wrote:
Gurli Rasmussen wrote:
Jeg er i gang med diagram A2 til Narvik Sweater nr 185-6. Hvordan gør jeg med udtagningerne med slå om masker, når der er mønsterpinde ? f.eks 3 m hvid 1 m grå og efter 16 m lav et omslag, så bliver der jo 4 m mellem de grå og det hele er forskudt ? eller vil det ikke ses ? På forhånd tak :)
08.07.2021 - 21:56DROPS Design answered:
Hej Gurli, ja det stemmer og det gør ikke noget. Hvis du absolut ikke vil have 4 masker imellem, så kan du lave udtagningen på næste pind istedet for.... :)
13.07.2021 - 15:37
![]() Spbrkr wrote:
Spbrkr wrote:
If you want to avoid the jog (or "step") at the beginning of each fair-isle round, go to Youtube and search for "jogless jog". There are techniques that make the start of the new round almost invisible in the fair isle. Happy knitting!
08.06.2020 - 22:08
![]() Julia wrote:
Julia wrote:
Hallo, gibt es einen Trick, wie man die Stufe am Rundenanfang verhindert, die entsteht, wenn man ein Norweger-Fair Isle Muster in Runden strickt? Die Methode mit dem Aufheben der unteren Masche wie im Vido erklärt fällt auf, wenn man sie mehrere Runden hintereinander macht. Viele Grüße/ Hello, is there a trick on how to avoid the "step" at the beginning of each round that comes from circular knitting? The method described in the video is unfortunately visible. Greetings
03.03.2020 - 12:44
![]() Christina wrote:
Christina wrote:
Guten Abend! Ich möchte zur Bestimmung der zu strickenden Größe gern wissem wie sich das Garn nach dem Waschen verhält. Für diese Anleitung habe ich mir die Drops Lima ausgesucht. Mir ist so, als würde Schurwolle nach dem Waschen ein wenig 'ausleiern', also das Strickobjekt größer werden?! Dann müsste ich für die gewünschte Größe XL (eigentlich nur wegen der breiten Schultern) eine L stricken? Viele Grüße!
30.12.2019 - 20:31DROPS Design answered:
Liebe Christina, am besten waschen Sie immer Ihre Maschenprobe bevor Sie das Modell stricken, Maschenprobe auch mal trocknen lassen, und nochmal messen, und wenn nötig die Nadlegrösse anpassen. Ihr DROPS Laden wird für Sie noch mehr Tipps haben. Viel Spaß beim stricken!
02.01.2020 - 17:13
![]() Frøydis wrote:
Frøydis wrote:
Jeg har strikket en annen genser hvor det også skulle legges ut masker nederst på bolen før man skulle strikke vrangbord. Det ble ikke pent, altfor romslig. Jeg tok det opp igjen og strikket vrangborden uten å legge opp nye masker, og det ble bedre. Jeg kommer ikke til å øke maskeantallet før jeg strikker vrangborden nederst på denne.
23.08.2019 - 16:24
![]() Cecilie Horn wrote:
Cecilie Horn wrote:
Stemmer det virkelig at man skal legge ut masker like før vrangborden nederst på genseren? Det normale er jo at det er færre masker i vrangborden.
10.02.2019 - 15:07
![]() Naida wrote:
Naida wrote:
Buon giorno che tg ha il modello
04.02.2019 - 16:33
![]() Mette wrote:
Mette wrote:
Hej Hvorfor er der valgt at udtagning gøres med omslag i stedet for at gøre det med usynlige udtagning som i også har i jeres teknik videoer? Med venlig hilsen Mette
14.09.2018 - 01:39DROPS Design answered:
Hej Mette, vi vælger gerne at bruge lidt forskellige udtagninger, men du skal naturligvis bare bruge den du synes bliver pænest. God fornøjelse!
17.09.2018 - 12:54
![]() Anne wrote:
Anne wrote:
Hei, jeg får ikke sett på oppskriften og aner ikke hvordan denne genseren ser ut. Får ikke opp bilde. Har prøvd Google og Microsoft og Firefox. Gjelder oppskrift Drops 185-6
10.09.2018 - 09:13DROPS Design answered:
Hei Anne. Vi har for øyeblikket tekniske problemer med siden vår, dette medfører at diagrammer og bilder dessverre ikke lastes ordentlig. Vi jobber med å løse problemet, og siden vil være tilbake som normalt så snart som mulig. Du kan følge med på vår twitter eller facebookside for oppdateringer. Beklager dette
10.09.2018 - 11:50
|
||||||||||||||||
Narvik#narviksweater |
||||||||||||||||
 |
 |
|||||||||||||||
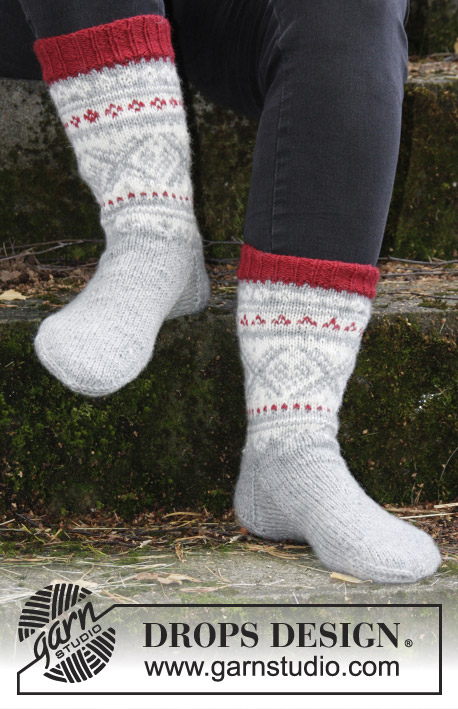
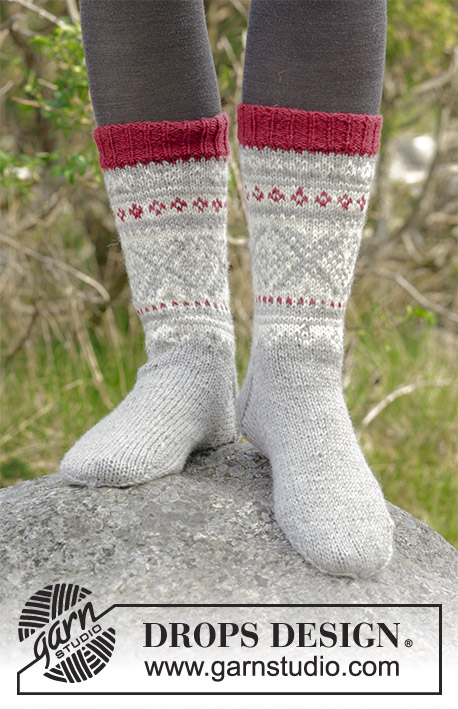
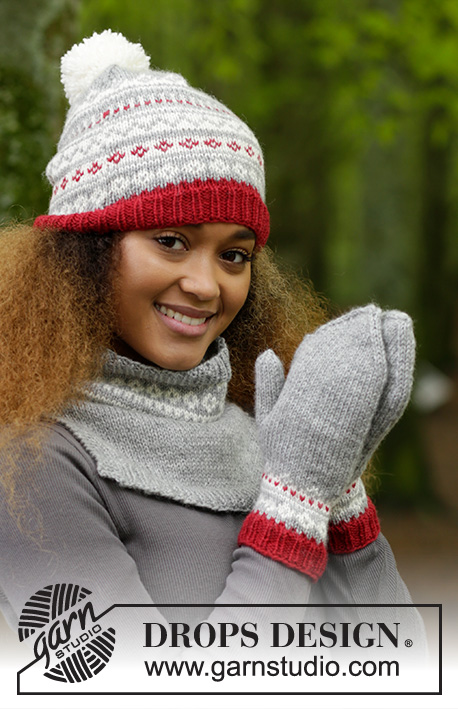
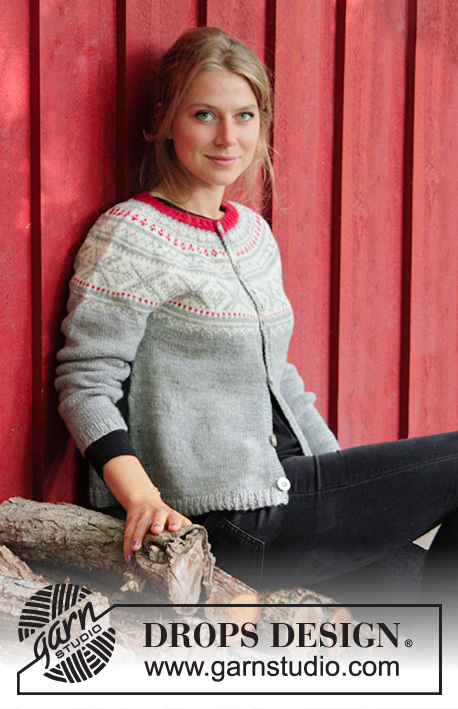
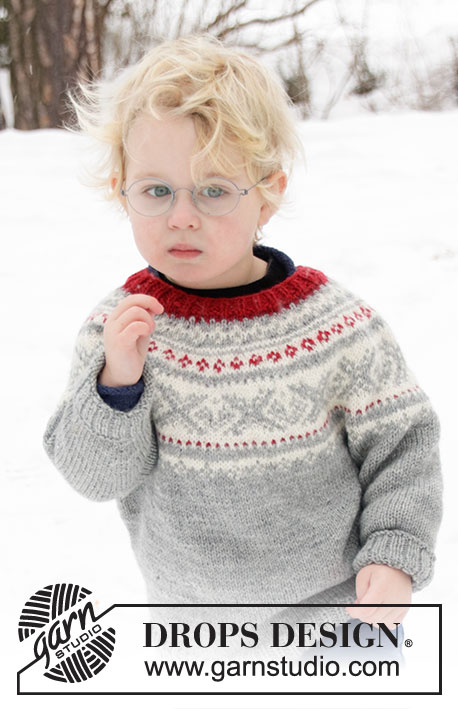
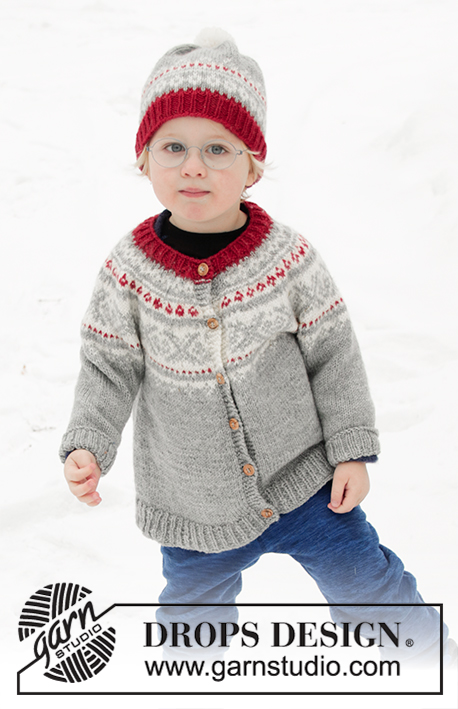
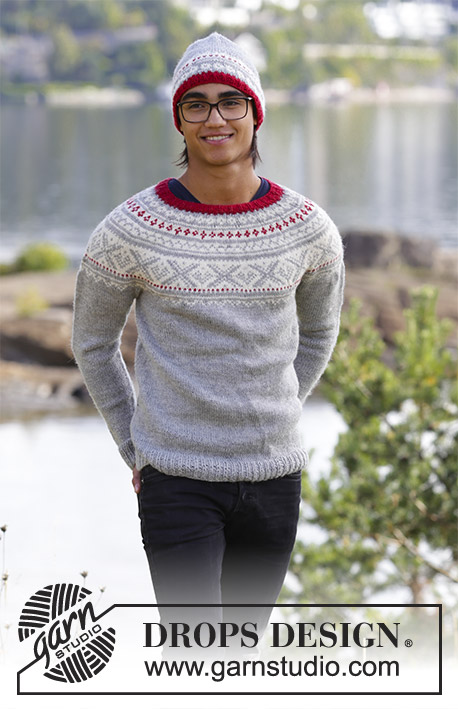
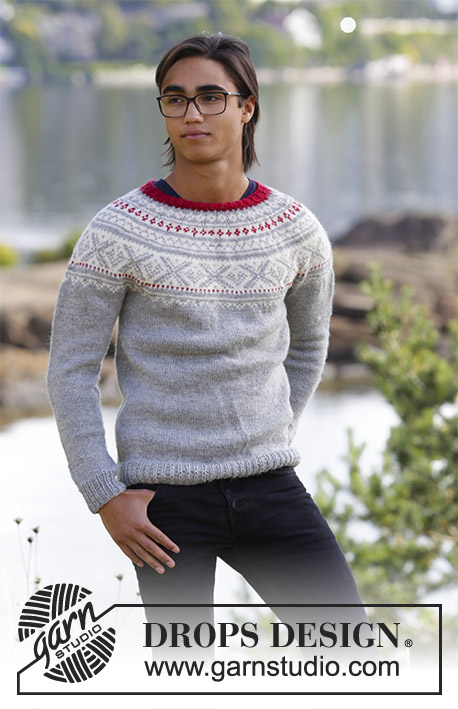
The set consists of: Men’s knitted jumper with round yoke and multi-coloured Nordic pattern, worked top down and men’s knitted hat with multi-coloured Nordic pattern. Sizes S - XXXL. The piece is worked in DROPS Merino Extra Fine.
DROPS 185-6 |
||||||||||||||||
|
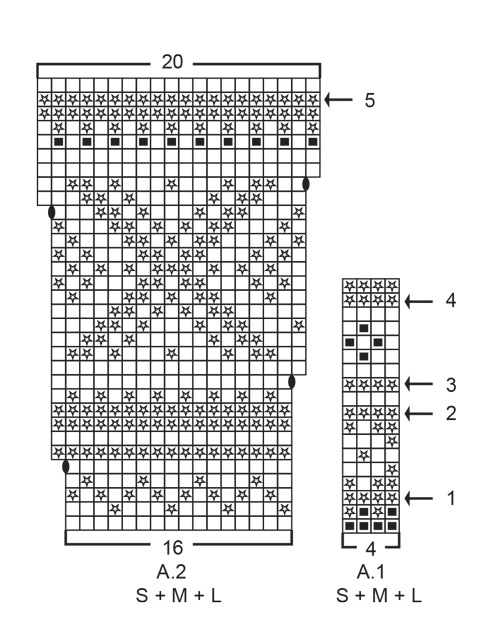
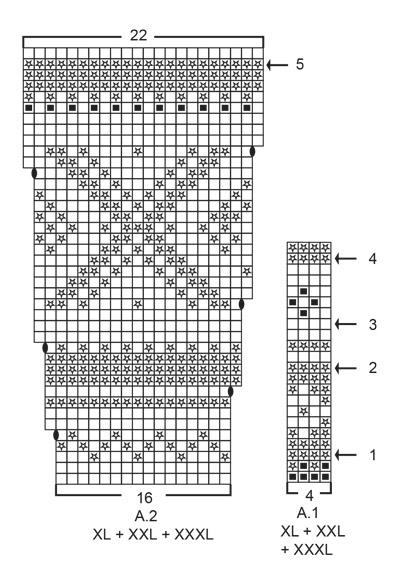
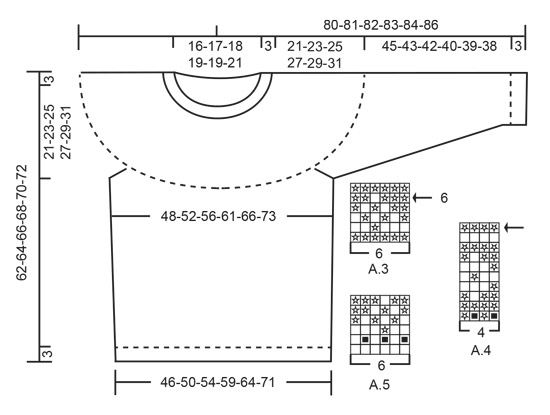
INFORMATION FOR THE PATTERN: INCREASE/DECREASE TIP: To work out how to increase/decrease evenly, count the total number of stitches on needle (e.g. 96 stitches) and divide by the number of increases/decreases to be made (e.g. 28) = 3.4. In this example, increase by making approx. 1 yarn over after alternately every 3rd and 4th stitch. On the next round knit the yarn overs twisted to avoid holes. If you are decreasing, knit together alternately every 3rd and 4th stitch and every 4th and 5th stitch. PATTERN: Jumper: See diagrams A.1 to A.3. Choose diagram for your size. Hat: See diagrams A.4 and A.5. The whole pattern is worked in stocking stitch. KNITTING TIP: To avoid the knitting tension becoming tighter when working pattern, it is important that the strands at the back of the piece do not pull. You can use a needle size larger when working pattern if this is a problem. INCREASE TIP (for sides in body): Start 2 stitches before marker thread, make 1 yarn over, knit 4 (marker thread sits in middle of these 4 stitches), make 1 yarn over (= 2 stitches increased). On the next round, knit the yarn overs twisted to avoid holes. DECREASE TIP (for sides in body and mid under sleeve): Start 3 stitches before marker thread, knit 2 together, knit 2 (marker thread sits in middle of these 2 stitches), slip 1 stitch as if to knit, knit 1, pass the slipped stitch over the knitted stitch (= 2 stitches decreased). ---------------------------------------------------------- JUMPER: The piece is worked in the round with circular needle from mid back, top down. After the neck you can work an elevation, back and forth mid back of neck to give a better fit, so that the neck is a little higher at the back – this elevation can be skipped – see text. After the elevation, the yoke and body is worked in the round with circular needle. The sleeves are worked in the round with double pointed needles, top down. NECK: Cast on 96-99-105-108-111-117 stitches with circular needle size 3 mm and red. Knit 1 round. Then work rib (knit 1 / purl 2). When the rib measures 3 cm knit 1 round where you increase 28-33-39-40-41-43 stitches evenly on round – read INCREASE/DECREASE TIP = 124-132-144-148-152-160 stitches. Then continue yoke as described below. YOKE: Read KNITTING TIP! Change to circular needle size 4 mm and knit 1 round. Now you can work an elevation in back of neck if you wish, or go straight to working the yoke. ELEVATION IN BACK OF NECK: Skip this section if you do not wish an elevation. Insert 1 marker at the beginning of the round = mid back. Start from the right side with red and knit 12-13-14-15-16-17 stitches past the marker, turn, tighten the strand and purl 24-26-28-30-32-34 stitches. Turn, tighten the strand and knit 36-39-42-45-48-51 stitches, turn, tighten the strand and purl 48-52-56-60-64-68 stitches. Turn, tighten the strand and knit 60-65-70-75-80-85 stitches, turn, tighten the strand and purl 72-78-84-90-96-102 stitches. Turn, tighten the strand and knit to mid back. When the elevation has been completed, work A.1 in the round (= 31-33-36-37-38-40 repeats of 4 stitches). Continue the pattern in this way and increase at the same time on every round marked with an arrow in A.1 as described below – read INCREASE/DECREASE TIP and REMEMBER THE KNITTING TENSION! On the round with arrow-1 increase 28-32-36-36-36-40 stitches evenly on round = 152-164-180-184-188-200 stitches. On the round with arrow-2 increase 24-28-36-32-36-36 stitches evenly on round = 176-192-216-216-224-236 stitches. On the round with arrow-3 increase 24-24-28-28-32-36 stitches evenly on round = 200-216-244-244-256-272 stitches. On the round with arrow-4 increase 24-24-28-28-32-32 stitches evenly on round = 224-240-272-272-288-304 stitches. When A.1 has been completed work A.2 in the round (= 14-15-17-17-18-19 repeats of 16 stitches). Continue the pattern in this way and increase as shown in the diagram. After the last increase in A.2 there are 280-300-340-374-396-418 stitches on the needle. Continue A.2 and increase at the same time 2-6-2-4-0-2 stitches evenly on the round with arrow-5 in A.2 = 282-306-342-378-396-420 stitches. When A.2 has been completed, work A.3 in the round (= 47-51-57-63-66-70 repeats of 6 stitches). Continue the pattern in this way. AT THE SAME TIME on the round with arrow-6 in A.3 increase 24-32-20-14-16-22 stitches evenly on round = 306-338-362-392-412-442 stitches. When A.3 has been completed, the piece measures approx. 23-23-23-27-27-27 cm from the cast-on edge mid front. Continue with stocking stitch and light grey until the piece measures 24-26-28-30-32-34 cm from the cast-on edge mid front. The next round is worked as follows: Knit 46-50-53-59-63-69 stitches (= ½ back piece), place the next 60-68-74-78-80-82 stitches on a thread for sleeve, cast on 8-8-10-10-12-14 new stitches on needle (= in side under sleeve), knit 93-101-107-118-126-139 stitches (= front piece), place the next 60-68-74-78-80-82 stitches on a thread for sleeve, cast on 8-8-10-10-12-14 new stitches on needle (= in side under sleeve) and knit the remaining 47-51-54-59-63-70 stitches (= ½ back piece). Body and sleeves are now finished separately. THE PIECE IS NOW MEASURED FROM HERE! BODY: = 202-218-234-256-276-306 stitches. Insert 1 marker thread in the middle of the 8-8-10-10-12-14 stitches cast on under the sleeve in each side. Start the round by one of the marker threads and work stocking stitch with light grey. When the piece measures 4 cm from the separation decrease 1 stitch on each side of both marker threads – read DECREASE TIP (= 4 stitches decreased). Repeat the decrease when the piece measures 25 cm = 194-210-226-248-268-298 stitches. Continue until the piece measures 35 cm in all sizes. Knit 1 round where you increase 43-45-50-55-59-65 stitches evenly on round = 237-255-276-303-327-363 stitches. Change to circular needle size 3 mm and work rib in the round (= knit 1 / purl 2) for 3 cm. Cast off with knit over knit and purl over purl, but to avoid the cast-off edge being tight, make 1 yarn over after every 6th stitch AT THE SAME TIME as casting off (the yarn overs are cast off as normal stitches). The jumper measures approx. 62-64-66-68-70-72 cm from the shoulder down. SLEEVE: Place the 60-68-74-78-80-82 stitches from the thread in one side of the piece on short circular needle size 4 mm. In addition, knit up 1 stitch in each of the 8-8-10-10-12-14 stitches cast on under the sleeve = 68-76-84-88-92-96 stitches on needle. Insert 1 marker thread in the middle of the 8-8-10-10-12-14 stitches (= mid under sleeve). Work stocking stitch in the round with light grey. When the piece measures 4 cm from the separation, decrease 2 stitches mid under the sleeve – Remember DECREASE TIP. Decrease in this way every 13th-9th-7th-6th-5th-5th round a total of 9-12-15-16-18-19 times = 50-52-54-56-56-58 stitches. When the sleeve measures 45-43-42-40-39-39 cm from the separation (shorter measurements in the larger sizes because of longer yoke), knit 1 round where you increase 7-8-6-7-7-8 stitches evenly on round = 57-60-60-63-63-66 stitches. Change to double pointed needles size 3 mm. Work rib in the round (= knit 1 / purl 2) for 3 cm. Cast off with knit over knit and purl over purl, but to avoid the cast-off edge being tight, make 1 yarn over after every 6th stitch at the same time as casting off (the yarn overs are cast off as normal stitches). The sleeve measures approx. 48-46-45-43-42-41 cm from the separation and down. Work the other sleeve in the same way. ---------------------------------------------------------- HAT: The piece is worked in the round with circular needle, bottom up. Change to double pointed needles when necessary. Cast on 114-123 stitches with circular needle size 3 mm and red. Knit 1 round. Then work rib (= knit 1 / purl 2) for 2 cm. Knit 1 round where you decrease 2-3 stitches evenly on round – read INCREASE/DECREASE TIP = 112-120 stitches. Change to circular needle size 3.5 mm and work pattern A.4 (= 28-30 repeats of 4 stitches). REMEMBER THE KNITTING TENSION! On the last round of A.4 increase 2-0 stitches evenly on round = 114-120 stitches. Then work A.5 in the round (= 19-20 repeats of 6 stitches). When A.5 has been completed the piece measures approx. 7 cm. Continue with stocking stitch and light grey. When the piece measures 18-20 cm decrease 2-0 stitches evenly on round = 112-120 stitches. Insert 8 marker threads in the piece with 14-15 stitches between each. On the next round decrease 1 stitch after each marker thread by knitting 2 stitches together (= 8 stitches decreased). Decrease in this way every 2nd round a total of 9 times = 40-48 stitches. On the next round knit all stitches together 2 and 2 = 20-24 stitches. Cut the strand, pull it through the remaining stitches, tighten and fasten well. The hat measures approx. 27-29 cm from the top down. |
||||||||||||||||
Diagram explanations |
||||||||||||||||
|
||||||||||||||||
 |
||||||||||||||||
 |
||||||||||||||||
 |
||||||||||||||||
Have you finished this pattern?Tag your pictures with #dropspattern #narviksweater or submit them to the #dropsfan gallery. Do you need help with this pattern?You'll find 30 tutorial videos, a Comments/Questions area and more by visiting the pattern on garnstudio.com. © 1982-2026 DROPS Design A/S. We reserve all rights. This document, including all its sub-sections, has copyrights. Read more about what you can do with our patterns at the bottom of each pattern on our site. |
||||||||||||||||


With over 40 years in knitting and crochet design, DROPS Design offers one of the most extensive collections of free patterns on the internet - translated to 17 languages. As of today we count 324 catalogues and 12290 patterns translated into English (UK/cm). 12290
We work hard to bring you the best knitting and crochet have to offer, inspiration and advice as well as great quality yarns at incredible prices! Would you like to use our patterns for other than personal use? You can read what you are allowed to do in the Copyright text at the bottom of all our patterns. Happy crafting!
Post a comment to pattern DROPS 185-6
We would love to hear what you have to say about this pattern!
If you want to leave a question, please make sure you select the correct category in the form below, to speed up the answering process. Required fields are marked *.