
Popular categories
Looking for a yarn?


Comments / Questions (17)
![]() Janice Connelly wrote:
Janice Connelly wrote:
It talks about pattern 1 and pattern 2 and pattern 3. Can\'t see anything labelled such. I presume the cable diagram is pattern1 but will have to quess from the pictures about the others. Thanks for your help
20.06.2018 - 01:56DROPS Design answered:
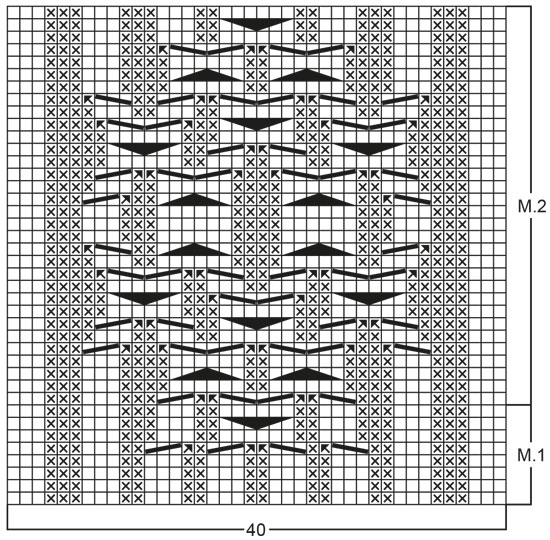
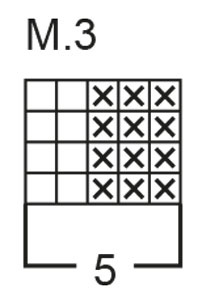
Dear Mrs Connelly, Pattern-1, 2 and 3 are the diagrams at the bottom of the page called M.1, M.2 and M.3. Read the diagrams starting at the bottom corner on the right side towards the left from RS and from the left towards the right from WS. Happy knitting!
20.06.2018 - 08:24Giuseppina wrote:
Salve! Cercavo un modello su Raverly ed ho trovato questo fantastico cardigan! Per favore potete fare la traduzione in italiano? Per favore! Per favore! Grazie. Hi! I was looking for a model on Raverly and I found this fantastic cardigan! Please can you do the translation in Italian? Please! Please! Thank you.
23.01.2018 - 16:32DROPS Design answered:
Buongiorno Giuseppina. Tradurremo il modello in italiano. Cercheremo di farlo quanto prima. Buon lavoro!
23.01.2018 - 16:57
![]() Lily Thijssen wrote:
Lily Thijssen wrote:
Ik wil even laten weten dat het kwartje bij mij gevallen is. Met Uw antwoord schoot ik nog niet veel op, want het was eigenlijk hetzelfde wat er in de beschrijving stond. Na veel peinzen, kwam ik tot de ontdekking dat ik eerst het rugpand aan het breien was en dadelijk ga ik de voorpanden pas doen. Ik brei nu weer vrolijk verder. Bedankt voor de hulp. gr. Lily
08.11.2016 - 20:14
![]() Lily wrote:
Lily wrote:
Ik ben uiteindelijk aan dit vest begonnen maar snap niet hoe jullie de mindering voor het armsgat in het voor en achterpand, bedoelen. Normaal kant ik aan het begin van de naald af. Nu hebben jullie het over "binnen 7 steken". Ik hoop dat jullie het mij duidelijk kunnen maken, dan kan ik weer verder. Alvast bedankt. Lily
05.11.2016 - 19:45DROPS Design answered:
Hoi Lily. Je kant eerst 8 st af, daarna ga je minderen naast de eerste 7 st (dus naast de 2 av, 2, r, 3 av aan de zijkant) Je mindert door samen te breien zoals er staat in Tip Breien aan het begin van het patroon.
07.11.2016 - 12:27
![]() Lily Thijssen wrote:
Lily Thijssen wrote:
Ik wil aan dit vest beginnen en nou zie ik een opmerking dat er iets niet klopt in de beschrijving. Geldt dit ook voor de Nederlandse beschrijving? En wat wordt er bedoeld met P 3, K 5, K 1, want dat zie ik in het patroon niet terug. En klopt het dat bij patroon M3 dat er 3 linkse en 2 rechtse steken moeten zijn. Als ik naar de foto kijk lijkt het alsof het 3 rechtse en 2 linkse steken moeten zijn. Alvast hartelijk dank, voor het antwoord. Lily Thijssen.
30.07.2016 - 23:28DROPS Design answered:
Hoi Lily. Als er een fout was in het patroon, dan zou het hersteld moeten zijn. De online versie heeft altijd de nieuwste versie.
02.08.2016 - 14:44
![]() DROPS / Lena wrote:
DROPS / Lena wrote:
Yes, there was a mistake. 9 sts on frontband are knitted from RS: P 3, K 5, K 1 (edge st knit in garter st throughout) – the last 9 sts are the button band.
16.11.2007 - 16:22
![]() Cindy Madden wrote:
Cindy Madden wrote:
I believe there is a mistake in the English translation in the buttonband set up row. Instead of K3,P5,K1 for the band, it appears to me that it should be P3,K5,P1. The sweater is beautiful, and I believe a lot of Ravelry knitters are looking to knit it, so this will help with confusion.
16.11.2007 - 12:57
|
|||||||||||||||||||
Oceans Song |
|||||||||||||||||||
|
|
|||||||||||||||||||
Knitted jacket with cable pattern in DROPS Alpaca. Size: S-L
DROPS 66-6 |
|||||||||||||||||||
|
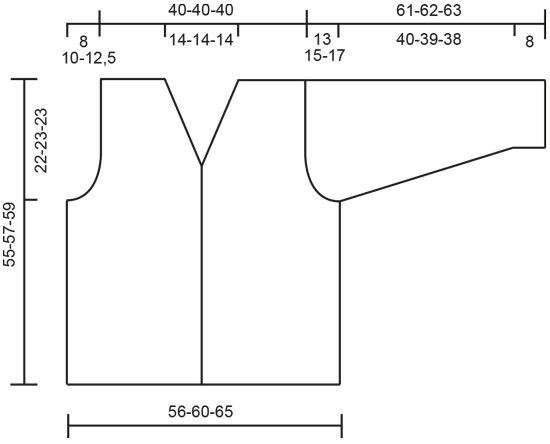
Gauge: 24 sts x 32 rows in stockinette st = 10 x 10 cm. Garter st, when knitting flat: Knit all sts, all rows. Pattern: See charts. The pattern is seen from the right side. Knitting tip (for decreasing for armholes): All decs are made on right side rows, inside the 7 sts at the edge (P2, K2, P3). Purl the 7th and 8th sts together. Left front: Cast on 94-99-104 sts. Row 1 (right side) knit as follows from side edge: K 1 (edge st knit in garter st throughout), K 1, 43-48-53 sts of Pattern 3, Pattern 1 (40 sts), P 3, K 5, K 1 (edge st knit in garter st throughout) – the last 9 sts are the button band. Continue with pattern as established over all sts. After Pattern 1 is complete, continue in Pattern 2. When the piece measures 33-34-36 cm bind off 8 sts at the side for armhole = 86-91-96 sts. Continue decreasing 1 st at armhole edge 10-15-20 times every other row - see knitting tips! At the same time, when the piece measures 36-37-38 cm shape the neck as follows: Put 1 marker at each side of Pattern 2. Now dec at markers as follows: at the first marker (center front), dec in Pattern 2, (before the 9 edge sts), at the second marker dec in Pattern 3 (after Pattern 2). All decs are on the right side row. At first marker towards mid front decrease by purling together the stitch to decrease with the first stitch in M.2 and at the 2nd marker decrease by knitting together the stitch to decrease in M.2 with the first front band stitch. Dec 1 st every other row 6-6-6 times at the first marker and at the same time 1 st every other row 15-15-15 times at the second marker = 55-55-55 sts remain on each shoulder. When the piece measures 55-57-59 cm dec 14-14-14 sts by K 2 tog across the 28 sts over cables and at the same time dec 1 st over de 3 K sts on the right side of cables = 40-40-40 sts. On the next row bind off all sts except the 6 sts at the center front. Cast on 1 new sts on the shoulder side of these sts = 7 sts. Knit in stockinette st keep 1 st in garter st at each side, for 7 cm - bind off. This band goes across the back neck. Right front: Knit the same as the left, reversing all shaping. Make buttonholes as follows: on wrong side row bind off the 8th and 9th sts from center front and on the next row cast on 2 new sts over the bound off sts. Make buttonholes when the piece measures: 1-1-1 cm, 8-9-9 cm, 15-16-17 cm, 22-23-24 cm, 29-30-31 cm and 36-37-38 cm . Back: Cast on 137-147-157 sts. Establish rib pattern as follows: K 2, Pattern 3 until 2 sts remain, K 2. Continue in rib as established over all sts. When the piece measures 33-34-36 cm bind off 8 sts at each side for armhole, then dec 1 st at each armhole edge every other row 10-15-20 times = 101-101-101 sts. When the piece measures 53-55-57 cm bind off the center 27-27-27 sts for the neck. Bind off 3 sts at each neck edge on the next row = 34-34-34 sts remain on each shoulder. When the piece measures 55-57-59 cm bind off all sts. Sleeve: Cast on 55-60-60 sts on double-pointed needles. Join and place a marker at the join; knit Pattern 3 over all sts. When the piece measures 8 cm inc 1 st each side of marker 20-20-20 times every 6 rows = 95-100-100 sts (work the increased sts into pattern as you go along). When the piece measures 48-47-46 cm bind off 8 sts each side of marker and knit back and forth on needles. Continue to bind off for armhole at each side every other row: 2 sts 3-3-1 times, 1 st 13-16-23 times, 2 sts 3-3-1 times, 3 sts 1-1-1 time. Bind off, the piece measures approx. 61-62-63 cm. Assembly: Sew shoulder seams - see that the rib sts line up. Sew together the band at center back and then sew to back neck edge using edge st as a seam allowance. Fold the 3 outermost button band sts to wrong side and stitch down. Sew together side seams using edge sts as seam allowance. Sew in sleeves using 2 edge sts on Body as seam allowance. Sew on buttons. |
|||||||||||||||||||
Diagram explanations |
|||||||||||||||||||
|
|||||||||||||||||||
 |
|||||||||||||||||||
 |
|||||||||||||||||||
 |
|||||||||||||||||||
Have you finished this pattern?Tag your pictures with #dropspattern or submit them to the #dropsfan gallery. Do you need help with this pattern?You'll find 20 tutorial videos, a Comments/Questions area and more by visiting the pattern on garnstudio.com. © 1982-2026 DROPS Design A/S. We reserve all rights. This document, including all its sub-sections, has copyrights. Read more about what you can do with our patterns at the bottom of each pattern on our site. |
|||||||||||||||||||


With over 40 years in knitting and crochet design, DROPS Design offers one of the most extensive collections of free patterns on the internet - translated to 17 languages. As of today we count 324 catalogues and 12290 patterns translated into English (UK/cm). 12290
We work hard to bring you the best knitting and crochet have to offer, inspiration and advice as well as great quality yarns at incredible prices! Would you like to use our patterns for other than personal use? You can read what you are allowed to do in the Copyright text at the bottom of all our patterns. Happy crafting!
Post a comment to pattern DROPS 66-6
We would love to hear what you have to say about this pattern!
If you want to leave a question, please make sure you select the correct category in the form below, to speed up the answering process. Required fields are marked *.