
Popular categories
Looking for a yarn?


Comments / Questions (19)
![]() Ann-Christine wrote:
Ann-Christine wrote:
Har stickat den här tröjan och den blev verkligen konstig i modellen. Med facit i hand måste det vara så att diagrammen visar både rät och avigsida. Inte bara rätsidan som det står i mönstret. Oket blev så långt att det går upp till öronen på mig. Har fler än jag samma problem. Väldigt tråkigt när man stickat hela tröjan klart.
09.07.2017 - 19:55DROPS Design answered:
Hej! Diagrammet visar alla varv i mönstret så som de ses från rätsidan, vilket tyvärr betyder att du har stickat dubbelt så många varv som det ska vara.
10.07.2017 - 14:11
![]() Regine Suhr wrote:
Regine Suhr wrote:
Bin für Gr.XL mit 514M angefangen. Da ich einen Fehler entdeckte, musste ich die M wieder abziehen.Nun wurde mir die Weite bewusst. (für zwei Körper) Habe ich etwas übersehen, oder sind es wirklich soviel M. Bevor ich neu anfange warte ich lieber ab. Vielen Dank für Ihre Zeit,Regine
09.02.2017 - 18:00DROPS Design answered:
Liebe Frau Suhr, am Anfang brauchen Sie mehr Maschen um den unterer Rand zu stricken, dann wird die Maschenanzahl zu 353 abgenommen und dann stimmt die Maßen im Skizzen. Viel Spaß beim stricken!
10.02.2017 - 09:15
![]() Andrea wrote:
Andrea wrote:
Einer meiner Favoriten
16.01.2017 - 19:49
![]() Lise wrote:
Lise wrote:
Denne var kjempefin, også genseren og kortermet jakke i samme "familie" :)
10.01.2017 - 17:39
![]() Elisabetta wrote:
Elisabetta wrote:
Wunderschön, bitte unbedingt in die neue Kollegtion aufnehmen;-)
02.01.2017 - 13:08
![]() Judith Weiler wrote:
Judith Weiler wrote:
Ich hoffe, dass die Anleitung veröffentlicht wird. Sehr schön!
14.12.2016 - 15:53
![]() Anne Zimmer wrote:
Anne Zimmer wrote:
Wunderschön, die möchte ich sehr gerne nacharbeiten.
13.12.2016 - 21:02
![]() Anne Zimmer wrote:
Anne Zimmer wrote:
Ein tolles Modell, das meinen Geschmack voll trifft! Ich freue mich darauf es nacharbeiten zu können.
13.12.2016 - 20:58
![]() Belz Gabriele wrote:
Belz Gabriele wrote:
Die ist so wunderschön - hoffe,dass die Anleitung erscheint!!
13.12.2016 - 19:43
|
|||||||||||||||||||||||||
Spring Valley Cardigan#springvalleycardigan |
|||||||||||||||||||||||||
 |
 |
||||||||||||||||||||||||
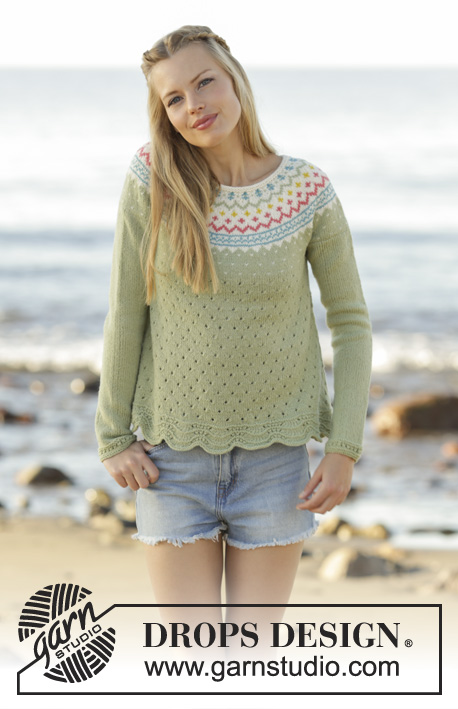
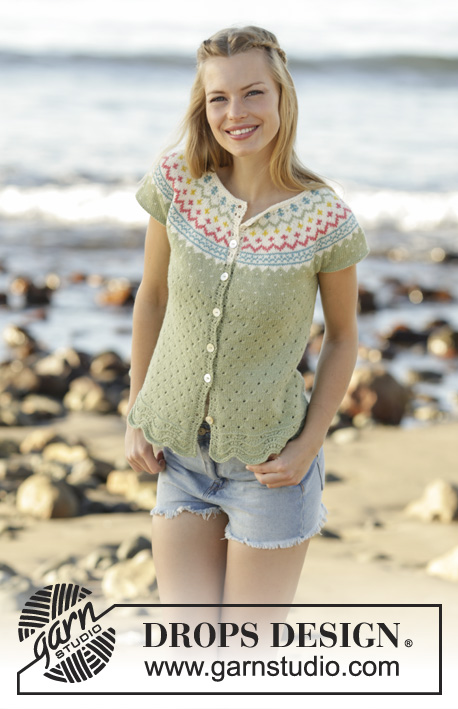
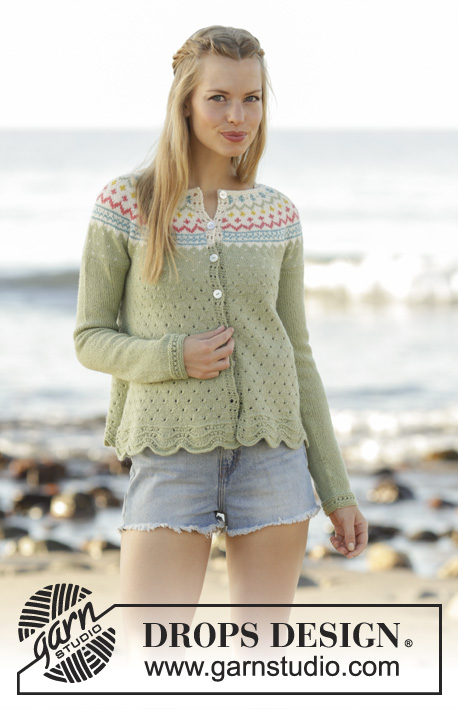
Knitted jacket with wave pattern, round yoke and multi-coloured pattern in DROPS Flora. Sizes S - XXXL.
DROPS 175-8 |
|||||||||||||||||||||||||
|
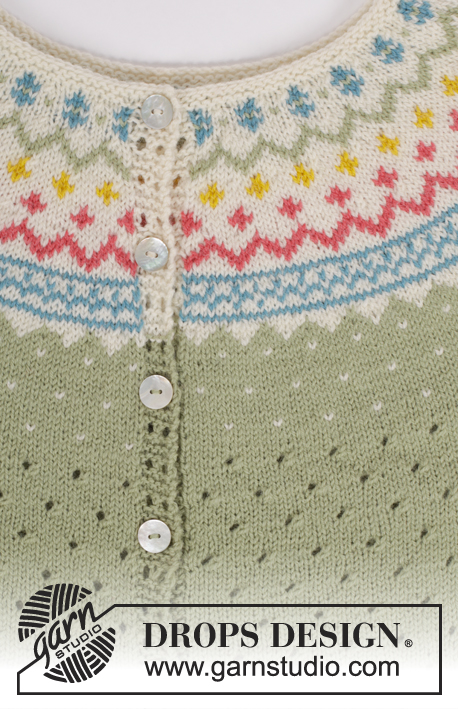
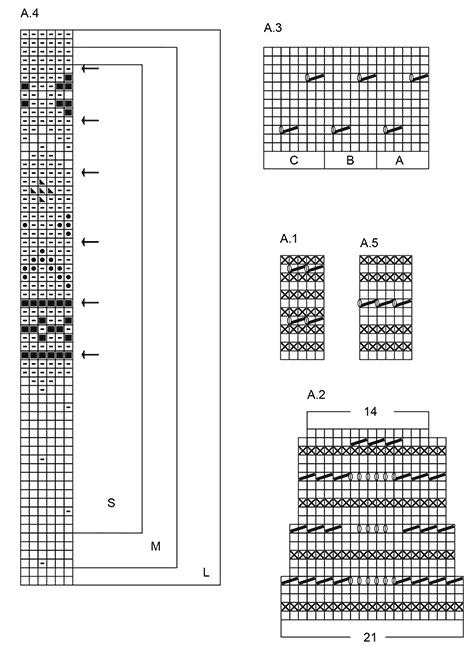
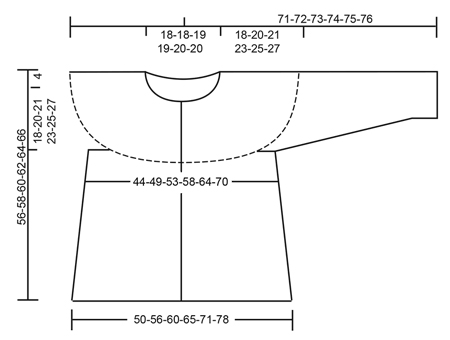
PATTERN: See diagrams A.1 to A.5. The diagrams show all the rows in the pattern seen from the right side. The whole of A.4 is worked in stocking stitch – see correct diagram for your size. DECREASE TIP-1: Start 3 stitches before the marker thread in the side. Knit 2 stitches together, knit 2 (the marker thread sits between these 2 stitches), slip 1 stitch, knit 1, pass the slip stitch over the knitted stitch. When decreasing in the sides, work the stitches that do not fit in A.3 in stocking stich. DECREASE TIP-2: To work out where to decrease on the row, count the total number of stitches on the needle (e.g. 377 stitches), minus the bands (e.g. 10 stitches) and divide the remaining stitches by the number of stitches to be decreased (e.g. 42) = 8.7. In other words, in this example, every 7th and 8th stitch are worked together. Do not decrease across the bands. Decrease by knitting 2 stitches together from the right side and purling 2 stitches together from the wrong side. INCREASE TIP: Increase mid underarm: Increase 1 stitch by making 1 yarn over. Work until there is 1 stitch left before the marker thread. Make 1 yarn over, knit 2 (the marker thread sits between these 2 stitches) and make 1 yarn over. On the next round work the yarn over stitches twisted to prevent holes (the increased stitches are worked in stocking stitch). RIDGE/GARTER STITCH (worked back and forth): 1 ridge = knit 2 rows. ELEVATION: Start from the right side and knit the first 53-55-57-59-61-63 stitches, insert a marker (= mid back), knit the next 7-7-7-8-8-8 stitches, turn, tighten the strand and knit 14-14-14-16-16-16 stitches, turn, tighten the strand and knit 21-21-21-24-24-24 stitches, turn, tighten the strand and knit 28-28-28-32-32-32 stitches. Continue back and forth in this way by knitting 7-7-7-8-8-8 stitches more each time until the middle 63-63-63-72-72-72 stitches on the needle are all worked, knit the rest of the row. ---------------------------------------------------------- JACKET: The jacket is worked back and forth on a circular needle from mid front from bottom up. BODY: Cast on 367-409-451-472-514-556 stitches (including 5 band stitches in each side towards mid front) with circular needle size 3 mm and pistachio. Work as follows – from the right side: A.1 across the first 5 stitches, A.2 across the next 357-399-441-462-504-546 stitches (= 17-19-21-22-24-26 repeats in width), finish with A.1 across the last 5 stitches. REMEMBER KNITTING TENSION! When the next to last row of A.2 has been worked, there are 248-276-304-318-346-374 stitches on the needle, on the last row of A.2 adjust the number of stitches evenly along row to 251-281-299-323-353-383 stitches. Continue to work as follows – from the right side: A.1 across the first 5 stitches as before, A.3 A (= 6 stitches), A.3 B across the next 228-258-276-300-330-360 stitches, A.3 C across the next 7 stitches and A.1 across the last 5 stitches as before. Insert 2 marker threads in the piece, 65-73-77-83-91-98 stitches in from each side (back piece = 121-135-145-157-171-187 stitches). When the piece measures 8 cm decrease 1 stitch on each side of the marker threads (= 4 stitches decreased) – READ DECREASE TIP-1. Decrease every 3 cm in total 8-9-9-9-9-9 times = 219-245-263-287-317-347 stitches. When the piece measures 34-34-35-35-35-35 cm cast off 10-10-12-12-14-16 stitches in each side from right side (= 5-5-6-6-7-8 stitches on each side of each marker thread) = 199-225-239-263-289-315 stitches. Lay the piece to one side and work the sleeves. SLEEVES: The sleeve is worked in the round on double pointed needles, from bottom up, change to a short circular needle when there are enough stitches. Cast on 50-52-56-58-60-64 stitches with double pointed needles size 3 mm and pistachio. Work A.5 across all the stitches. When A.5 has been worked once in height continue with stocking stitch across all stitches. Insert 1 marker thread at the beginning of the round = mid underarm. When the piece measures 6-6-6-6-8-8 cm increase 1 stitch on each side of the marker thread mid underarm – READ INCREASE TIP. Increase every 3-2-1½-1½-1-1 cm in total 13-17-20-21-23-23 times = 76-86-96-100-106-110 stitches. When the sleeve measures 44-43-43-42-40-39 cm cast off 10-10-12-12-14-16 stitches mid underarm (= 5-5-6-6-7-8 stitches on each side of the marker thread) = 66-76-84-88-92-94 stitches. Work one more sleeve in the same way. YOKE: (1st row = wrong side) Work the sleeves onto the same circular needle size 3 mm as the body where there are cast-off stitches for the armhole, at the same time decrease 2-0-0-4-6-4 stitches evenly along the row = 329-377-407-435-467-499 stitches. Continue to work as follows – from the right side: A.1 across the first 5 stitches, A.4 across the next 318-366-396-424-456-488 stitches (= 53-61-66-53-57-61 repeats of A.4), finish with the first stitch of A.4 and A.1 across the last 5 stitches. Continue this pattern upwards, AT THE SAME TIME decrease 36-42-42-40-40-48 stitches evenly along each row with an arrow – READ DECREASE TIP-2. From 1st-1st-1st-2nd-2nd-2nd row with decreases, continue by working A.1 in each side with off white. When A.4 is completed in height there are 113-125-155-155-187-163 stitches on the needle. Work 1 row knit from the right side with off white where 6-14-40-36-64-36 stitches are decreased evenly along the row = 107-111-115-119-123-127 stitches. Work 1 row purl from the wrong side. For a better fit you can work a small ELEVATION at the back of the neck with off white – see description above. Finish by working 2 RIDGES with off white – see description above, then cast off. The jacket measures approx. 56-58-60-62-64-66 cm to the shoulder. ASSEMBLY: Sew the opening under the sleeves. Sew on the buttons evenly spaced along the left band, the buttons are buttoned through the holes in the right band. |
|||||||||||||||||||||||||
Diagram explanations |
|||||||||||||||||||||||||
|
|||||||||||||||||||||||||
 |
|||||||||||||||||||||||||
 |
|||||||||||||||||||||||||
 |
|||||||||||||||||||||||||
Have you finished this pattern?Tag your pictures with #dropspattern #springvalleycardigan or submit them to the #dropsfan gallery. Do you need help with this pattern?You'll find 25 tutorial videos, a Comments/Questions area and more by visiting the pattern on garnstudio.com. © 1982-2026 DROPS Design A/S. We reserve all rights. This document, including all its sub-sections, has copyrights. Read more about what you can do with our patterns at the bottom of each pattern on our site. |
|||||||||||||||||||||||||


With over 40 years in knitting and crochet design, DROPS Design offers one of the most extensive collections of free patterns on the internet - translated to 17 languages. As of today we count 324 catalogues and 12290 patterns translated into English (UK/cm). 12290
We work hard to bring you the best knitting and crochet have to offer, inspiration and advice as well as great quality yarns at incredible prices! Would you like to use our patterns for other than personal use? You can read what you are allowed to do in the Copyright text at the bottom of all our patterns. Happy crafting!
Post a comment to pattern DROPS 175-8
We would love to hear what you have to say about this pattern!
If you want to leave a question, please make sure you select the correct category in the form below, to speed up the answering process. Required fields are marked *.