
Popular categories
Looking for a yarn?


Comments / Questions (19)
![]() Gabriele wrote:
Gabriele wrote:
Hallo, bitte schreibt mir doch wie und wo die Knopflöcher angebracht werden. Vielen Dank!
11.05.2019 - 19:14DROPS Design answered:
Liebe Gabriele, es wird keine Knopflöcher eingearbeitet, die Knöpfe werden durch die Löcher der rechten Blende (A.1) geschlossen. Viel Spaß beim stricken!
13.05.2019 - 09:07Bellinda Notari wrote:
De 6x42 st mind IN LARGE, zijn VERSCHRIKKELIJK MOEILIJK ; het is niet hoe Drops het gemakkelijk uitlegt. MOET 3 uur uitrekenen om het zelfs dan nog niet correct te hebben;GRAAG NOG HULP AUB 0m body,mouw & aan voorboorden:evenredig correct te meerderen,AUB!!
21.12.2018 - 16:59DROPS Design answered:
Dag Bellinda,
Op de naalden waar een pijl staat in het patroon, minder je 42 steken. Dit minderen doe je gelijkmatig over alle steken (de biessteken niet meegerekend. Dus tel het aantal steken (exclusief de biessteken) en deel deze door 42. Als je dan bijvoorbeeld op 9 uitkomt (ik zeg maar wat), minder je door steeds de 8e en 9e steek samen te breien. Als je niet op een heel getal uitkomt, bijvoorbeeld op 8,7 ofzo, dan minder je af en toe de 7e en 8e steek. Het gaat erom dat die 42 steken goed verdeeld worden over de hele toer.
01.01.2019 - 20:47
![]() Bellinda Notari wrote:
Bellinda Notari wrote:
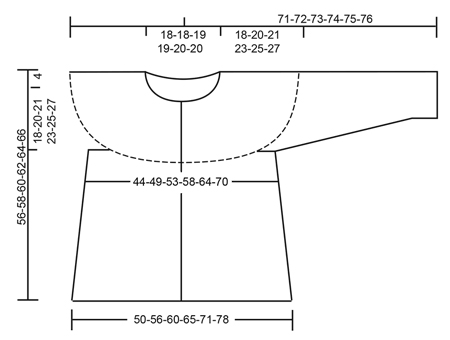
Measurement you sent with another PULLOVER do not match AT ALL with my cardigan ; are the meas. 40-42,43 cm ment for length of arms or the width of armholes?
07.12.2018 - 12:22DROPS Design answered:
Dear Mrs Notari, that's right, the lesson is only explaining how to read a diagram and the measurements. The measurements calculated in the answer yesterday were from the number of stitches (= width) as explained in the pattern at the beginning and at the end of sleeve. Please contact the store where you bought your yarn for any further individual assistance with measurements, it will be much easier for them (and for you) to help you. Happy knitting!
07.12.2018 - 14:28
![]() Bellinda Notari wrote:
Bellinda Notari wrote:
A foto or small draft along side with the measurements you explained in details ; would help me enormously & i think which is adequate in this situation ; because i dont understand very good where the measurements all stand for in the sleeve ; i would be very greatefully thankful for your huge & great effort. Hugs Bellinda
06.12.2018 - 20:38DROPS Design answered:
Dear Mrs Notari, you will find here how to read a measurement chart - I calculated the measurements on sleeve (last asnwer) from the number of stitches in both sizes you asked for with the tension of this pattern. Should you need any further individual assistance, please you are welcome to contact your DROPS store - even per mail or telephone. Happy knitting!
07.12.2018 - 08:13
![]() Bellinda Notari wrote:
Bellinda Notari wrote:
DESPERATE NEED ALL MEASUREMENTS OF SLEEVES FOR SIZES L & XL PLEASE ; DUE TO QUITE LARGE LIMBS! SORRY
05.12.2018 - 18:29DROPS Design answered:
Dear Mrs Notari, if your tension is right (= 24 m x 32 rows stocking st = 10 x 10 cm), sleeve starts with 56-58 sts = 23-24 cm - after all increase you have 96-100 sts = 40 -42 cm and after sts have been cast off for armhole after 43-42 cm, 84-88 sts remain = 35-37 cm. Happy knitting!
06.12.2018 - 09:25
![]() Bellinda Notari wrote:
Bellinda Notari wrote:
But wish to know ALL MEASURES of the sleeves : the wrists & ALL MEASURES of the armholes, length SLEEVE TILL FAIR ISLE, width of the arm outcuts (ALL MEASUREMENTS), the hight of the arm outcuts the shape the armholes, the width of the arms on the upperarms & also the lower arms, the length of the shoulders & ALL MEASURES from the neck, just as it was mentioned in the past & which are missing in your designe pattern, because I struggle with these measurements to choose Large or XL for sleeves?
04.12.2018 - 17:05DROPS Design answered:
Dear Mrs Notari, you will find all relevant & importantn measurements in the chart for both sizes. Compare a similar garment you have and like the shape to find out the matching size. Read more about how to choose a size here. Happy knitting!
05.12.2018 - 07:59
![]() Irene wrote:
Irene wrote:
Mangler det informasjon om knapphull, eller er det bare jeg som ikke finner det...........?
17.02.2018 - 18:59DROPS Design answered:
Hei Irene, Knappene kneppes gjennom hullene i høyre stolpen. God fornøyelse!
18.02.2018 - 07:06
![]() Sabine Lormann wrote:
Sabine Lormann wrote:
Het patroon van dit vestje heb ik ook gezien als trui met lange mouwen. Echter, ik kan het niet bij de patronen vinden! Bestaat het patroon nog? Ik zou dit heel graag willen breien! Ik hoor het graag!
20.09.2017 - 10:23DROPS Design answered:
Hallo Sabine, De trui-versie van dit patroon is nog niet beschikbaar in het Nederlands, maar wordt binnenkort (in oktober) wel vertaald. Vooralsnog is hij beschikbaar in het Engels. Mocht je daarmee voorlopig uit de voeten kunnen, dan vindt je 24.09.2017 - 10:45
Stevenson wrote:
Hi, because the Yoke starts on the WS - does that mean the first line of the chart begins showing a WS row? Thanks Carole
01.08.2017 - 15:38DROPS Design answered:
Hi Carole, All the rows in the pattern are shown from the right side. The first row of the yoke is where you work the body and sleeves together on the circular needle, from the wrong side, while at the same time decreasing evenly on the row. Then you work pattern from the right side. Happy knitting.
01.08.2017 - 15:51
![]() Federica Del Carratore wrote:
Federica Del Carratore wrote:
Nella spiegazione del corpo c'è scritto: "Quando il lavoro misura 8 cm diminuire 1 maglia a ogni lato dei segnapunti" Si intende 8 cm dall'inizio del lavoro, vero? Grazie fin d'ora!
25.07.2017 - 19:35DROPS Design answered:
Buongiorno Federica. Sì, sono 8 cm dall'inizio del lavoro. Buon lavoro!
25.07.2017 - 19:47
|
|||||||||||||||||||||||||
Spring Valley Cardigan#springvalleycardigan |
|||||||||||||||||||||||||
 |
 |
||||||||||||||||||||||||
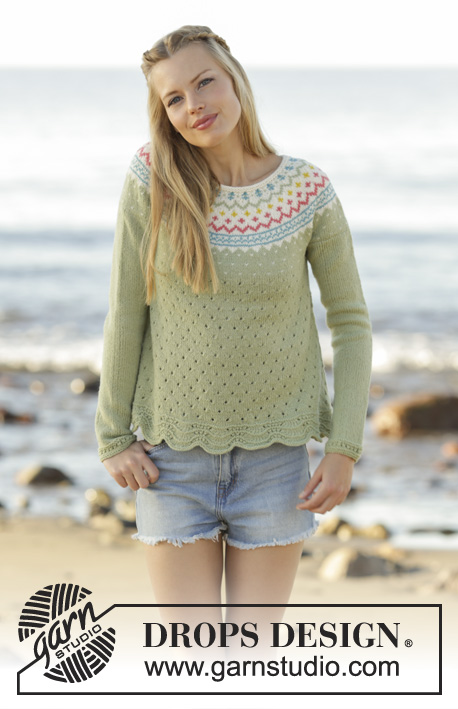
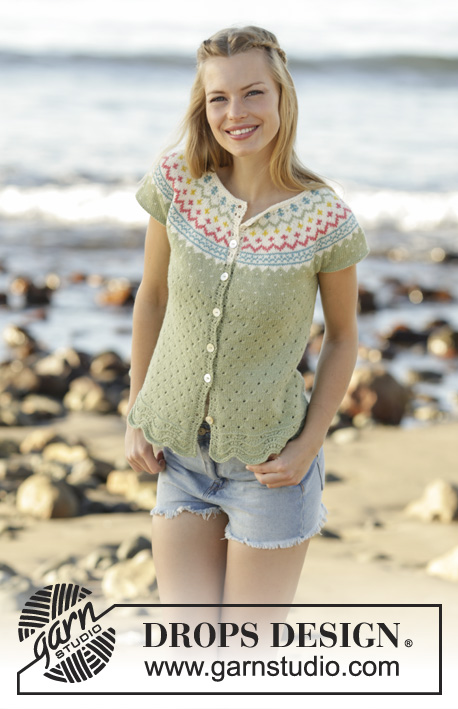
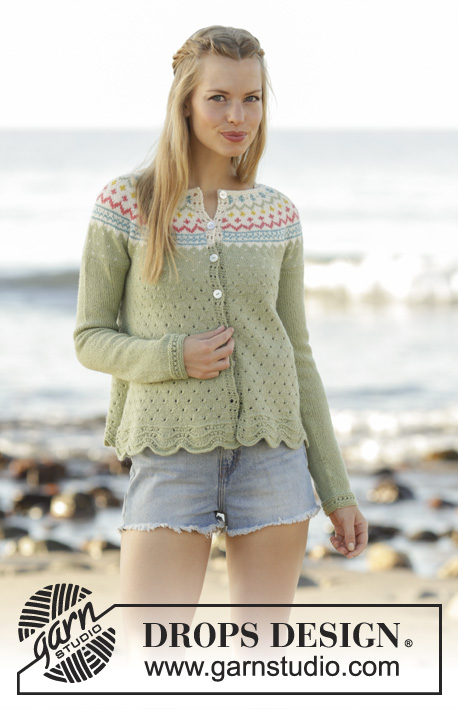
Knitted jacket with wave pattern, round yoke and multi-coloured pattern in DROPS Flora. Sizes S - XXXL.
DROPS 175-8 |
|||||||||||||||||||||||||
|
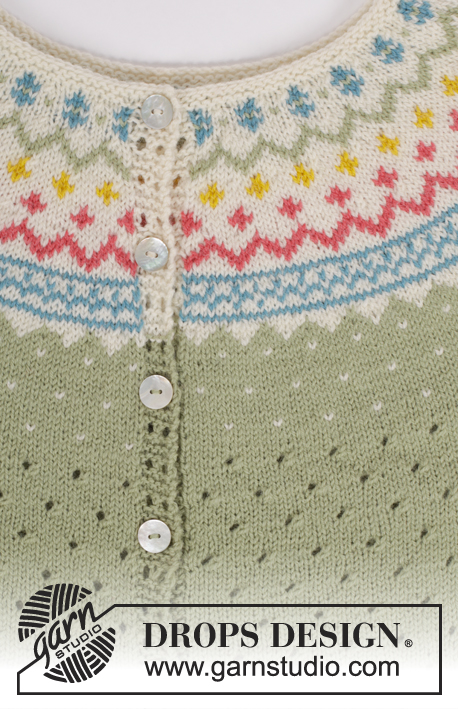
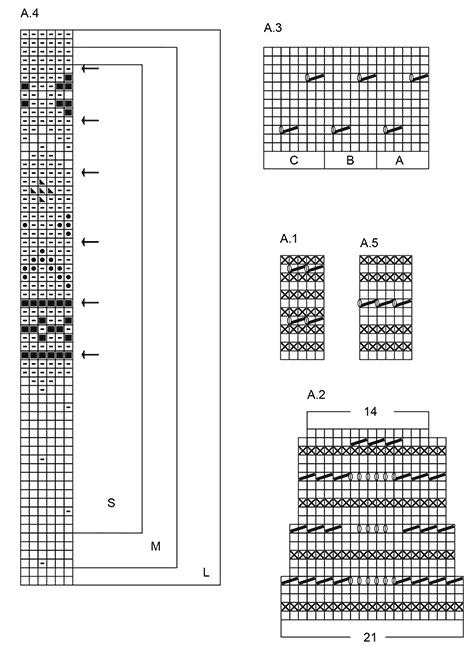
PATTERN: See diagrams A.1 to A.5. The diagrams show all the rows in the pattern seen from the right side. The whole of A.4 is worked in stocking stitch – see correct diagram for your size. DECREASE TIP-1: Start 3 stitches before the marker thread in the side. Knit 2 stitches together, knit 2 (the marker thread sits between these 2 stitches), slip 1 stitch, knit 1, pass the slip stitch over the knitted stitch. When decreasing in the sides, work the stitches that do not fit in A.3 in stocking stich. DECREASE TIP-2: To work out where to decrease on the row, count the total number of stitches on the needle (e.g. 377 stitches), minus the bands (e.g. 10 stitches) and divide the remaining stitches by the number of stitches to be decreased (e.g. 42) = 8.7. In other words, in this example, every 7th and 8th stitch are worked together. Do not decrease across the bands. Decrease by knitting 2 stitches together from the right side and purling 2 stitches together from the wrong side. INCREASE TIP: Increase mid underarm: Increase 1 stitch by making 1 yarn over. Work until there is 1 stitch left before the marker thread. Make 1 yarn over, knit 2 (the marker thread sits between these 2 stitches) and make 1 yarn over. On the next round work the yarn over stitches twisted to prevent holes (the increased stitches are worked in stocking stitch). RIDGE/GARTER STITCH (worked back and forth): 1 ridge = knit 2 rows. ELEVATION: Start from the right side and knit the first 53-55-57-59-61-63 stitches, insert a marker (= mid back), knit the next 7-7-7-8-8-8 stitches, turn, tighten the strand and knit 14-14-14-16-16-16 stitches, turn, tighten the strand and knit 21-21-21-24-24-24 stitches, turn, tighten the strand and knit 28-28-28-32-32-32 stitches. Continue back and forth in this way by knitting 7-7-7-8-8-8 stitches more each time until the middle 63-63-63-72-72-72 stitches on the needle are all worked, knit the rest of the row. ---------------------------------------------------------- JACKET: The jacket is worked back and forth on a circular needle from mid front from bottom up. BODY: Cast on 367-409-451-472-514-556 stitches (including 5 band stitches in each side towards mid front) with circular needle size 3 mm and pistachio. Work as follows – from the right side: A.1 across the first 5 stitches, A.2 across the next 357-399-441-462-504-546 stitches (= 17-19-21-22-24-26 repeats in width), finish with A.1 across the last 5 stitches. REMEMBER KNITTING TENSION! When the next to last row of A.2 has been worked, there are 248-276-304-318-346-374 stitches on the needle, on the last row of A.2 adjust the number of stitches evenly along row to 251-281-299-323-353-383 stitches. Continue to work as follows – from the right side: A.1 across the first 5 stitches as before, A.3 A (= 6 stitches), A.3 B across the next 228-258-276-300-330-360 stitches, A.3 C across the next 7 stitches and A.1 across the last 5 stitches as before. Insert 2 marker threads in the piece, 65-73-77-83-91-98 stitches in from each side (back piece = 121-135-145-157-171-187 stitches). When the piece measures 8 cm decrease 1 stitch on each side of the marker threads (= 4 stitches decreased) – READ DECREASE TIP-1. Decrease every 3 cm in total 8-9-9-9-9-9 times = 219-245-263-287-317-347 stitches. When the piece measures 34-34-35-35-35-35 cm cast off 10-10-12-12-14-16 stitches in each side from right side (= 5-5-6-6-7-8 stitches on each side of each marker thread) = 199-225-239-263-289-315 stitches. Lay the piece to one side and work the sleeves. SLEEVES: The sleeve is worked in the round on double pointed needles, from bottom up, change to a short circular needle when there are enough stitches. Cast on 50-52-56-58-60-64 stitches with double pointed needles size 3 mm and pistachio. Work A.5 across all the stitches. When A.5 has been worked once in height continue with stocking stitch across all stitches. Insert 1 marker thread at the beginning of the round = mid underarm. When the piece measures 6-6-6-6-8-8 cm increase 1 stitch on each side of the marker thread mid underarm – READ INCREASE TIP. Increase every 3-2-1½-1½-1-1 cm in total 13-17-20-21-23-23 times = 76-86-96-100-106-110 stitches. When the sleeve measures 44-43-43-42-40-39 cm cast off 10-10-12-12-14-16 stitches mid underarm (= 5-5-6-6-7-8 stitches on each side of the marker thread) = 66-76-84-88-92-94 stitches. Work one more sleeve in the same way. YOKE: (1st row = wrong side) Work the sleeves onto the same circular needle size 3 mm as the body where there are cast-off stitches for the armhole, at the same time decrease 2-0-0-4-6-4 stitches evenly along the row = 329-377-407-435-467-499 stitches. Continue to work as follows – from the right side: A.1 across the first 5 stitches, A.4 across the next 318-366-396-424-456-488 stitches (= 53-61-66-53-57-61 repeats of A.4), finish with the first stitch of A.4 and A.1 across the last 5 stitches. Continue this pattern upwards, AT THE SAME TIME decrease 36-42-42-40-40-48 stitches evenly along each row with an arrow – READ DECREASE TIP-2. From 1st-1st-1st-2nd-2nd-2nd row with decreases, continue by working A.1 in each side with off white. When A.4 is completed in height there are 113-125-155-155-187-163 stitches on the needle. Work 1 row knit from the right side with off white where 6-14-40-36-64-36 stitches are decreased evenly along the row = 107-111-115-119-123-127 stitches. Work 1 row purl from the wrong side. For a better fit you can work a small ELEVATION at the back of the neck with off white – see description above. Finish by working 2 RIDGES with off white – see description above, then cast off. The jacket measures approx. 56-58-60-62-64-66 cm to the shoulder. ASSEMBLY: Sew the opening under the sleeves. Sew on the buttons evenly spaced along the left band, the buttons are buttoned through the holes in the right band. |
|||||||||||||||||||||||||
Diagram explanations |
|||||||||||||||||||||||||
|
|||||||||||||||||||||||||
 |
|||||||||||||||||||||||||
 |
|||||||||||||||||||||||||
 |
|||||||||||||||||||||||||
Have you finished this pattern?Tag your pictures with #dropspattern #springvalleycardigan or submit them to the #dropsfan gallery. Do you need help with this pattern?You'll find 25 tutorial videos, a Comments/Questions area and more by visiting the pattern on garnstudio.com. © 1982-2026 DROPS Design A/S. We reserve all rights. This document, including all its sub-sections, has copyrights. Read more about what you can do with our patterns at the bottom of each pattern on our site. |
|||||||||||||||||||||||||


With over 40 years in knitting and crochet design, DROPS Design offers one of the most extensive collections of free patterns on the internet - translated to 17 languages. As of today we count 324 catalogues and 12290 patterns translated into English (UK/cm). 12290
We work hard to bring you the best knitting and crochet have to offer, inspiration and advice as well as great quality yarns at incredible prices! Would you like to use our patterns for other than personal use? You can read what you are allowed to do in the Copyright text at the bottom of all our patterns. Happy crafting!
Post a comment to pattern DROPS 175-8
We would love to hear what you have to say about this pattern!
If you want to leave a question, please make sure you select the correct category in the form below, to speed up the answering process. Required fields are marked *.