
Popular categories
Looking for a yarn?


Comments / Questions (46)
![]() Beatrice wrote:
Beatrice wrote:
Commencer tous les rangs de B par 3 ml (ne remplacent pas la 1ère B). Je me comprend pas cette phrase
18.06.2018 - 18:27DROPS Design answered:
Bonjour Béatrice, au début d'un nouveau rang quand vous venez juste de tourner, crochetez 3 mailles en l'air, puis 1 bride dans la 1ère bride (= la dernière du rang précédent), ces 3 ml servent à commencer avec la bonne hauteur pour la 1ère bride mais ne comptent pas comme étant la 1ère bride du rang. Bon crochet!
19.06.2018 - 08:05
![]() Chris wrote:
Chris wrote:
Ik ben net begonnen met het patroon en heb nu 5 rijen gehaakt. Het is de eerste keer dat ik met zo een telpatroon werk, het is dus effen zoeken. Moet ik vanaf rij 6 nog de A1 patronen volgen (dus herhalen) of enkel A2 verder volgen?
16.06.2018 - 19:35
![]() Olivia wrote:
Olivia wrote:
Hej Jeg er forvirret over, hvor jeg skal sætte mærketrådene, i midten af de 8 stangmasker under ærmerne eller efter de 8 stangmasker? På forhånd tak
29.05.2018 - 20:55DROPS Design answered:
Hej Olivia, mærket sætter du imellem de 8 masker under ærmet, det skal markere midten af hver side. God fornøjelse!
30.05.2018 - 12:29
![]() Nikita wrote:
Nikita wrote:
Jeg forstår simpelthen ikke hvordan jeg skal lave farveskift med nummer ''4'' farve altså når jeg skal bruge farve 1 igen, jeg ved ikke hvor jeg skal lave den km og hvordan jeg får tråden op? kan i forklare det på en anden måde ?
26.04.2018 - 22:18DROPS Design answered:
Hej Nikita, du kan altid klippe tråden og sætte den fast der hvor du skal begynde med en kædemaske. God fornøjelse!
07.05.2018 - 15:24
![]() Amalie wrote:
Amalie wrote:
Hej :) Tak for jeres svar ;) Det jeg mere tænkte på, var om når jeg starter på en omgang i mønsteret, hvor jeg skal tage ud, skal jeg så gentage mønstret hele vejen over rækken? For dette har jeg gjort, og det gav altså ALT for mange masker, og det er det som jeg ikke forstår :(
24.04.2018 - 19:19DROPS Design answered:
Hej igen Amalie, nej det er kun i A.2 du tager ud ifølge diagrammet, hvis du sætter et mærke på hver side af A.2 så bliver det lettere. Over de andre masker står der beskrevet i opskriften nøjagtig hvor mange du skal tage ud :)
26.04.2018 - 10:00
![]() Amalie wrote:
Amalie wrote:
Jeg har d. 14/4-2018 stilt et spørgsmål til denne opskrift, som jeg endnu ikke har fået svar på :( jeg håber snart, at kunne få et svar.
23.04.2018 - 10:13DROPS Design answered:
Hej Amalie, du tager ud ved at hækle skiftevis 2 og 3 stangmasker om lufmaskerne (du hækler ikke i fastmaskerne). God fornøjelse!
24.04.2018 - 11:08
![]() Amalie wrote:
Amalie wrote:
Hej Drops :) Jeg er ved at hækle cardiganen i str. XL, men jeg har et problem. Jeg er lige blevet færdig med at hækle diagram A.2, og skal til at tage ud til ærme, men jeg har alt for mange masker. Jeg forstår ikke udtagningen i diagram A.2, fra efter at man har hæklet 5. række. Fra række 5 havde jeg det rigtige antal masker. Kan I hjælpe mig? Mvh Amalie
14.04.2018 - 08:42DROPS Design answered:
Se svar ovenfor :)
24.04.2018 - 11:09
![]() Amalie wrote:
Amalie wrote:
Hej Drops :) Jeg er ved at hækle cardiganen i str. XL, men jeg har et problem. Jeg er lige blevet færdig med at hækle diagram A.2, og skal til at tage ud til ærme, men jeg har alt for mange masker. Jeg forstår ikke udtagningen i diagram A.2, fra efter at man har hæklet 5. række. Fra række 5 havde jeg det rigtige antal masker. Kan I hjælpe mig? Mvh Amalie
13.04.2018 - 13:30
![]() Jude Temple wrote:
Jude Temple wrote:
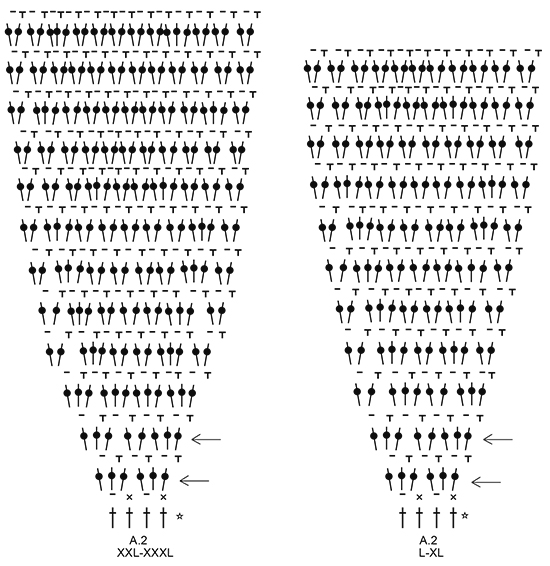
I'm a complete beginner with interpreting the pattern diagrams. Please could you let me know in written instructions, the stitches for A1a A1b and A1c and A2. Thanks Or a video would be great too
05.04.2018 - 14:16DROPS Design answered:
Dear Mrs Temple, each symbol represents a stitch - see diagram text, start reading diagram from the bottom corner on the right side towards the left from RS and from the left towards the right from WS, in A.1a, row1 = 1 dc in next st, 1 ch, skip next st. Row 2: 2 tr around the ch. Row3: as row 1. Row 4: as row 2. Do not hesitate to request help from the store where you bought your yarn even per mail, telephone or via social medias, they will assist you with diagrams. Happy crocheting!
05.04.2018 - 15:41
![]() Bini wrote:
Bini wrote:
Könnten Sie bitte erklären, wie das Muster ab Reihe 5 gehäkelt wird? Erst A1a, 1Ab, 1Ac und dann A2? Bei dem ersten Versuch habe ich nach 18 Reihen viel zu viele Maschen!?
09.08.2017 - 21:26DROPS Design answered:
Liebe Bini, Reihe 5 wird wie beschrieben gehäkelt, dann mit A.1a, A.1b, A.2 ... dh wie zuvor häkeln, die Zunahmen werden dann nur im A.2 gehäkelt (keine Zunahme mehr im A.1). Viel Spaß beim häkeln!
10.08.2017 - 09:11
|
||||||||||||||||||||||
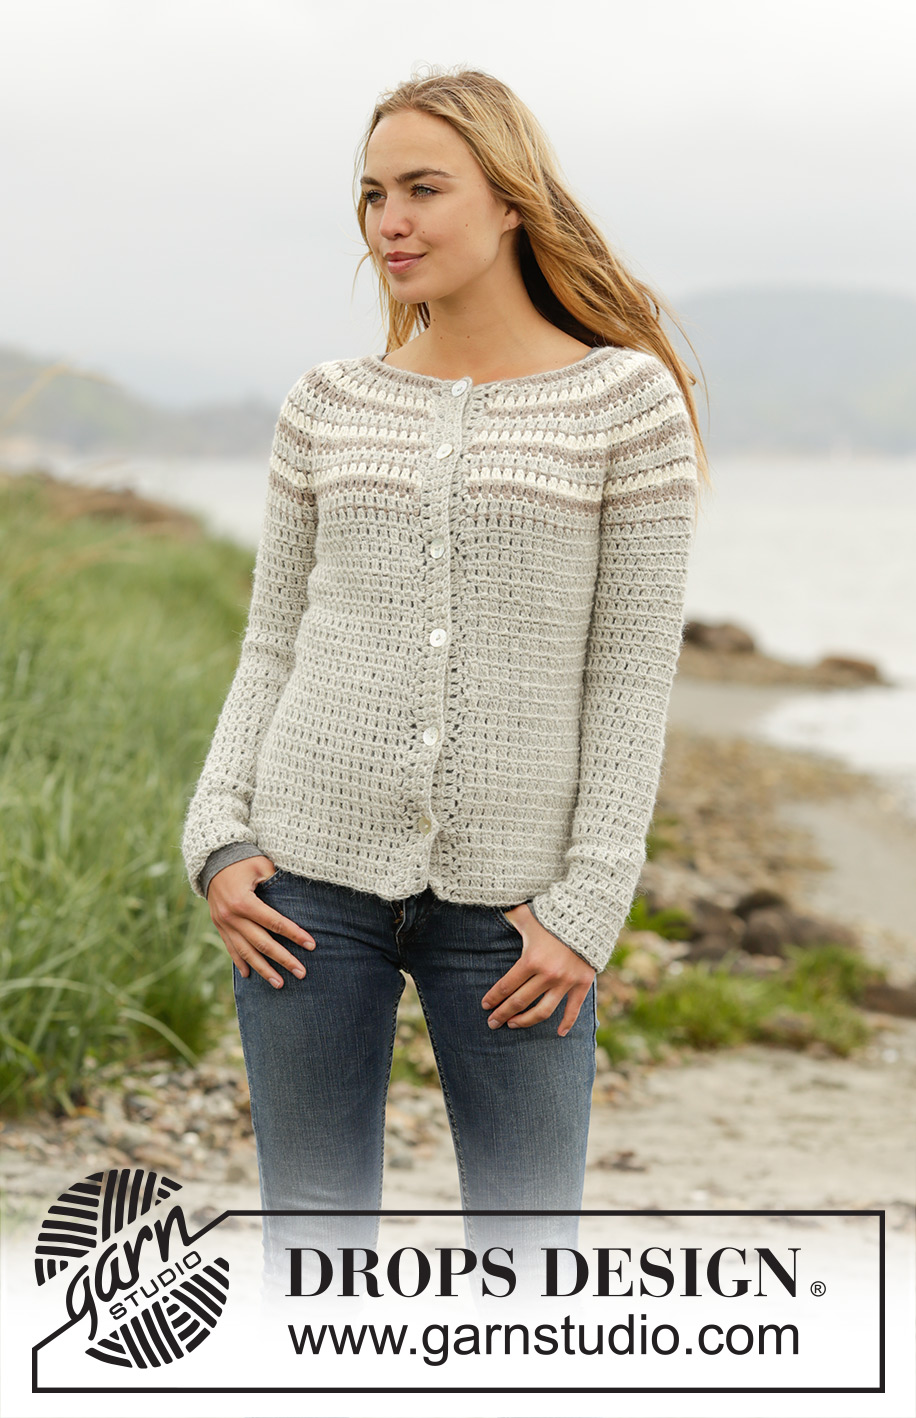
Misty Mountain Cardigan#mistymountaincardigan |
||||||||||||||||||||||
|
|
||||||||||||||||||||||
Crochet DROPS jacket with stripes, worked top down in ”Puna”. Size: S - XXXL.
DROPS 173-38 |
||||||||||||||||||||||
|
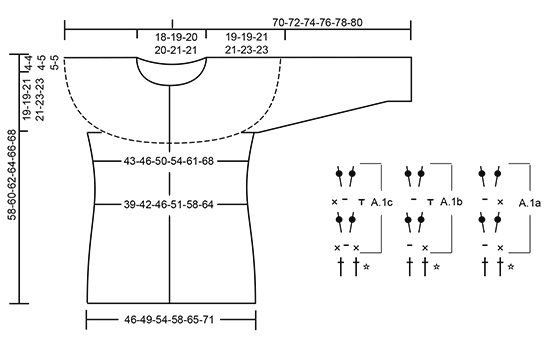
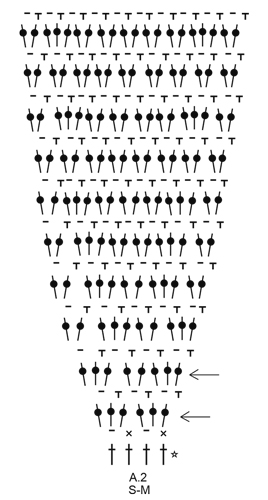
PATTERN: See diagrams A.1 and A.2. All rows with tr = RS. See diagram for correct size. CROCHET INFO: When working back and forth: Beg every tr row with 3 ch (does not replace first tr). Beg every dc row with 1 ch (does not replace first dc). At the end of every row with tr/dc work as follows: Before last pull through of last tr/dc switch colour as follows: Get next colour, i.e. 2 rows down (1 tr row and 1 dc row), with the new colour work 1 sl st around row it was worked on (i.e. around last tr/dc), 4 ch, pull then through last loop on hook. This is done to avoid a tight strand in the side of piece. When working in the round: Beg every dc round with 1 ch (this replaces first dc) and finish with 1 sl st in first ch from beg of round. Beg every round with tr with 3 ch (= first tr) and finish with 1 sl st in 3rd ch at beg of round. STRIPES: STRIPE 1: 1 row off white. STRIPE 2: 1 row light grey. STRIPE 3: 1 row taupe. DECREASE TIP (applies to body): Adjust so that next row is 1 row with tr. Work as before until 1 ch remains before marker, * work 1 tr around next ch, but wait with last pull through, work 1 tr more around same ch, but on last pull through, pull yarn through all sts on hook (= 1 tr dec) *, repeat from *-* around next ch (i.e. on the other side of marker) = 2 tr dec at each marker (= 4 tr in total). Every time you dec, repeat A.1b 2 times less in total in width. INCREASE TIP: Adjust so that next row is 1 row with tr. Work as before until 1 ch remains before marker, * work 3 tr around next ch *, repeat from *-* 2 times in total = 2 tr inc at marker, repeat at both markers (= 4 tr inc in total). Every time you inc, repeat A.1b 2 more times in total in width. DECREASE TIP-1 (applies to sleeve): Adjust so that next round is 1 round with tr. * Work 1 tr around first/next ch on round but wait with last pull through, work 1 tr more around the same ch but on last pull through, pull yarn through all sts on hook (= 1 tr dec) *, repeat from *-* around next ch = 2 tr dec. Every time you dec, repeat A.1b 1 time less in total in width. Dec alternately at beg and end of round (i.e. when dec at the end work as before until 2 ch remain on round). ---------------------------------------------------------- JACKET: Worked top down, back and forth. Work band at the end. YOKE: Work 100-103-107-114-117-124 ch (incl 3 ch to turn with) on hook size 4.5 mm with taupe. Work 1 tr in 4th ch from hook - READ CROCHET INFO, 1 tr in each of the next 5-1-5-5-1-1 ch, * skip 1 ch, 1 tr in each of the next 6 ch *, repeat from *-* the entire row = 84-86-90-96-98-104 tr. Work 2nd row in pattern as follows (= from WS with dc/ch) in STRIPES - see explanation above. Work A.1c over the next 2 tr, A.1b over the first 8-8-10-10-10-12 tr (= 4-4-5-5-5-6 times in width), A.2 over the next 8 tr (= 2 times in width), A.1b over the next 6-6-6-8-8-8 tr (= 3-3-3-4-4-4 times in width), A.2 over the next 8 tr (= 2 times in width), A.1b over the next 20-22-22-24-26-28 tr (= 10-11-11-12-13-14 times in width), A.2 over the next 8 tr (= 2 times in width), A.1b over the next 6-6-6-8-8-8 tr (= 3-3-3-4-4-4 times in width), A.2 over the next 8 tr (= 2 times in width), A.1b over the next 8-8-10-10-10-12 tr (= 4-4-5-5-5-6 times in width), finish with A.1a over the last 2 tr. Repeat A.1a to A.1c vertically and inc as shown in A.2 AT THE SAME TIME inc evenly as follows: Work 3rd row in pattern AT THE SAME TIME inc evenly as follows (= from RS): Work A.1a over the first 2 sts, A.1b over the next 8-8-10-10-10-12 sts and inc 0-2-2-4-4-4 tr evenly, A.2 as before (= 2 times in width), A.1b over the next 6-6-6-8-8-8 sts and inc 0-4-4-4-4-4 tr evenly, A.2 as before, A.1b over the next 20-22-22-24-26-28 sts and inc 0-4-4-6-6-8 tr evenly, A.2 as before, A.1b over the next 6-6-6-8-8-8 sts and inc 0-4-4-4-4-4 tr evenly, A.2 as before, A.1b over the next 8-8-10-10-10-12 sts and inc 0-2-2-4-4-4 tr evenly, finish with A.1c over the last 2 sts = 100-118-122-134-136-144 tr (incl inc in A.2). REMEMBER THE CROCHET TENSION! Work 4th row in pattern as follows (= from WS): Work A.1c over the first 2 tr, A.1b over the next 8-10-12-14-14-16 tr, A.2 as before, A.1b over the next 6-10-10-12-12-12 tr, A.2 as before, A.1b over the next 20-26-26-30-32-36 tr, A.2 as before, A.1b over the next 6-10-10-12-12-12 tr, A.2 as before, A.1b over the next 8-10-12-14-14-16 tr, finish with A.1a over the last 2 sts. Work 5th row in pattern AT THE SAME TIME inc evenly as follows (= from RS): Work A.1a over the first 2 sts, A.1b over the next 8-10-12-14-14-16 sts and inc 0-0-0-0-2-4 tr evenly, A.2 as before (= 2 times in width), A.1b over the next 6-10-10-12-12-12 sts and inc 0-2-4-4-0-0 tr evenly, A.2 as before, A.1b over the next 20-26-26-30-32-36 sts and inc 0-0-2-4-4-8 tr evenly, A.2 as before, A.1b over the next 6-10-10-12-12-12 sts and inc 0-2-4-4-0-0 tr evenly, A.2 as before, A.1b over the next 8-10-12-14-14-16 sts and inc 0-0-0-0-2-4 tr evenly, finish with A.1c over the last 2 sts = 116-138-148-162-160-176 tr (incl inc in A.2). Continue pattern and inc in A.2. When last row remains in A.2, piece measures approx. 18-18-19-19-21-21 cm from neck edge (= 212-234-260-274-304-320 tr). Work last row of A.2 from WS as follows: Work A.1c over the first 2 tr, A.1b over the next 8-10-12-14-16-20 tr, A.2 over the next 20-20-22-22-26-26 tr (= 1 time in width), 8-8-8-10-10-12 ch, skip the next 46-52-58-60-64-64 tr (i.e. 20-20-22-22-26-26 tr A.2, 6-12-14-16-12-12 tr A.1b and 20-20-22-22-26-26 tr A.2 for sleeve), A.2 over the next 20-20-22-22-26-26 tr (= 1 time in width), A.1b over the next 20-26-28-34-36-44 tr, A.2 over the next 20-20-22-22-26-26 tr (= 1 time in width), 8-8-8-10-10-12 ch, skip the next 46-52-58-60-64-64 tr (i.e. 20-20-22-22-26-26 tr A.2, 6-12-14-16-12-12 tr A.1b and 20-20-22-22-26-26 tr A.2 for sleeve), A.2 over the next 20-20-22-22-26-26 tr (= 1 time in width), A.1b over the next 8-10-12-14-16-20 tr, finish with A.1a over the last 2 tr = 137-147-161-175-197-217 sts. Continue piece with light grey. Work next row as follows from RS: Work A.1a over the first 2 tr, A.1b over the next 28-30-34-36-42-46 sts, 1 tr in each of the 8-8-8-10-10-12 ch under sleeve, insert 1 marker between these sts, A.1b over the next 60-66-72-78-88-96 sts, 1 tr in each of the 8-8-8-10-10-12 ch under sleeve, insert 1 marker between these, A.1b over the next 28-30-34-36-42-46 sts, finish with A.1c over the last 3 sts. Insert 1 marker in piece, NOW MEASURE PIECE FROM HERE. Work next row as follows from WS: Work A.1c over the first 2 tr as before, repeat A.1b over the next 132-142-156-170-192-212 tr, finish with A.1a over the last 2 tr. Continue pattern like this. When piece measures 4 cm from marker, dec 2 tr at each marker - READ DECREASE TIP. Dec like this every 4-4½-4½-5½-5½-6 cm 3 times in total = 124-134-148-162-184-204 tr. When piece measures 14-16-16-17-17-19 cm from marker, inc 2 tr at each marker – see INCREASE TIP. Inc like this every 2½ cm a total of 6 times = 148-158-172-186-208-228 tr. Continue pattern until piece measures 35-37-37-38-38-40 cm from marker (= 54-56-58-59-61-63 cm from neck edge), adjust to finish with 1 row tr. Fasten off. SLEEVE: = 46-52-58-60-64-64 tr. Work first round on sleeve with same colour as last stripe in dc on body. Sleeve is worked in the round, top down. Beg by working mid under sleeve as follows: Work 1 dc in the 5th-5th-5th-5th-5th-6th ch of the 8-8-8-10-10-12 ch worked in armhole on body, work 1 ch (= 1 dc), work 1 dc in each of the next 3-3-3-5-5-6 ch, A.1b (i.e. 1 round with dc and ch) over the 46-52-58-60-64-64 tr over sleeve, finish with 1 dc in each of the remaining 4-4-4-4-4-5 ch under sleeve = 54-60-66-70-74-76 sts. Continue piece with light grey. Insert 1 marker in piece, NOW MEASURE PIECE FROM HERE. Work A.1b in the round. When piece measures 3 cm from marker, dec 2 tr under sleeve - READ DECREASE TIP-1. Dec like this every 3-2½-2-2-2-2 cm 11-13-15-17-18-18 times in total = 32-34-36-36-38-40 sts. When piece measures 42-44-43-45-45-47 cm from marker, adjust to finish with 1 round tr. Fasten off. Work the other sleeve the same way. LEFT BAND: Beg at the bottom of jacket from WS. Worked back and forth. Work with light grey as follows: Work 1 sl st around first tr, 1 dc, * 2 ch, skip approx. 1 cm, 1 dc around next tr *, repeat from *-* evenly up along edge on jacket, adjust to finish with 1 dc in last tr at the top of neck. On next row work 2 tr around every ch-space. Then work A.1a over the first 2 tr, repeat A.1b until 2 tr remain, finish with A.1c over the last 2 tr. Work a total of 3 rows of A.1 (= last row is a row with dc and ch). Fasten off. RIGHT BAND: Work as left but now from the top of jack down along the edge of jacket from WS. NECK EDGE: Work with light grey from RS as follows: Beg with 1 sl st around first tr on band, 1 ch (= 1 dc), work 1 dc around same tr, 2 dc around each of the next tr on band, 1 dc in every ch where tr was worked in first row (= 84-86-90-96-98-104 dc), finish with 2 dc around every tr over band. Fasten off. ASSEMBLY: Sew on buttons on left band. Fasten 1st button approx. 2 cm from neck edge, then fasten them approx. 8 cm apart. Button between 2 tr on right band. |
||||||||||||||||||||||
Diagram explanations |
||||||||||||||||||||||
|
||||||||||||||||||||||
 |
||||||||||||||||||||||
 |
||||||||||||||||||||||
 |
||||||||||||||||||||||
Have you finished this pattern?Tag your pictures with #dropspattern #mistymountaincardigan or submit them to the #dropsfan gallery. Do you need help with this pattern?You'll find 12 tutorial videos, a Comments/Questions area and more by visiting the pattern on garnstudio.com. © 1982-2026 DROPS Design A/S. We reserve all rights. This document, including all its sub-sections, has copyrights. Read more about what you can do with our patterns at the bottom of each pattern on our site. |
||||||||||||||||||||||


With over 40 years in knitting and crochet design, DROPS Design offers one of the most extensive collections of free patterns on the internet - translated to 17 languages. As of today we count 324 catalogues and 12290 patterns translated into English (UK/cm). 12290
We work hard to bring you the best knitting and crochet have to offer, inspiration and advice as well as great quality yarns at incredible prices! Would you like to use our patterns for other than personal use? You can read what you are allowed to do in the Copyright text at the bottom of all our patterns. Happy crafting!
Post a comment to pattern DROPS 173-38
We would love to hear what you have to say about this pattern!
If you want to leave a question, please make sure you select the correct category in the form below, to speed up the answering process. Required fields are marked *.