
Popular categories
Looking for a yarn?


Comments / Questions (15)
![]() Camo wrote:
Camo wrote:
Efter jeg har strikket ribben til halsen og lavet første udtag med 2 tråde kid-mohair forstår jeg det som jeg kun skal strikke med 1 tråd kid- silk resten af jakken -er det korrekt?
06.04.2026 - 15:46DROPS Design answered:
Hei Camo. Ja, det er riktig. mvh DROPS Design
07.04.2026 - 13:25
![]() Yvette wrote:
Yvette wrote:
Bonjour. Je pense que je n’ai pas bien compris les explications pour les manches car avec les augmentations du ranglan les dessins A1 et A2 se décalent et ne forment plus les dessins prevus. Après le marqueur du ranglan je tricote une m et je fais un Jetté et pour les rangs deux et quatre je continue avec un deuxième jetté pour commencer le dessin ? Mais alors la figure se décale de 2m et rien ne va… merci pour votre réponse
10.04.2025 - 19:35DROPS Design answered:
Bonjour Yvette, le point fantaisie se tricote sur 3 mailles, dont tant que vous n'avez pas 3 mailles avant le motif précédent au début de la manche et après le dernier motif à la fin de la manche (sans compter les 2 mailles après le marqueur au début de la manche et avant le marqueur à la fin de la manche), tricotez ces mailles en jersey tout simplement, dès que vous en aurez suffisamment pour tricoter un nouveau motif, tricotez-le au début/à la fin de la manche. Pensez éventuellement à mettre un marqueur au début/à la fin du point ajouré, vous pourrez ainsi mieux voir quand commencer un nouveau motif. Bon tricot!
11.04.2025 - 09:18
![]() Martine wrote:
Martine wrote:
Bonjour, je voudrais savoir si, pour ce gilet, il faut prendre 1 seul fil ou alors 2 fils ? Merci.
13.03.2023 - 14:55DROPS Design answered:
Bonjour Martine, on tricote avec 1 seul fil Kid-Silk, seul le montage se fera avec 2 fils pour qu'il ne soit pas trop serré (cf cette vidéo. Bon tricot!
13.03.2023 - 16:08
![]() Marion Balmino wrote:
Marion Balmino wrote:
Bonjour, Je viens de commencer l'ouvrage en taille M. Tout allait bien jusqu'ici mais j'avoue que je suis un peu perdue une fois le premier rang d'augmentation du raglan faite. Je ne comprends pas où placer les motifs A1 et A2 une fois passés les premiers marqueurs. Faut-il centrer le motif sur 12 mailles entre chaque groupe de marqueurs en ajoutant des mailles jersey de part et d'autre ou agrandir le motif ? Merci pour votre réponse. Marion
06.01.2020 - 16:39DROPS Design answered:
Bonjour Mme Balmino, les augmentations doivent se tricoter comme dans les diagrammes (= A.1 au début de la manche, A.2 à la fin de la manche), tricotez les nouvelles mailles en jersey jusqu'à ce que vous ayez suffisamment de mailles pour un motif ajouré entier (= rang 3 ou 7 de A.1-A.2). Les augmentations vont ainsi se tricoter progressivement au point ajouré. Bon tricot!
07.01.2020 - 08:12
![]() Maria Laczkó wrote:
Maria Laczkó wrote:
Szép estét. Számoltam és a kardigán eleje:26-26 szem, ujja:19-19 szem, háta:42 szem =132 szem. Remélem minden jó lesz. Ûdvözlettel Mária
04.03.2019 - 20:15
![]() Eva wrote:
Eva wrote:
Pour le fil vous indiquez: n°05, vieux rose. En ligne le vieux rose a le n°04. Le n° 05 s'appelle "bruyère". De quel couleur s'agit-il sur votre modèle? Merci!
02.03.2019 - 19:42DROPS Design answered:
Bonjour Eva, le nom des couleurs est parfois ajusté au fur et à mesure du temps pour s'ajuster à la palette, suivez toujours bien le numéro de la couleur, soit n°5 ici. Pour toute info complémentaire ou aide au choix de la couleur, n'hésitez pas à contacter votre magasin DROPS, même par mail ou téléphone, on saura vous conseiller. Bon tricot!
04.03.2019 - 09:08
![]() Mme PETIT wrote:
Mme PETIT wrote:
Bonjour, Si j'ai bien compris, la manche se fait en A1 A2 A2 soit 15 mailles et les autres mailles faut il les tricoter en jersey ou continuer le point fantaisie? Merci pour votre réponse et vos jolis modèles qui m'ont redonnés le goût du tricot
12.02.2019 - 12:31DROPS Design answered:
Bonjour Mme Petit, seules les mailles des manches se tricotent au point ajouré, en commençant par A.1, répétez ensuite A.2 sur les mailles suivantes, les 2 mailles du raglan se tricotent en jersey, comme celles des devants et du dos. Tricotez les augmentations du dos et des devants en jersey et celles des manches au point ajouré (A.2). Bon tricot!
12.02.2019 - 13:39
![]() Annica Bruceä wrote:
Annica Bruceä wrote:
Hej, hade en fundering runt de mönsterstickade partierna, på koftans vänstra sida börjar man med A1 och sedan A2 men då man kommer till högra sidan ska man inte då sticka A2 först och sedan A1 annars blir det ju inte lika, eller tänker jag fel. Med vänlig hälsning, Annica
22.01.2019 - 10:44DROPS Design answered:
Hei Annica. Ja, det stemmer. Diagrammene viser alle omgangene sett fra rettsiden. Når du strikker fra avigsiden må du derfor strikke diagrammene i motsatt rekkefølge, og lese dem motsatt vei: altså fra venstre mot høyre. Diagrammet skal strikkes over de samme maskene hele veien opp. God fornøyelse
29.01.2019 - 14:02Katherine wrote:
Hello, I've got a question about the amount of the buttons. The edge (size S) measures approx 56 cm according to the description and the last buttonhole is made at 37 cm, is that correct? If so the rest of the 19 cm should be knit without buttons and holes, right?
27.03.2018 - 19:13DROPS Design answered:
Dear Katherine, there should be a total of 6 buttonholes for size S: 2, 9, 16, 23, 30 and 37 cm. - see BUTTONHOLES. The last cm will have no buttonholes but feel free to add one more if you like. Happy knitting!
28.03.2018 - 15:21BELLA wrote:
Hello The amount of yarns needed is far too small than in other jackets. I am afraid there is a mistake....It cannot be 150 gr.for all the item!! Please answer me so I want to knit it...it is lovely !! Thanks
30.05.2017 - 08:42DROPS Design answered:
Dear Bella, Kid-Silk is approx. 200 m/25 g, ie you will require 6 balls and approx. 1200 m. Remember to always check and keep your tension. Happy knitting!
30.05.2017 - 09:03
|
||||||||||
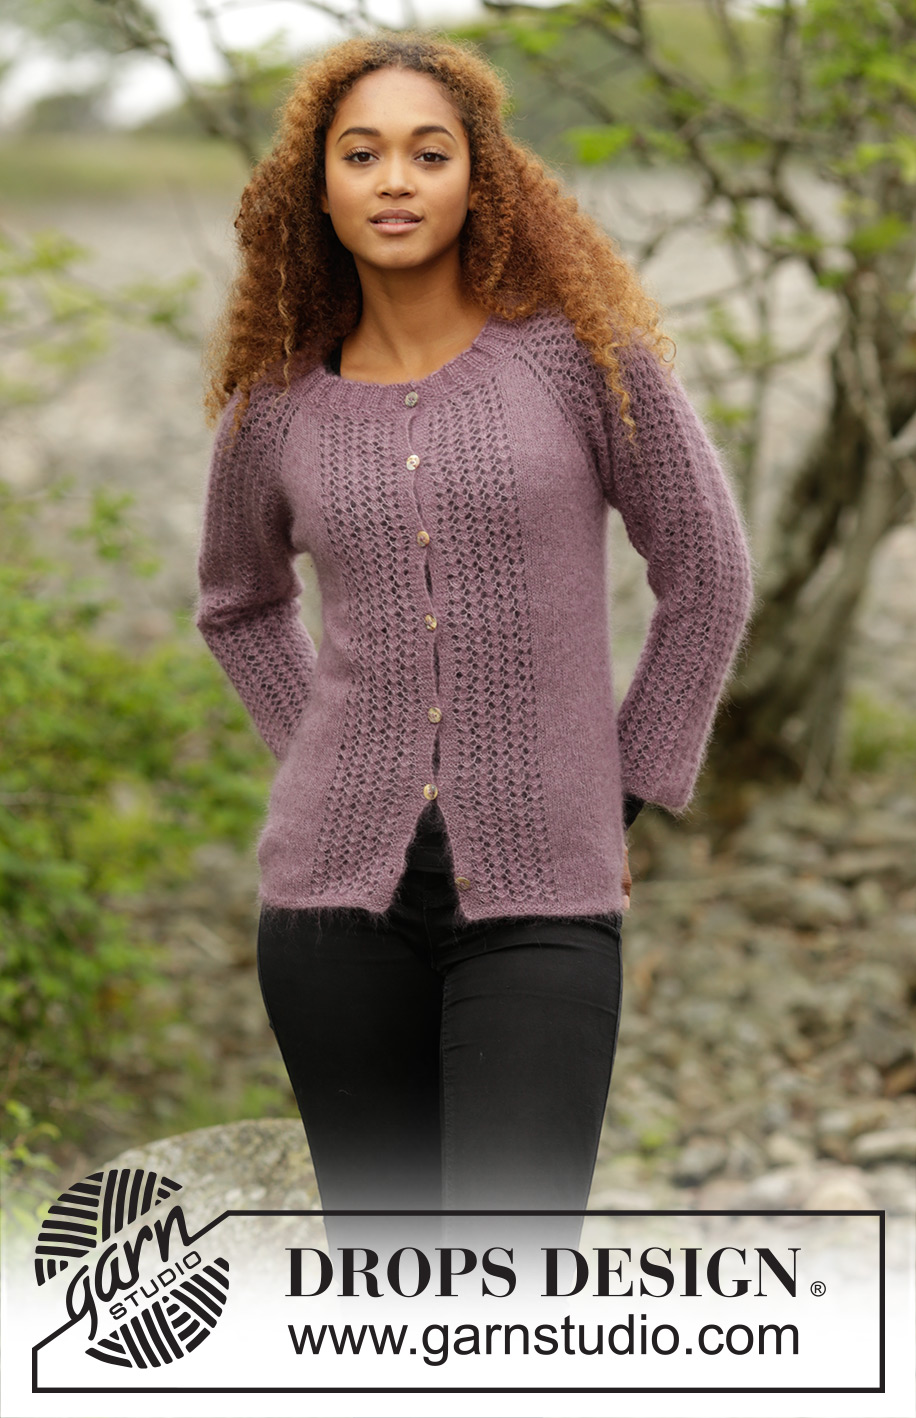
Touch of Heather Cardigan#touchofheathercardigan |
||||||||||
|
|
||||||||||
Knitted DROPS jacket with raglan and lace pattern, worked top down in ”Kid-Silk”. Size: S - XXXL.
DROPS 172-31 |
||||||||||
|
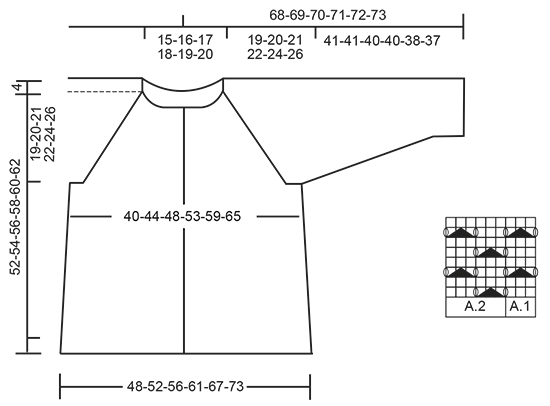
GARTER ST (back and forth): K all rows. 1 ridge = 2 rows K. GARTER ST (worked in the round): 1 ridge = 2 rounds. * K 1 round and P 1 round *, repeat from *-*. PATTERN: See diagrams A.1 and A.2. The diagrams show all rows in pattern seen from RS. RAGLAN: Inc on every row from RS (= every other row) as follows: Inc 4 sts on back piece, 2 sts on each front piece and 4 sts on each sleeve (= 16 sts inc in total). Inc as follows before marker (beg 2 sts before marker): K 2 sts in 1 st, 1 YO, K 1, marker. P YOs on next row to make holes. Inc as follows after marker: Marker, K 1, 1 YO and K 2 sts in next st. P YOs on next row to make holes. Inc 16 sts like this 1-1-2-2-1-1 more times (= 2-2-3-3-2-2 times in total, first inc is explained in text). Then inc on every row from RS (= every other row) as follows: Inc 2 sts on back piece, 1 sts on each front piece and 2 sts on each sleeve (= 8 sts inc in total). Inc as follows before marker (beg 1 sts before marker): 1 YO, K 1, marker. Inc as follows after marker: Marker, K 1, 1 YO. P YOs on next row to make holes. Inc 8 sts this way 20-22-22-24-28-30 times in total. BUTTONHOLES: Dec for buttonholes on right band. 1 buttonhole = K tog second and third st from edge and make 1 YO. Dec for buttonholes when piece measures (measured from cast-on edge): SIZE S-M-L: 2, 9, 16, 23, 30 and 37 cm. SIZE XL-XXL-XXXL: 2, 9, 16, 23, 30, 37 and 44 cm INCREASE TIP (applies to inc in the sides of body): Beg 1 sts before marker, 1 YO, K 2 (marker is in the middle of these 2 sts), 1 YO (= 2 sts inc). On next row P YOs twisted to avoid holes. ---------------------------------------------------------- JACKET: Work back and forth on circular needle from mid front, work top down. Cast on 116-120-128-132-136-140 sts (incl 5 band sts each side towards mid front) on a short circular needle size 3.5 mm with 2 strands Kid-Silk. P 1 row from WS, then work as follows - from RS: 5 sts in GARTER ST (= band) - see explanation above, K 2/ P 2 *, repeat from *-* until 7 sts remain, K 2 and 5 sts in garter st (= band). Dec for BUTTONHOLES on right band - see explanation above. Work rib for 3 cm. Work 2 ridges, on first row in last ridge inc 4-12-12-24-40-56 sts evenly = 120-132-140-156-176-196 sts. Remove one strand, then work with 1 strand Kid-Silk. Work as follows, and inc for RAGLAN – from mid front and from RS – see explanation above: 5 sts in garter st, A.1 (= 3 sts), A.2 over the next 12-12-12-15-18-21 sts, work 1-4-6-7-9-11 sts in stocking st, K 2 sts in next st, 1 YO, 2 sts in stocking st (insert a marker between these sts), 1 YO, K 2 sts in next st, A.1, A.2 over the next 12 sts, K 2 sts in next st, 1 YO, 2 sts in stocking st (insert a marker between these sts), 1 YO, K 2 sts in next st, 32-38-42-50-60-70 sts in stocking st, K 2 sts in next st, 1 YO, 2 sts in stocking st (insert a marker between these sts), 1 YO, K 2 sts in next st, A.1, A.2 over the next 12 sts, K 2 sts in next st, 1 YO, 2 sts in stocking st (insert a marker between these sts), 1 YO, K 2 sts in next st, 1-4-6-7-9-11 sts in stocking st, A.1, A.2 over the next 12-12-12-15-18-21 sts, finish with 5 sts in garter st. Continue this pattern, and inc for raglan as explained above, first inc is now done. Work the new sts on sleeves in A.1 and A.2. REMEMBER THE KNITTING TENSION When all inc for raglan are done, there are 312-340-364-396-432-468 sts on needle. Piece measures 23-24-25-26-28-30 cm from shoulder (19-20-21-22-24-26 cm from cast-on edge). Work next row as follows from WS: Work 47-52-56-62-69-76 sts (= right front piece), slip the next 67-71-75-79-83-87 sts on a stitch holder (= sleeve), cast on 8 sts under sleeve, work the next 84-94-102-114-128-142 sts (= back piece), slip the next 67-71-75-79-83-87 sts on a stitch holder (= sleeve), cast on 8 new sts under sleeve, work the last 47-52-56-62-69-76 sts (= left front piece). BODY: There are now 194-214-230-254-282-310 sts on body. Continue in stocking st, pattern and garter st as before. Insert a marker in each side, in the middle of the 8 new sts that were cast on. NOW MEASURE PIECE FROM HERE. When piece measures 4 cm, inc 1 st on each side of each marker (= 4 sts inc) - READ INCREASE TIP, inc every 3 cm 9 times in total = 230-250-266-290-318-346 sts. When piece measures 36-37-38-39-39-39 cm, work 2 ridges over all sts. Cast off, piece measures approx. 56-58-60-62-64-66 cm from cast-on edge. SLEEVE: Worked in the round. Slip sts from sleeve back on a short circular needle/double pointed needles size 3.5 mm, pick up 1 st in each of the 8 sts under sleeve = 75-79-83-87-91-95 sts. Insert 1 marker mid under sleeve = beg of round. NOW MEASURE PIECE FROM HERE! Continue with A.1 and A.2, work the sts in each side that do not fit the pattern in stocking st. When piece measures 4 cm, dec 1 st on each side of marker. Dec every 3-2½-2-2-2-2 cm 10-11-12-12-13-14 times in total = 55-57-59-63-65-67 sts. When piece measures 40-40-39-39-37-36 cm, work 2 ridges in GARTER ST - see explanation above! Then cast off. NOTE: Because of lace pattern the sleeve will stretch lengthwise. Try the jacket and work sleeve to desired length. Work the other sleeve the same way. ASSEMBLY: Sew the buttons on to left front piece. |
||||||||||
Diagram explanations |
||||||||||
|
||||||||||
 |
||||||||||
Have you finished this pattern?Tag your pictures with #dropspattern #touchofheathercardigan or submit them to the #dropsfan gallery. Do you need help with this pattern?You'll find 27 tutorial videos, a Comments/Questions area and more by visiting the pattern on garnstudio.com. © 1982-2026 DROPS Design A/S. We reserve all rights. This document, including all its sub-sections, has copyrights. Read more about what you can do with our patterns at the bottom of each pattern on our site. |
||||||||||


With over 40 years in knitting and crochet design, DROPS Design offers one of the most extensive collections of free patterns on the internet - translated to 17 languages. As of today we count 324 catalogues and 12290 patterns translated into English (UK/cm). 12290
We work hard to bring you the best knitting and crochet have to offer, inspiration and advice as well as great quality yarns at incredible prices! Would you like to use our patterns for other than personal use? You can read what you are allowed to do in the Copyright text at the bottom of all our patterns. Happy crafting!
Post a comment to pattern DROPS 172-31
We would love to hear what you have to say about this pattern!
If you want to leave a question, please make sure you select the correct category in the form below, to speed up the answering process. Required fields are marked *.