
Popular categories
Looking for a yarn?


Comments / Questions (57)
![]() Alison wrote:
Alison wrote:
Thank you 😻
14.04.2024 - 11:38
![]() Alison wrote:
Alison wrote:
When knitting the pattern, on flat, does row always start from the right hand side or do you knit the second and every following second row from the left hand side of the pattern? Thank you
13.04.2024 - 21:50DROPS Design answered:
Dear Allison, the diagrams always show the pattern as you would see it from looking at it at the right side. So, when knitting on th eround, they always read from right to left, and from the bottom up, when knitting flat, they read right side rows from right to left, wrong side rows from left to right (unless the pattern sepcifically tells you otherwise). Happy Knitting!
14.04.2024 - 07:16
![]() Annica Cottman wrote:
Annica Cottman wrote:
Vill sticka tröjan Keep it Together ,men jag vill sticka i ett bomullsgarn.Tacksam på olika förslag på garn som skulle passa Med vänlig hälsning, Annica
30.09.2023 - 15:25DROPS Design answered:
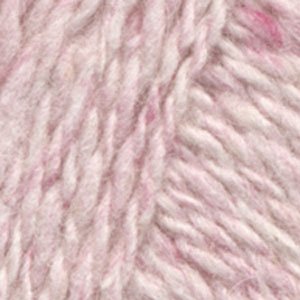
Hej Annica. Du kan sticka detta mönster i alla garn från garngrupp B. Om du vill sticka i ett 100% bomullsgarn så blir det då DROPS Muskat. Kom bara ihåg att beräkna riktig garnåtgång om du byter till ett annat garn (använd gärna vår garnkalkylator). Mvh DROPS Design
03.10.2023 - 14:02
![]() Marlies Dijkstra wrote:
Marlies Dijkstra wrote:
Goedendag, Ik moet nu beginnen met het afkanten voor de mouwen. De 8 steken aan beide zijden dat begrijp ik wel, maar ik begrijp niet hoe ik de rest nu moet afkanten. Er staat: Kant bij een hoogte van 32-33-35 cm aan weerszijden 8-8-8 st af voor het armsgat. Kant daarna 5-10-15 keer 1 st af voor het armsgat binnen 7 st (dwz 2 st av, 2 st r, 3 st av) in iedere 2e nld - . Het 10x1 steek binnen 7 steken begrijp ik niet helemaal. Misschien kunt u het wat duidelijker verwoorden?
05.10.2022 - 14:57DROPS Design answered:
Dag Marlies,
De 5-10-15 keer refereert naar de maten, dus als je de kleinste maar breit, minder je 5 keer, enzovoort. Het minderen binnen 7 steken houdt in dat je eerst 7 steken breit en dan mindert. Of als je aan het eind van de naald bent, zorgt dat je 7 steken over hebt na het minderen.
08.10.2022 - 16:47
![]() Sanna Scheelcke wrote:
Sanna Scheelcke wrote:
Vad menas med att ”Vidare avm det 1 m för ärmhål på insidan av 7 m (dvs 2 am, 2 rm, 3 am) 5-10-15 ggr ”?
16.01.2022 - 20:44
![]() Shelley McHugh wrote:
Shelley McHugh wrote:
Can you please clarify how to do the decreases on the sides of the neckline on the front? Do I keep the 11 sts which include cabling intact and do all decreases 'outside' these stitches? Also, if I decrease on WS by K3 together this affects the total number of stitches decreased in the 6 rows of decrease, so I would have decreased by 9 sts not 6. Is this correct? If so, I should not need to decrease by 1st in every other row for 12 rows to reach the required number of sts.
17.12.2021 - 21:43DROPS Design answered:
Dear Mrs McHugh, decrease as explained under "knitting tips for armhole shaping" which are the same tips as for neckline, ie decrease the 11th st towards neckline by purling this stitch + the next/previous 2 sts together from RS and by knitting this stitch + the next/previous 2 sts together from WS. You decrease first 6 times on every row (P3 tog from RS/K3 tog from WS) then 12 times on every other row (= on every row from RS). Happy knitting!
20.12.2021 - 07:06
![]() Shelley McHugh wrote:
Shelley McHugh wrote:
Hi, I can\'t find the \'knitting tips\' referenced in the pattern to help with decreasing 12 sts along the neck edge on the front. The only knitting tips in the pattern refer to decreasing for the armhole shaping. Should these 12 sts be decreased within the first 11 sts as happened when I was decreasing the first 6 stitches, but every in second/other row?
17.12.2021 - 11:20DROPS Design answered:
Dear Mrs McHugh, you will decrease for neck as you did for armhole, this means either with P2 tog inside the 11 first/last sts (= P2, K6 cable, P3) a total of 6 times on every row (from WS decrease by K 3 tog) then a total of 12 times on every other row. Can this help?
17.12.2021 - 13:15
![]() Helena wrote:
Helena wrote:
Danke für die Aufklärung! Trotzdem verstehe ich die Anleitung nicht: Die nächste Ndl so stricken (vom Hals): 2 li, 6 M werden wie den Zopf bei M.4 gestrickt, 2 M li zusammen, ...Bis hier ist klar, da habe ich bereits 1M abgenommen,aber der Rest? ...1 li, 2 M li zusammen, M.4 und danach die restlichen M in M.3 stricken ...Dann habe ich bereits 2M abgenommen und soll nochmals 1 abnehmen?
24.11.2021 - 16:51DROPS Design answered:
Liebe Helena, ja genau bei der 1. Reihe vom Halsauschnitt werden so 2 Maschen abgenommen aber dann werden Sie nur 1 M innerhalb 11 M zuerst 6 Mal in jeder Reihe dann 12 Mal in jeder 2. Reihe abnehmen = 51 M - 2 = 49 M - 6 -12 = 31 M übrig für den Schulter. Viel Spaß beims tricken!
25.11.2021 - 08:43
![]() Helena wrote:
Helena wrote:
Guten Tag Ich verstehe das Abketten beim Kragen nicht. Innerhalb der 11M, aber da mache ich doch den Zopf? Sind Abnahmen statt Abketten gemeint? Und weshalb steht da nach dem Zopf nochmals M4?
24.11.2021 - 12:25DROPS Design answered:
Liebe Helena, ja stimmt, hier wird es abgenommen und nicht abgekettet - Zopf M.4 folgt den Halszauschnitt (siehe 3.Foto), deshalb wird es innerhalb 11 M abgenommen. Viel Spaß beim stricken!
24.11.2021 - 15:47
![]() Claire Fournier wrote:
Claire Fournier wrote:
Merci pour votre réponse, mais on les fait comment? 2 mailles ensemble ou surjet et pour chacun des cotés (droite et gauche) pour que les diminutions soient bien orientées? Vous dites qu'il y a une correction pour ce patron on la retrouve ou?
26.02.2020 - 14:30DROPS Design answered:
Bonjour Mme Fournier, sur l'endroit, vous tricotez ensemble à l'envers la maille à diminuer avec la dernière (début de rang)/première (fin de rang) des 3 mailles envers. La correction se trouve en rouge à la fin des explications. Bon tricot!
26.02.2020 - 15:01
|
|||||||||||||||||||
Keep it Together |
|||||||||||||||||||
 |
 |
||||||||||||||||||
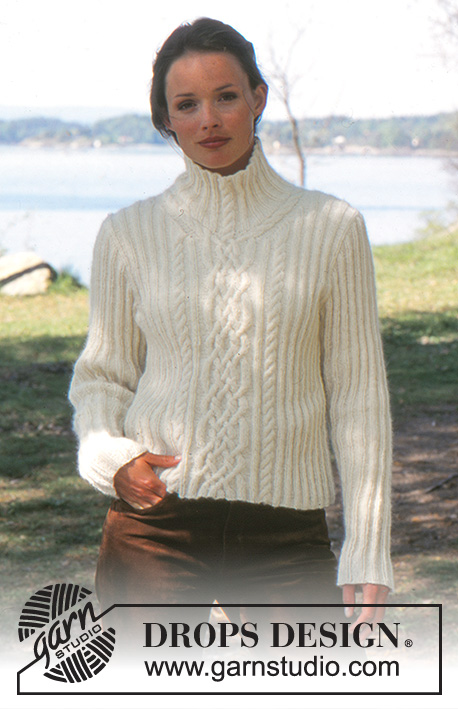
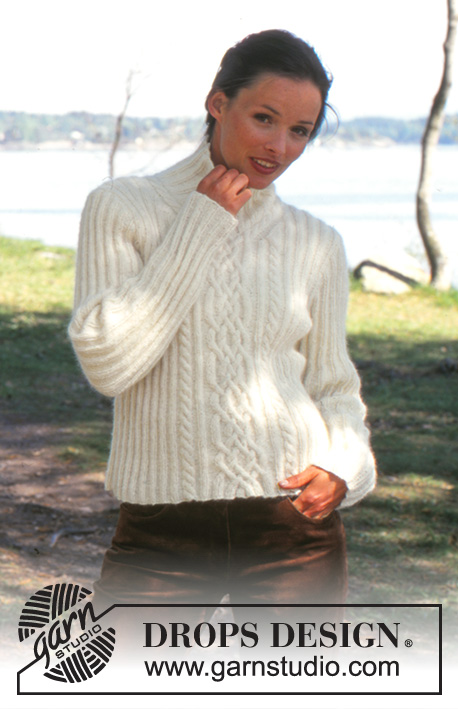
Knitted Pullover in DROPS Angora-Tweed or DROPS Puna or DROPS Soft Tweed
DROPS 67-4 |
|||||||||||||||||||
|
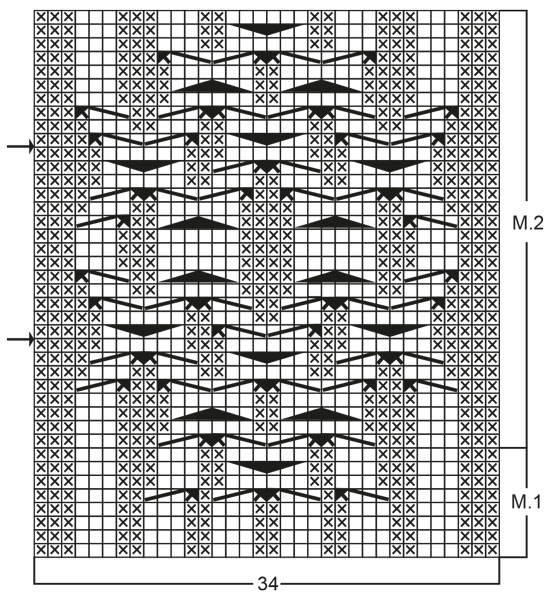
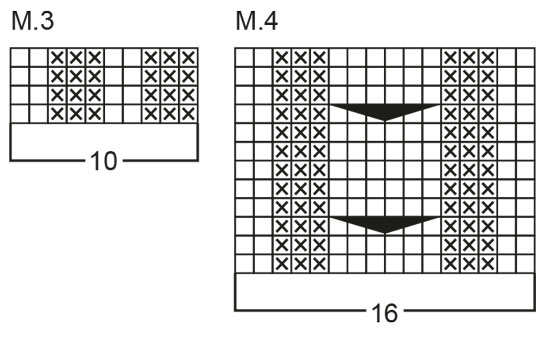
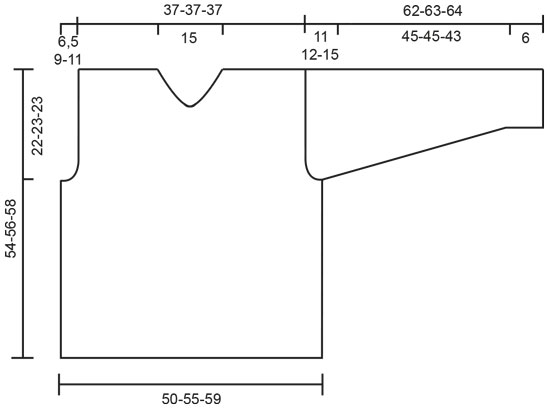
Gauge: 22 sts x 30 rows in stockinette st = 10 x 10 cm Garter st, when knitting flat: Knit all sts, all rows. Garter st, when knitting in the round: *Rnd 1, knit. Rnd 2, purl.* Repeat from * - *. Pattern: See charts. The pattern is seen from the right side. Knitting tips for armhole shaping: Dec 1 st from right side as follows: P tog the st to be decreased with the first of the P 3 sts. Dec 1 st from wrong side as follows: K tog the st to be decreased with the first of the K 3 sts. Front: Cast on 136-146-156 sts. Establish pattern on the first row (right side) as follows: K 1 (edge st knit in garter st throughout), K 1, 33-38-43 sts of Pattern 3, Pattern 4 (16 sts), Pattern 1 (34 sts), Pattern 4, 33-38-43 sts of Pattern 3, K 1, K 1 (edge st knit in garter st throughout). Continue with pattern as established – after Pattern 1 is complete repeat Pattern 2 over the center 34 sts. When the piece measures 32-33-35 cm bind off 8-8-8 sts at each side for armhole. Dec 1 st for armhole inside the 7 sts at edge (P 2, K 2, P 3) 5-10-15 times every other row - see knitting tips. After armhole shaping is complete there are 110-110-110 sts on needles. Continue in pattern until piece measures approx. 42/44-44/46-46/48 cm - adjust so you end after one of the arrows in Pattern 2. Put 8 sts at center front on a st holder for the neck = 51-51-51 sts each side. Knit the next row as follows (from neck edge): P 2, 6 sts continue the cables in Pattern 4, P 2 tog, P 1, P 2 tog, Pattern 4 and the remaining sts in Pattern 3 = 49 sts each side. Continue with pattern - at the same time dec 1 st for the neck inside the 11 sts at neck edge (P 2, 6 sts cable, P 3) 6-6-6 times every row, then 12-12-12 times every other row - see knitting tips = 31-31-31 sts remain on each shoulder. When the piece measures approx. 54-56-58 cm dec 4 sts over cables in Pattern 4 by K 3 tog across the 6 sts of the cable = 27 sts. On the next row bind off the remaining sts. Back: Cast on 112-122-132 sts and establish pattern on first row (right side) as follows: K 1 (edge st knit in garter st throughout), K 1, 108-118-128 sts in Pattern 3, K 1, K 1 (edge st knit in garter st throughout). Knit in pattern as established until the piece measures 32-33-35 cm then shape armholes as on front = 86-86-86 sts. When the piece measures approx. 52-54-56 cm bind off the center 28-28-28 sts for the neck. Bind off 2 sts at each neck edge on the next row = 27-27-27 sts remain on shoulder. When the piece measures 54-56-58 cm bind off all sts. Sleeve: Cast on 55-55-55 sts on double-pointed needles; join and place a marker at the join. Knit Pattern 3 over all sts. When the piece measures 6 cm inc 1 st each side of marker (make incs at each side of a K 2): 20-20-20 times alternately every 6th and 7th rows = 95-95-95 sts. When the piece measures 51-51-49 cm bind off 4 sts each side of marker and knit the rest back and forth on needles. Bind off for sleeve cap at each side every other row: 2 sts 4-3-1 times, 1 st 5-9-17 times, 2 sts 4-3-1 times and 3 sts 2-2-2 times. Bind off, the piece measures approx. 62-63-64 cm. Assembly: Sew shoulder seams - see that the ribs match up. Pick up around the neck on double-pointed needles as follows: 32 sts over back, 28 sts along each side of front neck + 8 sts from st holder at center front = 96 sts. Knit the 6 sts at center front continuing Pattern 4 (cable), each side the cable P 4, the remaining sts knit in Pattern 3 - see that the pattern matches the sts on the back. After 1 row dec the P 4 each side of cables to P 3. Continue with pattern over all sts. When collar measures approx. 12 cm dec 3 sts over cables at center front by K 2 tog across the 6 sts of the cable. On the next row bind off all sts in pattern. Sew side seams using edge sts as seam allowance. Sew in sleeves inside 2 edge sts on Body. |
|||||||||||||||||||
Diagram explanations |
|||||||||||||||||||
|
|||||||||||||||||||
 |
|||||||||||||||||||
 |
|||||||||||||||||||
 |
|||||||||||||||||||
Have you finished this pattern?Tag your pictures with #dropspattern or submit them to the #dropsfan gallery. Do you need help with this pattern?You'll find 21 tutorial videos, a Comments/Questions area and more by visiting the pattern on garnstudio.com. © 1982-2026 DROPS Design A/S. We reserve all rights. This document, including all its sub-sections, has copyrights. Read more about what you can do with our patterns at the bottom of each pattern on our site. |
|||||||||||||||||||


With over 40 years in knitting and crochet design, DROPS Design offers one of the most extensive collections of free patterns on the internet - translated to 17 languages. As of today we count 324 catalogues and 12290 patterns translated into English (UK/cm). 12290
We work hard to bring you the best knitting and crochet have to offer, inspiration and advice as well as great quality yarns at incredible prices! Would you like to use our patterns for other than personal use? You can read what you are allowed to do in the Copyright text at the bottom of all our patterns. Happy crafting!
Post a comment to pattern DROPS 67-4
We would love to hear what you have to say about this pattern!
If you want to leave a question, please make sure you select the correct category in the form below, to speed up the answering process. Required fields are marked *.