
Popular categories
Looking for a yarn?


Comments / Questions (35)
![]() Esther wrote:
Esther wrote:
Erstmal vielen Dank für die schnelle Antwort. Den maschenstich finde ich sehr gut. Aber - ich Kette ja die Krausrippenreihe nicht ab sondern starte ja mit ihnen. Hm? Benötige ich die denn wirklich oder kann ich sie einfach weglassen
04.03.2026 - 09:13DROPS Design answered:
Liebe Esther, oops ja sorry es stimmt, wahrscheinlich können Sie diese 2 Krausrippen am Anfang von jedem Teil weglassen, Rückenteil wird dann etwas unterschiedlich als wie im Foto aussehen. Viel Spaß beim Stricken!
05.03.2026 - 09:23
![]() Esther wrote:
Esther wrote:
Eine Frage habe ich noch :Wenn ich die strickrichtung betrachte und mit Krausrippenreihe beginne, dann habe ich beim zusammennähen eine deutlich sichtbare naht oder habe ich einen Denkfehler?
04.03.2026 - 06:01DROPS Design answered:
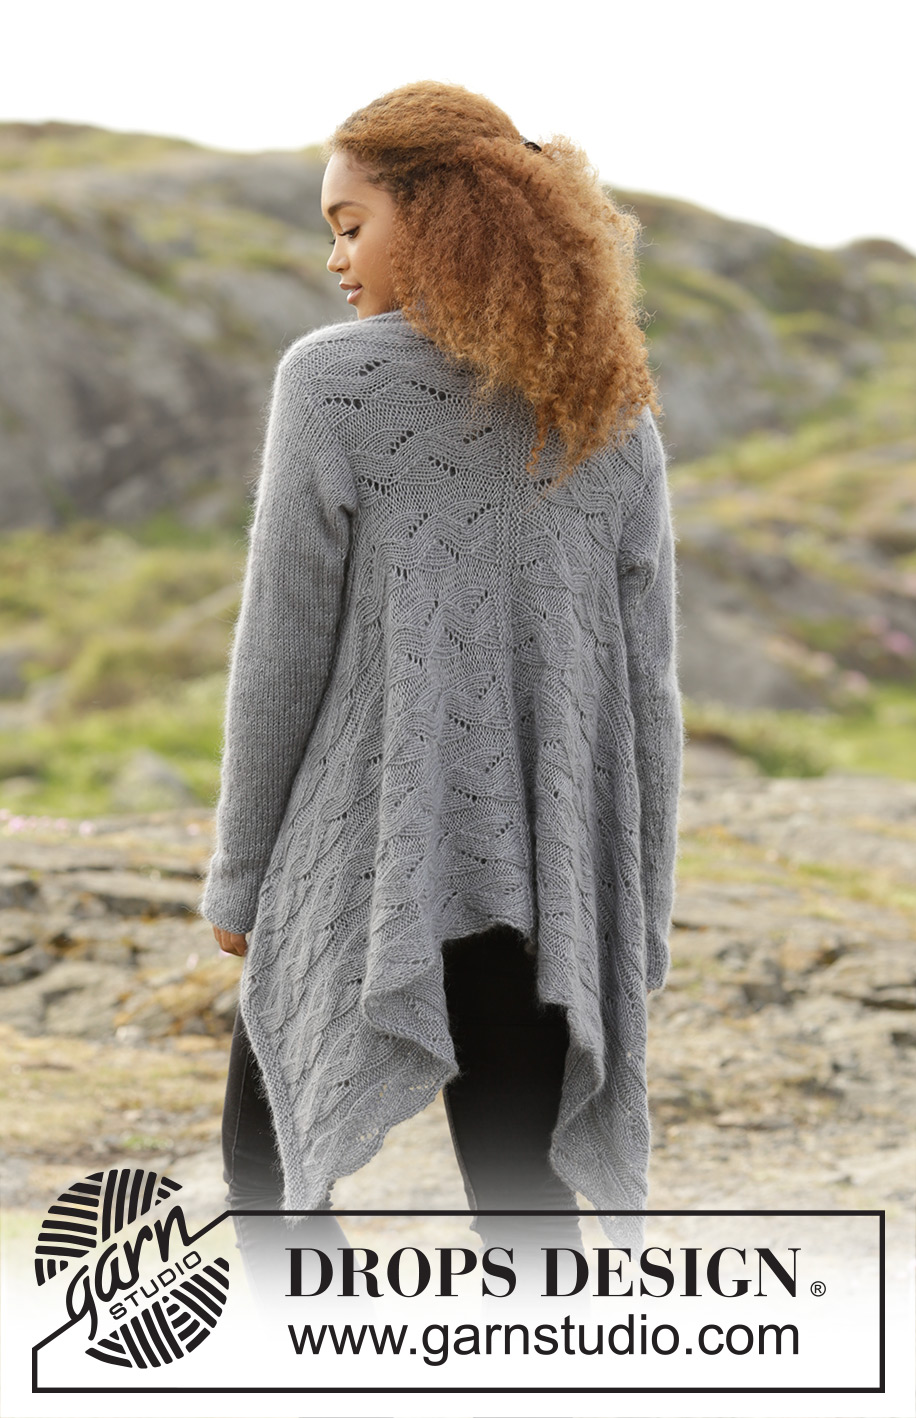
Liebe Esther, in der Mitte vom Rückenteil können Sie ja beim 2. Foto die Krausrippen schauen. Gerne könnnen Sie die Maschen nicht abketten und dann die beiden Teilen mit dieser Technik zusammennähen. Viel Spaß beim Stricken!
04.03.2026 - 08:06
![]() Esther Jürgens wrote:
Esther Jürgens wrote:
Auch ich hänge bei : Gleichzeitig in der ersten R 2 M über jedem Linksteil a' 4 M abnehmen. Das wie hab ich - glaube ich - verstanden. Auf was bezieht sich "in der ersten R" - auf die erste Krausrippenreihe?
03.03.2026 - 21:25DROPS Design answered:
Liebe Frau Jürgens, diese Abnahmen entstehen bei der 1. Reihe der 3 Krausrippen / der 6 Reihen kraus rechts. Viel Spaß beim Stricken!
04.03.2026 - 07:51
![]() Kaja wrote:
Kaja wrote:
Hi! If I want to make it with Drops Paris (one C strand instead of A+A), how many grams/metres do I need for size S? I tried to calculate, but I'm getting different results each time, so I figured I'd just ask. :) Thanks!
22.03.2025 - 01:11DROPS Design answered:
Hi Kaja, You need the same amount of yarn, whether you are working 2 A strands or 1 C strand. Happy knitting!
22.03.2025 - 12:04
![]() Merrilyn wrote:
Merrilyn wrote:
Hi, I can’t seem to find how much wool is required to knit this garment please advise.
11.04.2022 - 05:50DROPS Design answered:
Hi Merrilyn, The yarn amounts are specified below the title and pattern number at the top of the page. Happy crafting!
11.04.2022 - 07:11
![]() Sareith wrote:
Sareith wrote:
Bonjour, J'aimerais savoir quand rabattre à 43-44-46-48-54-57 cm de hauteur totale ou depuis l'emmanchure comme expliqué sur les mesures soit 17½-18-19-20-23-24½ cm + 43-44-46-48-54-57 ?? Dois je regarder le plan ou lire les instructions ?
05.01.2021 - 22:03DROPS Design answered:
Bonjour Mme Sareith! Vous devez rabattre à 43-44-46-48-54-57 cm depuis l'emmanchure (dans les explications vous avez plus tot la phrase MESURER MAINTENANT À PARTIR D'ICI, cela veut dire depuis l'emmanchure). Bon tricot!
06.01.2021 - 09:32
![]() Anna wrote:
Anna wrote:
Ho un dubbio sull'aumento: dalla foto sembra che nel giro successivo venga lavorato senza essere ritorto (infatti c'è il buco) mentre nelle istruzioni scritte dice chiaramente di lavorare l'aumento ritorto (per evitare il buco). Come fare? Grazie
22.03.2020 - 17:41DROPS Design answered:
Buongiorno Anna. Gli aumenti nei diagrammi vanno lavorati non ritorti, per formare un buco come vede nella fotografia. Il suggerimento per gli aumenti deve essere seguito quando viene indicato nel testo, p.es quando aumenta sulle maniche. Buon lavoro!
22.03.2020 - 20:58
![]() Hayly Wiggins wrote:
Hayly Wiggins wrote:
I love this pattern! I am working on my sleeve and have a question about the first increase. The pattern says “inc 1 at inside 1 edge st and K1 in each side of piece. I read this as 3 inc stitches, but the next line is -read increase tip (= 2 sts inc). Does this mean that I only do an increase stitch on one side of the piece?
23.02.2020 - 16:52DROPS Design answered:
Hi Hayly, You increase 1 stitch on each side of the piece, which means a total of 2 stitches increased on the row. The increases are worked after/before the 1 knitted edge-stitch on each side. Happy knitting!
24.02.2020 - 07:16
![]() Melanie wrote:
Melanie wrote:
Sorry, es sollte natürlich "Hallo Drops Design" und "ich hänge auch hier" und nicht "Haengesessel" heißen. LG
18.02.2020 - 20:08
![]() Melanie wrote:
Melanie wrote:
Hallo Mona, ich haengesessel auch hier: GLEICHZEITIG in der ersten R 2 M über jedem Linksbereich à 4 M abnehmen (indem 2 M re zusgestr werden). Stricke ich 2x2 oder 4x2 M re. Zusammen? Danke für deine Antwort. Herzliche Grüße Melanie
18.02.2020 - 20:02DROPS Design answered:
Liebe Melanie, alle Maschen stricken Sie jetzt rechts (Krausrippe), dh die Abnahmen werden über die linke Maschen mit 2 M rechts zusammen gestrickt. Viel Spaß beim stricken!
19.02.2020 - 09:08
|
|||||||||||||||||||
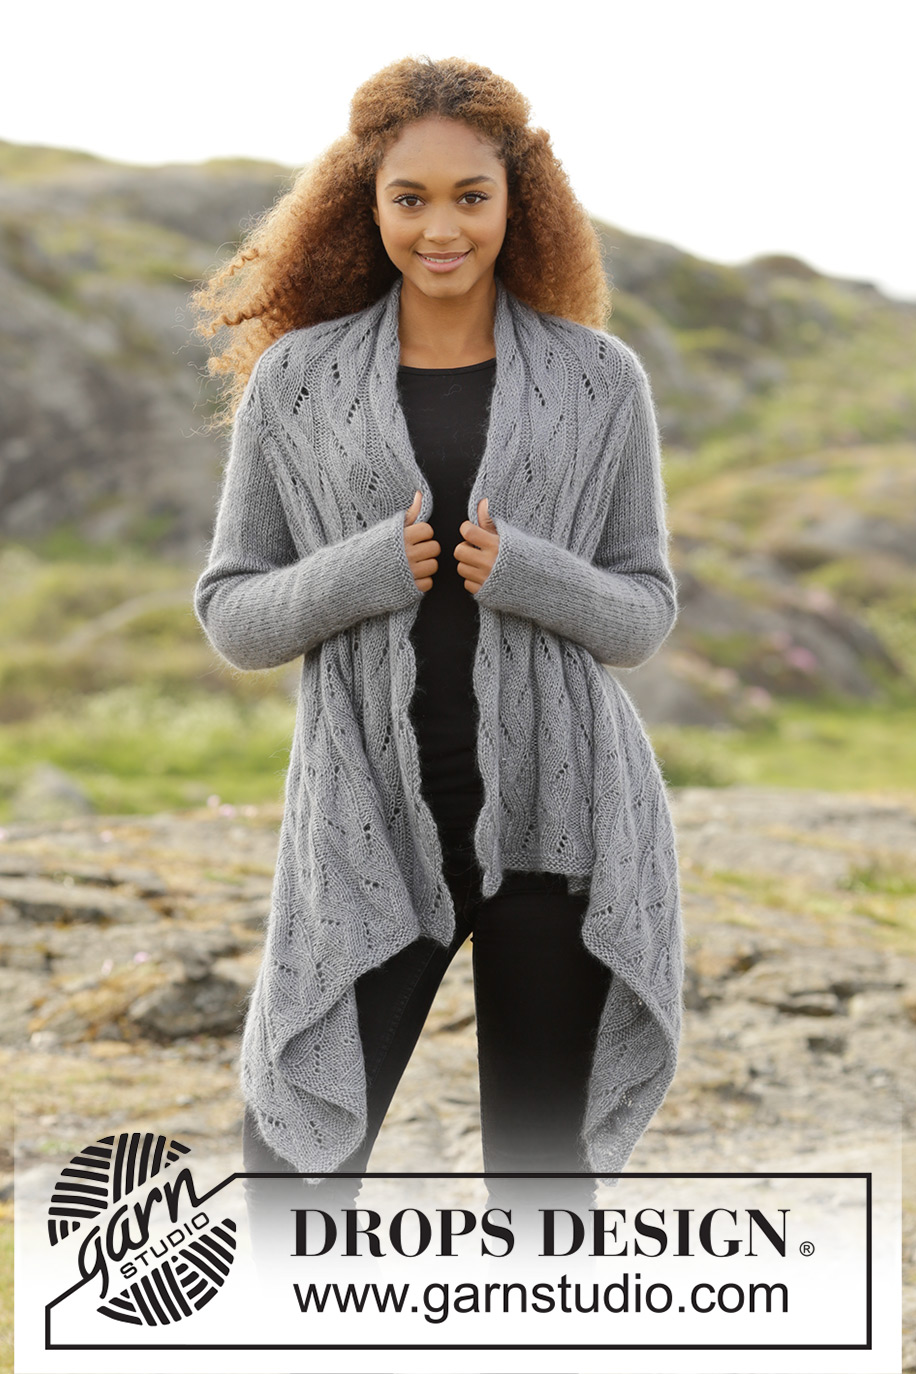
Winter Bird#winterbirdcardigan |
|||||||||||||||||||
 |
 |
||||||||||||||||||
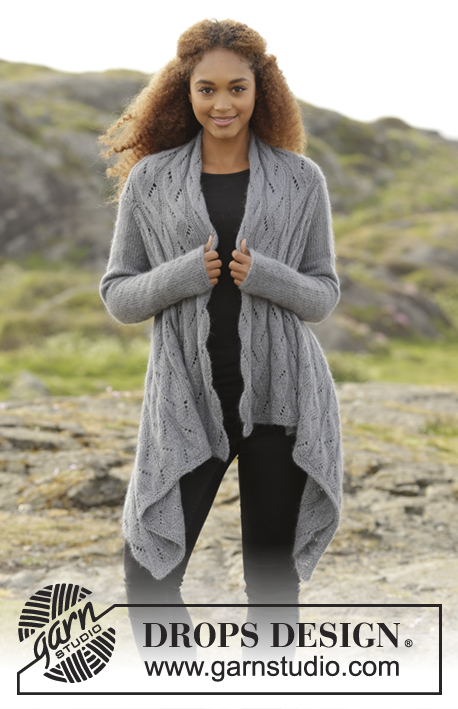
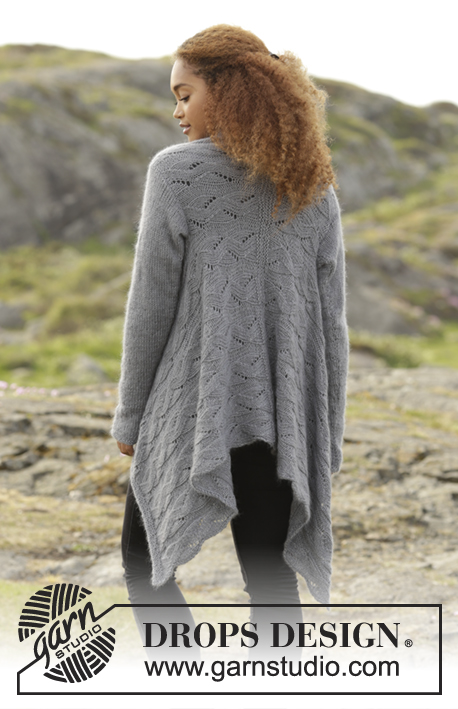
Knitted DROPS square jacket with lace pattern, worked sideways in "BabyAlpaca Silk" and "Kid-Silk". Size: S - XXXL.
DROPS 173-6 |
|||||||||||||||||||
|
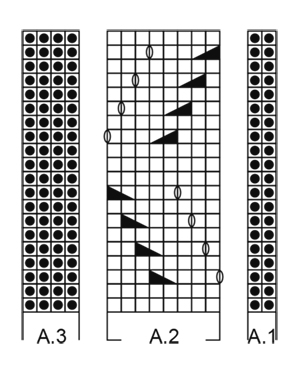
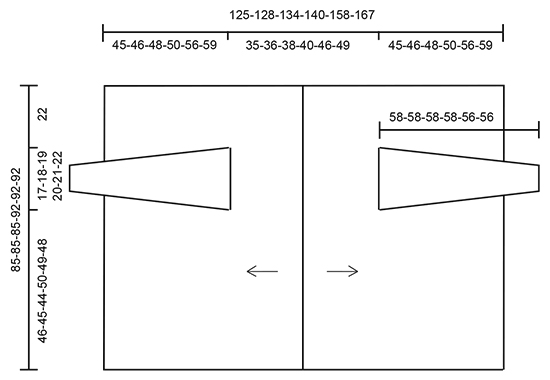
GARTER ST (back and forth): K all rows. 1 ridge = 2 rows K. PATTERN: See diagrams A.1 to A.3. The diagrams show all rows in pattern seen from RS. INCREASE TIP: All inc are done from RS. Inc inside 1 edge st in garter st and K 1: Making 1 YO, on next row, P YO twisted to avoid holes. ---------------------------------------------------------- JACKET: Worked in 2 parts sideways that are sewn tog mid back when finished. Work from mid back on back and towards mid front. LEFT BACK/FRONT PIECE: Worked back and forth on circular needle to make room for all the sts. Cast on 144-144-144-156-156-156 sts on needle size 4 mm with 1 strand BabyAlpaca Silk and 1 strand Kid-Silk (= 2 strands). Work 2 ridges in GARTER ST - see explanation above. Switch to circular needle size 5 mm and work as follows from RS: Work A.1 (= 2 sts) * A.2 (= 8 sts), A.3 (= 4 sts) *, repeat from *-* 10-10-10-11-11-11 more times, A.2 (= 8 sts), finish with A.1 (= 2 sts). Continue pattern like this. REMEMBER THE KNITTING TENSION When piece measures 17½-18-19-20-23-24½ cm, cast off for armhole from RS as follows: Work the first 38 sts, cast off the next 29-31-32-34-36-38 sts and work as before over the last 77-75-74-84-82-80 sts. NOW MEASURE PIECE FROM HERE! On next row cast on 29-31-32-34-36-38 new sts over the cast off sts and continue pattern as before. When piece measures 43-44-46-48-54-57 cm, work 3 ridges - AT THE SAME TIME on first row dec 2 sts over each P section of 4 sts (dec by K 2 tog) = 122-122-122-132-132-132 sts. LOOSELY cast off. RIGHT BACK/FRONT PIECE: Cast on and work as left back/front piece but cast off for armhole after the first 38 sts beg from WS and cast on new sts from RS. SLEEVE: Worked back and forth on circular needle. Cast on 38-38-40-40-44-44 sts (incl 1 edge st in each side) on circular needle size 4 mm with 1 strand BabyAlpaca + 1 strand Kid-Silk (= 2 strands). Work 2 ridges. Switch to circular needle size 5 mm and work in stocking st with 1 edge st in garter st in each side. When piece measures 11-12-12-13-12-11 cm, inc 1 st inside 1 edge st and K 1 in each side of piece - read INCREASE TIP (= 2 sts inc). Repeat inc every 4-3-3-2½-2½-2½ cm 11-13-13-15-15-16 times in total = 60-64-66-70-74-76 sts. When piece measures 53-53-53-53-51-51 cm (NOTE: Shorter measurements in the larger sizes because of broader shoulders), cast off for sleeve cap at beg of every row as follows: Cast off 4 sts 5 times in total in each side = 20-24-26-30-34-36 sts. Cast off the remaining sts, piece measures approx. 58-58-58-58-56-56 cm. Knit another sleeve. ASSEMBLY: Sew cast-on edges tog in outer loops of edge sts. Sew in sleeves. Sew underarm seams inside 1 edge st. |
|||||||||||||||||||
Diagram explanations |
|||||||||||||||||||
|
|||||||||||||||||||
 |
|||||||||||||||||||
 |
|||||||||||||||||||
Have you finished this pattern?Tag your pictures with #dropspattern #winterbirdcardigan or submit them to the #dropsfan gallery. Do you need help with this pattern?You'll find 21 tutorial videos, a Comments/Questions area and more by visiting the pattern on garnstudio.com. © 1982-2026 DROPS Design A/S. We reserve all rights. This document, including all its sub-sections, has copyrights. Read more about what you can do with our patterns at the bottom of each pattern on our site. |
|||||||||||||||||||


With over 40 years in knitting and crochet design, DROPS Design offers one of the most extensive collections of free patterns on the internet - translated to 17 languages. As of today we count 324 catalogues and 12290 patterns translated into English (UK/cm). 12290
We work hard to bring you the best knitting and crochet have to offer, inspiration and advice as well as great quality yarns at incredible prices! Would you like to use our patterns for other than personal use? You can read what you are allowed to do in the Copyright text at the bottom of all our patterns. Happy crafting!
Post a comment to pattern DROPS 173-6
We would love to hear what you have to say about this pattern!
If you want to leave a question, please make sure you select the correct category in the form below, to speed up the answering process. Required fields are marked *.