
Popular categories
Looking for a yarn?


Comments / Questions (88)
![]() Jeannette Pedersen wrote:
Jeannette Pedersen wrote:
Den blever meget lille i halsen er gået på på nål 5 og pillet op mange gange
22.03.2025 - 09:07DROPS Design answered:
Hei Jeannette. Bare pass på at du får den oppgitte heklefastheten med heklenål str. 5 da. Plagget har en del tyngde, slik at den vil sige litt ned når den has på. Blir den heklet for løs, vil den bare sige enda mer. mvh DROPS Design
24.03.2025 - 13:18
![]() Laura wrote:
Laura wrote:
Ohjeessa taitaa yhä olla virheitä? Milloin virkataan A.7, A.8 ja A.9? Ohjeessa myös käsketään virkkaamaan mallivirkkauksia A.11, A.12 ja A.13 "kunnes olet virkannut A.1/A.2/A.3 loppuun."
11.03.2025 - 17:14DROPS Design answered:
Kyllä, ohjeesta puuttui tekstiä. Ohje on nyt korjattu.
13.03.2025 - 18:15
![]() Pia wrote:
Pia wrote:
Ich bedanke mich für die ganzen Antworten aber ich habe noch eine Frage... Wo genau soll ich die 108FM hinhäkeln? Müssen da irgendwo 2FM rein gehäkelt werden. Weil ich habe ja nur 93M von den Schulter-Vorderteilen. Tut mir leid das ich so viele Fragen stelle
02.01.2025 - 19:52DROPS Design answered:
Liebe Pia, häkeln Sie 1 fMasche in jeder Luftmasche von der Luftmaschenkette am Anfang Schulter Vorderteil, dann bei der nächsten Reihe überspringen Sie fM wie bei der 1. Reihe Schulter Vorderteil. Viel Spaß beim Häkeln!
03.01.2025 - 15:50
![]() Pia wrote:
Pia wrote:
Hallo Ich habe glaube ein Fehler entdeckt Bin gerade bei linke Schulter Rückenteil und da soll eine Reihe FM in die 108Stb (Habe große Gr genommen mit 117LM). Aber laut Anleitung sind es beim Vorderteil am Anfang dann nur 93Stb. Bei 108Stb würde die wdh von 13x ja nicht gehen. Es müsste doch beim Rückenteil Rechts und Links 63-78-93 geschrieben sein und nicht 78-93-108.
29.12.2024 - 12:00DROPS Design answered:
Liebe Pia, bei der 1. Reihe Schulter Rückenteil häkeln Sie zuerst 108 fM, dann häkeln Sie wie bei der 1. Reihe Schulter Vorderteil = 63-78-93 Stäbchen. Viel Spaß beim Häkeln!
02.01.2025 - 14:15
![]() Pia wrote:
Pia wrote:
Guten Abend Ich bin gerade dabei die linke Schulter Vorderteil zu häkeln,aber komme nicht weiter... Die ersten 3Reihen habe ich gehäkelt und müsste jetzt laut Anleitung 3Lm und dann 7LM häkeln, ist das richtig so? Es soll ja bei der linken Schulter mit A.5 begonnen werden. Und noch eine Frage... wie wird dann die darauf folgende Reihe begonnen?
15.12.2024 - 22:27DROPS Design answered:
Liebe Pia, beim linken Vorderteil beginnen Sie mit A.5, dh die 1.Reihe A.5 (und alle ungerade Reihe) lesen Sie rechts nach links, die 2. Reihe und all gerade Reihen lesen Sie links nach rechts, so die 3. Reihe ist eine Hinreihe (lesen Sie links nach rechts) und begint mit 3 Luftmaschen (Wendemasche = das Stäbchen am Ende der 3. Reihe A.4) + 7 Luftmaschen (1. Luftmaschenbogen). Viel Spaß beim Häkeln!
16.12.2024 - 11:19
![]() Lucette wrote:
Lucette wrote:
Bonjour, Le schéma A13 ne devrait-il pas se faire sur 7 brides au lieu des 9 indiquées ? Je suis allée voir dans le modèle original et là ils écrivent bien sur 7 brides je crois. Neste rad (= fra retten) hekles slik: Hekle 1 st i hver av de første 2 st, A.11 over de neste 7 st, A.12 over de neste 135-165-195 st (= 9-11-13 ganger), A.13 over de neste 7 st, avslutt med 1 st i hver av de neste 2 st. Hekle A.11/A.12/A.13 totalt 1 gang i høyden.
04.09.2020 - 17:57DROPS Design answered:
Bonjour Lucette, effectivement, mais l'erreur vient probablement de la correction lorsqu'elle a été faite en norvégien, car A.13 se crochète bien sur 9 brides comme le montre le schéma: 2 brides, A.11 (= 7 m) A.12 (= 135-165-195 m), A.13 (= 9 m), 2 b= 2+7+135-165-195+9+2=155-185-215 m. Merci pour votre retour, la correction va être faite. Bon crochet!
07.09.2020 - 08:11
![]() RaeGina wrote:
RaeGina wrote:
Hello, I have completed the front and I am about to start the back. I am confused as how to start. Do I chain and continue, then sew the shoulder seams? Or do I crochet into the beginning chain of the front? Thanks!
28.07.2020 - 17:57DROPS Design answered:
Dear RaeGina, the shoulders on back piece are worked in the chain stitches of shoulders on front piece, ie instead of starting with the foundation chain, crochet 1 single crochet in each of the given double crochets of the shoulder, front piece. Happy crocheting!
29.07.2020 - 11:31
![]() Laurie wrote:
Laurie wrote:
Pour moi le rang 7 est sur l'envers et non sur l'endroit ? faut il joindre en fin de 6ème rang par une mc ou au milieu du 7ème rang ? et comment ? je suis complètement perdue impossible de comprendre le diagramme
10.06.2020 - 09:35DROPS Design answered:
Bonjour Laurie, le 1er rang des diagrammes a été crocheté sur l'endroit, tous les rang impairs sont donc sur l'endroit, y compris le 7ème rang. Les 2 épaules sont assemblées entre elles à la fin du 6ème rang de l'épaule gauche (= 1 mc dans l'épaule droite). Bon crochet!
10.06.2020 - 12:33
![]() Paige wrote:
Paige wrote:
Merci pour votre réponse! Pour moi le 1er "endroit" était juste, c'est le suivant et tout ce qui suit qui est inversé. Du moins il me semble en tous les cas c'est comme ça que j'ai fait^^ merci encore!
13.03.2019 - 16:28DROPS Design answered:
Bonjour Paige, il semble effectivement que les rangs envers/endroit ont été inversés, nos stylistes vont vérifier pour que la correction soit faite, merci. Bon crochet!
14.03.2019 - 09:40
![]() Paige wrote:
Paige wrote:
Bonjour Merci pour ce modèle que je me régale à crocheter! Il me semble qu'il y a une erreur sur l'indication endroit/envers car pour le devant il est écrit: "Crocheter le rang suivant (= sur l'ENDROIT) ainsi: (...) Crocheter le rang suivant (= sur l'ENDROIT)" 2 rangs de suite à l'endroit? c'est impossible non?merci beaucoup
13.03.2019 - 13:12DROPS Design answered:
Bonjour Paige et merci, effectivement, après A.X et A.Y (devant), le rang suivant se crochète sur l'envers = 155-185-215 B, puis on crochète le rang suivant sur l'endroit. La correction a été faite, merci. Bon crochet!
13.03.2019 - 15:04
|
|||||||||||||||||||||||||||||||||||||||||||||||||||||||||||||||||||
Graceful Mermaid#gracefulmermaidponcho |
|||||||||||||||||||||||||||||||||||||||||||||||||||||||||||||||||||
|
|
|||||||||||||||||||||||||||||||||||||||||||||||||||||||||||||||||||
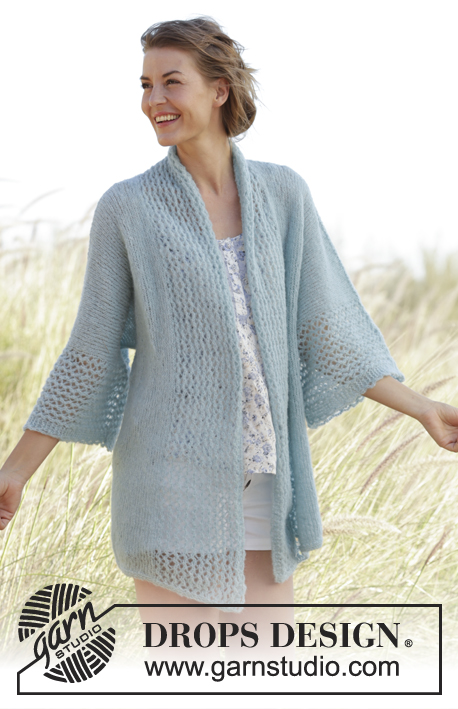
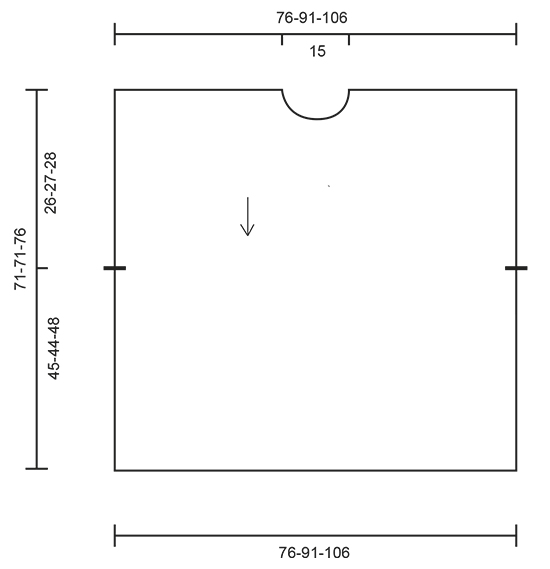
Crochet DROPS poncho with lace pattern, worked top down in ”Cotton Merino”. Size: S - XXXL.
DROPS 168-29 |
|||||||||||||||||||||||||||||||||||||||||||||||||||||||||||||||||||
|
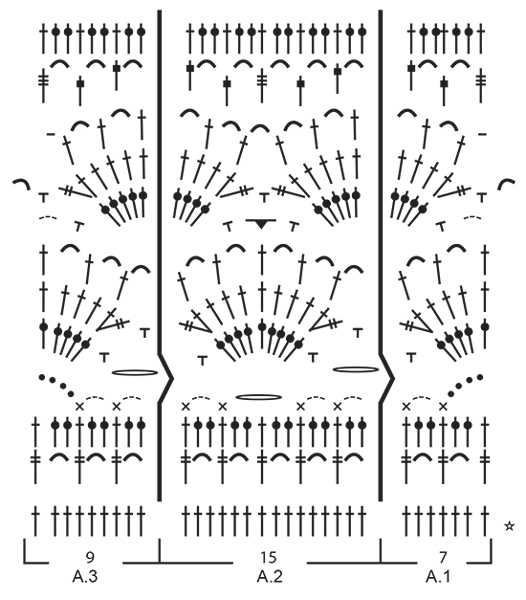
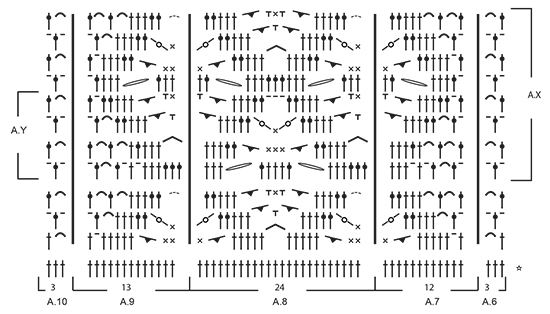
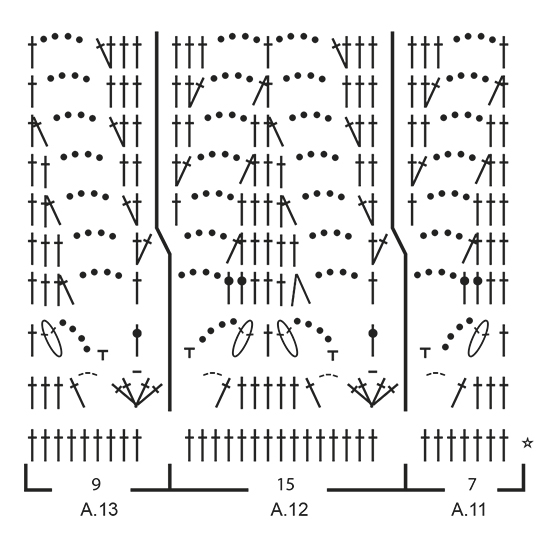
PATTERN: See diagrams A.1 to A.16. CROCHET INFO: Replace first tr at beg of every tr row with 3 ch. Replace first dtr at beg of every dtr row with 4 ch. Replace first dc at beg of every dc row with 1 ch. ---------------------------------------------------------- PONCHO: The poncho is the same at the front and back with opening in the sides. Work back and forth, top down. RIGHT SHOULDER - FRONT PIECE: Work 80-98-117 ch on hook size 3.5 mm with Cotton Merino. Turn and work 1 tr in 4th ch from hook (= 2 tr), 1 tr in each of the next 1-4-3 ch, * skip 1 ch, 1 tr in each of the next 4 ch *, repeat from *-* the entire row = 63-78-93 tr (incl 2 edge sts in the side). Work next row (= from RS) as follows: READ CROCHET INFO! 1 tr in each of the first 2 tr (= edge sts), A.1 over the next 7 tr, A.2 over the next 45-60-75 tr (=3-4-5 times), finish with A.4 over the next 9 tr. Work to and with 6th row. Put piece aside and work left shoulder. REMEMBER THE CROCHET TENSION! LEFT SHOULDER - FRONT PIECE: Work first row as on right shoulder - front piece = 63-78-93 tr. Work next row (= from RS) as follows: A.5 over the first 7 tr, A.2 over the next 45-60-75 tr (=3-4-5 times), A.3 over the next 9 tr, finish with 1 tr in each of the next 2 tr (= edge sts). Work to and with 6th row - NOTE: Fasten sl st at the end of A.5 in right shoulder so that the shoulder are fastened tog. Cut the yarn and beg to work from RS over both shoulders. FRONT PIECE: Continue on diagram (= 7th row), i.e. work next row (= from RS) as follows: 1 dc in each of the first 2 tr (= edge sts), A.1 over the next 7 tr, A.2 over the next 135-165-195 tr/ch (= 9-11-13 times) - NOTE: See last row in A.4/A.5 on how 7th row is worked over the middle 2 repetitions, A.3 over the next 9 tr, finish with 1 dc in each of the next 2 tr (= edge st). Work diagram A.1/A.2/A.3 1 time in total vertically (NOTE! You also begin and finish with 1 dc in first and last 2 dc's on row 8 and hereafter you work 1 tr in first 2 and last st on remaining rows)= 155-185-215 tr on last row. Work next row (= from WS) as follows: 1 tr in each of the first 2 tr, A.10 over the next 51-66-69 tr (= 17-22-23 times), A.9 over the next 13 tr, A.8 over the next 24-24-48 tr (= 1-1-2 times), A.7 over the next 12 tr, A.6 over the next 51-66-69 tr (= 17-22-23 times), finish with 1 tr in each of the next 2 tr. Work to and with 3rd row. Then work A.X 2-2-3 times in total vertically. Then work A.Y 1-1-0 times in total vertically. Work next row (= from RS) as follows: Work 1 tr in every tr/dc, 1 tr around every ch, 2 tr around every ch-space with 2 ch, 3 tr around every ch-space with 3 ch and 4 tr around every ch-space with 5 ch = 155-185-215 tr. Work next row (= from WS) as follows: Work 1 tr in each of the first 2 tr, A.3 over the next 9 tr, A.2 over the next 135-165-195 tr (= 9-11-13 times), A.1 over the next 7 tr, finish with 1 tr in each of the next 2 tr. Work A.3/A.2/A.1 1 time in total vertically = 155-185-215 tr on last row. Work next row (= from RS) as follows: Work 1 tr in each of the first 2 tr, A.11 over the next 7 tr, A.12 over the next 135-165-195 tr (= 9-11-13 times), A.13 over the next 7 tr, finish with 1 tr in each of the next 2 tr. Work A.11/A.12/A.13 1 time in total vertically. Work next row (= from WS) as follows: Work 1 tr in each of the first 2 tr, A.16 over A.13, A.15 over A.12 and A.14 over A.11. Then work 4th and 5th row in A.1/A.2/A.3, i.e. work next row (= from RS) as follows: Work 1 tr in each of the first 2 tr, A.1 over A.14, A.2 over A.15, A.3 over A.16, finish with 1 tr in each of the next 2 tr. Fasten off. LEFT SHOULDER - BACK PIECE: Work in left shoulder on front piece but in opposite direction, beg from WS. Instead of working ch and first tr-row work as follows: Work 1 dc in each of the 78-93-108 tr. Then work as right shoulder - front piece. RIGHT SHOULDER - BACK PIECE: Work in right shoulder on front piece but in opposite direction, beg from WS. Instead of working ch and first tr-row work as follows: Work 1 dc in each of the 78-93-108 tr. Then work as left shoulder - front piece. BACK PIECE: Continue as on front piece. NECK EDGE: Beg on one shoulder, work as follows along the entire neck from RS: 2 dc around every tr-row, 1 ch, 3 dc around every dtr row/ch-space, 1 ch etc. Finish with 1 sl st in first dc. Fasten off. TWINED STRING: Cut 2 lengths Cotton Merino yarn of 6 metres each. Twine the strands tog until they resist, fold the string double so that it twines again. Tie a knot in each end and thread it through a hole in the side on front and back piece, approx. 26-27-28 cm down from shoulder, tie a bow. Make another string and fasten it to the other side of poncho. |
|||||||||||||||||||||||||||||||||||||||||||||||||||||||||||||||||||
Diagram explanations |
|||||||||||||||||||||||||||||||||||||||||||||||||||||||||||||||||||
|
|||||||||||||||||||||||||||||||||||||||||||||||||||||||||||||||||||
 |
|||||||||||||||||||||||||||||||||||||||||||||||||||||||||||||||||||
 |
|||||||||||||||||||||||||||||||||||||||||||||||||||||||||||||||||||
 |
|||||||||||||||||||||||||||||||||||||||||||||||||||||||||||||||||||
 |
|||||||||||||||||||||||||||||||||||||||||||||||||||||||||||||||||||
 |
|||||||||||||||||||||||||||||||||||||||||||||||||||||||||||||||||||
Have you finished this pattern?Tag your pictures with #dropspattern #gracefulmermaidponcho or submit them to the #dropsfan gallery. Do you need help with this pattern?You'll find 9 tutorial videos, a Comments/Questions area and more by visiting the pattern on garnstudio.com. © 1982-2026 DROPS Design A/S. We reserve all rights. This document, including all its sub-sections, has copyrights. Read more about what you can do with our patterns at the bottom of each pattern on our site. |
|||||||||||||||||||||||||||||||||||||||||||||||||||||||||||||||||||


With over 40 years in knitting and crochet design, DROPS Design offers one of the most extensive collections of free patterns on the internet - translated to 17 languages. As of today we count 324 catalogues and 12290 patterns translated into English (UK/cm). 12290
We work hard to bring you the best knitting and crochet have to offer, inspiration and advice as well as great quality yarns at incredible prices! Would you like to use our patterns for other than personal use? You can read what you are allowed to do in the Copyright text at the bottom of all our patterns. Happy crafting!
Post a comment to pattern DROPS 168-29
We would love to hear what you have to say about this pattern!
If you want to leave a question, please make sure you select the correct category in the form below, to speed up the answering process. Required fields are marked *.