
Popular categories
Looking for a yarn?


Comments / Questions (91)
![]() Rossella wrote:
Rossella wrote:
Buongiorno, non mi trovo con il giro manica. Puoi spiegarlo meglio? sono taglia S\M. Per esempio, di quanti archetti deve risultare? grazie
29.03.2026 - 15:47DROPS Design answered:
Buonasera Rossella, per un'assistenza così personalizzata può rivolgersi al suo rivenditore DROPS di fiducia. Buon lavoro!
29.03.2026 - 23:31
![]() Paris wrote:
Paris wrote:
Comment fait on A2 et A3 en même temps merci
14.07.2025 - 16:52DROPS Design answered:
Bonjour Paris, vous allez crocheter alternativement A.2 et A.3 en largeur ainsi: (crochetez le 1er rang de A.2, puis crochetez le 1er rang de A.3), répétez de (à) tout le tour; au tout suivant, (crochetez le 2ème tour de A.2, puis le 2ème tour de A.3) et répétez de (à) tout le tour. Continuez ainsi jusqu'à ce que tous les rangs de A.2 et A.3 aient été crochetés. Bon crochet!
23.07.2025 - 11:43
![]() Engla Haldisdotter Roos wrote:
Engla Haldisdotter Roos wrote:
Stämmer första varvet i A2-A3 där 1 varv bara är 1 st i varje maska
29.06.2025 - 08:11DROPS Design answered:
Hej Engla, ja diagrammerne stemmer, så dem kan du følge :)
01.07.2025 - 09:34
![]() Llanos wrote:
Llanos wrote:
Buenas tardes. Tras hacerla fila de 36 p. altos, 40 cadenas, saltar 40 puntos, 100 p. altos, 40 cadenas , saltar 40 puntos y 36 p. altos (252 puntos). Que patron debo seguir?. Yo salto al patron A2 y A3 en la fila siguiente a la talla xxl/xxxl, pero al terminar no me quedan puntos. Cuantos puntos deben quedar en cada una de las 4 vueltas que siguen a esa vuelta de 252 puntos?. Muchas Gracias
30.03.2024 - 21:34DROPS Design answered:
Hola Llanos, tras tener 252 puntos, en la fila indicada en la pregunta, tenías que continuar trabajando el patrón sobre todos los puntos, excepto los puntos saltados para la sisa y las 40 cadenetas. En la siguiente fila continúas trabajando el patrón sobre los puntos de la fila anterior y trabajas alrededor de las cadenetas alrededor de la sisa. No tienes que saltar ninguna fila de los diagramas.
07.04.2024 - 22:35
![]() Llanos wrote:
Llanos wrote:
Buenos días. Tras terminar el diagrama A1, tengo 132 puntos pero al finalizar lis diagramas A2 y A3 en la fecha de mi talla, L/XL, no consigo los 252. En la 2 fila consigo 12o puntos, en la 3 y 4, tengo 180 puntos, 5 y 6 tengo 204 puntos y en la última vuelta consigo solo 228 en vez de 252 que debo tener.. no sé donde fallo!. Gracias
24.03.2024 - 10:37DROPS Design answered:
Hola Llanos, en la última fila tienes que tener (incluyendo las cadenetas y el punto de inicio de la fila) 21 puntos en cada repetición de A.2 y de A.3. 21x6 repeticiones de A.2 en la fila = 126 pts. 21 x 6 repeticiones de A.3 = 126 pts. 126 + 126 = 252 pts.
25.03.2024 - 00:42
![]() Kari wrote:
Kari wrote:
Hei. Jeg har fått problemer med forstå hvordan jeg løser rad 10 på mønsterrapportene A2 og A3. Mønsteret viser at jeg skal lage kjedemasker frem til første stav, og så starte med mønsteret. Hvor fra skal jeg telle 36 masker? Uansett hvor jeg starter kommer jeg til 36 midt i en luftmaskebue. Det må jo bli feil? Jeg ser at det er mange som har problemer med den omgangen. Hvordan få det korrekt?
22.02.2024 - 22:44DROPS Design answered:
Hei Kari. Du starter å telle fra 1.maske (= 1 stav i diagrammet, men hekles som 3 luftmasker). Så hekler du over 36 masker (om det da er str. L/XL du hekler etter). Den 36. masken = 1 luftmaske, så hekles det 40 luftmasker og hoppes over 40 masker. mvh DROPS Design
04.03.2024 - 08:52
![]() Kerstin Pauly wrote:
Kerstin Pauly wrote:
Meine ursprüngliche Frage wegen der Rauten ... ich soll also 3 Stäbchen in die gleiche Masche häkeln und zsm abnehmen, ok. In der Legende das Zeichen direkt da drunter, das auszieht wie ein Zirkel, funktioniert laut Text genauso, bloß dass es nur 2 Stäbchen sind. Sämtliche Diagramme von a2 bis a6 sehen aber so aus, als würden aus 2 Stäbchen der Vorrunde nun 1 Stäbchen, also einfach 2 Stäbchen zusammen abgemascht. Das ist was ganz anderes. Ist das nicht inkonsequent ?
16.11.2023 - 14:03DROPS Design answered:
Liebe Frau Pauly, ja genau mit dem 5. Symbol häkelt man 3 Stäbchen zusammen und bei dem 6. Symbol 2 Stäbchen zusammen; bi A.2 bis A.6 wird man das Ende von den Sternchen häkeln, so hat man weniger Stäbchen aber mehr Luftmaschen/Lufmaschenbogen/Stäbchen zwischen den Stäbchen. Viel Spaß beim häkeln!
17.11.2023 - 08:15
![]() Kerstin Pauly wrote:
Kerstin Pauly wrote:
Hallo. In a1 in Reihe 7 stehen diese Rauten, die laut Legende bedeuten, dass drei Stäbchen zu einem zusammen gehäkelt werden sollen. Es sind drei Rauten in einem Abschnitt, dafür sind doch eigentlich neun Maschen nötig, darunter sind aber nur sechs Maschen. Wie soll das funktionieren bitte ?
15.11.2023 - 16:25DROPS Design answered:
Liebe Frau Pauly, bei der 7. Rune A.1 häkeln Sie: (3 Stäbchen zusammen in das nächste Stäbchen, 1 Luftmasche, 1 Stäbchen überspringen) und von (bis) die ganze Runde wiederholen; über die 12 Stäbchen von jedem Rapport A.1 sind es jetzt 6 Mal (3 Stäbchen zusammen, 1 Luftmasche). Viel Spaß beim häkeln!
16.11.2023 - 09:33
![]() Angela wrote:
Angela wrote:
Hi when i am working A2 and A3 I end up making a fablous bag but definately not a cardigan what am i doing wrong. it all atarts to go wrong on row 2 and 3 of A2 and A3. If i do as you say and make 2 tr into 1 tr i end up with 15 points to my star and if i do over 2 stitches i end up with 12 as i should but this is when it sarts to look like a bag
24.04.2023 - 13:57DROPS Design answered:
Dear Angela, do you have 132 tr at the end of A.1? you should have a total of 12 points to your star, A.2 shos the end of the first point at the beg of the round + the beg of 2nd point, then A.3 shows the beg of 2nnd point + beg of 3rd point, so that working A.2, A.3 and repeat this pattern (A.2, A.3) should give you the 12 points - hope this can help. Happy crocheting!
24.04.2023 - 16:26
![]() Ulla Eilersen wrote:
Ulla Eilersen wrote:
Hej, Jeg kom til at skrive sm i stedet for st, men teksten står under HÆKLETIPS på side 1. Skal læses sammen med beskrivelsen af hækling af ærmer nederst side 2. Mvh Ulla
11.04.2023 - 17:52DROPS Design answered:
Hei Ulla. Litt usikker på om jeg skjønner hva du mener, men når du hekler rundt og rundt, hekles det 3 luftmasker + 1 stav (som gjentas rundt og rundt) om hver bue. Så er det viktig å la merketråden følge med oppover slik at ikke "midt under" forskyver seg, og når det felles hekles det ikke 3 luftmasker mellom stavene. mvh DROPS Design
17.04.2023 - 11:30
|
||||||||||||||||||||||||||||
Endless Love#endlesslovecardigan |
||||||||||||||||||||||||||||
 |
 |
|||||||||||||||||||||||||||
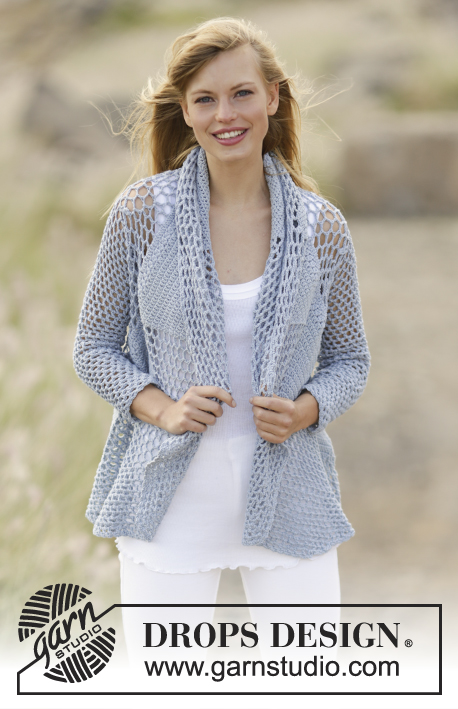
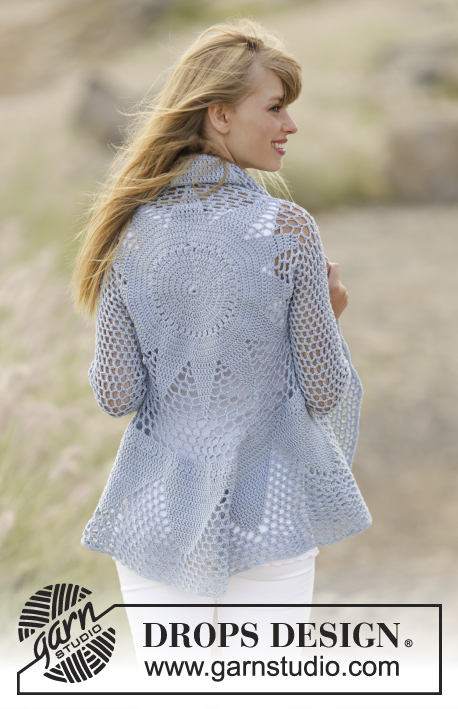
Crochet DROPS jacket worked in a circle with trebles and lace pattern in ”Cotton Merino”. Size S - XXXL.
DROPS 168-12 |
||||||||||||||||||||||||||||
|
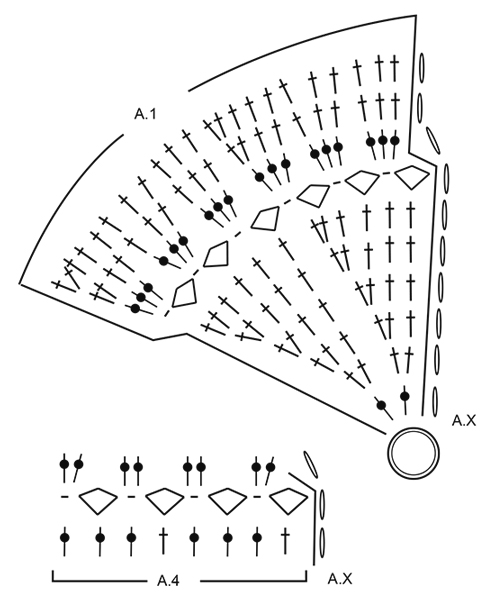
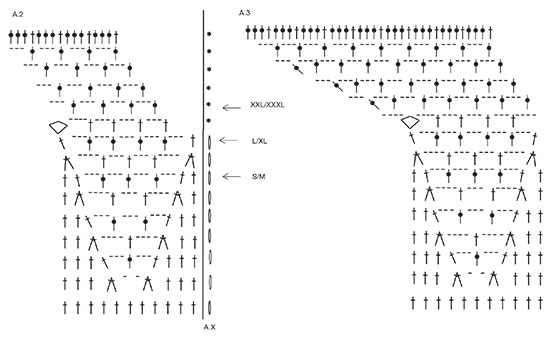
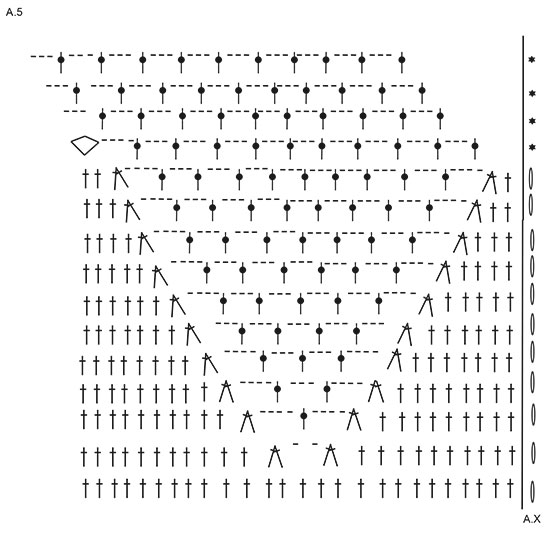
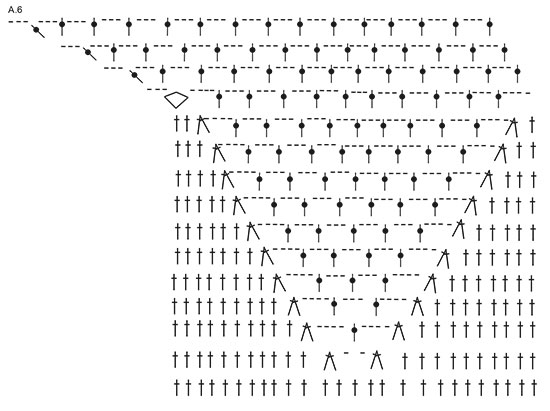
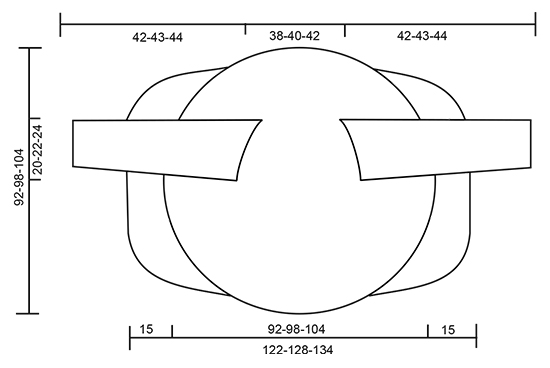
PATTERN: See diagrams A.1 to A.6. DECREASE TIP: Work 1 tr around next ch-space but wait with last pull through, work next tr around next ch-space (do not work 3 ch between tr), on last pull through, pull yarn through all 3 loops on hook. CROCHET TIP (applies to sleeve): After last tr on the round, continue to next round with 1 tr in next ch-space (= first ch-space on next round). NOTE: Insert 1 marker at the beg of round between last ch and first tr on the next round, move the marker upwards. NOTE: MAKE SURE NOT TO DISPLACE THE MARKER. ---------------------------------------------------------- JACKET WORKED IN A CIRCLE: Worked in the round from the centre and outwards. Work 4 ch with Cotton Merino on hook size 4 mm and form a ring with 1 sl st. Then work pattern according to diagram A.1 (= 6 repetitions in width) NOTE: A.x shows how every round beg and end, and is in addition to pattern. REMEMBER THE CROCHET TENSION! When entire A.1 has been worked vertically (= 132 tr), continue as follows: Work * A.2 (= 11 tr), A.3 (= 11 tr) *, repeat from *-* 6 times in total. Work up to and with arrow in diagram - see arrow for your size, there are now 228-252-264 sts on round. Work next round as follows: Continue to work over the first 34-36-38 sts, work 36-40-44 ch, and skip the next 36-40-44 sts (= armhole), work until 70-76-82 sts remain, work 36-40-44 ch and skip the next 36-40-44 sts (= armhole), continue to work over the last 34-36-38 sts. On next round continue according to pattern, work pattern as in diagram around ch-spaces in each side. When A.2 and A.3 have been worked, there are 312 tr on round. Continue with A.4 (= 39 repetitions on round). First round in A.4 shows last round in A.2/A.3, do not work this round. Continue to work as follows: Work * A.5 (= 26 tr), A.6 (= 26 tr) *, repeat from *-* 6 times in total. When A.5/A.6 have been worked, there are 600 sts on round (150 tr with 3 ch between each). Finish size S/M here. Size M/L -XXL/XXXL: Work 2-4 more rounds as last round in A.5/A.6 = 162-174 tr with 3 ch between. ALL SIZES: Piece measures approx. 46-49-52 cm from centre (92-98-104 cm in total). FRONT PIECES: Work back and forth in the one side with short rows. Cut the yarn, skip the first 13-16-19 tr on round, then work over the next 49 tr + ch-spaces as follows (insert a marker here): Work 3 ch, skip 1 ch-space, 1 dc around next ch-space, 3 ch (these 2 ch-spaces are no longer worked), 1 tr around next ch-space, work pattern as before until 2 ch-spaces remain (i.e. ch-spaces between tr, do not work around these 2 ch-spaces anymore), turn piece. Continue the short rows like this, AT THE SAME TIME inc 1 tr + 3 sts in the middle ch-space on every row (work 1 tr + 3 ch + 1 tr in this space). Continue with inc and dec on every row until piece measures 15 cm from marker. Skip 26-32-38 tr, then work short rows over the next 49 tr (13-16-19 tr remain on round). Work the same way as in the other side. CROCHET EDGE: Work an edge around the entire circle as follows: 1 dc around first ch-space, * 3 ch, 1 dc around next ch-space *, repeat from *-* and finish with 1 sl st in first dc. Fasten off. SLEEVES: Worked in the round, top down. Beg mid under one armhole, work 1 dc around first ch-space, 6 ch (= 1 tr + 3 ch), skip first tr and work 1 tr around next ch-space, * 3 ch, 1 tr around next ch-space *, repeat from *-* the entire round (work 1 tr + 3 ch around tr in corners), finish round with 1 tr around first 6 ch, then continue to work in the round without finishing it – READ CROCHET TIP = 21-23-25 tr + 21-23-25 ch-spaces. Continue with 1 tr + 3 ch around every space. When piece measures 4 cm, dec 1 ch-space before marker - READ DECREASE TIP! Repeat dec every 4½ cm 7 more times, dec alternately before and after marker = 13-15-17 tr + 13-15-17 ch-spaces. Continue until piece measures 42-43-44 cm. CROCHET EDGE SLEEVES: Crochet an edge around the sleeves as follows: 1 dc around first ch-space, * 3 ch, 1 dc around next ch-space *, repeat from *-* and finish with 1 sl st in first dc. Fasten off. Work the other sleeve the same way. |
||||||||||||||||||||||||||||
Diagram explanations |
||||||||||||||||||||||||||||
|
||||||||||||||||||||||||||||
 |
||||||||||||||||||||||||||||
 |
||||||||||||||||||||||||||||
 |
||||||||||||||||||||||||||||
 |
||||||||||||||||||||||||||||
 |
||||||||||||||||||||||||||||
Have you finished this pattern?Tag your pictures with #dropspattern #endlesslovecardigan or submit them to the #dropsfan gallery. Do you need help with this pattern?You'll find 7 tutorial videos, a Comments/Questions area and more by visiting the pattern on garnstudio.com. © 1982-2026 DROPS Design A/S. We reserve all rights. This document, including all its sub-sections, has copyrights. Read more about what you can do with our patterns at the bottom of each pattern on our site. |
||||||||||||||||||||||||||||


With over 40 years in knitting and crochet design, DROPS Design offers one of the most extensive collections of free patterns on the internet - translated to 17 languages. As of today we count 324 catalogues and 12290 patterns translated into English (UK/cm). 12290
We work hard to bring you the best knitting and crochet have to offer, inspiration and advice as well as great quality yarns at incredible prices! Would you like to use our patterns for other than personal use? You can read what you are allowed to do in the Copyright text at the bottom of all our patterns. Happy crafting!
Post a comment to pattern DROPS 168-12
We would love to hear what you have to say about this pattern!
If you want to leave a question, please make sure you select the correct category in the form below, to speed up the answering process. Required fields are marked *.