
Popular categories
Looking for a yarn?


Comments / Questions (60)
![]() Stieneke wrote:
Stieneke wrote:
Heeft deze steek ook een naam? recht aan de goede kant, averecht aan de verkeerde kant = recht aan de goede kant, averecht aan de verkeerde kant r aan de verkeerde kant = r aan de verkeerde kant
13.05.2025 - 16:02DROPS Design answered:
Dag Stieneke,
Je zou het misschien een variant van gerstekorrel kunnen noemen.
14.05.2025 - 08:56
![]() Jacqueline wrote:
Jacqueline wrote:
Guten Morgen, Ich verste bei der Anleitung Morning Walk nicht wann ich mit dem Schalkragen beginnen und auf welcher Höhe ich die Maschen dazu wie aufnehmen soll. Wäre sehr dankbar für eine Antwort. Liebe Grüße, Jacqueline
11.09.2023 - 10:11DROPS Design answered:
Liebe Jacqueline, die Maschen werden nicht extra angeschlagen; wenn die Maschen vom Schulter abgekettet sind, schlagen Sie neue Maschen an, die am Halsausschnitt vom Rückenteil angenäht werden, und so stricken Sie mit A.1 weiter (und 2 maschen krausrechts beidseitig); dann stricken Sie 3 Reihen rechts mit Zunahmen bei der 1. Reihe; und wieder mit A.1 mit 2 Maschen krausrechts beidseitig. Dann Abketten wenn der ganze Schalkragen 9 cm (nach den neuen angeschlagenen Maschen) misst. Viel Spaß beim stricken!
11.09.2023 - 13:54
![]() María wrote:
María wrote:
Los laterales de la chaqueta , están cosidos hasta bajo del todo o está abierto a partir de los 15 cm debajo de la sisa donde se pone el cordón?
05.11.2022 - 10:06
![]() Karrie Jacoby wrote:
Karrie Jacoby wrote:
I’ve never had a cardigan where the individual right and left front pieces have the same number of stitches as the back piece. For example, 69 sts for the back and 69 for both from pieces or a total of 138 sts for the front. Is this correct?
26.01.2021 - 00:30DROPS Design answered:
Dear Mrs Jacoby, this is correct, in 4th size you will have 69 sts for back piece and 63 sts for each front piece, as you can see on the picture (as well as on the measurement chart), front pieces are very wide here. Happy knitting!
26.01.2021 - 09:16
![]() Wladi wrote:
Wladi wrote:
Guten Tag. Dankeschön.
29.05.2020 - 11:30
![]() Wladi wrote:
Wladi wrote:
Guten Abend! Ich verstehe das mit einer Doppelhäkelarbeit nicht wirklich. In welcher Reihe und vor welcher Schleife machst du es? Danke.
28.05.2020 - 19:22DROPS Design answered:
Liebe Wladi, das erste muss 15 cm unter dem Armausschnitt (linken Seite) eingezogen: die 6 Fäden durch eine Masche ziehen (die sind jetzt doppelt = jetzt haben Sie 12 Fäden) und diese 12 zusammen flechten. Eine ähnliche Flecthe am Vorderteil einziehen, hier wird vom Schalkragen gemessen. Legen Sie die Jacke flach und so können Sie am besten die benötige Höhe für das 2. Bändchen finden. Die Jacke einziehen und prüfen ob die richtige Höhe passt. Viel Spaß beim stricken!
29.05.2020 - 07:57
![]() Johanna wrote:
Johanna wrote:
Ang. Höger framstycke; När man har maskar av maskor för axeln och skall fortsätta med kragen, skall man då fortsätta sticka varvet på samma sticka utan att klippa av garnet eller skall man avsluta axelpartiet och sedan fortsätta på kragen separat?
05.04.2020 - 06:53DROPS Design answered:
Hej Johanna, kan du få det til at stemme, så du bare fortsætter over maskerne på kraven, så gør du bare det :)
21.04.2020 - 11:34
![]() Venche wrote:
Venche wrote:
Er garnmengden virkelig korrekt? Vanlig genser med dobbel tråd air, 550 gram i str xl, her 800 gr ( det samme gjelder garnmengde på winter greeting)
05.03.2020 - 20:27
![]() Jolanda Kuiper wrote:
Jolanda Kuiper wrote:
Ik ben bezig met het achterpand en heb zojuist aan beide kanten 5 steken afgekant voor de mouwen. Tot dit punt zijn de eerste 2 en de laatste 2 steken van een naald in ribbelsteek. Het patroon zegt dat ik vanaf dit punt het patroon A1 moet breien als ervoor. Is dit dan zonder de eerste 2 en de laatste 2 steken van een naald in ribbelsteek?
08.12.2019 - 19:04DROPS Design answered:
Dag Jolanda,
Na het afkanten voor de mouwkop, brei je aan beide kanten 1 kantsteek in ribbelsteek en verder zet je het patroon A1 voort, dus zodat de juiste steken boven elkaar komen tov de vorige naald.
12.12.2019 - 10:43
![]() Els Welte wrote:
Els Welte wrote:
Het achterland heeft wel erg weinig steken, vergeleken bij 2 x voorpand. Volgends klopt dit niet.
20.11.2019 - 12:46DROPS Design answered:
Dag Els,
Ja, dat klopt, er zit een grote overslag op de voorpanden, waardoor ze bijna even breed zijn als het achterpand.
23.11.2019 - 16:23
|
|||||||
Morning Walk#morningwalkcardigan |
|||||||
|
|
|||||||
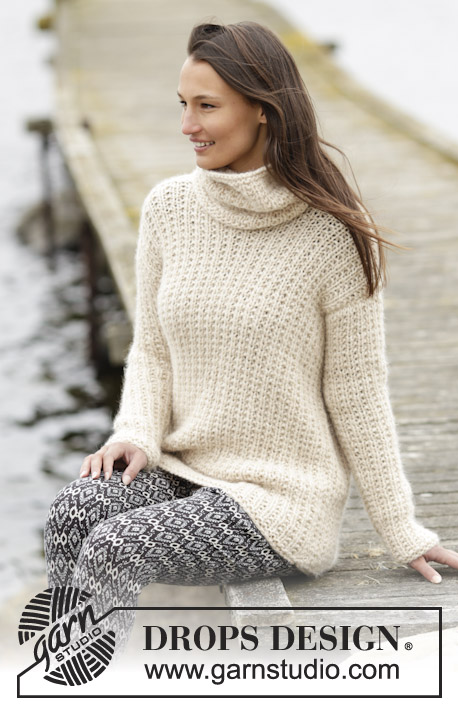
Knitted DROPS jacket with textured pattern and shawl collar in 1 thread Cloud or 2 threads Air. Size: S - XXXL.
DROPS 166-10 |
|||||||
|
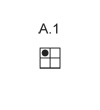
GARTER ST (back and forth): K all rows. 1 ridge = 2 rows K. PATTERN: See diagram A.1. The diagram shows all rows in pattern seen from RS. MEASURING TIP: All measurements must be done when holding the piece up on needle. INCREASE TIP: Inc with 1 YO, work YO twisted on next row to avoid holes. Work the inc sts in the pattern A.1. ---------------------------------------------------------- BACK PIECE: Worked back and forth on circular needle. Cast on 57-59-63-69-75-81 sts (incl 1 edge st in each side) on circular needle size 8 mm with 1 thread Cloud or 2 threads Air. Work 2 ridges in GARTER ST - see explanation above. Switch to circular needle size 9 mm. Then work as follows from RS: 1 edge sts in garter st, A.1 (= 2 sts) until 2 sts remain, K 1, 1 edge sts in garter st. REMEMBER THE KNITTING TENSION When piece measures 51-52-53-54-55-56 cm – READ MEASURING TIP – cast off 5 sts for armholes at beg of the next 2 rows = 47-49-53-59-65-71 sts. Work A.1 as before until piece measures 66-68-70-72-74-76 cm. Now cast off for neck as follows: Work A.1 over the first 19-20-21-24-26-29 sts as before, cast off the next 9-9-11-11-13-13 sts and work A.1 over the last 19-20-21-24-26-29 sts as before. Now finish each shoulder separately. On next row from the neck, cast off 1 st = 18-19-20-23-25-28 sts remain on shoulder. When piece measures 67-69-71-73-75-77 cm, work 1 ridge over all sts. Cast off. Work the other shoulder the same way. RIGHT FRONT PIECE: Worked back and forth on circular needle. Cast on 51-53-57-63-69-75 sts (incl 1 edge st in the side and 2 band sts towards mid front) on circular needle size 8 mm with 1 thread Cloud or 2 threads Air. Work 2 ridges in GARTER ST - see explanation above. Switch to circular needle size 9 mm. Then work as follows from RS: 2 band sts in garter st, A.1 (= 2 sts) until 1 st remains, 1 st in garter st. Work band sts in garter st until finished measurements. When piece measures 51-52-53-54-55-56 cm, cast off 5 sts for armhole at beg of row from WS = 46-48-52-58-64-70 sts. When piece measures 67-69-71-73-75-77 cm, adjust so that next row is from WS, work 1 ridge in garter st over the first 18-19-20-23-25-28 sts, A.1 until 2 sts remain on needle and finish with 2 band sts in garter st. Then cast off the first 18-19-20-23-25-28 sts on next row from WS (= shoulder) = 28-29-32-35-39-42 sts remain for shawl collar. On next row from RS, cast on 6-6-7-7-8-8 sts at the end of row = 34-35-39-42-47-50 sts. Work 1 ridge over the new sts, work the remaining sts in A.1, work band in garter st. Then work 2 band sts in garter st towards mid front and the remaining sts in A.1. When piece measures 4 cm from where the new sts were cast on, adjust so that next row is from RS, * K 3 rows, AT THE SAME TIME on first row inc 3-3-3-4-4-4 sts evenly * = 37-38-42-46-51-54 sts. Work 2 band sts in garter st towards mid front and A.1 over the remaining sts, until piece measures 9 cm (from where the new sts were cast on), adjust so that next row is from RS, then repeat from *-* = 40-41-45-50-55-58 sts. Cast off. LEFT FRONT PIECE: Work as right but reversed. Cast off for armhole at beg of row from RS. Cast off sts for shoulder at beg of row from RS, and cast on new sts at the end of row from WS. SLEEVE: Worked back and forth on needle. Cast on 26-26-28-28-30-30 sts (incl 1 edge st in each side) on circular needle size 8 mm with 1 thread Cloud or 2 threads Air. Work 2 ridges. Switch to circular needle size 9 mm. Work A.1 with 1 edge st in garter st in each side of piece. Continue like this. When piece measures 8 cm, inc 1 st inside 2 sts in each side of piece - READ INCREASE TIP! Repeat inc every 9½-8-8-6-6-4½ cm 4-5-5-6-6-7 more times = 36-38-40-42-44-46 sts. Cast off when piece measures 51-51-50-48-46-44 cm (shorter measurements in the larger sizes because of longer sleeve cap and wider shoulders). Knit another sleeve the same way. ASSEMBLY: Sew the shoulder seams. Sew the collar tog mid back and sew it to the neckline. Sew in sleeves. Sew the sleeve and side seams inside 1 edge st. TIES: Cut 3 strands of Cloud or 6 strands of Air, approx. 70 cm long, thread them half way through the side of jacket and approx. 15 cm down from armhole (try the jacket on and adjust), make a braid of approx. 22 cm, tie a knot, the remaining yarn becomes a tassel. Do the same mid front approx. 40 cm down (measured from shawl collar). |
|||||||
Diagram explanations |
|||||||
|
|||||||
 |
|||||||
 |
|||||||
Have you finished this pattern?Tag your pictures with #dropspattern #morningwalkcardigan or submit them to the #dropsfan gallery. Do you need help with this pattern?You'll find 17 tutorial videos, a Comments/Questions area and more by visiting the pattern on garnstudio.com. © 1982-2026 DROPS Design A/S. We reserve all rights. This document, including all its sub-sections, has copyrights. Read more about what you can do with our patterns at the bottom of each pattern on our site. |
|||||||


With over 40 years in knitting and crochet design, DROPS Design offers one of the most extensive collections of free patterns on the internet - translated to 17 languages. As of today we count 324 catalogues and 12290 patterns translated into English (UK/cm). 12290
We work hard to bring you the best knitting and crochet have to offer, inspiration and advice as well as great quality yarns at incredible prices! Would you like to use our patterns for other than personal use? You can read what you are allowed to do in the Copyright text at the bottom of all our patterns. Happy crafting!
Post a comment to pattern DROPS 166-10
We would love to hear what you have to say about this pattern!
If you want to leave a question, please make sure you select the correct category in the form below, to speed up the answering process. Required fields are marked *.