
Popular categories
Looking for a yarn?


Comments / Questions (97)
![]() Sylviane wrote:
Sylviane wrote:
Merci pour votre réponse . Pouvez vous me préciser à quel endroit je dois faire les augmentations pour le dos et le devant ? Est il possible pour vous de nous dire au premier rang où nous devons poser des marqueurs pour faire les augmentations des raglans , des manches , du dos et du devant en changeant les couleurs comme c’est fait pour certains modèles chez drops de façon à ce que nous ayons des repères ? ( je débute dans le tricot circulaire) 🤔 Un grand merci !
05.09.2024 - 17:36DROPS Design answered:
Bonjour Sylviane, au tout début de l'empiècement, après que vous avez tricoté A.1, vous trouverez la description de chaque pièce (dos, devant et manches), vous pouvez ajouter des marqueurs aux endroits où vous avez besoin de les avoir; augmentez pour le raglan comme indiqué sous RAGLAN: avant/après A.2: pour le dos avant le 1er A.2, pour la manche droite après le 1er A.2 et avant le 2ème A.2), pour le devant: après le 2ème A.2 et avant le 3ème A.2), pour la manche gauche après le 3ème A.2 et avant le 4ème A.2 et pour le demi-dos après le 4ème A.2. Bon tricot!
13.09.2024 - 09:13
![]() Sylviane wrote:
Sylviane wrote:
Bonjour, Serait-il possible d'obtenir les interrogations suivantes : ou devons nous faire les augmentations dos/ devant et manches? ( pas de marqueurs à poser pour se repérer!) - combien de fois pour le raglan? - on ne peut pas faire simultanément les augmentations des manches et des raglans de chaque coté de A2... - Comme on double A2 sur les manches , ça veut dire quoi de chaque coté de A2.... ? Un grand merci :)
28.08.2024 - 10:02DROPS Design answered:
Bonjour Sylviane, vous allez augmenter pour le raglan avant/après A.2 (mailles des raglans) - cf RAGLAN mais vous n'augmentez pas pour le devant/le dos au même rythme que pour les manches, autrement dit, vous augmenterez alternativement 8 mailles (dos, devant tous les tours + manches tous les 2 tours) et 4 mailles (dos devant tous les tours), puis, en fonction de la taille vous augmenterez tous les 2 tours pour le dos/le devant et tous les 4 tours pour les manches. Augmentez pour le dos/devant avant A2 à la fin du dos/devant et après A.2 au début du dos/devant; après A.2 et avant A.2 pour les manches. Bon tricot!
29.08.2024 - 09:26
![]() Gertraud wrote:
Gertraud wrote:
Muss der Mustersatz A.2 öfter gestrickt werden? Ich glaube ich müsste den komplett 2x stricken um auf die 17cm zu kommen. Oder hab ich was überlesen?
27.08.2024 - 15:54DROPS Design answered:
Liebe Gertraud, A.2 wird in der Höhe wiederholt, bis man die Maschen verteilt, dh bis 17 cm ab Schulter (und nicht ab Anschlagskante, dh 10 cm ab Anschlagskante in der vorderen/hinteren Mitte)) in die 1. Größe. Viel Spaß beim Stricken!
28.08.2024 - 08:47
![]() Gulli wrote:
Gulli wrote:
Hei. Jeg skjønner ikke hvordan det går an å øke for raglan hver omgang etter A-2, og samtidig øke til armer annen hver omgang!! Fins det en bedre forklaring enn på oppskriften? Håper at dere kan hjelpe, har prøvd, men det blir ikke pent. Mvh Gulli Bø
16.08.2024 - 07:19DROPS Design answered:
Hei Gulli, På den første omgangen, øker du før og etter alle A.2 (øker på både for- og bakstykket + ermene). På neste omgangen, øker du før første A.2 (på bakstykket) men ikke etter (på ermet), ikke øk før neste A.2 (fremdeles ermet), men etter (forstykket), øk før neste A.2 (fremdeles forstykket), men ikke etter (ermet), ikke før den siste A.2 (fremdeles ermet) men øk etter (bakstykket). På 3. omgangen øker du før og etter alle A.2 igjen, o.s.v. Håper dette hjelper og god fornøyelse.
20.08.2024 - 04:39
![]() Anni Sæterlid wrote:
Anni Sæterlid wrote:
Jeg ser på bilde av armen at det er rett masker mellom de 2 A2 på samme erme. Ser ut til at mønsteret følger raglan, hvordan gjør jeg det?
23.04.2024 - 23:07DROPS Design answered:
Hej Anni, Du tager ud til raglan på hver side af A.2, dvs A.2 forandres ikke, de nye masker strikkes i ret så det bliver til glatstrik :)
26.04.2024 - 08:19
![]() Sigrid Salmonsson wrote:
Sigrid Salmonsson wrote:
Vid ökningar på ärmen, är det på varje sida av armen alltså 2 maskors ökning på varje arm eller bara 1 maska per arm. Luddig beskrivning!
15.04.2023 - 15:41DROPS Design answered:
Hej Sigrid, du øger på hver side af A.2, det vil sige at når du øger på ærmet, så er det efter A.2 i den ene side og før A.2 i den anden side af samme ærme :)
18.04.2023 - 10:29
![]() Roberta Ciaraulo wrote:
Roberta Ciaraulo wrote:
I'm confused when it comes to the increasing for the raglan. Are the increases for the front/back and sleeves done at the same time? And where should the increases for the front/back and sleeves happen?
17.02.2023 - 17:22DROPS Design answered:
Dear Roberta, yes, the increases are worked simultaneously, but on different rows. For example, for size S, increase for the body every row 14 times, then every other row 7 times. On the other hand, for the sleeve, increase every 2nd row 2 times, then every 4th row 6 times. So, in some rows, you will increase only for the body or only for the sleeves. Happy knitting!
19.02.2023 - 20:34
![]() Evelyn wrote:
Evelyn wrote:
I can’t find how many skeins are needed for this pattern. How do I know how many I should order?
13.02.2023 - 17:01DROPS Design answered:
Dear Evelyn, material consumption is always shown in the header of the pattern, by the main photo of the model. In this case: Size: S - M - L - XL - XXL - XXXL Materials: DROPS MUSKAT from Garnstudio 300-350-350-400-450-450 g colour no 18, white DROPS Muskat is provided in 50 g balls, so you will need 6-7-7-8-9-9 balls of this yarn. Happy knitting!
13.02.2023 - 18:37
![]() Andrea wrote:
Andrea wrote:
Hallo, ich habe gerade mit diesem Modell angefangen, 154 M mit Nadel 3 angeschlagen, auf 4 gewechselt und bin nun am Andang der Raglanärmel zunahmen. Mein Problem ist, dass mir der Halsausschnitt extrem weit vorkommt. In der Skizze ist dieser mit 18 cm angegeben, bei meinen 154 M ist der Ausschnitt aber über 30 cm breit. Wo hab‘ ich denn da den Denkfehler? Ich stricke übrigens mit Original Dropswolle Muskat. Freue mich auf Ihre Antwort und bedanke mich schon mal vorab. Viele Grüsse
14.12.2022 - 00:08DROPS Design answered:
Liebe Andrea, die 18 cm in der Skizze sind für die Breite vom Hals, aber der Umfang ist 154 Maschen, davon einige für den Hals vorne und hinten und ca auch ein Teil für jede Schulter. Sollte Ihre Maschenprobe stimmen, dann sollten Sie auch das gleiche Ergebnis wie im Foto und in der Skizze bekommen. Viel Spaß beim stricken!
14.12.2022 - 08:09
![]() Anna wrote:
Anna wrote:
Bonjour, je ne suis pas assez claire sur les augmentations pour le raglan, on augmente avant/après A.2 (sur le dos/le devant et les manches) ? Est-ce possible de me détailler par rang où je dois les augmenter (rang 1, rang 2, 3, 4…) J’ai hâte de tricoter ce modèle ! Merci de votre aide Anna
25.08.2022 - 22:15DROPS Design answered:
Bonjour Anna, tout va dépendre de votre taille, car les augmentations des raglans se font à un rythme différent pour le dos/le devant et pour les manches - vous allez augmenter après A.2 (début du dos, devant et manches) et avant A.2 (fin du dos, devant et manches), mais vous augmenterez parfois 8 mailles (= 2 pour le dos, le devant et les manches) parfois seulement 4 mailles (quand on doit augmenter tous les tours pour le dos/le devant alors qu'on augmente tous les 2 tours pour les manches)? Bon tricot!
26.08.2022 - 09:30
|
||||||||||||||||||||||
Esther#esthertop |
||||||||||||||||||||||
 |
 |
|||||||||||||||||||||
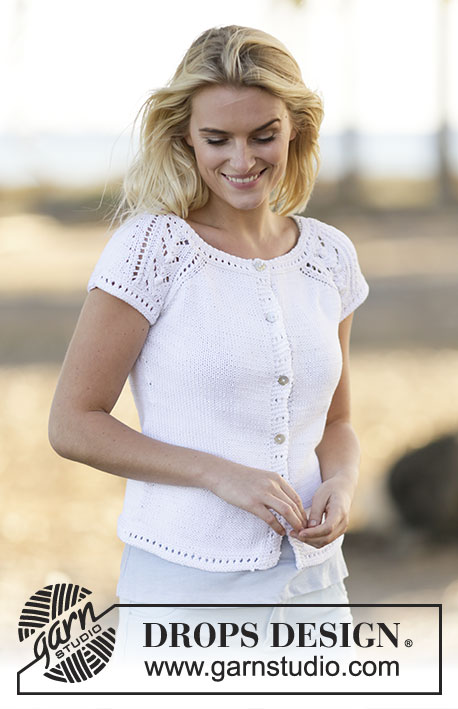
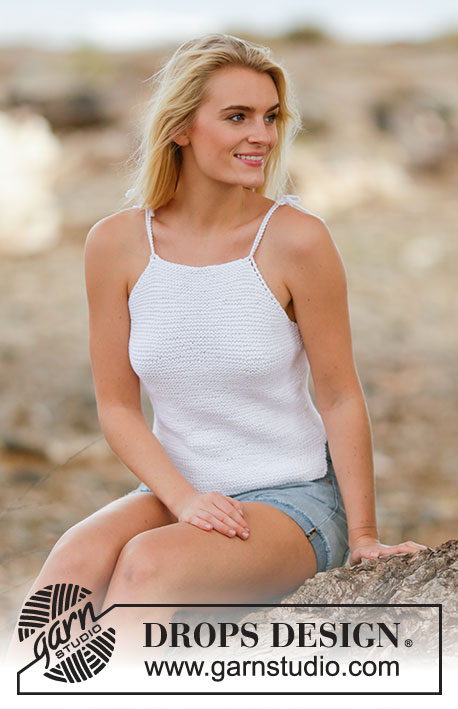
Knitted DROPS top with raglan and lace pattern, worked top down with short sleeves in ”Muskat”. Size: S - XXXL.
DROPS 159-33 |
||||||||||||||||||||||
|
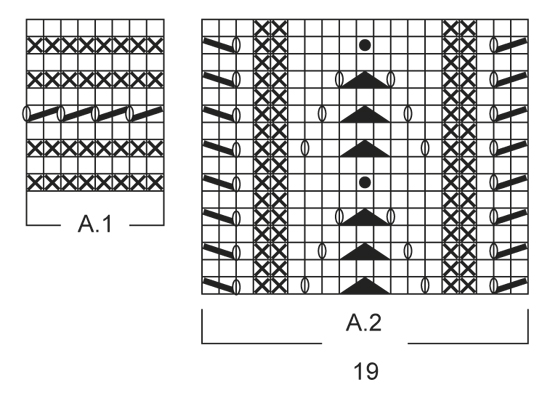
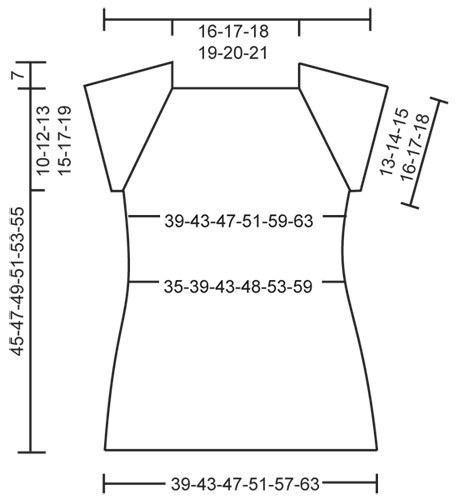
PATTERN: See diagrams A.1-A.2. RAGLAN: Inc for raglan on each side of A.2. Inc with a YO, work YO twisted on next round to avoid holes. The inc on body and sleeves are uneven as explained in pattern. INCREASE TIP: Beg 1 st before marker and inc as follows: 1 YO, K 2 (marker is between these 2 sts), 1 YO. On next round K YOs twisted to avoid holes. DECREASE TIP: Dec as follows before marker: K 2 tog. Dec as follows after marker: Slip 1 st as if to K, K 1, psso. ---------------------------------------------------------- TOP: Worked in the round on circular needle, top down. YOKE: READ ALL OF THE FOLLOWING SECTION BEFORE CONTINUING! Cast on 146-150-154-158-162-166 sts on circular needle size 3 mm with Muskat. Work A.1. When A.1 has been worked, switch to circular needle size 4 mm. Work next round as follows from mid back: Work 17-18-19-20-21-22 sts in stocking st (= back piece), work A.2 (= 19 sts), 1 st in stocking st, A.2 (= 19 sts) (= 39 sts on sleeve), work 34-36-38-40-42-44 sts in stocking st (= front piece), work A.2, 1 st in stocking st and A.2 (= 39 sts on sleeve) and finish with 17-18-19-20-21-22 sts in stocking st (= back piece). Continue pattern like this AT THE SAME TIME inc for RAGLAN beg on next round - see explanation above. Inc on front/back piece: 1 st every round a total of 14-16-18-20-26-30 times, then on every other round 7-8-9-10-9-9 times. Inc on sleeves: 1 st every other round a total of 2-4-6-8-10-12 times and then every 4th round a total of 6 times in all sizes. After all inc there are 262-286-310-334-366-394 sts on row, continue working until the piece measures approx. 17-19-20-22-24-26 cm from shoulder and down. Work next round as follows: K 38-42-46-50-56-61 (= back piece), slip the next 55-59-63-67-71-75 sts on a stitch holder for sleeve, cast on 6-6-6-8-8-10 new sts, insert 1 marker in the middle of the new sts, K 76-84-92-100-112-122 (= front piece), slip the next 55-59-63-67-71-75 sts on 1 stitch holder for sleeve, cast on 6-6-6-8-8-10 new sts, insert 1 marker in the middle of the new sts and K the remaining 38-42-46-50-56-61 (= back piece) = 164-180-196-216-240-264 sts on row - NOW MEASURE PIECE FROM HERE. BODY: Continue in stocking st. When piece measures 4 cm, dec 1 st on each side of markers in the side - READ DECREASE TIP (= 4 sts dec). Repeat dec every 4 cm a total of 4 times = 148-164-180-200-224-248 sts. When piece measures 22 cm in all sizes, inc 1 st on each side of markers in the side - READ INCREASE TIP (= 4 sts inc). Repeat inc every 2 1/2 cm a total of 4 times = 164-180-196-216-240-264 sts. When piece measures 33-33-34-34-34-34 cm, switch to circular needle size 3 mm. Work pattern according to diagram A.1 and then loosely cast off. Top measures approx. 52-54-56-58-60-62 cm from shoulder and down. SLEEVE EDGE: Worked in the round on double pointed needles. Slip the 55-59-63-67-71-75 sts from stitch holder back on double pointed needles size 3 mm and cast on 6-6-6-8-8-10 new sts under sleeve = 61-65-69-75-79-85 sts. Work pattern in the round according to diagram A.1 and then loosely cast off. Work the other sleeve edge the same way. ASSEMBLY: Sew tog under sleeves. |
||||||||||||||||||||||
Diagram explanations |
||||||||||||||||||||||
|
||||||||||||||||||||||
 |
||||||||||||||||||||||
 |
||||||||||||||||||||||
Have you finished this pattern?Tag your pictures with #dropspattern #esthertop or submit them to the #dropsfan gallery. Do you need help with this pattern?You'll find 24 tutorial videos, a Comments/Questions area and more by visiting the pattern on garnstudio.com. © 1982-2026 DROPS Design A/S. We reserve all rights. This document, including all its sub-sections, has copyrights. Read more about what you can do with our patterns at the bottom of each pattern on our site. |
||||||||||||||||||||||


With over 40 years in knitting and crochet design, DROPS Design offers one of the most extensive collections of free patterns on the internet - translated to 17 languages. As of today we count 324 catalogues and 12290 patterns translated into English (UK/cm). 12290
We work hard to bring you the best knitting and crochet have to offer, inspiration and advice as well as great quality yarns at incredible prices! Would you like to use our patterns for other than personal use? You can read what you are allowed to do in the Copyright text at the bottom of all our patterns. Happy crafting!
Post a comment to pattern DROPS 159-33
We would love to hear what you have to say about this pattern!
If you want to leave a question, please make sure you select the correct category in the form below, to speed up the answering process. Required fields are marked *.