
Popular categories
Looking for a yarn?


Comments / Questions (55)
![]() Johanna wrote:
Johanna wrote:
Guten Tag, ich finde die Zunahme sehr schlecht beschrieben und verstehe nicht, in welcher Weise sie geschene soll. Wenn ich richtig zähle, gibt es in manchen Reihen eine ungerade Anzahl von Zunahmen... Stimmt das? Nimmt man manchmal 9 und manchmal 8 M zu? Und an welchen Stellen genau, wenn die Zunahme der Maschen ungerade ist? Wie verteilt sich das? Ich wäre sehr dankbar über eine genaue Beschreibung der Zunahme!
22.09.2018 - 00:26DROPS Design answered:
Liebe Johanna, die Raglanzunahmen sind unterschiedlich je nach der Größe und auf dem Rumpfteil und auf den Ärmeln: Beim Rumpfteil: Sie zuerst in jeder Reihe (Hin- sowie Rückreihen), dann in jeder 2. Reihe (jeder Hinreihe) und dann jeder 4. Reihe (jeder 2. Hinreihe) = 2 M Rückenteil und 1 M am jeden Vorderteil. Bei den Ärmeln: in jeder Reihe (= Hin sowie Rückreihen), dann in jeder 2. Reihe und dann in jeder 4. Reihe. Die Zunahmen werden vor A.1 (li. Vorderteil, Ende beide Ärmel und Rückenteil) und nach A.1 (Anfang Ärmel, Rückenteil und re. Vorderteil). Siehe RAGLAN. Viel Spaß beim stricken!
24.09.2018 - 11:17
![]() Adelgunde wrote:
Adelgunde wrote:
Kann ich diese Jacke anstatt glatt rechts auch kraus rechts stricken?
06.09.2018 - 21:45DROPS Design answered:
Liebe Adelgunde, die Maschenprobe krausrechts würde dann unterschiedlich, am besten suchen Sie eine Anleitung mit krausrechts, so brauchen Sie nichts anzupassen. Viel Spaß beim stricken!
24.09.2019 - 14:10
![]() Pilar wrote:
Pilar wrote:
Buenos días, Para el aumento del raglán, entiendo que se tiene que aumentar 1p. antes de la muestra, en total 8 por cada hilera LD, pero no entiendo los aumentos de cuerpo y mangas. Gracias y saludos!
27.08.2018 - 09:49DROPS Design answered:
Hola Pilar, el número de aumentos en la fila no es siempre 8 puntos. Hay filas en las que se aumenta sólo para el cuerpo o sólo en las mangas, lee con atención en las explicaciones cuántas veces y cada qué fila se trabajan los aumentos.
28.08.2018 - 19:43
![]() Tobi wrote:
Tobi wrote:
Hallo, habe jetzt irgendwie ein Brett vorm Kopf, oder denke zu kompliziert. Bei den Zunahmen für das Rumpfteil soll ich ja In jeder R 0-2-5-8-10-12 x, danach in jeder 2. R 4-4-3-4-4-8 x und danach in jeder 4. R 5-5-5-4-4-2 x zunehmen. Heißt doch jetzt für mich: 1. Reihe 2M zunehm., 2. Reihe 2M + 4M zunehm., 3. Reihe 2M zunehm., 4. Reihe 2M + 4M + 5M oder? Also in 4 Reihen insgesamt 21M zunehmen? LG
29.01.2018 - 10:21DROPS Design answered:
Lieber Tobi, in der Größe M werden Sie so zunehmen: Rumpfteil: in jeder Reihe 2x, in jeder 2. Reihe 4 x und in jeder 4. Reihe 5x und gleichzeitig für die Ärmel: in jeder Reihe 6x, in jeder 2. Reihe 4x und in jeder 4. Reihe 4x. D.h.Sie werden manchmal 4 Maschen zunehmen (= Rücken- und beide Vorderteile) und manchmal 8 Maschen zunehmen (= Rumpfteil und Ärmel). Viel Spaß beim stricken!
29.01.2018 - 10:37
![]() Lelletta wrote:
Lelletta wrote:
Buonasera! Mi piace molto questo cardigan, ma mi piacerebbe più accollato. Se metto meno maglie e faccio qualche ferro in più a coste, per poi arrivare al n.° di maglie richiesto (54 per la taglia M) e proseguire normalmente? E se si, quante maglie mi consigliate di mettere? Scusate per l'inconsueta domanda! Attendo come al solito la Vs/rapida risposta e Vi saluto ringraziandoVi! :)
14.01.2018 - 22:09DROPS Design answered:
Buonasera Lelletta. Sì può provare con meno maglie e qualche ferro in più. Per il numero delle maglie, potrebbe aiutarla misurare uno scollo di una maglia simile e in base al campione calcolare quante maglie avviare. Buon lavoro!
16.01.2018 - 21:10
![]() Marie Lavie wrote:
Marie Lavie wrote:
Bonjour, il n'est pas mentionné dans le modèle combien doivent mesurer les bordures (avec et sans les boutonnières) merci de votre aide Marie
09.01.2018 - 01:18DROPS Design answered:
Bonjour Mme Lavie, effectivement, nos stylistes vont y regarder de plus près, merci d'avance pour votre patience.
09.01.2018 - 09:41
![]() PIERROT J wrote:
PIERROT J wrote:
Un grand merci pour la réponse plus que rapide, je ne m'y attendais pas à bientôt
03.10.2017 - 14:16
![]() PIERROT J wrote:
PIERROT J wrote:
Les premières augmentations dos devant manches sont elles véritablement à faire tous les rangs ..... donc endroit et envers
03.10.2017 - 11:20DROPS Design answered:
Bonjour Mme Pierrot, tout à fait, les premières augmentations se font tous les rangs c'est-à-dire aussi bien sur l'endroit que sur l'envers, les jetés se tricotent torse au rang suivant pour éviter les trous. Bon tricot!
03.10.2017 - 13:18
![]() Séverine wrote:
Séverine wrote:
Re-bonjour, cette fois-ci j'ai bien compris car avec les explications seules, j'étais très perplexe... Un grand merci pour votre réponse rapide !
19.01.2017 - 09:33
![]() Séverine wrote:
Séverine wrote:
Bonjour et merci pour votre réponse. Je voudrai être sûre de bien comprendre comment faire les augmentations du dos et devant. J'ai compris où les faire et qu'il fallait les faire 4 fois mais si je suis les indications, je dois faire 4 fois *1 jeté, 2 m endroit, 1 jeté*, ça fait 8 augmentations uniquement pour le dos et devant et non 4. Pouvez vous me dire où je me trompe ? Merci.
19.01.2017 - 08:19DROPS Design answered:
Bonjour Séverine, ces augmentations (dos & devants) ne concernent que la partie du bas de la veste, après l'empiècement. Pour le raglan, augmentez avant/après chaque A.1 en faisant 1 jeté (cf RAGLAN). Bon tricot!
19.01.2017 - 09:00
|
|||||||
Virginia Cardigan#virginiacardigan |
|||||||
|
|
|||||||
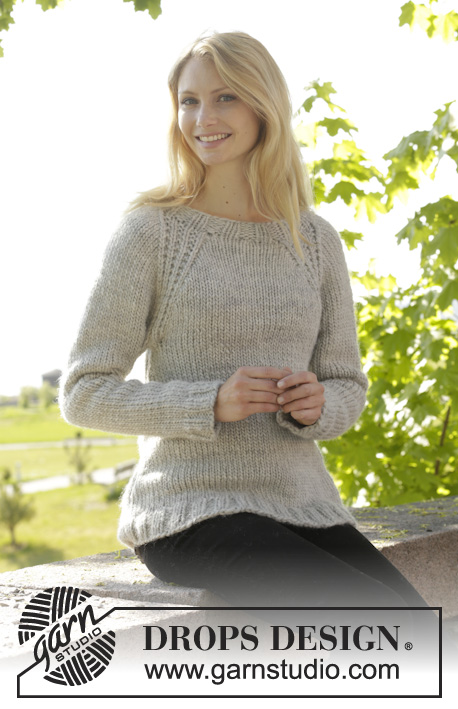
Knitted DROPS jacket with rib and raglan, worked top down in ”Snow”. Size: S - XXXL.
DROPS 157-28 |
|||||||
|
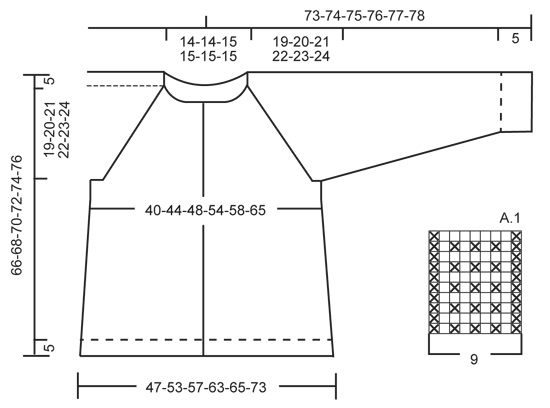
GARTER ST (back and forth on needle): K all rows. 1 ridge = 2 rows K. PATTERN: See diagram A.1. The diagram shows all rows in pattern seen from RS. RAGLAN: Inc on each side of every A.1 by making 1 YO (= 8 inc on row). On next row work YOs twisted (i.e. work in the back loop of st instead of front) to avoid holes. INCREASE TIP (applies to body): Work until 1 st remains before marker, 1 YO, K 2, 1 YO = 2 sts inc. Repeat in the other side. On next row K YOs twisted (i.e. work in the back loop of st instead of front) to avoid holes. DECREASE TIP (applies to sleeves): Dec before marker and 1 st as follows: K 2 tog. Dec after marker and 1 st as follows: Slip 1 st as if to K, K 1, psso. BUTTONHOLES: Dec for buttonholes on right band. 1 buttonhole = K 2 tog and make 1 YO. Dec for buttonholes when piece measures (measured from edge at the bottom of body): SIZE S: 5, 14, 23, 32, 41, 50 and 59 cm SIZE M: 5, 15, 25, 34, 43, 52 and 61 cm SIZE L: 5, 15, 25, 35, 45, 54 and 63 cm SIZE XL: 5, 15, 25, 35, 45, 55 and 65 cm SIZE XXL: 5, 14, 23, 32, 41, 50, 59 and 67 cm. SIZE XXXL: 5, 15, 24, 33, 42, 51, 60 and 69 cm. ---------------------------------------------------------- JACKET: Worked back and forth, top down. Work sleeves in the round on double pointed needles. YOKE: Cast on 54-54-58-58-58-58 sts on circular needle size 8 mm. Continue to work rib as follows: P 2, * K 2, P 2 *, repeat from *-*. When rib has been worked for 3 cm, work 1 row in stocking st from RS while AT THE SAME TIME inc 8-8-7-7-8-8 sts evenly = 62-62-65-65-66-66 sts. Now work pattern as follows: 5-5-6-6-6-6 sts in stocking st (= front piece), A.1, 3 sts in stocking st (= sleeve), A.1, 10-10-11-11-12-12 sts in stocking st (= back piece), A.1, 3 sts in stocking st (= sleeve ), A.1, 5-5-6-6-6-6 sts in stocking st (= front piece). There is now 1 repetition A.1 in each raglan. REMEMBER THE KNITTING TENSION! Continue with pattern like this, AT THE SAME TIME on next row from RS beg inc for RAGLAN – see explanation above! Inc differently on body and sleeves: BODY: Repeat inc every row 0-2-5-8-10-12 times, every other row 4-4-3-4-4-8 times and every 4th row 5-5-5-4-4-2 times. SLEEVE: Repeat inc every row 6-6-7-7-10-11 times, every other row 3-4-4-5-4-4 times and every 4th row 4 times in all sizes. When all inc are done and piece measures 24-25-26-27-28-29 cm, there are 150-162-177-193-210-230 sts in total on needle. Then continue in stocking st as follows: Work the first 18-20-23-26-28-32 sts, slip the next 39-41-43-45-49-51 sts on a stitch holder for sleeve, cast on 8 new sts under sleeve, insert a marker in the middle of these sts, work the next 36-40-45-51-56-64 sts, slip the next 39-41-43-45-49-51 sts on a stitch holder for sleeve, cast on 8 new sts under sleeve, insert a marker in the middle of these sts, work the remaining 18-20-23-26-28-32 sts. Work the new sts under each sleeve in stocking st. BODY: There are now 88-96-106-118-128-144 sts for body. Continue in stocking st. When piece measures 4 cm from the new sts under sleeve, beg inc on each side of markers - READ INCREASE TIP! Repeat inc every 8-6½-7-7-9-9 cm 3-4-4-4-3-3 more times = 104-116-126-138-144-160 sts. When piece measures 61-63-65-67-69-71 cm in total, inc 2-2-4-4-2-2 sts = 106-118-130-142-146-162 sts. Now work rib as follows: P 2, * K 2, P 2 *, repeat from *-*. Continue like this until rib has been worked for 5 cm. Cast off with K over K and P over P. SLEEVE: Slip sts back on double pointed needles. Work in stocking st and cast on 8 new sts at the end of row = 47-49-51-53-57-59 sts. Insert a marker in the middle of the new sts under the sleeve. NOW MEASURE THE PIECE FROM HERE. Then work in stocking st in the round – AT THE SAME TIME dec 1 st on each side of marker – READ DECREASE TIP. Repeat dec every other round 2 more times in all sizes = 41-43-45-47-51-53 sts. Then dec every 4-3½-4-3½-3-3 cm 9-10-9-10-12-11 times = 23-23-27-27-27-31 sts. When sleeve measures 42-42-41-41-41-41 cm, inc 1 st in all sizes = 24-24-28-28-28-32 sts. Continue with rib as follows: K 1, * P 2, K 2 *, repeat from *-* until 1 st remains, K 1. Continue like this until rib has been worked for 5 cm. Cast off with K over K and P over P. RIGHT BAND: Pick up sts for band as follows from RS: Beg at the bottom on right front piece and pick up 86-90-90-94-98-102 sts evenly inside 1 st in stocking st. Then work rib, beg from WS as follows: 2 sts in GARTER ST – see explanation above -, * K 2, P 2 *, repeat from *-* until 4 sts remain, P 2, 2 sts in garter st. Continue like this back and forth, AT THE SAME TIME on 1st row from RS dec for BUTTONHOLES – see explanation above! Cast off when band measures 4 cm. LEFT BAND: Pick up sts and work band the same way as right band but reversed. I.e. pick up sts from neck edge st at the top (= from RS). Do not dec for buttonholes. ASSEMBLY: Sew the holes under the sleeves. Sew the buttons on to the left band. |
|||||||
Diagram explanations |
|||||||
|
|||||||
 |
|||||||
Have you finished this pattern?Tag your pictures with #dropspattern #virginiacardigan or submit them to the #dropsfan gallery. Do you need help with this pattern?You'll find 25 tutorial videos, a Comments/Questions area and more by visiting the pattern on garnstudio.com. © 1982-2026 DROPS Design A/S. We reserve all rights. This document, including all its sub-sections, has copyrights. Read more about what you can do with our patterns at the bottom of each pattern on our site. |
|||||||


With over 40 years in knitting and crochet design, DROPS Design offers one of the most extensive collections of free patterns on the internet - translated to 17 languages. As of today we count 324 catalogues and 12290 patterns translated into English (UK/cm). 12290
We work hard to bring you the best knitting and crochet have to offer, inspiration and advice as well as great quality yarns at incredible prices! Would you like to use our patterns for other than personal use? You can read what you are allowed to do in the Copyright text at the bottom of all our patterns. Happy crafting!
Post a comment to pattern DROPS 157-28
We would love to hear what you have to say about this pattern!
If you want to leave a question, please make sure you select the correct category in the form below, to speed up the answering process. Required fields are marked *.