
Popular categories
Looking for a yarn?


Comments / Questions (78)
![]() Agata Rzegotka wrote:
Agata Rzegotka wrote:
Dziękuję, udało mi się rozwiązać mój problem - chodzi o to, że schemat A2 na okrągło należy przerobić tak jak wcześniej, czyli 1o.prawe, 2o lewe, ale w następnym okrążeniu przerobić wszystkie oczka na prawo. Wtedy jest wszystko ok. Pozdrawiam
26.07.2024 - 22:22DROPS Design answered:
Super. Pozdrawiamy!
26.07.2024 - 22:27
![]() Agata Rzegotka wrote:
Agata Rzegotka wrote:
Dziękuję za odpowiedź, ale kiedy robię tak jak napisaliście, to wychodzi mi zwykły ściągacz i widać różnicę między rzędami a robótką na okrągło.
25.07.2024 - 20:58DROPS Design answered:
Witaj Agato, to może być kwestia różnicy w napięciu nici podczas przerabiania w rzędach, a na okrągło - przerabiając na okrągło przerabiamy zwykle bardziej ścisło. Może to się nieco poprawić po upraniu i zblokowaniu poncho. A może chodzi o coś innego -możesz przesłać mi zdjęcie na poland@dropsproject.com, będzie mi łatwiej stwierdzić w czym jest problem. Pozdrawiam!
25.07.2024 - 21:05
![]() Agata wrote:
Agata wrote:
Mam problem z przerabianiem schematu A2 na okrągło - wychodzi mi inny wzór niż kiedy przerabiałam w rzędach. Proszę mi wyjaśnić kiedy prawe a kiedy lewe, gdy robię na okrągło.
25.07.2024 - 16:42DROPS Design answered:
Witaj Agato, czytasz schemat cały czas od prawej do lewej strony. Przerabiasz tylko na prawej stronie robótki więc: pusty kwadracik oznacza 1 o.p., a kwadracik z krzyżykiem to 1 o.l. Pozdrawiamy!
25.07.2024 - 16:50
![]() Stefanie wrote:
Stefanie wrote:
Ég skil ekki útaukning, í 4. hverja umferð, er ég þá líka að auka út fyrir 2. hverja í leiðinni? Sama spurning fyrir 6.hverja.
22.07.2024 - 22:19DROPS Design answered:
Blessuð Stefanie. Útaukningar eru mismunandi á fram- og bakstykki og á "ermi". Aukið út á milli 2. og 3. prjónamerkis og á milli 6. og 7. prjónamerkis fyrir "ermar" og aukið út á undan 1. prjónamerki /eftir 8. prjónamerki fyrir framstykki + á milli 4. og 5. prjónamerki fyrir bakstykki. Í stærð S er aukið út á fram- og bakstykki í annarri hverri umferð 5 sinnum, í 4. hverri umf/umferð 4 sinnum og í 6. hverri umferð 6 sinnum og aukið út fyrir "ermar" í annarri hverri umferð 7 sinnum, í 4. hverri umf/umferð 9 sinnum og 6. hverja umferð 2 sinnum. Gangi þér vel.
23.07.2024 - 11:09
![]() Caro wrote:
Caro wrote:
Hi, I love your patterns, have a question: hood instructions, what do you mean with "Work 1 ridge AT THE SAME TIME", at the same time of what? Thanks!
30.05.2024 - 23:18DROPS Design answered:
Dear Caro, while you are knitting the ridge of the garter stitch you should increase 8-10 stitches (evenly distributed on the last row of the garter stitch. Happy Knitting!
31.05.2024 - 03:28
![]() Anne Helen Kaldestad wrote:
Anne Helen Kaldestad wrote:
Forstår ikkje det med økningene. Skal det økes ved alle merker hver omgang? Kan du forklare nøyere?skjønte heller ikke det med 2. 4 og 6 omg
13.12.2023 - 18:42DROPS Design answered:
Hej Anne, Du tager ud på hver 2. omgang. Hvilken størrelse strikker du?
14.12.2023 - 08:23
![]() Tiphaine Lapierre wrote:
Tiphaine Lapierre wrote:
Bonjour, Lors du passage en circulaire, je ne comprends pas comment faire, au milieu du rang commencé en aller-retour, pour continuer en rond. Dois-je rebrousser chemin sur les mailles tricotées juste avant le placement du marqueur représentant le début du cercle ? Enfin y-a-t-il une importance à ce que je commence le circulaire sur l'endroit où l'envers du tricot ? Merci d'avance pour vos réponses !
08.04.2023 - 15:25DROPS Design answered:
Bonjour Mme Lapierre, tricotez à l'endroit sur l'endroit jusqu'au 1er A.2 (mais ne tricotez pas encore ces mailles), mettez un marqueur ici pour repérer le début des tours, puis tricotez comme avant: A.2 et jersey endroit en tricotant au point mousse les 6 mailles sous la fente d'encolure. Bon tricot!
11.04.2023 - 12:20
![]() Ännä wrote:
Ännä wrote:
I do wish you showed more pictures! I know I could do this, if I could see the whole garment, but the written directions just hurt my eyes. Brains. Soul ;) Oh please, use more photos!!!
23.08.2022 - 07:06
![]() Paula wrote:
Paula wrote:
"Autumn Stroll" by Drops design 157-37 . I have completed the first four "ridges" and have increased the 30 sts. I am now at the section where it tells me to "work as follows from mid-front. What I don't understand is what it means when it says "3 band sts in garter sts...what is the "3 band sts"? I'm thinking that if this is a button band, it is usually done with 5 sts. I'm not sure what this means. Thank you!
15.03.2022 - 17:35DROPS Design answered:
Hi Paula, In this pattern the bands are narrow (3 stitches in width). Happy knitting!
16.03.2022 - 07:43
![]() Carmen wrote:
Carmen wrote:
Ich verstehe folgenden Abschnitt nicht. Muss ich beide Zunahme gleichzeitig in 1 Reihe machen? Wie folgt vor der 1. und der 5. Markierung und nach der 4. und der 8.Markierung zunehmen: in jeder 2. Reihe 5-6-7 x, in jeder 4.R/Runde 4-6-9 x, und in jeder 6.Runde 6-6-4 x. Wie folgt vor der 3.und 7.Markierung und nach der 2.und 6.Markierung zunehmen: in jeder 2. Reihe 7-8-9 x, in jeder 4.R/Runde 9-10-11 x und in jeder 6.Runde 2-2-2 x. Werd noch völlig irre... 😣
20.12.2020 - 08:42DROPS Design answered:
Liebe Carmen, je nach der Größe werden Sie entweder 4 Maschen oder 8 Maschen zunehmen, die Zunahmen zwischen den Markierernt werden mit einem unregelmäßigen Rythmus gearbeitet. Viel Spaß beim stricken!
21.12.2020 - 08:00
|
|||||||
Autumn Stroll#autumnstrollponcho |
|||||||
|
|
|||||||
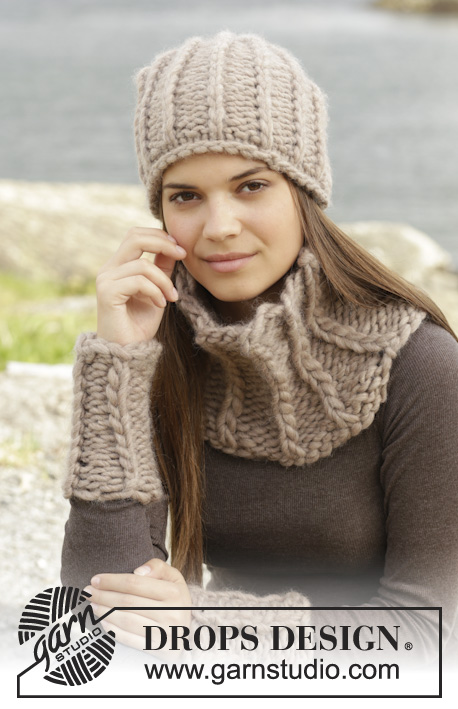
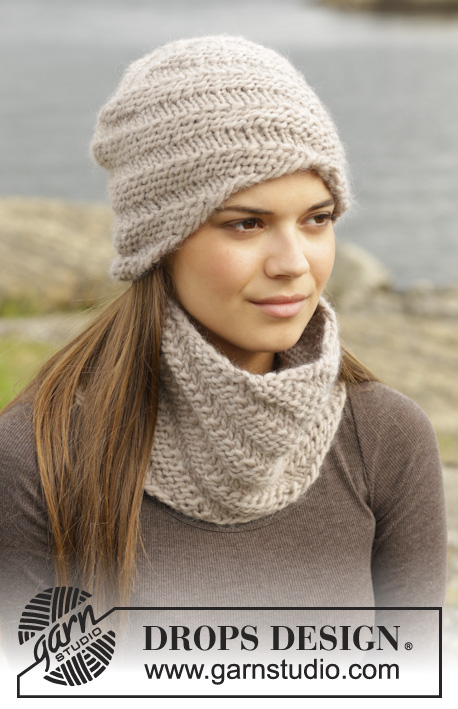
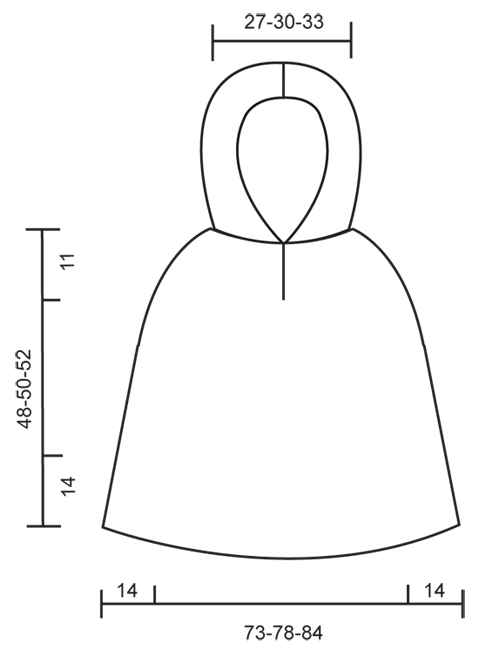
Knitted DROPS poncho with hood and vent, worked top down in ”Alaska”. Size: S -XXXL
DROPS 157-37 |
|||||||
|
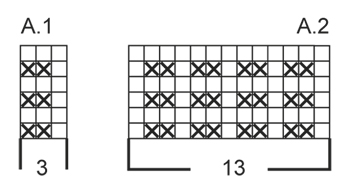
GARTER ST (back and forth on needle): K all rows. 1 ridge = 2 rows K. GARTER ST (in the round on circular needle): * K 1 round and P 1 round *, repeat from *-*. 1 ridge = 2 rounds. PATTERN: See diagrams A.1 and A.2. The diagrams show all rows in pattern seen from RS. INCREASE TIP: All inc are done from RS. Inc 1 st by making a YO. On next row work YO twisted to avoid holes. Then work the new sts in stocking st. BUTTONHOLES: Dec for buttonhole on right band. 1 buttonhole = K tog third and fourth st from edge and make 1 YO. Dec for buttonhole when piece measures approx. 2 cm from cast-on edge. ---------------------------------------------------------- PONCHO: Poncho and hood are worked separately and sewn tog at the end. The poncho is worked top down. Work back and forth until vent mid front is done, then work in the round until vents in each side beg, then work front and back piece back and forth. Cast on 92-102-112 sts on circular needle size 5 mm with Alaska. Work 4 ridges in GARTER ST - see explanation above, AT THE SAME TIME on 1st row in last ridge (= RS) inc 30-32-34 sts evenly = 122-134-146 sts. REMEMBER BUTTONHOLES! Then work as follows from mid front: 3 band sts in garter st, 8-10-12 sts in stocking st, insert 1st marker here, A.2 (= 13 sts), insert 2nd marker here, 13-15-17 sts in stocking st, insert 3rd marker here, A.2, insert 4th marker here, 22-26-30 sts in stocking st, insert 5th marker here, A.2, insert 6th marker here, 13-15-17 sts in stocking st, insert 7th marker here, A.2, insert 8th marker here, 8-10-12 sts in stocking st, 3 band sts in garter st. READ ALL OF THE FOLLOWING SECTION BEFORE CONTINUING! REMEMBER THE KNITTING TENSION! Continue like this, AT THE SAME TIME on next row from RS inc on each side of every repetition of A.2 – READ INCREASE TIP! NOTE: Inc differently on front and back piece and on side pieces: Inc as follows before 1st and 5th marker and after 4th and 8th marker: Every other row 5-6-7 times, every 4th row/round 4-6-9 times and every 6th round 6-6-4 times. Inc as follows before 3rd and 7th marker and after 2nd and 6th marker: Every other row 7-8-9 times, every 4th row/round 9-10-11 times and every 6th round 2-2-2 times. When inc are done, there are 254-286-314 sts on round. AT THE SAME TIME when piece measures 11 cm in total, the vent mid front is done and work in the round as follows: Work until first repetition of A.2 (= beg of round), work the round in the round as before with pattern and inc until the 3 sts in garter st before vent mid front, then work 6 sts in GARTER ST in the round on circular needle – see explanation above, over the 3 sts in garter st on each side of vent. Continue like this until there are 2 ridges under vent. Then continue with stocking st, inc and A.2 until piece measures 34-36-38 cm in total. Now work as follows from beg of round: * A.2, 21-24-27 sts in stocking st, 7 sts in garter st, 21-24-27 sts in stocking st *, A.2, stocking st until next A.2, repeat from *-*, A.2, work the rest of round in stocking st. Continue like this until there are 2 ridges on each side piece, AT THE SAME TIME on last round cast off the middle sts of the 7 sts in garter st in each side (= 6 sts in garter st remain), work until cast off st in the side = 252-284-312 sts on round. Then finish front and back piece separately. FRONT PIECE: Turn piece and work as follows from WS: 3 sts in garter st, stocking st over the next 21-24-27 sts, A.2 as before, stocking st over the next 52-62-70 sts, AT THE SAME TIME inc 1-0-1 st, work A.2, 21-24-27 sts in stocking st, 3 sts in garter st = 127-142-157 sts. When piece measures 41-43-45 cm, work as follows from RS: 3 sts in garter st, A.1 until 4 sts remain, K 1 (= 1st st in A.1), 3 sts in garter st. Continue like this back and forth until piece measures 48-50-52 cm in total. Cast off. BACK PIECE: Work as front piece. Adjust length according to front piece. HOOD: Worked back and forth on needle. Cast on 92-102-112 sts on circular needle size 5 mm with Alaska. Work 1 ridge AT THE SAME TIME inc 8-1-0 sts evenly on last row = 100-103-112 sts. Then work as follows: 3 edge sts in garter st, A.1 (= 3 sts) until 4 sts remain, K 1, 3 edge sts in garter st. Continue like this until piece measures 30 cm. Work 1 ridge. Cast off. ASSEMBLY: Fold hood and sew cast-off edge neatly tog st by st. Sew hood to poncho st by st. Sew the button on to left band 2 cm in from egde. Cut and fasten the yarn. |
|||||||
Diagram explanations |
|||||||
|
|||||||
 |
|||||||
 |
|||||||
Have you finished this pattern?Tag your pictures with #dropspattern #autumnstrollponcho or submit them to the #dropsfan gallery. Do you need help with this pattern?You'll find 22 tutorial videos, a Comments/Questions area and more by visiting the pattern on garnstudio.com. © 1982-2026 DROPS Design A/S. We reserve all rights. This document, including all its sub-sections, has copyrights. Read more about what you can do with our patterns at the bottom of each pattern on our site. |
|||||||


With over 40 years in knitting and crochet design, DROPS Design offers one of the most extensive collections of free patterns on the internet - translated to 17 languages. As of today we count 324 catalogues and 12290 patterns translated into English (UK/cm). 12290
We work hard to bring you the best knitting and crochet have to offer, inspiration and advice as well as great quality yarns at incredible prices! Would you like to use our patterns for other than personal use? You can read what you are allowed to do in the Copyright text at the bottom of all our patterns. Happy crafting!
Post a comment to pattern DROPS 157-37
We would love to hear what you have to say about this pattern!
If you want to leave a question, please make sure you select the correct category in the form below, to speed up the answering process. Required fields are marked *.