
Popular categories
Looking for a yarn?


Comments / Questions (78)
![]() Jessie wrote:
Jessie wrote:
Hi there, I am excited about this poncho. I am ready to see the hood together and have a couple questions. My hood is cast on with 102 stitches. My neck is also 102 stitches. Regarding sewing the hood to the poncho, is the 2cm from edge down below the garter stitch rather than left from edge for sewing the 2 pieces together? And do you have pictures of the seam at the neck and hood? Thanks for the pattern.
16.02.2026 - 04:19DROPS Design answered:
Hi Jessie, The hood and body of the poncho are sewn together edge to edge, stitch for stitch. Sadly, we do not have a picture of this seam. Regards, Drops Team.
17.02.2026 - 07:33
![]() Melina wrote:
Melina wrote:
Jag börjar förstå mönstret men undrar nu, innan jag fortsätter, om jag ska öka 16 maskor på varv 12 eftersom det blir både vart 4:e och 6:e varv samtidigt?
31.01.2026 - 22:49DROPS Design answered:
Hej Melina: Du skriver inte vilken storlek du stickar... men om du ökar på alla 8 ställen samtidigt, så blir det totalt 8 maskor du ökar :)
04.02.2026 - 13:21
![]() Melina wrote:
Melina wrote:
Jag förstår inte ökningarna. Om jag stickar storlek S ska det då vara 5+7+7+5+5+7+7+5=48 ökningar varv 2. Och betyder det 5 omslag efter varandra? Varv fyra, ökas totalt 52 gånger, eller blir det 52+48 om man raknar vartannat varv? Eller räknar man det som varv 2, 4, och 6. Eller fortsätter man räkna varv 8, 10, 12 osv och tänka att varv 8 ökas 48+ 52 maskor och varv 12 48 + 32 maskor?
28.01.2026 - 20:17DROPS Design answered:
Hej Melina, första ökningsvarv ökar du före markör 1, 3, 5, 7 och efter markör 2, 4, 6, 8 = 8 ökningar. Stickar 1 varv utan ökningar, Ökar igen på nästa varv osv :)
05.02.2026 - 11:58
![]() Evs wrote:
Evs wrote:
Zunächst bis zu dem ersten Rapport A.2 str (= Anfang der Runde), dann die Runde mit dem Muster und Zunahmen wie vorher weiterstr bis zu den 3 M kraus re vor dem Schlitz vorne. Nun 6 M KRAUS RECHTS (rund gestrickt) str – siehe oben, über die 3 M kraus rechts auf jeder Seite des Schlitzes stricken. Verstehe ich nicht. Muss ich vor dem ersten Rapport die Arbeit wenden?
17.01.2026 - 13:55DROPS Design answered:
Liebe Evs, wenn man dann in der Runde strickt, dann beginnen di Runden mit dem 1. A.2 so bei der 1. Runde, zuerst alle Maschen bei einer Hinreihe genauso wie zuvor stricken, so bis ersten A.2, eine Markierung hier einsetzen = Beg. der Runde; dann wie zuvor Weiterstricken, aber die 3 Maschenkrausrechts am Ende der Reihen werden mit den 3 ersten Maschen am Anfang der Reihen krausrechts für 4 Runden in Runden gestrickt. Viel Spaß beim Stricken!
19.01.2026 - 08:43
![]() Deborah wrote:
Deborah wrote:
Could you please post the comments for this pattern in English?
01.01.2026 - 18:24DROPS Design answered:
Hi Deborah, our clients come from different countries, sometimes they don't know English. You can always copy the questions in google translator tool. It can help you. Happy knitting!
02.01.2026 - 10:41
![]() Monica wrote:
Monica wrote:
Please are there any other graphic diagrams to understand the poncho details? The photo is beautiful but is not helpful as to the garter stitches around the bottom and down the sides. Need more visual help.
27.12.2025 - 23:46
![]() Janett wrote:
Janett wrote:
Hei, er det noen spesiell grunn til at hetta og bilen strikkes hver for seg? For er vel mulig å begynne med hetta og strikke den nedover? Har strikket en som oppskriften beskriver og skal begynne på en til. Har også vært innom tanken på å strikke bilen for så å hente opp masker til hetten istedenfor å legge opp nye masker og montere dem sammen i etterkant. Takk for svar!
02.11.2025 - 22:14DROPS Design answered:
Hei Janett. I denne oppskriften er det forklart som 2 deler, - Ponchoen og hetten strikkes hver for seg og syes sammen tilslutt. Men du kan fint tilpasse oppskriften og strikke hetten fast i ponschoen istedenfor. mvh DROPS Design
03.11.2025 - 10:22
![]() Birgit wrote:
Birgit wrote:
När jag stickar runt på rundstickan efter de 4 varven för öppningen framtill, ska varv 2 i A2 stickas aviga, (rätsidan alltså)? Närjag stickade fram och tillbaka stickades varv 2 i aviga maskor från avigsidan. Sålunda varv 1 en rät och 2 aviga över 13 maskor och varv 2 aviga närman stickar runt. Annars ser mönstret annorlunda ut.
25.10.2025 - 21:38DROPS Design answered:
Hei Birgit. Du legger opp, deretter strikkes det 8 pinner. På 7. pinne (retten) økes det masker jevnt fordelt, siste pinne er fra vrangen. Du starter å strikke diagram A.2 fra retten (1. rad i diagrammet = 1 rett-2 vrang-1 rett-2 vrang -1 rett - 2 vrang - 1 rett-2 vrang -1 rett). 2. rad i diagrammet strikkes fra vrangen og maskene strikkes vrang. Når det strikkes etter A.2 vil man få en typ perlestrikk med 1 glattstrikket maske mellom. mvh DROPS Design
10.11.2025 - 09:32
![]() Kjersti wrote:
Kjersti wrote:
Hei, blir forvirra av: utlegg hver 2. p - hver 4.p - hver 6.p?? Jeg strikker str S Takk for svar
24.10.2025 - 09:18DROPS Design answered:
Hei Kjersti. Hva blir du forvirra av? Hvordan det økes? (les ØKETIPS øverst i oppskriften) eller hvordan det økes før og etter merkene? Husk det økes forskjellige ganger ved de forskjellige merkene. Fint med et litt mer utdypende spørsmål om vi skal gi et riktig svar:) mvh DROPS Design
03.11.2025 - 08:22
![]() Sylvie Turcan wrote:
Sylvie Turcan wrote:
Dans le modèle il est dit que les augmentations sont différentes pour le dos et le devant, ça devrait donc concerner les marqueurs 1-2-7-8 pour le devant et 3-4-5-6 pour le dos . Or dans le modèle c'est écrit 1-4-5-8 pour le devant et 2-3-6-7 pour le dos... Est-ce qu'il faut suivre le modèle ou le corriger ? Merci d'avance pour votre réponse
26.01.2025 - 21:48DROPS Design answered:
Bonjour Mme Turcan, entre les marqueurs 1 et 2, entre les marqueurs 3 et 4, les marqueurs 5 et 6 et les marqueurs 7et 8 on va tricoter le diagramme A.2, autrement dit, le devant est avant le marqueur 1; le dos entre les marqueurs 4 et 5 et le 2ème devant après le marqueur 8. Les côtés (= "manches") sont entre les marqueurs 2 et 3 et entre les marqueurs 6 et 7. Vous augmentez ainsi pour le devant gauche avant le marqueur -1, pour le dos après le marqueur 3 et avant le marqueur 5 et pour le devant droit après le marqueur 5. Bon tricot!
27.01.2025 - 09:47
|
|||||||
Autumn Stroll#autumnstrollponcho |
|||||||
|
|
|||||||
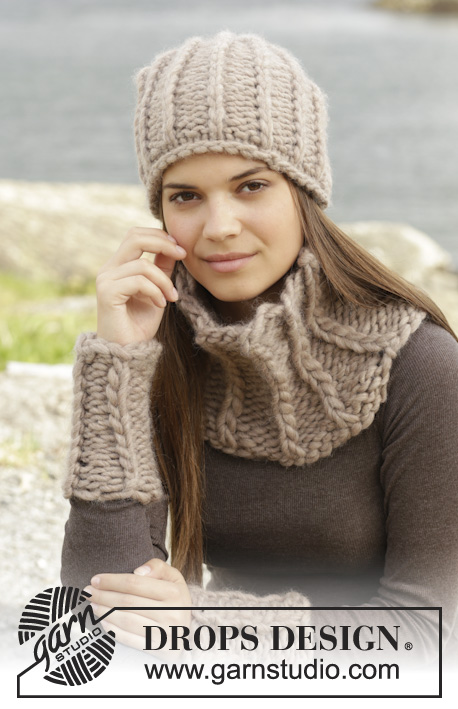
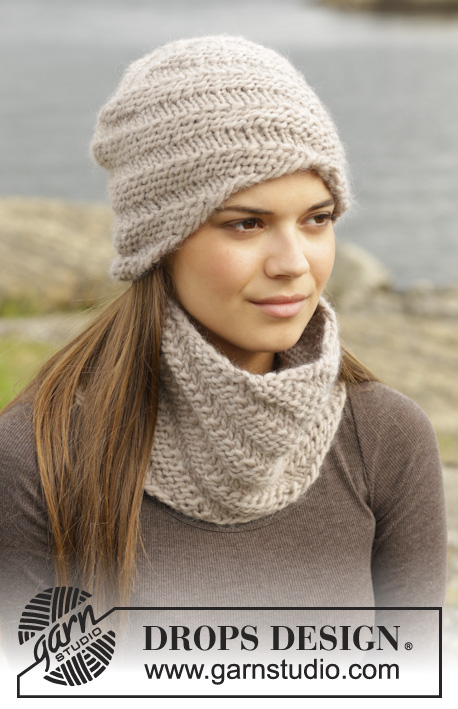
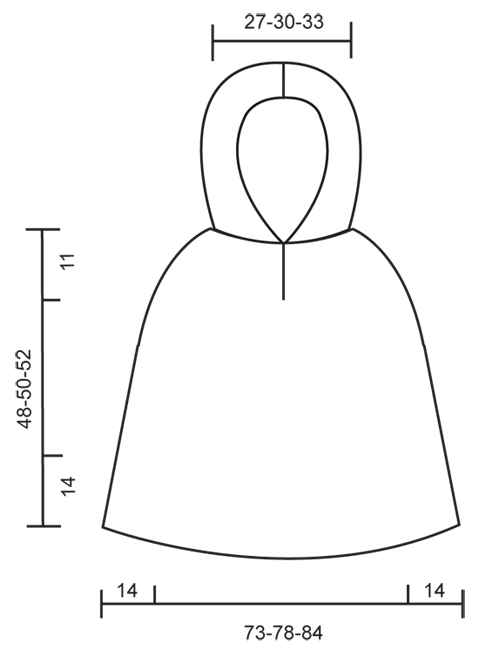
Knitted DROPS poncho with hood and vent, worked top down in ”Alaska”. Size: S -XXXL
DROPS 157-37 |
|||||||
|
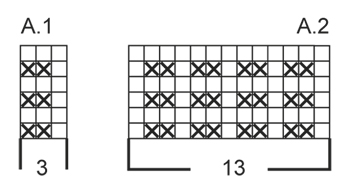
GARTER ST (back and forth on needle): K all rows. 1 ridge = 2 rows K. GARTER ST (in the round on circular needle): * K 1 round and P 1 round *, repeat from *-*. 1 ridge = 2 rounds. PATTERN: See diagrams A.1 and A.2. The diagrams show all rows in pattern seen from RS. INCREASE TIP: All inc are done from RS. Inc 1 st by making a YO. On next row work YO twisted to avoid holes. Then work the new sts in stocking st. BUTTONHOLES: Dec for buttonhole on right band. 1 buttonhole = K tog third and fourth st from edge and make 1 YO. Dec for buttonhole when piece measures approx. 2 cm from cast-on edge. ---------------------------------------------------------- PONCHO: Poncho and hood are worked separately and sewn tog at the end. The poncho is worked top down. Work back and forth until vent mid front is done, then work in the round until vents in each side beg, then work front and back piece back and forth. Cast on 92-102-112 sts on circular needle size 5 mm with Alaska. Work 4 ridges in GARTER ST - see explanation above, AT THE SAME TIME on 1st row in last ridge (= RS) inc 30-32-34 sts evenly = 122-134-146 sts. REMEMBER BUTTONHOLES! Then work as follows from mid front: 3 band sts in garter st, 8-10-12 sts in stocking st, insert 1st marker here, A.2 (= 13 sts), insert 2nd marker here, 13-15-17 sts in stocking st, insert 3rd marker here, A.2, insert 4th marker here, 22-26-30 sts in stocking st, insert 5th marker here, A.2, insert 6th marker here, 13-15-17 sts in stocking st, insert 7th marker here, A.2, insert 8th marker here, 8-10-12 sts in stocking st, 3 band sts in garter st. READ ALL OF THE FOLLOWING SECTION BEFORE CONTINUING! REMEMBER THE KNITTING TENSION! Continue like this, AT THE SAME TIME on next row from RS inc on each side of every repetition of A.2 – READ INCREASE TIP! NOTE: Inc differently on front and back piece and on side pieces: Inc as follows before 1st and 5th marker and after 4th and 8th marker: Every other row 5-6-7 times, every 4th row/round 4-6-9 times and every 6th round 6-6-4 times. Inc as follows before 3rd and 7th marker and after 2nd and 6th marker: Every other row 7-8-9 times, every 4th row/round 9-10-11 times and every 6th round 2-2-2 times. When inc are done, there are 254-286-314 sts on round. AT THE SAME TIME when piece measures 11 cm in total, the vent mid front is done and work in the round as follows: Work until first repetition of A.2 (= beg of round), work the round in the round as before with pattern and inc until the 3 sts in garter st before vent mid front, then work 6 sts in GARTER ST in the round on circular needle – see explanation above, over the 3 sts in garter st on each side of vent. Continue like this until there are 2 ridges under vent. Then continue with stocking st, inc and A.2 until piece measures 34-36-38 cm in total. Now work as follows from beg of round: * A.2, 21-24-27 sts in stocking st, 7 sts in garter st, 21-24-27 sts in stocking st *, A.2, stocking st until next A.2, repeat from *-*, A.2, work the rest of round in stocking st. Continue like this until there are 2 ridges on each side piece, AT THE SAME TIME on last round cast off the middle sts of the 7 sts in garter st in each side (= 6 sts in garter st remain), work until cast off st in the side = 252-284-312 sts on round. Then finish front and back piece separately. FRONT PIECE: Turn piece and work as follows from WS: 3 sts in garter st, stocking st over the next 21-24-27 sts, A.2 as before, stocking st over the next 52-62-70 sts, AT THE SAME TIME inc 1-0-1 st, work A.2, 21-24-27 sts in stocking st, 3 sts in garter st = 127-142-157 sts. When piece measures 41-43-45 cm, work as follows from RS: 3 sts in garter st, A.1 until 4 sts remain, K 1 (= 1st st in A.1), 3 sts in garter st. Continue like this back and forth until piece measures 48-50-52 cm in total. Cast off. BACK PIECE: Work as front piece. Adjust length according to front piece. HOOD: Worked back and forth on needle. Cast on 92-102-112 sts on circular needle size 5 mm with Alaska. Work 1 ridge AT THE SAME TIME inc 8-1-0 sts evenly on last row = 100-103-112 sts. Then work as follows: 3 edge sts in garter st, A.1 (= 3 sts) until 4 sts remain, K 1, 3 edge sts in garter st. Continue like this until piece measures 30 cm. Work 1 ridge. Cast off. ASSEMBLY: Fold hood and sew cast-off edge neatly tog st by st. Sew hood to poncho st by st. Sew the button on to left band 2 cm in from egde. Cut and fasten the yarn. |
|||||||
Diagram explanations |
|||||||
|
|||||||
 |
|||||||
 |
|||||||
Have you finished this pattern?Tag your pictures with #dropspattern #autumnstrollponcho or submit them to the #dropsfan gallery. Do you need help with this pattern?You'll find 22 tutorial videos, a Comments/Questions area and more by visiting the pattern on garnstudio.com. © 1982-2026 DROPS Design A/S. We reserve all rights. This document, including all its sub-sections, has copyrights. Read more about what you can do with our patterns at the bottom of each pattern on our site. |
|||||||


With over 40 years in knitting and crochet design, DROPS Design offers one of the most extensive collections of free patterns on the internet - translated to 17 languages. As of today we count 324 catalogues and 12290 patterns translated into English (UK/cm). 12290
We work hard to bring you the best knitting and crochet have to offer, inspiration and advice as well as great quality yarns at incredible prices! Would you like to use our patterns for other than personal use? You can read what you are allowed to do in the Copyright text at the bottom of all our patterns. Happy crafting!
Post a comment to pattern DROPS 157-37
We would love to hear what you have to say about this pattern!
If you want to leave a question, please make sure you select the correct category in the form below, to speed up the answering process. Required fields are marked *.