
Popular categories
Looking for a yarn?


Comments / Questions (31)
![]() Rita Pedersen wrote:
Rita Pedersen wrote:
Jeg har strikket de første 50 cm og kan simpelthen ikke få næste række til at passe med både mønster og masker.. hvad gør jeg forkert? jeg strikker A4 og A8 2 gange og A4 og A5 2,5 gang så har jeg ikke flere masker altså første række af diagram...
23.01.2017 - 13:34DROPS Design answered:
Hej Rita. Hvilken str laver du? Saa kan jeg kigge lidt hurtigere med :) Tak
23.01.2017 - 14:05Claire Daoust wrote:
Très joli boléro. Lorsque je mets en attente tous les 2 rangs 5 fois 10 mailles, est-ce que je continue en point fantaisie ou en point mousse. Concernant les rangs raccourcis, quelle méthode dois-je utiliser ou bien juste tourner sans faire rien de spécial (wrap) ? Merci
03.04.2016 - 22:37DROPS Design answered:
Bonjour Mme Daoust, quand vous mettez les mailles en attente (5x10m), tricotez en point fantaisie comme avant - utilisez la méthode que vous préférez pour les rangs raccourcis (wrap ou basique, au choix). On tricote ensuite les rangs raccourcis suivants au point mousse. Bon tricot!
04.04.2016 - 09:21
![]() Nathalie wrote:
Nathalie wrote:
Un grand merci pour votre réponse je tiens à vous dire que j'adore vos modèles ainsi que toutes vos laines. Pour une addicte au tricot comme moi c'est le bonheur bien à vous nathalie
17.09.2014 - 10:14
![]() Nathalie wrote:
Nathalie wrote:
Bonjour j'ai une petite question concernant la phrase "les diagrammes montrent tous les rangs vus sur l'endroit" est ce que cela veut dire que pour le diagramme A2 je tricote 2 M env 2 M endroit 2 M env, puis sur le rang envers je tricoté les mailles comme elles se présentent et que je refais encore une fois ces deux rangs en trico tant le dernier en mailles endroit sur l'envers? Merci de votre réponse et bon après midi nathalie
16.09.2014 - 14:51DROPS Design answered:
Bonjour Nathalie, dans les diagrammes, 1 case = 1 m x 1 rang, ainsi dans A.2, vous tricotez sur l'end aux rangs 1 et 3: 2 m env, 2 m end, 2 m env, au rang 2: 2 m end, 2 m env, 2 m end et au rang 4, toutes les mailles à l'end sur l'env (A.2 = 4 rangs). Bon tricot!
16.09.2014 - 16:50
![]() Lene Gadgaard wrote:
Lene Gadgaard wrote:
Jeg skal til at strikke venstre stykke, som er spejlvendt. Skal rækkefølgen af mønstrene, der strikkes efter ærmet, også ændres? Så man strikker A4 til start og så A4 og A5 3 gange derefter A4 og A8 3 gange??
02.09.2014 - 16:39DROPS Design answered:
Nej venstre ærme strikkes nøjagtig som højre, det er først når du kommer op og skal begynde at sætte m på en tråd, du skal gøre det i modsat side.
03.09.2014 - 11:22
![]() Vera Lusk wrote:
Vera Lusk wrote:
Vackert , bedårande,bra beskrivning ,stor tack
02.09.2014 - 16:29
![]() Bodil wrote:
Bodil wrote:
Jeg har et spørgsmål til denne, når jeg kommer til 6 række i A8 kan jeg ikke få det til at gå op med de 6 ens masker i midten, er der fejl i opskriften ?
25.06.2014 - 20:39DROPS Design answered:
Hej Bodil. Har du taget de 2 masker ud i midten af de 4 masker i raekke 5? Har du det, saa skulle det vaere i orden i raekke 6 i og med du strikker 2 vrang, 6 ret (de 4 i midten er taget ud til 6) og 2 vrang per gentagelse af A8.
26.06.2014 - 16:17
![]() Tomm wrote:
Tomm wrote:
Ich habe noch eine Frage zum Rippenmuster der Blende: werden die Maschen nach 3 und 7 cm im A.3 Muster aufgenommen? Wird das Muster dann nicht unsymetrisch?
12.05.2014 - 18:03DROPS Design answered:
Liebe Frau Tomm, in jedem Rapport von *-* (= 13 M mit insgesamt 6 Linksmaschen) haben Sie ja insgesamt 3 Linksrippen, 2 in A.3 und 1 zusätzlich. In insgesamt 2 dieser 3 Linksrippen nehmen Sie nach 3 und 7 cm je 1 M zu, am besten in den beiden Linksrippen von A.3. Unsymmetrisch wirkt das nicht, die Linksrippen wenden sich ja nach innen, die Lochmusterrippe und die Rechtsrippen verändern sich ja nicht.
16.05.2014 - 13:01
![]() Tomm wrote:
Tomm wrote:
In der Anleitung ist mir folgendes aufgefallen: "wenn A5 ein Mal in der Höhe gestrickt ist sind 196 M (für Grösse S) auf der Nadel" Das stimmt aber so nicht, es sind schon die 204 M die später erwähnt werden. Herzlichen Dank. PS: Das Muster ist wirklich wunderschön und macht grossen Spass zu stricken!
28.04.2014 - 13:08DROPS Design answered:
Liebe Frau Tomm, da scheint tatsächlich etwas nicht ganz richtig zu sein, die 196 M sind offenbar bereits nach A8a und nicht erst nach Beendigung von A4/A5 auf der Nadel. Ich leite Ihre Anmerkung an die Designer zur nochmaligen Prüfung weiter. Letztendlich stimmt aber die Angabe der M-Zahl nach A8b (204 M), sodass Sie den Bolero weiterstricken können.
28.04.2014 - 15:20
![]() Tomm wrote:
Tomm wrote:
Ich habe eine Frage betreffend die stillgelegten Maschen von der Vorderseite (Grösse S: 110 M). Wenn ich mit dem Rücken fertig bin, was mache ich dann mit den vorderen Maschen? Brauche ich die am Schluss um den Rand zu stricken?
28.04.2014 - 13:07DROPS Design answered:
Liebe Frau Tomm, ja genau, die 110 stillgelegten M brauchen Sie am Ende für den Rippenmuster-Rand. Im letzten Absatz unter "Rippenmuster" fassen Sie ja rund um den Bolero M auf, dazu gehören auch die je 110 stillgelegten M der rechten und linken Seite.
28.04.2014 - 15:28
|
||||||||||||||||||||||
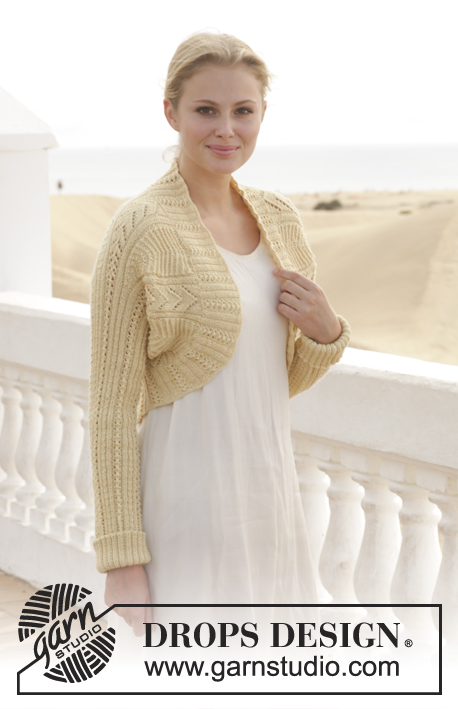
Lemon Shrug#lemonshrugbolero |
||||||||||||||||||||||
 |
 |
|||||||||||||||||||||
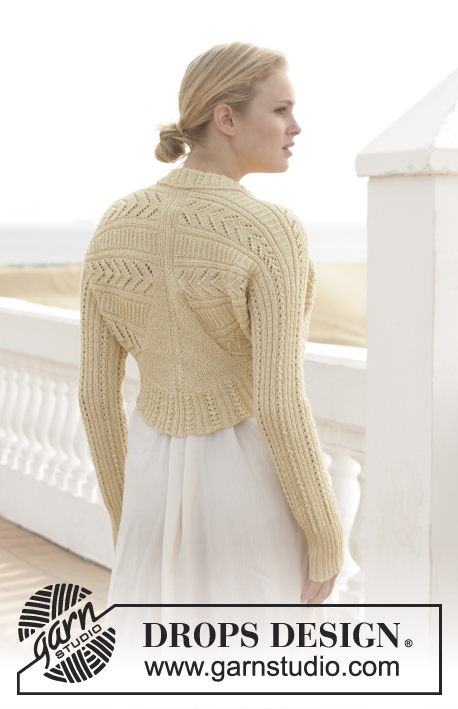
Knitted DROPS bolero with lace pattern in ”BabyAlpaca Silk”. Size: S - XXXL.
DROPS 152-14 |
||||||||||||||||||||||
|
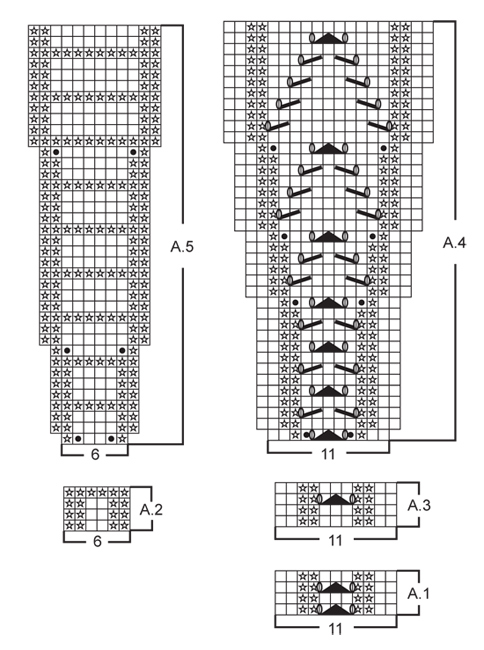
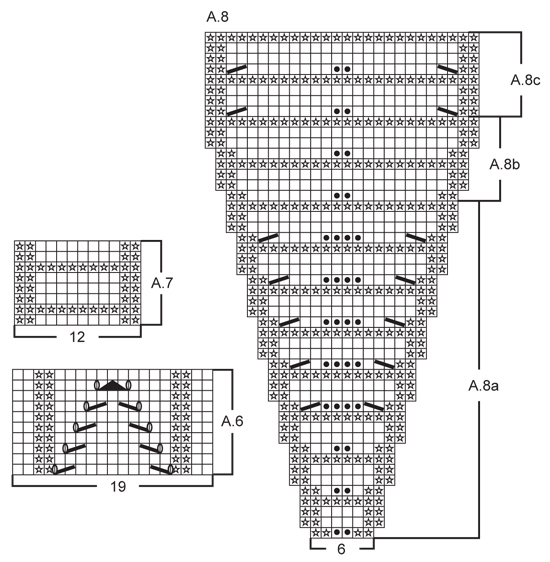
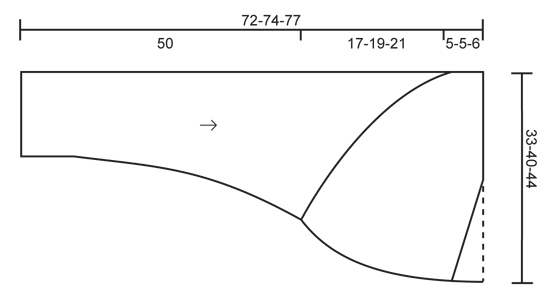
GARTER ST (back and forth on circular needle): K all rows. 1 ridge = 2 rows K. PATTERN: See diagrams A.1 to A.8. The diagrams show all rows in pattern seen from RS. ---------------------------------------------------------- BOLERO: Worked in 2 parts from edge of sleeve to mid back. Then the 2 parts are sewn tog mid back Pick up an edge in rib around the opening of bolero. RIGHT SIDE: Worked back and forth on circular needle from bottom of sleeve. Cast on 98-115-132 sts (incl 1 edge st in each side) on circular needle size 2.5 mm with BabyAlpaca Silk. P 1 row from WS. Work next row as follows from RS: 1 edge st in GARTER ST – see explanation above, * K 2, P 2, K 3, P 2, K 2, P 2, K 2, P 2 *, repeat from *-* 5-6-7 times in total, then * K 2, P 2, K 3, P 2, K 2 *, repeat from *-* 1 time in total and finish with 1 edge st in garter st. Continue rib like this. When piece measures 10 cm, switch to circular needle size 3 mm. Work next row as follows from RS: 1 edge st in garter st, * A.1 (= 11 sts), A.2 (= 6 sts) *, repeat from *-* 5-6-7 times in total, then A.1 (= 11 sts) 1 time in total, finish with 1 edge st in garter st. Continue like this until A.1 has been worked for 5 cm (piece measures approx. 15 cm). Now work A.3 instead of A.1 (continue A.2 as before). When piece measures 50 cm, insert 1 marker in piece. Work next row as follows from RS: 1 edge st in garter st, * A.4 (= 11 sts), A.8 (= 6 sts) *, repeat from *-* 2-3-3 times in total, ** A.4 (= 11 sts), A.5 (= 6 sts) **, repeat from **-** 3-3-4 times in total and finish with A.4 1 time and 1 edge st in garter st. Continue pattern like this. When A.4/ A.5 has been worked 1 time vertically, there are 196-237-268 sts on needle and piece measures approx. 12 cm from marker. Then work A.6 instead of A.4 and A.7 instead of A.5 (continue diagram A.8 as follows: Work A.8b 1 time and continue with A.8c). When A.8b has been worked 1 time vertically, there are 204-249-280 sts on needle. When piece measures 17-19-21 cm from marker, slip the first 110-136-155 sts on needle from RS on 1 stitch holder (work sts before slipping them on holder) = right front piece. There are now 94-113-125 sts on needle for back. Insert another marker (side seam is seamed up to this marker) and continue pattern back and forth over back sts. When piece measures 2-2-3 cm from marker, slip 10 sts on 1 stitch holder 5 times in total from bottom of back and up towards neck every other row (i.e. at beg of every row from WS - work sts before slipping them on holder to avoid cutting the yarn) = 44-63-75 sts remain on needle. Switch to circular needle size 2.5 mm and slip all sts from stitch holder back on needle AT THE SAME TIME work the rest of row from RS = 94-113-125 sts. P 1 row from WS while AT THE SAME TIME inc 10 sts evenly = 104-123-135 sts. Work 1 ridge in garter st over all sts. Slip the first 48-59-63 sts at the top of neck on 1 stitch holder (work sts before slipping them on holder). Then continue in garter st back and forth over the 56-64-72 sts AT THE SAME TIME work short rows as follows: ROW 1 (= RS): K 56-64-72 (from middle of back to bottom edge), turn piece. ROW 2 (= WS): K from bottom edge until 2 sts remain on needle (i.e. towards middle of back), turn piece. ROW 3 (= RS): K 54-62-70 sts, turn piece. ROW 4 (= WS): K from bottom edge until 4 sts remain on needle, turn piece. ROW 5 (= RS): K 52-60-68 sts, turn piece. ROW 6 (= WS): K from bottom edge until 6 sts remain on needle, turn piece. Continue like this until 1 ridge has been worked only over the outermost 2 sts at the bottom of back piece = 28-32-36 ridges. Then work 1 ridge over all 104-123-135 sts (also sts on stitch holder), loosely cast off. Bolero has now been worked until mid of back, i.e. half way. LEFT SIDE: Cast on and work as right side but reversed. I.e. when sts on front piece are slipped on a stitch holder, this is done from WS (not RS) and when sts from back are slipped on stitch holder, this is done at beg of every row from RS (not WS). ASSEMBLY: Sew sleeve seams edge to edge in outer loops of edge sts up to marker at 50 cm, then sew side seams, i.e. continue sleeve seam so that the side on front piece is sewn towards the side on back piece up to marker. Sew back seam. RIB: Pick up sts along the opening of bolero - i.e. up along right front piece, back of neck, down along left front piece and then along back piece as follows: Pick up from RS approx. 340 to 380 sts (incl sts on stitch holders) on circular needle size 2.5 mm and work in the round on needle as follows: P 1 round, then K 1 round while AT THE SAME TIME inc evenly to 390-416-468 sts. Continue to work rib as follows: * Work A.3 (= 11 sts), P 2 *, repeat from *-* the entire round. When rib measures 3 cm, inc every 3rd P-section to 3 P sts = 420-448-504 sts. Repeat inc when edge measures 7 cm, but displace inc so that there now are 2 sections with 3 P sts between every section with 2 P = 450-480-540 sts. When edge measures 8 cm, loosely cast off with K over K and P over P - NOTE: To avoid a tight cast-off edge, 1 YO after approx. every 6th or 12th st can be made and cast off as a regular st. |
||||||||||||||||||||||
Diagram explanations |
||||||||||||||||||||||
|
||||||||||||||||||||||
 |
||||||||||||||||||||||
 |
||||||||||||||||||||||
 |
||||||||||||||||||||||
Have you finished this pattern?Tag your pictures with #dropspattern #lemonshrugbolero or submit them to the #dropsfan gallery. Do you need help with this pattern?You'll find 26 tutorial videos, a Comments/Questions area and more by visiting the pattern on garnstudio.com. © 1982-2026 DROPS Design A/S. We reserve all rights. This document, including all its sub-sections, has copyrights. Read more about what you can do with our patterns at the bottom of each pattern on our site. |
||||||||||||||||||||||


With over 40 years in knitting and crochet design, DROPS Design offers one of the most extensive collections of free patterns on the internet - translated to 17 languages. As of today we count 324 catalogues and 12290 patterns translated into English (UK/cm). 12290
We work hard to bring you the best knitting and crochet have to offer, inspiration and advice as well as great quality yarns at incredible prices! Would you like to use our patterns for other than personal use? You can read what you are allowed to do in the Copyright text at the bottom of all our patterns. Happy crafting!
Post a comment to pattern DROPS 152-14
We would love to hear what you have to say about this pattern!
If you want to leave a question, please make sure you select the correct category in the form below, to speed up the answering process. Required fields are marked *.