
Popular categories
Looking for a yarn?


Comments / Questions (10)
![]() Cynthia wrote:
Cynthia wrote:
Not understanding where to find corrections understanding bacon.
07.10.2023 - 22:02DROPS Design answered:
Dear Cynthia, the corrections under bacon have already been made; the online version is already correct. This is a tip for those who printed the pattern before the correction and may have an outdated pattern. Happy crochetting!
08.10.2023 - 21:06
![]() Joanna wrote:
Joanna wrote:
Proszę o wyjaśnienie dot. tosta - w opisie jest "Ułożyć brzeg wokół spodu tostu i przer. wokół kromki kolorem brązowym. Przer. 1 oś w każde oś i 2 oś w każdy rz." w jakim dokładnie momencie przerabiać 2 oś? Nie rozumiem tej części opisu...
20.02.2023 - 01:25DROPS Design answered:
Witaj Joanno, 1 oczko ścisłe przerabiasz w 1 oczko ścisłe w każde oczko na górze/dole kromki (1-szy i ostatni rząd kromki). 2 oczka ścisłe przerabiasz w każdy rząd, czyli na 2 bokach kromki. Pozdrawiamy!
20.02.2023 - 13:42
![]() Dorthe Jansen wrote:
Dorthe Jansen wrote:
Der er ensrettelse til bacon opskriften men jeg kan ikke se hvad den er? Er de 35 masker korrekte?
05.12.2022 - 18:47
![]() Bożena wrote:
Bożena wrote:
Czemu w opisie bekonu jest 46 o.ł. powinno być 35? Robią 46 wyjdzie dłuższy i nie zgodny z waszym zdjęciem
14.08.2022 - 23:40DROPS Design answered:
Witaj Bożeno, zgadza się. Już to zgłosiłam. Wkrótce powinna pojawić się korekta. Dziękuję i pozdrawiam
17.08.2022 - 08:56
![]() Ine wrote:
Ine wrote:
Ik snap niet wat met t losse randje voor de boterham moet gaan gebeuren. Je maakt n losse en n vaste rand? Graag uw reactie. Groetjes Ine
03.06.2018 - 09:47DROPS Design answered:
Dag Ine, Voor de boterham maak je eerst 2 lapjes, beige en dan een rand van bruin'; dit is zegmaar de korst die rondom de boterham komt en beide lapjes met elkaar verbindt. Je haakt deze dus rondom met vasten aan de lapjes. Dit doe je door vasten door de vasten te haken of 2 vasten als je a.h.w. op een toer vast moet haken (dus wanneer der rand langs de zijkant van de lapjes ligt)
03.06.2018 - 17:21
![]() Margret wrote:
Margret wrote:
Ik heb dezelfde vraag als Jaukje. Wat tedoen met de rand van de boterham?
26.04.2018 - 08:27DROPS Design answered:
Dag Margreet, De rand is a.h.w. de korst en verbindt beide lapjes voor de boterham. Deze haak je dus rondom de lapjes, tegen beide kanten aan.
03.06.2018 - 17:23
![]() De Knutseljuf Ede wrote:
De Knutseljuf Ede wrote:
Wat een geweldig haakpatroon, superleuk! Dit fantastische voorbeeld met natuurlijk een mooie link naar hier is ook genoemd in een blogje, dat heet: Haak een pannenkoek! Kijk dan even op FB bij Crea met Kids 2-12 jr
14.03.2018 - 23:22
![]() Mirelle Rothengatter wrote:
Mirelle Rothengatter wrote:
Ik wil mijn complimenten geven voor uw prachtige ontwerp! Het ziet er net echt uit! Ik heb in mijn blog een verwijzing gegeven naar uw blog zodat iedereen dit kan bekijken en haken! Vriendelijke groeten,Mirelle
14.03.2018 - 23:11
![]() Jaukje wrote:
Jaukje wrote:
Hallo, ik heb het spiegelei en het spek gehaakt. Erg leuk geworden. Nu wil ik de boterham maken, maar hoe zet ik deze in elkaar? In de uitleg staat niet hoe ik de rand aan het donkerbeige vast moet maken. Groeten Jaukje.
02.06.2015 - 20:18DROPS Design answered:
Hoi Jaukje. Je haakt eerst de rand met bruin zoals beschreven: "Haak 4 l met bruin en haaknld 4 mm, keer en haak 1 v in tweede l, haak 1 v in elke l = 3 v. Haak 1 v in elke v tot rand ongeveer 39 cm meet". Dan staat er: "Leg de bovenkant op de onderkant en haak rondom het hele sneetje brood met bruin. Haak 1 v in elke v en 2 v in elke toer, vul als er nog ongeveer 5 cm over is het sneetje brood met wat kussenvulling en haak dan verder. Hecht de draad af."
03.06.2015 - 13:39
![]() Rita wrote:
Rita wrote:
Ich habe das Spiegelei gehäkelt und es ist toll geworden. Meine Jungs lieben es!! Nun muss wohl die Kinderküche mit noch mehr Lebensmittel gefüllt werden;) Vielen Dank für die tolle Anleitung!!
08.10.2014 - 21:41
|
|
Ham & Eggs#dropshamandeggs |
|
 |
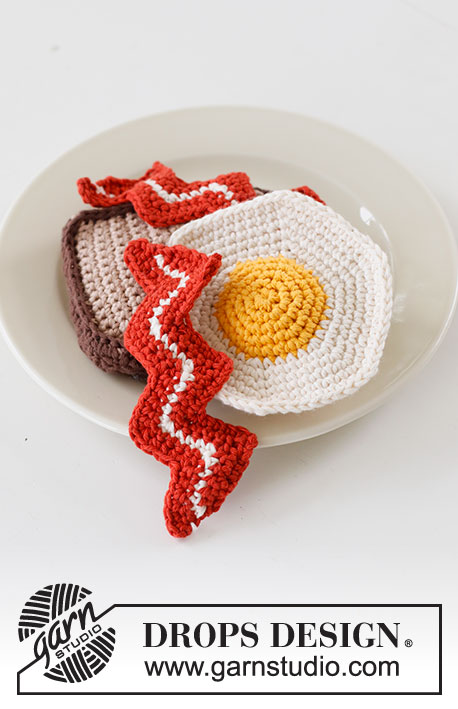 |
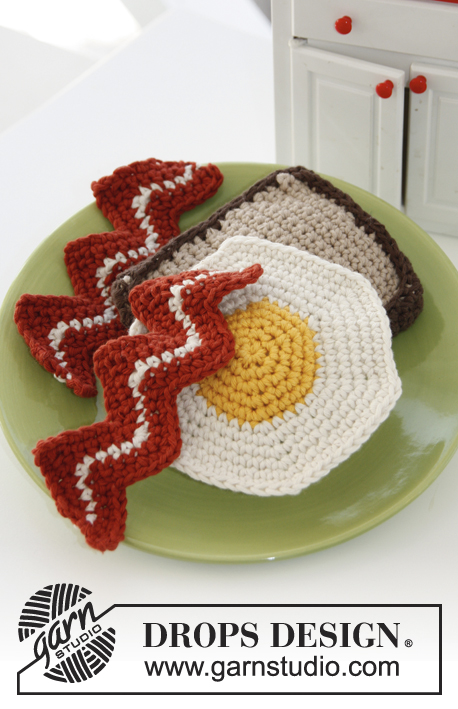
Crochet breakfast with bread, bacon and eggs, crocheted in DROPS Paris
DROPS Children 24-43 |
|
|
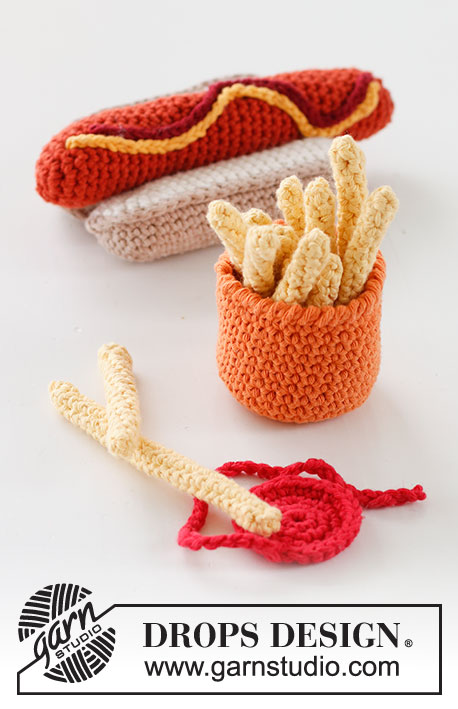
MAGIC CIRCLE: When piece is worked in the round, start with this technique to avoid holes in the middle. Hold the yarn end and wind the yarn one time around the index finger to make a loop. Hold the loop with left thumb and middle finger, place the yarn over left index finger. Insert hook through the loop, make a YO and pull yarn through loop, work 1 ch, then work dc around the loop. When the desired no of dc have been reached, pull the yarn end to tighten the loop. Fasten the yarn end on the back side. Continue to work in the round in a circle. WORK IN THE ROUND IN A CIRCLE: After last dc on the round, continue to next round with 1 dc in next dc (= first dc from previous round). NOTE: Insert a marker at the beg of round between last dc and 1st dc on round, move the marker upwards when working. DECREASE TIP: Dec 1 st by working 2 sts tog as follows: * Insert hook in next st, get yarn *, repeat from *-* one more time, make 1 YO and pull yarn through all 3 sts on hook. -------------------------------------------------------- EGGS: Worked in the round in a circle. Start by making a MAGIC CIRCLE with strong yellow - read explanation above - on hook size 4 mm. ROUND 1: Work 6 dc in the magic circle - READ WORK IN THE ROUND IN A CIRCLE. Insert 1 marker at beg of round and move the marker upwards when working. ROUND 2: Work 2 dc in every dc = 12 dc. ROUND 3: * 1 dc in next dc, work 2 dc in next dc *, repeat from *-* the entire round = 18 dc. ROUND 4: * 1 dc in each of the next 2 dc, work 2 dc in next dc *, repeat from *-* the entire round = 24 dc. ROUND 5: * 1 dc in each of the next 3 dc, work 2 dc in next dc *, repeat from *-* the entire round = 30 dc. Fasten off. Work another circle the same way = 2 circles in strong yellow. ROUND 6: Place the circles on top of each other, then work in the round with off white - work through both layers as follows: * 1 dc in each of the next 4 dc, work 2 dc in next dc *, repeat from *-* the entire round = 36 dc. NOTE! When approx. 10 dc remain, fill the middle circles with cotton wool before finishing round. ROUND 7: * 1 dc in each of the next 5 dc, work 2 dc in next dc *, repeat from *-* the entire round = 42 dc. ROUND 8-11: Continue with inc the same way, there is 1 dc more on every round between inc = 66 dc. Fasten off. BREAD: TOP/BOTTOM: Work 16 ch with dark beige on hook size 4 mm, turn and work 1 dc in second ch from hook, work 1 dc in every ch = 15 dc. Work 1 dc in every dc until bread measures approx. 11 cm vertically. Work another part the same way. EDGE AROUND: Work 4 ch with brown on hook size 4 mm, turn and work 1 dc in second ch, work 1 dc in every ch = 3 dc. Work 1 dc in every dc until edge measures approx. 39 cm. Place the edge towards the bottom and work around the entire slice of bread with brown. Work 1 dc in every dc and 2 dc in every row. Fasten the top the same way, when approx. 5 cm remain fill the slice with some cotton wool before finishing. Fasten off. BACON: Crochet 35 loose ch on hook size 4 mm with rust. ROW 1: Work 2 dc in 2nd ch from hook, * 1 dc in each of the next 4 ch, skip 2 ch, 1 dc in each of the next 4 ch, 3 dc in next ch *, repeat from *-* a total of 3 times but finish with only 2 dc in last ch = 34 dc. ROW 2: 1 ch, 2 dc in first dc, * 1 dc in each of the next 4 dc, skip 2 dc, 1 dc in each of the next 4 dc, 3 dc in next dc *, repeat from *-* 3 times and finish with only 2 dc in last ch. ROW 3: Switch to off white and work as 2nd row. ROW 4-5: Switch to rust and work as 2nd row. Fasten off. |
|
Have you finished this pattern?Tag your pictures with #dropspattern #dropshamandeggs or submit them to the #dropsfan gallery. Do you need help with this pattern?You'll find 6 tutorial videos, a Comments/Questions area and more by visiting the pattern on garnstudio.com. © 1982-2026 DROPS Design A/S. We reserve all rights. This document, including all its sub-sections, has copyrights. Read more about what you can do with our patterns at the bottom of each pattern on our site. |
|


With over 40 years in knitting and crochet design, DROPS Design offers one of the most extensive collections of free patterns on the internet - translated to 17 languages. As of today we count 324 catalogues and 12290 patterns translated into English (UK/cm). 12290
We work hard to bring you the best knitting and crochet have to offer, inspiration and advice as well as great quality yarns at incredible prices! Would you like to use our patterns for other than personal use? You can read what you are allowed to do in the Copyright text at the bottom of all our patterns. Happy crafting!
Post a comment to pattern DROPS Children 24-43
We would love to hear what you have to say about this pattern!
If you want to leave a question, please make sure you select the correct category in the form below, to speed up the answering process. Required fields are marked *.