Comments / Questions (19)
![]() Dinade Man wrote:
Dinade Man wrote:
Ik ben deze lieveheersbeestje aan het haken ik heb een vraag over toer11 ik bergrijp het niet zo kunt u mij helpen
06.07.2016 - 13:06DROPS Design answered:
Hoi Dina. Wat begrijp je niet precies in toer 11?
06.07.2016 - 14:21
![]() Emma wrote:
Emma wrote:
Ik vind het lieveheersbeestje heel leuk. en de andere figuurtjes ook natuurlijk. maar komen er nog figuurtjes bij? ik heb er al veel gemaakt, en ik weet niet wat ik nu zou maken. komen er dus nog figuurtjes bij? ik zou het graag hebben
14.08.2015 - 13:42DROPS Design answered:
Hoi Emma. Dat weet ik niet, het kan zijn dat er later wel meer bij komen.
18.08.2015 - 17:08
![]() Janneke wrote:
Janneke wrote:
Ben bezig maar zit vast bij toer 11,die begrijp ik niet goed, er staat 11 vasten en wat moet ik dan
21.04.2014 - 19:02DROPS Design answered:
Hoi Janneke. Je hebt na toer 10 56 v op de toer, dan moet je haken: 1 v in elke van volgende 3 v, haak 2 v in volgende st *, herhaal van *-* nog een keer, haak 1 v in elke van volgende 11 v. ** Haak 2 v in volgende st, 1 v in elke van volgende 3 v, haak 2 v in volgende st **, 1 v in elke van volgende 7 v, herhaal van **-** nog een keer, haak 1 v in elke van volgende 11 v, herhaal van **-** nog een keer, 1 v in elke van de laatste 4 v op toer = 64 st (= 8 st gemeerderd).
22.04.2014 - 16:43
![]() Heidi wrote:
Heidi wrote:
Ein richtig süsser Marienkäfer. Einfach zu häkeln, allerdings habe ich fürs zusammen nähen fast genauso lange gebraucht.
17.01.2014 - 18:41
![]() Lisa wrote:
Lisa wrote:
Jeg det står der, men der står også at man ikke skal tage jævnt ud, og når man følger de anvisninger, hænger det ikke sammen mere.... SÅ er det bare at jeg gerne vil vide om jeg skal tage de maske jævnt ud eller om det skal tages bestemt ud for at få en form på mariehønen?? :)
12.10.2013 - 09:02DROPS Design answered:
Nej du behøver ikke tænke på formen, du tager dem bare ud så "jævnt" du kan. God fornøjelse!
14.10.2013 - 12:06
![]() Lisa wrote:
Lisa wrote:
Hej Jeg er igang med mariehønen og jeg kan bare ikke få det til at passe med masker ved omgang 11.. Jeg har lavet det om flere gange og hvis jeg følger anvisningen kommer jeg op på 118 fm og så kan jeg ikke blive indenfor omgangen... ??
09.10.2013 - 20:55DROPS Design answered:
Efter 11.omgang skal du have 64 m hvilket betyder at du skal tage 8 m ud i løbet af omgangen. God fornøjelse!
10.10.2013 - 07:57
![]() An Meylemans wrote:
An Meylemans wrote:
Ik zou een poef willen maken voor in de kleuterklas. Zou ik dit beestje met het zpagetti garen van Hoooked kunnen doen? Krijg ik dan een soort poef? Hoeveel garen zou ik dan nodig hebben?
05.03.2013 - 19:16DROPS Design answered:
Het beestje is ca 14 cm in diameter. Wil je hem groter maken, kan je een dikker garen/naald kiezen zoals de Eskimo. Test de stekenverhouding om te zien hoe groot die dan wordt. Kies je een alternatief product zoals Hooked Zpagetti, dan kan je beter contact opnemen met hun of met een winkel die dit product verkopen.
07.03.2013 - 16:32Julia wrote:
This ladybug looks really lovely! I think it could be a nice present for little kids and for our loved ones as well.
21.02.2013 - 11:58
![]() Béatrice wrote:
Béatrice wrote:
Un petit modèle ludique et mignon, j'adore !
28.01.2013 - 21:54
Francis |
|
 |
 |
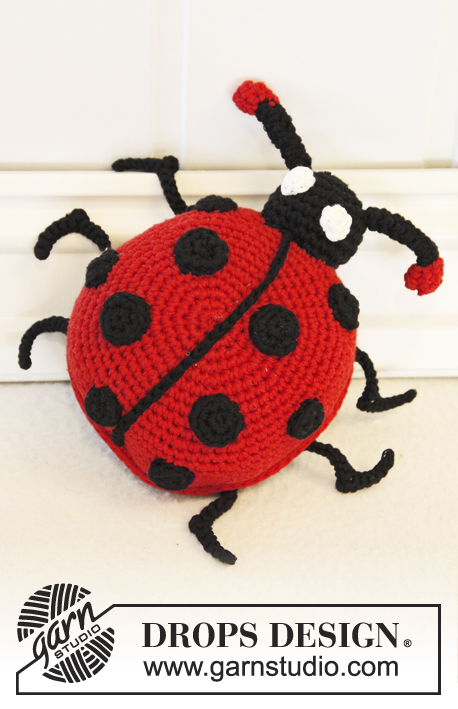
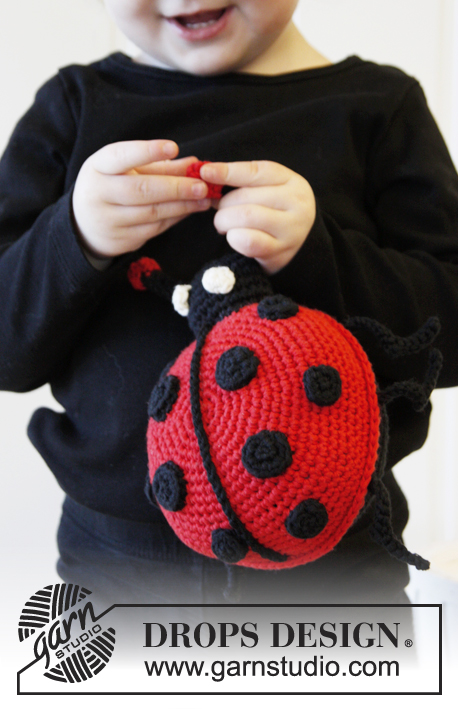
Crochet DROPS lady bug in "Cotton Light".
DROPS Extra 0-890 |
|
|
MAGIC CIRCLE: When piece is worked in the round, start with this technique to avoid holes in the middle (instead of ch-ring): Hold the yarn end and wind the yarn one time around the index finger to make a loop. Hold the loop with left thumb and middle finger, place the yarn over left index finger. Insert hook through the loop, make a YO and pull yarn through loop, work 1 ch, then work dc around the loop. When the desired no of dc have been reached, pull the yarn end to tighten the loop. Fasten the yarn end at the back. Continue to work in the round in a circle. WORK IN THE ROUND IN A CIRCLE: After last dc on the round, continue to next round with 1 dc in next dc which is 1st dc from previous round. NOTE: Insert a marker at the beg of round between last dc and 1st dc on round, move the marker upwards when working. DECREASE TIP: Dec 1 st by working 2 sts tog as follows: * Insert hook in next st, get yarn *, repeat from *-* one more time, make 1 YO and pull yarn through all 3 sts on hook. COLOUR CHANGE: To get a nice colour change work last dc on round as follows: Insert hook in last dc, get yarn, make a YO with the new colour and pull it through all sts on hook. Continue on to next round with the new colour. CROCHET TIP 1: Beg every dc round with 1 ch which replaces the first dc. -------------------------------------------------------- TOP SIDE OF LADY BUG: Worked in the round in a circle from mid on top of upper part of body with red on hook size 3.5 mm. Start by making a MAGIC CIRCLE - read explanation above. ROUND 1: Work 8 dc in the magic circle - READ WORK IN THE ROUND IN A CIRCLE - Insert 1 marker at beg of round and move it upwards when working. ROUND 2: Work 2 dc in every st = 16 dc. ROUND 3: * 1 dc in next dc, work 2 dc in next st *, repeat from *-* the entire round = 24 dc. ROUND 4: * 1 dc in each of the next 2 dc, work 2 dc in next st *, repeat from *-* the entire round = 32 dc. ROUND 5: * 1 dc in each of the next 3 dc, work 2 dc in next st *, repeat from *-* the entire round = 40 dc. ROUND 6: Work 1 dc in every dc. ROUND 7: * 1 dc in each of the next 4 dc, work 2 dc in next st *, repeat from *-* the entire round = 48 dc. ROUND 8: Work 1 dc in every dc. ROUND 9: * 1 dc in each of the next 5 dc, work 2 dc in next st *, repeat from *-* the entire round = 56 dc. ROUND 10: Work 1 dc in every dc. ROUND 11: * 1 dc in each of the next 3 dc, work 2 dc in next st *, repeat from *-* one more time, work 1 dc in each of the next 11 dc. ** Work 2 dc in next st, 1 dc in each of the next 3 dc, work 2 dc in next st **, 1 dc in each of the next 7 dc, repeat from **-** one more time, work 1 dc in each of the next 11 dc, repeat from **-** one more time, 1 dc in each of the last 4 dc on round = 64 sts (= 8 inc sts). ROUND 12: Work 1 dc in every dc. ROUND 13: 1 dc in each of the first 4 dc, work 2 dc in next st, 1 dc in each of the next 3 dc, work 2 dc in next st, work 1 dc in each of the next 15 dc, * work 2 dc in next st, 1 dc in each of the next 3 dc, work 2 dc in next st *, 1 dc in each of the next 7 dc, repeat from *-* 1 more time, work 1 dc in each of the next 15 dc, repeat from *-* one more time, 1 dc in each of the last 3 dc on round = 72 sts (= 8 inc sts). ROUND 14-18: Work 1 dc in every dc. Put piece aside - do not cut the yarn. LADY BUG'S DOTS: Work 6 small dots (stop after 2nd round) and 4 large dots (stop after 3rd round) with black as follows: Work 5 ch and form a ring with 1 sl st in first ch. READ CROCHET TIP 1! Round 1: 8 dc in ch-ring, finish with 1 sl st in 1st dc from beg of round. Round 2: 2 dc in every dc = 16 dc, finish with 1 sl st in 1st dc from beg of round. Round 3 (for large dots): * 1 dc in next dc, work 2 dc in next st *, repeat from *-* the entire round = 24 dc. Fasten off. Fasten the dots on the top side. Work a ch row of 24-28 cm with black. Fasten the row down along the middle of the top side. UNDERSIDE OF LADY BUG: Work as top side but with black to and with 13th round, fasten off. Now place the underside and top side on top of each other and work them tog with a dc round in red through both layers while at the same time filling the lady bug with cotton wool. Fasten off. LEG: Crochet 16 ch with black. Turn piece and work back as follows: Beg in 2nd st from hook and work 1 dc in each of the next 6 ch, then work 2 ch, work 1 dc in each of the next 9 ch. Cut the yarn - this is used to fasten the leg to the lower part of body. Work 6 legs in total and fasten them evenly on each side. ANTENNAS: Worked in the round in a circle. Work 4 ch with black, form a ring by working 1 sl st in first ch, then 1 dc in every ch made = 4 dc. Then work 1 dc in every dc until piece measures approx. 4 cm, switch to red - READ COLOUR CHANGE. Then work 2 dc in each of the next 4 dc = 8 dc. Work 1 dc in each of the next 8 dc, then work all dc on round tog 2 by 2 = 4 dc, fasten off. Pull yarn end through the antenna and tighten until it bends. EYE: Worked in the round in a circle. Start by making a magic circle in off white. Work 6 dc in the magic circle, cut, tighten and fasten the yarn. HEAD: Start by making a MAGIC CIRCLE - read explanation above with black. ROUND 1: Work 6 dc in the magic circle - READ WORK IN THE ROUND IN A CIRCLE - Insert 1 marker at beg of round and move it upwards when working. ROUND 2: Work 2 dc in every st = 12 dc. ROUND 3: * 1 dc in next dc, work 2 dc in next st *, repeat from *-* the entire round = 18 dc. ROUND 4: * 1 dc in each of the next 2 dc, work 2 dc in next st *, repeat from *-* the entire round = 24 dc. ROUND 5-9: Work 1 dc in every dc. Fasten off. Fasten 1 antenna in each side of head, fasten the eyes, then fill the head with some cotton and fasten it to body. |
|
Have you finished this pattern?Tag your pictures with #dropspattern or submit them to the #dropsfan gallery. Do you need help with this pattern?You'll find 8 tutorial videos, a Comments/Questions area and more by visiting the pattern on garnstudio.com. © 1982-2025 DROPS Design A/S. We reserve all rights. This document, including all its sub-sections, has copyrights. Read more about what you can do with our patterns at the bottom of each pattern on our site. |
|


Post a comment to pattern DROPS Extra 0-890
We would love to hear what you have to say about this pattern!
If you want to leave a question, please make sure you select the correct category in the form below, to speed up the answering process. Required fields are marked *.