
Popular categories
Looking for a yarn?


Comments / Questions (69)
![]() ORMES wrote:
ORMES wrote:
Je travaille sur la taille L : après les diminutions des emmanchures pour le dos, je monte à 83 cm comme c'est noté, alors que pour le devant gauche on me dit de monter à 86 cm : où est l'erreur svp ?
12.11.2015 - 18:56DROPS Design answered:
Bonjour Mme Ormes, pour le dos, on rabat les mailles de l'encolure à 83 cm (taille L) et on rabat celles des épaules à 86 cm, pour les devants, on ne rabat pas de mailles pour l'encolure, on continue directement jusqu'à 86 cm et on rabat alors les mailles de l'épaule, puis on tricote le col en rangs raccourcis sur les mailles restantes. Bon tricot!
13.11.2015 - 09:09
![]() Cathie De Klerk wrote:
Cathie De Klerk wrote:
Ben bezig met de linker voorpand, begrip niet hoe het ziet met de col! Is de lange gedeelte richting schoudernaald of richting voorbies? Op jullie tekening is de lange kant richting schouder/mouw. Graag jullie hulp en reactie. Met vriendelijke groeten Cathie de Klerk - Lemonsu
27.11.2014 - 15:43DROPS Design answered:
Hoi Cathie. Ja, dat is ook correct. Je begint met de verkorte toeren aan het begin van de nld en bij het omvouwen komen deze deel aan de schouderkant.
04.12.2014 - 13:28
![]() Linda Nielsen wrote:
Linda Nielsen wrote:
Kantmaske er det altid en ret fra begge sider.. Både retside og vrangsiden.?
26.09.2014 - 11:16DROPS Design answered:
Hej Linda. Ja, det er det.
29.09.2014 - 12:34
![]() Jemina Typpö wrote:
Jemina Typpö wrote:
Hei! minkä kokoinen takki mallilla on kuvassa? S vai M? Kiitos!
24.08.2014 - 15:14DROPS Design answered:
Hei! Kuvassa on luultavasti koko M. Tarkista mitat ohjeen mittapiirroksesta ennen kuin aloitat neulomisen.
26.08.2014 - 16:34
![]() Paola wrote:
Paola wrote:
Ho realizzato questo modello con Drops Andes ed è riuscito benissimo. Un piccolo appunto: secondo me nelle spiegazioni del davanti sinistro quando si inziano i ferri accorciati bisogna iniziare sul rovescio del lavoro e non sul diritto come indicato.Grazie:
05.12.2013 - 11:42DROPS Design answered:
Buongiorno Paola. Abbiamo corretto il testo. La ringraziamo per la segnalazione. Buon lavoro!
05.12.2013 - 12:14
![]() Paola wrote:
Paola wrote:
Vorrei acquistare la lana per questo modello ma non capisco perché nelle istruzioni trovo colore 70t bianco-grigio mentre nella tabella colori trovo un 70 panna-ruggine.
14.11.2013 - 16:16DROPS Design answered:
Buongiorno Paola, abbiamo corretto il modello, il colore è il 70 panna/ruggine. Buon lavoro!!!
14.11.2013 - 17:14
![]() Regina wrote:
Regina wrote:
Where do you find the measurements for the sizes please?
12.10.2013 - 18:37Tora answered:
Below, under the diagram; in cms!
13.10.2013 - 19:30
![]() Hiltsje wrote:
Hiltsje wrote:
In het patroon staat achter het aantal op te zetten steken tussen haakjes 'incl. 1 kantst aan weerskanten'. Betekend dit dat je bij het aantal op te zetten steken nog 2 steken extra op moet zetten? Of zitten deze 2 kantsteken al bij het genoemde aantal op te zetten steken? Bvd.
03.10.2013 - 19:38DROPS Design answered:
Hoi Hiltsje. Het aantal st is inclusief de kantsteken. Je hoeft dus niet meer st op te zetten.
07.10.2013 - 21:23
![]() Marga wrote:
Marga wrote:
Klópt het, dat als je de verkorte toeren brei, je dan een opening krijgt tussen de 4 steken die je over hebt en de 14 waar je langer mee doorbreit?
17.09.2013 - 22:25DROPS Design answered:
Hoi Marga. Er kan een kleine opening ontstaan door het keren van de nld, maar vaak verdwijnt het als het vest een keer gewassen is. Vind je het gaatje te groot, dan kan je altijd 1 st opnemen in de overgang tussen de 14/4 st en deze samen breien met de eerste st op de nld.
18.09.2013 - 10:52
![]() Marga Hoogeboom wrote:
Marga Hoogeboom wrote:
Hoe lang is het model dat dit vest aan heeft? Ìk ben 1.85m en wil het vest verlengen, maar hoeveel en bij welke hoogte?
10.09.2013 - 16:49DROPS Design answered:
Hoi Marga. Onderaan het patroon vind je de maattekening met de afmetingen in cm per maat. Je kan hier vergelijken met je eigen afmetingen - je kan dan ook inschatten waar je eventueel moet verlengen. Veel breiplezier!
11.09.2013 - 10:42
|
|||||||
Tweed on the Town#tweedonthetownjacket |
|||||||
|
|
|||||||
Knitted DROPS jacket with shawl collar in ”Snow”. Size: S - XXXL.
DROPS 143-13 |
|||||||
|
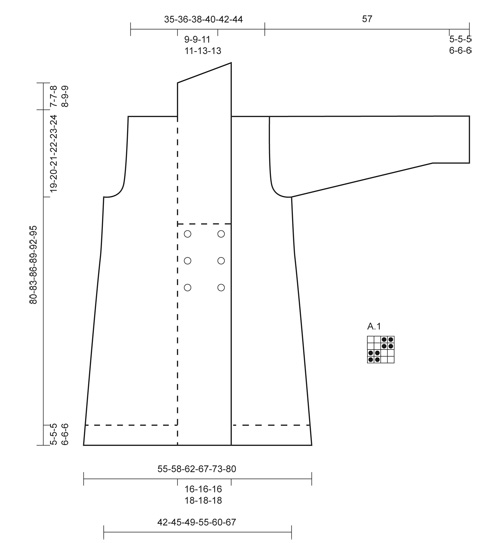
GARTER ST (back and forth on needle): K all rows. 1 ridge = 2 rows K. DECREASE TIP: All dec are done from RS. Dec 1 st at beg of row as follows: 1 edge st in garter st, slip 1 st as if to K, K 1, psso. Dec 1 st at end of row as follows: Work until 3 sts remain on needle, K the next 2 sts tog, 1 edge st in garter st. PATTERN: See diagram A.1, diagram shows 1 pattern repetition seen from RS. BUTTONHOLES: Cast off for 6 buttonholes on band on right front piece as follows: Work 4 sts, cast off the next 2 sts, work 6-6-6-8-8-8 sts, cast off the next 2 sts = 2 buttonholes on same row (4 sts remain on band). On next row cast on 2 new sts over the cast off sts. Cast off for buttonholes when piece measures: SIZE S: 36, 45, 54 cm SIZE M: 38, 47, 56 cm SIZE L: 40, 49, 58 cm SIZE XL: 42, 51, 60 cm SIZE XXL: 44, 53, 62 cm SIZE XXXL: 46, 55, 64 cm Approx. 1 cm remains before working in garter st over all sts on band. INCREASE TIP: Inc 1 st by making 1 YO, on next row work YO twisted (i.e. work in back loop of st instead front) to avoid holes. -------------------------------------------------------- BACK: Worked back and forth on needle. Cast on 62-66-70-76-82-90 sts (incl 1 edge st in each side) on circular needle size 7 mm with Snow. Work in GARTER ST - see explanation above - for 5-5-5-6-6-6 cm (1st row = RS). On next row from RS switch to circular needle size 8 mm and continue in stocking st with 1 edge st in garter st in each side. NOTE! All edge sts in the sides are worked in garter st until finished measurements. REMEMBER THE KNITTING TENSION! When piece measures 12-12-13-13-14-14 cm, dec 1 st inside 1 edge st in each side - Read DECREASE TIP. Repeat dec every 7-7½-7½-8-8-8 cm 6 more times (= 7 dec in total) = 48-52-56-62-68-76 sts. Continue until piece measures 61-63-65-67-69-71 cm. Then cast off for armholes at the beg of every row in each side as follows: Cast off 3 sts 0-0-1-1-1-1 time, 2 sts 1-1-1-1-2-3 times and 1 st 2-3-1-3-3-4 times = 40-42-44-46-48-50 sts. Continue until piece measures 77-80-83-86-89-92 cm. Then cast off the middle 8-8-10-10-12-12 sts for neck and finish each shoulder separately. On next row from neck, cast off 1 st = 15-16-16-17-17-18 sts remain on shoulder. Loosely cast off all sts when piece measures 80-83-86-89-92-95 cm. LEFT FRONT PIECE: Worked back and forth on needle. Cast on 44-46-47-52-54-58 sts (incl 1 edge st) on circular needle size 7 mm. Work 1st row from RS as follows: K until 18-18-18-20-20-20 sts remain, work A.1 over the remaining sts (= band). Continue with A.1 over band and in garter st over the other sts for 5-5-5-6-6-6 cm. Then switch to circular needle size 8 mm and work next row from RS as follows: 1 edge st in garter st, work in stocking st until 18-18-18-20-20-20 sts remain, continue with A.1 over band. Work in stocking st with A.1 over band until piece measures 12-12-13-13-14-14 cm. Then dec 1 st after 1 edge st at beg of row from RS. Repeat dec every 7-7½-7½-8-8-8 cm 6 more times (= 7 dec in total) = 37-39-40-45-47-51 sts. AT THE SAME TIME when piece measures 55-57-59-61-63-65 cm, work in garter st over the 18-18-18-20-20-20 sts on band until finished measurements. When piece measures 61-63-65-67-69-71 cm, cast off for armhole at the beg of every row from RS as follows: Cast off 3 sts 0-0-1-1-1-1 time, 2 sts 1-1-1-1-2-3 times and 1 st 2-3-1-3-3-4 times = 33-34-34-37-37-38 sts. Continue until piece measures 80-83-86-89-92-95 cm. On next row from RS cast off the first 15-16-16-17-17-18 sts (= shoulder) = 18-18-18-20-20-20 sts in garter st remain on band. Continue in garter st over these sts - AT THE SAME TIME work short rows with start from neck (WS) as follows: * Work 1 ridge over all sts (= 2 rows K). On next row from WS, K 14-14-14-16-16-16 sts, turn and K back *. Repeat from *-* until piece measures 7-7-8-8-9-9 cm from where shoulder was cast off (short side). Loosely cast off all sts. RIGHT FRONT PIECE: Cast on and work the same way as on left front piece but reversed - AT THE SAME TIME cast off for BUTTONHOLES - read explanation above - on band. SLEEVE: Worked back and forth on needle. Cast on 26-26-30-30-34-34 sts (incl 1 edge st in each side) on circular needle size 8 mm with Snow. Work A.1 for 5-5-5-6-6-6 cm. Then work in stocking st with 1 edge st in garter st in each side. When piece measures 9 cm, inc 1 st - READ INCREASE TIP - inside 1 edge st in each side. Repeat inc every 6½-4½-5-4½-5-4 cm a total of 6-8-7-8-7-8 times = 38-42-44-46-48-50 sts. When piece measures 47-46-45-44-43-43 cm (shorter measurements in the larger sizes because of longer sleeve cap) cast off at beg of every row in each side for sleeve cap as follows: 3 sts 1 time, 2 sts 1 time, and 1 st 3-3-4-5-6-5 times. Then cast off 2 sts in each side until piece measures approx. 56 cm, then cast off 3 sts 1 time in each side. Cast off the remaining sts, the piece measures approx. 57 cm. ASSEMBLY: Sew shoulder seams and sew in sleeves inside 1 edge st. Sew sleeve and side seams in one inside 1 edge st. Sew bands tog mid back for collar - NOTE! Seam should be at the back so that it is not visible when collar is folded down. Sew collar along neckline in the back of neck. Sew the buttons on to the left band. POCKET: Worked back and forth on needle. Cast on 18-18-18-20-20-20 sts (incl 1 edge st in each side) on circular needle size 8 mm with Snow. Work in stocking st with 1 edge st in garter st in each side until piece measures 16-16-16-18-18-18 cm. Then work 2 ridges (= 4 rows K) before casting off (piece measures approx. 18-18-18-20-20-20 cm vertically). Knit another pocket the same way. Sew pockets on to front piece, approx. 12-12-12-13-13-13 cm from bottom edge and 18-18-19-19-20-20 cm in from mid front. |
|||||||
Diagram explanations |
|||||||
|
|||||||
 |
|||||||
Have you finished this pattern?Tag your pictures with #dropspattern #tweedonthetownjacket or submit them to the #dropsfan gallery. Do you need help with this pattern?You'll find 11 tutorial videos, a Comments/Questions area and more by visiting the pattern on garnstudio.com. © 1982-2026 DROPS Design A/S. We reserve all rights. This document, including all its sub-sections, has copyrights. Read more about what you can do with our patterns at the bottom of each pattern on our site. |
|||||||


With over 40 years in knitting and crochet design, DROPS Design offers one of the most extensive collections of free patterns on the internet - translated to 17 languages. As of today we count 324 catalogues and 12245 patterns translated into English (UK/cm). 12245
We work hard to bring you the best knitting and crochet have to offer, inspiration and advice as well as great quality yarns at incredible prices! Would you like to use our patterns for other than personal use? You can read what you are allowed to do in the Copyright text at the bottom of all our patterns. Happy crafting!
Post a comment to pattern DROPS 143-13
We would love to hear what you have to say about this pattern!
If you want to leave a question, please make sure you select the correct category in the form below, to speed up the answering process. Required fields are marked *.