
Popular categories
Looking for a yarn?


Comments / Questions (82)
![]() Laurence wrote:
Laurence wrote:
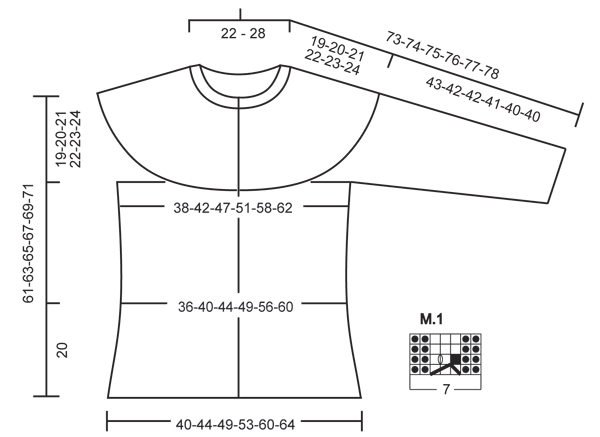
Merci d'annuler ma question précédente. J'ai mal compris le diagramme. 61cm est la hauteur totale de l'ouvrage, y compris les emmanchures. Désolée! Tout est OK
18.12.2014 - 19:25
![]() Laurence wrote:
Laurence wrote:
Je tricote le modèle en S Je me pose une question sur la hauteur de l'ouvrage. Si je regarde le diagramme, la hauteur totale avant les manches est indiquée à 61 cm. Dans les explications, il est dit de mettre en attente 2 rang après 42 cm, avant de faire les manches . Cela ne me parait pas cohérent
18.12.2014 - 19:21DROPS Design answered:
Bonjour Laurence, les 61 cm du schéma en taille S correspondent à la hauteur totale, la hauteur jusqu'aux emmanchures est bien de 61 - 19 (emmanchure/empiècement)= 42 cm. On met alors les mailles en attente au rang suivant les 42 cm (1 seul rang tricoté, celui où on rabat les mailles des emmanchures). Bon tricot!
19.12.2014 - 08:48
![]() Lucie wrote:
Lucie wrote:
Bonjour, J'aimerais bien tricoter cette jaquette, mais j'ai peur qu'avec des aig. no 10 le tricot soit trop mou, trop lâche. Pensez-vous que si je prends des aig. no 9 (recommandé pour la laine andes) et en tricotant la taille L pour avoir une taille M, j'arrive à un bon résultat ? Merci
27.08.2014 - 01:50DROPS Design answered:
Bonjour Lucie, les explications sont basées sur un échantillon de 9 m x 12 rangs jersey = 10x10 cm - si vous souhaitez modifier la tension, il vous faudra également recalculer l'empiècement en fonction de la vôtre, pensez également à adapter la quantité de laine en conséquence. Bon tricot!
27.08.2014 - 09:37
![]() Jean wrote:
Jean wrote:
I cannot understand the M1 pattern.
22.03.2014 - 21:51DROPS Design answered:
Dear Jean, on first row in M.1 work (from RS): P2, slip 1 as if to K, K2, pass the slipped st over the K2 (2 sts remain), P2. On 2nd row (from WS), work K2, P1, YO, P1 (= 3 sts again), K2. Happy knitting!
23.03.2014 - 18:13
![]() DUVERNEIX wrote:
DUVERNEIX wrote:
Je n'arrive pas à tricoter la torsade, il me manque des mailles et je ne comprends pas les explications. Avez-vous une video pour m'expliquer ? Merci
24.01.2014 - 17:33DROPS Design answered:
Bonjour Mme Duverneix, au rang 1 de M.1, tricotez les 3 m centrales ainsi: Glissez 1 m à l'end, tricotez 2 m end, puis passez la m glissée par-dessus les 2 m tricotées (il reste 2 m). Au rang 2, tricotez 1 m end, 1 jeté, 1 m end (= vous avez de nouveau 3 m au milieu aux rangs 4 et 5). Bon tricot!
24.01.2014 - 19:13
![]() Marie wrote:
Marie wrote:
Sur l'empiècement, les instructions mentionnent de faire les premières diminutions à 2 cm et de les refaire 4 fois pour les tailles inférieures ou égales au L. Cependant, en faisant le compte des mailles qui doivent me rester, je compte que les diminutions doivent se faire 4 fois au total et non 1 + 4. Peut-être un problème de formulation de l'explication. Par ailleurs, votre fenêtre de saisie est petite et pas agréable à manier....
31.12.2013 - 22:02
![]() Wil Van Oort wrote:
Wil Van Oort wrote:
Ik worstel met het telpatroon M.1. Moet het telpatroon een kabel voorstellen?
01.12.2013 - 21:12DROPS Design answered:
Hoi Wil. Het is geen kabel. Je breit in de eerste rij: 2 av, 1 st r afh, 2 st r, afgeh st overh de 2 rechte st (dwz, je haalt de eerste afgehaalde st over de 2 r st = 3 st worden 2 st), 2 av). In de volgende nld brei je boven de 2 r st in het midden (verkeerde kant): 1 av, 1 omslag, 1 av (dwz, de 2 st worden weer 3). Ik hoop dat je zo verder kan.
02.12.2013 - 12:25Isabelle Bleau wrote:
Je n'ai jamais tricoté de veste avec une aiguille circulaire, j'aimerais savoir dans quel sens on doit lire le diagramme, il y a 4 rang, est-ce qu'on les lis tous de droite à gauche de bas en haut? Ma deuxième question est: dans le diagramme M.1 tout de suite après le surjet, vous dites "pas de maille" je ne sais pas quoi faire avec "pas de maille" j'ai hâte de tricoter cette veste, j'ai fait venir la laine Eskimo, très jolie. Merci
09.08.2013 - 20:35DROPS Design answered:
Bonjour Mme Bleau, on tricote en allers et retours sur aiguille circulaire comme sur aiguilles droites (cf vidéo dans l'onglet). Le diag. se lit à partir du bas à droite vers la gauche sur l'endroit, de gauche à droite sur l'envers. Au rang 1 de M.1, on diminue 1 m, au rang suivant, cette maille n'existe plus = pas de mailles, on la remplace par 1 jeté entre les 2 m end suiv. Bon tricot!
10.08.2013 - 10:12
![]() Nins wrote:
Nins wrote:
Bonjour, Je suis en train de tricoter cette veste mais je n'ai pas assez de fil, j'ai pourtant commandé les 500g nécessaire pour la taille M et mon échantillon est conforme...
16.01.2013 - 18:55
![]() Marie wrote:
Marie wrote:
It needs more yarn for this jacket than it says in the instructions....
10.01.2013 - 20:44
|
||||||||||||||||
Mist#mistcardigan |
||||||||||||||||
|
|
||||||||||||||||
Knitted DROPS jacket in stocking st with cables and round yoke in ”Andes” or “Snow”. Size: S - XXXL.
DROPS 134-17 |
||||||||||||||||
|
GARTER ST (back and forth on needle): K all rows. DECREASE TIP 1: All dec are done from RS. Dec as follows before 4 sts in the side: Work until 2 sts remain before marker, K tog the next 2 sts. Dec as follows after 4 sts in the side: Slip 1 st as if to K, K 1, psso. DECREASE TIP 2: Dec 1 st on each side of marker as follows: Work until 2 sts remain before marker, slip 1 st as if to K, K 1, psso, (marker), K tog the next 2 sts. INCREASE TIP: All inc are done from RS. Inc 1 st by making 1 YO. On next row P YO twisted (i.e. work in back loop of YO instead of front) to avoid holes. PATTERN: See diagram M.1 (the diagram shows the pattern from RS) -------------------------------------------------------- BODY: Worked back and forth on circular needle from mid front. Cast on 78-86-94-102-114-122 sts (incl 3 band sts in each side towards mid front) on circular needle size 10 mm with Andes. Work 1st row (= from RS) as follows: 3 band sts in garter st - See explanation above - work diagram M.1 (= 7 sts), * K 2, P 2 *, repeat from *-* until 10 sts remain on needle, work diagram M.1 and finish with 3 band sts in garter st. NOTE: Work band sts in garter st until finished measurements. Work like this for 4 rows, work next row (= RS) as follows: 3 band sts, work diagram M.1, work in stocking st until 10 sts remain on needle, work diagram M.1, finish with 3 band sts. Continue in stocking st with diagram M.1 and 3 band sts in each side. Insert 4 markers in the piece as follows: Work 19-21-23-25-28-30 sts, 1 marker, work 4 sts, 1 marker, work 32-36-40-44-50-54 sts, 1 marker, work 4 sts, 1 marker, work remaining sts (= 4 sts between each marker in each side). REMEMBER THE KNITTING TENSION! When piece measures 10 cm from cast on edge, dec 1 st on each side of 4 sts in each side - see decrease tip 1 above. Repeat dec when piece measures 20 cm = 70-78-86-94-106-114 sts. Continue in stocking st with diagram M.1 and 3 band sts in each side. When piece measures 31-32-32-33-33-34 cm, inc 1 st on each side of 4 sts in the sides - Read increase tip above = 74-82-90-98-110-118 sts. Continue to work until piece measures 42-43-44-45-46-47 cm. Work next row from WS as follows: Work 18-20-22-24-27-29 sts, cast off the next 4 sts, work 30-34-38-42-48-52 sts, cast off the next 4 sts and work the last 18-20-22-24-27-29 sts. Put piece aside = 66-74-82-90-102-110 sts remain on needle. SLEEVE: The sleeve is worked back and forth on circular needle. Cast on 22-22-22-26-26-26 sts (incl 1 edge st in each side) on circular needle size 10 mm. Work 1st row (= RS) in rib as follows: 1 edge st in garter st, * K 2, P 2 *, repeat from *-* and finish with 1 edge st in garter st. Continue like this until rib measures approx. 4 cm. Now continue in stocking st with 1 edge st in each side - At the same time on 1st row from RS, adjust no of sts to 22-23-23-25-27-27. When piece measures 8 cm, inc 1 st in each side inside 1 edge st. Repeat inc every 6-6-5-5-5-4 cm a total of 6-6-7-7-7-8 times = 34-35-37-39-41-43 sts. When piece measures approx. 43-42-42-41-40-40 cm (NOTE! Shorter measurements in the larger sizes because of broader shoulder width) cast off 3 sts at beg of the next 2 rows = 28-29-31-33-35-37 sts. Put piece aside and knit another sleeve. ASSEMBLY: Sew the sleeves tog inside 1 edge st. YOKE: Slip sleeves on to same circular needle as body where armholes were cast off = 122-132-144-156-172-184 sts. Insert 1 marker after 19-17-16-18-18-20 sts, then insert another 7-7-7-8-8-8 markers with 12-14-16-15-17-18 sts between each = 19-17-16-18-18-20 sts remain after last marker (= 8-8-8-9-9-9 markers). Now measure the piece from here. Continue in stocking st with diagram M.1 and 3 band sts in each side as before. When piece measures 2 cm, dec 1 st on each side of every marker (= 16-16-16-18-18-18 sts dec) - Read decrease tip 2. Repeat dec every 4½-5-5-5½-4½-4½ cm a total of 4-4-4-4-5-5 times = 58-68-80-84-82-94 sts. Continue to work until piece measures 18-19-20-21-22-23 cm. NOTE: Adjust so that last row is the 4th row in diagram M.1. Continue to work an elevation in the neck with short rows as follows: 1st row (= RS): 3 band sts, work 1st row in diagram M.1, work in stocking st while AT THE SAME TIME dec 12-18-30-30-28-36 sts evenly (do not dec over diagram M.1 and band sts), work 1st row in diagram M.1 and finish with 3 band sts = 46-50-50-54-54-58 sts, turn piece. 2nd row (= WS): 3 band sts, work 2nd row in diagram M.1, work in P sts - but turn piece when 10 sts remain on needle. 3rd row: Tighten the thread and K from RS until 10 sts remain in the other side. Turn piece and tighten thread. 4th row: P 1 row from WS until 10 sts remain towards mid front, work 2nd row in diagram M.1 over the next 7 sts and finish with 3 band sts. Work next row (= from RS) as follows: 3 band sts, diagram M.1, * K 2, P 2 *, repeat from *-* until 10 sts remain, work diagram M.1 and finish with 3 band sts. Continue like this until rib measures 3 cm, then loosely cast off with K over K and P over P. ASSEMBLY: Sew the openings under the sleeves. Sew 7 buttons evenly distributed on left front band, use the holes between sts on right front band as button holes. |
||||||||||||||||
Diagram explanations |
||||||||||||||||
|
||||||||||||||||
 |
||||||||||||||||
Have you finished this pattern?Tag your pictures with #dropspattern #mistcardigan or submit them to the #dropsfan gallery. Do you need help with this pattern?You'll find 12 tutorial videos, a Comments/Questions area and more by visiting the pattern on garnstudio.com. © 1982-2026 DROPS Design A/S. We reserve all rights. This document, including all its sub-sections, has copyrights. Read more about what you can do with our patterns at the bottom of each pattern on our site. |
||||||||||||||||


With over 40 years in knitting and crochet design, DROPS Design offers one of the most extensive collections of free patterns on the internet - translated to 17 languages. As of today we count 324 catalogues and 12239 patterns translated into English (UK/cm). 12239
We work hard to bring you the best knitting and crochet have to offer, inspiration and advice as well as great quality yarns at incredible prices! Would you like to use our patterns for other than personal use? You can read what you are allowed to do in the Copyright text at the bottom of all our patterns. Happy crafting!
Post a comment to pattern DROPS 134-17
We would love to hear what you have to say about this pattern!
If you want to leave a question, please make sure you select the correct category in the form below, to speed up the answering process. Required fields are marked *.