
Popular categories
Looking for a yarn?


Comments / Questions (116)
![]() Ayoë Thürmer Jensen wrote:
Ayoë Thürmer Jensen wrote:
Det er den værste opskrift, jeg nogen sinde har fulgt.... Hvorfor er der dog ikke lavet en "Tuborg" (= klamme) ved navn M.2 - som indeholder M.2 A og M.2 B ??? Og med rækkefølgen som beskrevet i svaret 29.07.2021 ???
30.11.2024 - 20:59
![]() Kathleen Breslin wrote:
Kathleen Breslin wrote:
I am sorry to keep bothering you but your last answer doesn't answer whether I am to work the pattern on the purl side? When I am on the WS do I work M2B first and then M2A? because of the direction of the pattern? Thank you again.
17.07.2024 - 22:22DROPS Design answered:
Dear Kathleen, the diagram shows all of the rows (both from the RS and WS) as seen from the right side. So the WS is seen inverted from the order it's worked in. The diagrams would also be worked in the inverted order; M.2B and then M.2A. You can find more information here: https://www.garnstudio.com/lesson.php?id=68&cid=19. Happy knitting!
21.07.2024 - 19:19
![]() Kathleen Breslin wrote:
Kathleen Breslin wrote:
I appreciate answer to my previous question but wonder how I would know as it is not clear in the instructions.I realize that in the round it is obvious that pattern is worked on RS.When working inthe straight ,the graph does not show purl(or WS) instructions.Does that make sense? thank you so much.
12.07.2024 - 21:58DROPS Design answered:
Dear Kathleen, the diagrams ALWAYS show the patterns as they would appear if you look the pece from the right side. Happy Stitching!
16.07.2024 - 00:52
![]() Kathleen Breslin wrote:
Kathleen Breslin wrote:
I am knitting the patternFIRST SNOW and wonder if the graphs are to be done on RS only or if it is both RS and WS ?
10.07.2024 - 03:06DROPS Design answered:
Hi Kathleen, the diagrams show all rows in pattern from RS. To learn more please see our lesson HERE. Happy knitting!
12.07.2024 - 14:46
![]() Kerstin wrote:
Kerstin wrote:
Ska resåren i halsringningen vikas inåt o sys fast eller ska den vara 4 cm bred?
15.06.2024 - 23:05
![]() Isabelle wrote:
Isabelle wrote:
Comment puis-je faire des côtes ( 1 m end , 3 mailles env) avec un chiffre impair de mailles, dans ce cas ci 89 mailles?
22.05.2024 - 03:52DROPS Design answered:
Bonjour Isabelle, tricotez ainsi: 4 m point mousse, répétez 20 fois (1 m end, 3 m env), tricotez ensuite 1 m end et 4 m point mousse, vous avez ainsi: 4+(20x4)+1+4=89 et les côtes sont symétriques = elles commencent et se terminent par 1 m end, vu sur l'endroit. Bon tricot!
22.05.2024 - 08:09
![]() Nadine wrote:
Nadine wrote:
Hallo. Ich nochmal. Ich habe es nochmal durchgelesen. Also ich habe jetzt die 2 cm gestrickt und soll nun 12 Maschen abnehmen. Soll die Abnahme nur jeweils nach den 4 Maschen abgenommen werden. Oder wiederholt sich das in der Reihe.?Dann sind das aber mehr. Ich habe auch ohne Muster gestrickt. Ich bin ein bisschen ratlos. Würde das Jäckchen gerne fertig bekommen. Könnt ihr mir helfen? Freundliche grüße Nadine
21.05.2024 - 08:23DROPS Design answered:
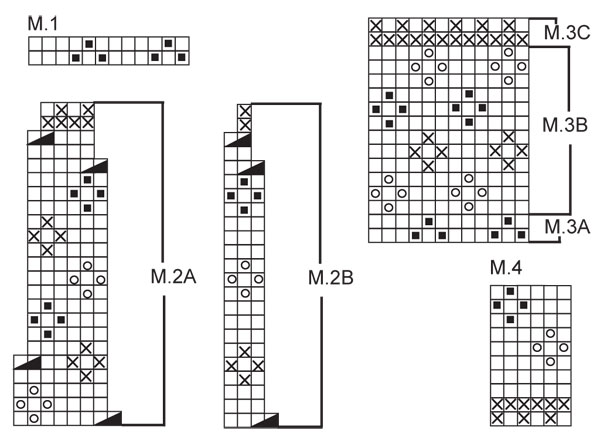
Liebe Nadine, Sie stricken die 3. Grösse, richtig? Dann wird M.2A 23 Mal insgesamt wiederholt + 1 x M;2B gestrickt; nehmen Sie ab wie im Diagram gezeigt (siehe vorrige Antwort), wenn die Diagramme fertig sind, haben Sie dann: 4 BlendenMaschen, 23 x 4 M in M.2A, 1 M in M.2B und 4 BlendenMaschen= 101 Maschen übrig. (bei den Diagrammen lesen Sie die Hin-Reihe rechts nach links und die Rück-Reihe links nach rechts). Viel Spaß beim Stricken!
21.05.2024 - 14:22
![]() Nadine wrote:
Nadine wrote:
Hallo. Komme leider nicht weiter. Bin bis zur Passe Mit dem Muster weiterfahren und gleichzeitig in M2 Maschen abnehmen. Nach M2 sind noch 81-89-101 (109-121) M. Hier meine Frage - wie nehme ich denn ab? Alle auf einmal? Oder wieviel in welchen Reihen? Schade. Ich bin traurig und aufgeschmissen. Verstehe das nicht. Könnt ihr mir helfen?
20.05.2024 - 22:57DROPS Design answered:
Liebe Nadine, bei der Passe strickt man das Muster mit M.2A und M.2B : man wiederholt M.2A und endet das Muster mit M.2B; in jedem Diagram wird man abnehmen (siehe letztes Symbol = 2 Maschen rechts zusammen), so daß M.2A/M.2B zuerst über 8 M (M.2A)/4 M (M.2B) gestrickt wird und wenn die beide Diagramme fertig sind sind es nur noch 4 M in jedem M.2A und 1 Masche in M.2B. Viel Spaß beim Stricken!
21.05.2024 - 14:19
![]() Tanya Dupuis wrote:
Tanya Dupuis wrote:
Bonjour, Je suis rendu à l’empiècement afin d’effectuer le jacquard. Malheureusement, je ne comprend pas comment effectuer le patron de M2A sur les 160 M suivantes, M2B…continuer ainsi en même temps, diminuer les mailles M2 afin qu’il reste 89 mailles? Pouvez vous m’aider svp Merci
24.04.2024 - 04:27DROPS Design answered:
Bonjour Mme Dupuis, tricotez les diagrammes ainsi: 4 m point mousse, répétez 20 fois les 8 mailles de M.2A (= 20x 8= 160 mailles), tricotez ensuite les 4 mailles de M.2B et terminez par 4 mailles point mousse. Sur l'envers, tricotez M.2B et répétez M.2A en lisant les diagrammes de gauche à droite. Diminuez comme indiqué dans le diagramme (cf triangle noir, autrement dit, on va diminuer 1 m dans chaque M.2A et 1 m dans M.2B au 1er rang). Quand les diagrammes sont terminés, il reste 4 m dans M.2A et 1 dans M.2B soit: 4 m + 20x4 + 1 + 4 = 89 mailles. Bon tricot!
24.04.2024 - 08:24
![]() Gerda Overkämping wrote:
Gerda Overkämping wrote:
Hallo,was bedeutet bei der Passe alle Maschen auf eine Nadel legen?Werden sie gestrickt oder nur draufgezogen?
17.03.2024 - 09:06DROPS Design answered:
Liebe Frau Overkämping, legen Sie zuerst alle Maschen auf dergleichen Nadel wie in diesem Video, dann beginnen Sie die Passe mit einer Rückreihe. Viel Spaß beim Stricken!
18.03.2024 - 09:08
|
||||||||||||||||
First Snow#firstsnowset |
||||||||||||||||
 |
 |
|||||||||||||||
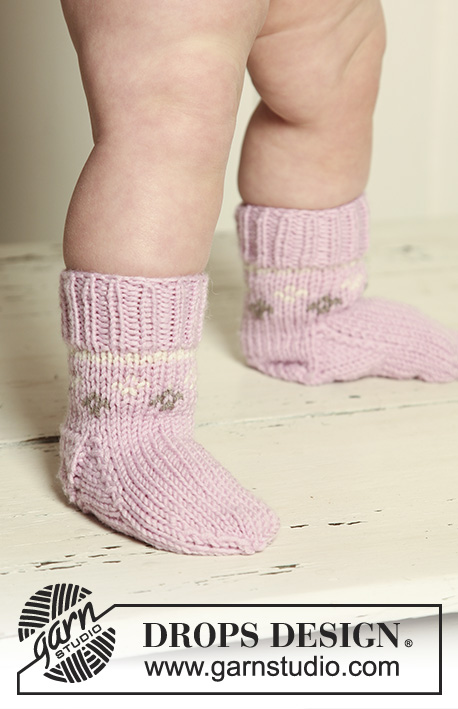
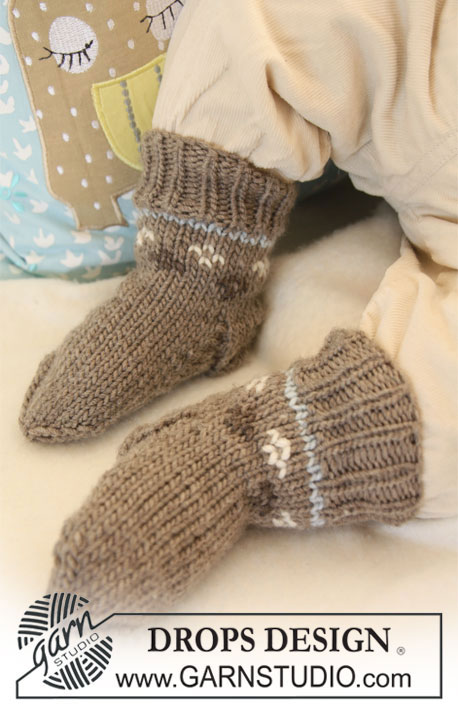
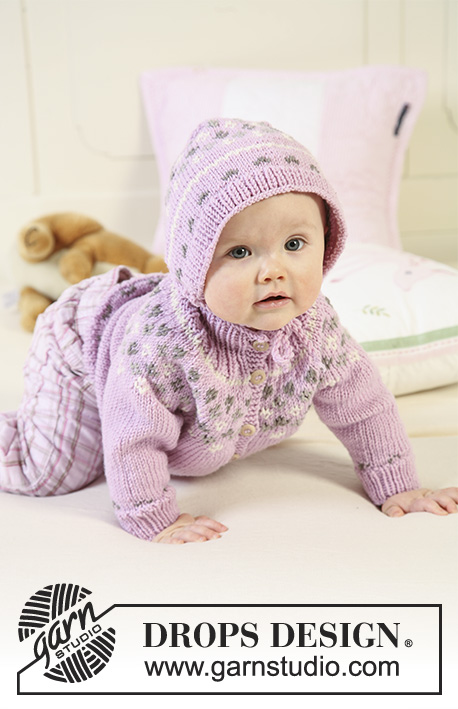
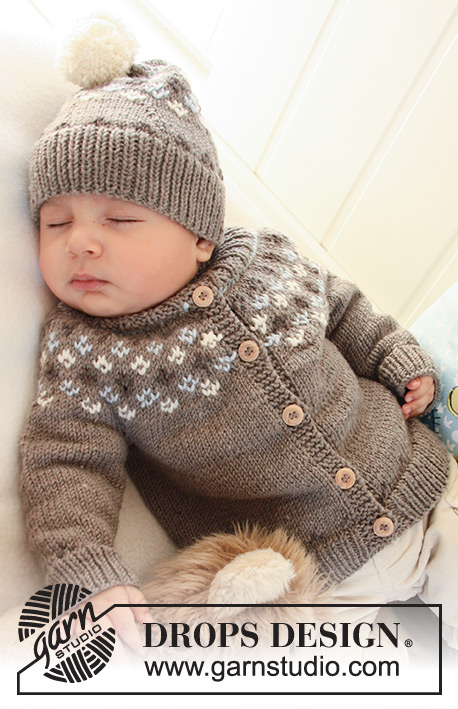
Set of knitted jacket with raglan sleeves and turtle neck, hat and socks with Nordic pattern for baby and children in DROPS Merino Extra Fine
DROPS Baby 19-2 |
||||||||||||||||
|
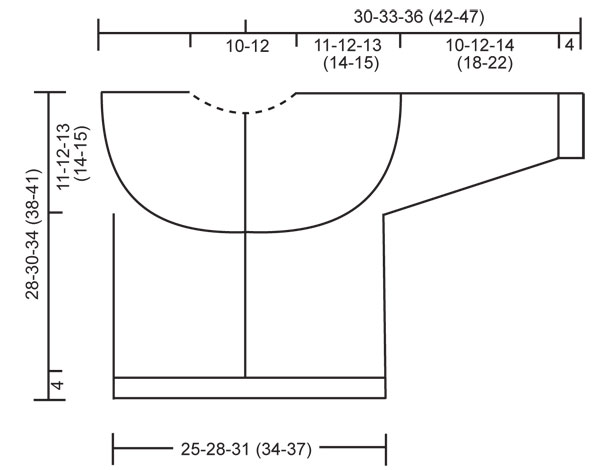
JACKET: GARTER ST (back and forth on needle): K all rows. PATTERN: See diagrams M.1 and M.2. Pattern is worked in stocking st. BUTTONHOLES: Make buttonholes on right front band. 1 BUTTONHOLE = K tog 2nd and 3rd st from mid front and make 1 YO. Make buttonholes when piece measures: SIZE 1/3 months: 2, 8, 14, 20 and 26 cm SIZE 6/9 months: 2, 8, 15, 21 and 28 cm SIZE 12/18 months: 2, 8, 14, 20, 26 and 32 cm SIZE 2 years: 2, 9, 16, 23, 30 and 36 cm SIZE 3/4 years: 2, 10, 17, 25, 32 and 39 cm The last buttonhole is made on neckline. --------------------------------------------------------- --------------------------------------------------------- BODY PIECE: Worked back and forth on circular needle from mid front. Cast on 119-133-145 (159-171) sts (includes 4 front band sts each side towards mid front) on circular needle size 3.5 mm with light brown mix. P 1 row from WS with 4 GARTER STS – see above – each side (front bands). Continue in rib as follows from RS: 4 front band sts in garter st, * K1/P1 *, repeat from *-* and finish with K1 and 4 front band sts in garter st – remember BUTTONHOLES on right front band. When rib measures 4 cm change to circular needle size 4.5 mm. Work 1 row stocking st (with front bands in garter st as before), AT THE SAME TIME dec 12-14-14 (16-16) sts evenly (do not dec on front bands) = 107-119-131 (143-155) sts. Now continue in M.1 with 4 front band sts in garter st each side. After M.1 continue in stocking st and light brown mix with front bands in garter st as before. REMEMBER THE KNITTING TENSION! When piece measures 17-18-21 (24-26) cm - adjust so that next row is from RS - work next row as follows: 26-29-32 (35-38) sts (= front piece), cast off 6 sts for armhole, 43-49-55 (61-67) sts (= back piece), cast off 6 sts for armhole, 26-29-32 (35-38) sts (= front piece). Put piece aside and knit the sleeves. SLEEVE: Worked in the round on double pointed needles. Cast on 34-36-38 (38-38) sts on double pointed needles size 3.5 mm with light brown mix. K 1 round and continue in rib, K1/P1. When rib measures 4 cm change to double pointed needles size 4.5 mm. K 1 round, AT THE SAME TIME dec 4-6-2 (2-2) sts evenly = 30-30-36 (36-36) sts. Now work M.1. After M.1 continue in stocking st and light brown mix. AT THE SAME TIME when piece measures 5 cm inc 2 sts mid under sleeve. Repeat the inc on every 4-4-6 (6-6) round a total of 5-7-6 (8-10) times = 40-44-48 (52-56) sts. When piece measures 14-16-18 (22-26) cm (inc are now complete) cast off 6 sts mid under sleeve = 34-38-42 (46-50) sts left on needle. Put piece aside and knit the other sleeve. YOKE: Slip sleeves on the same circular needle as body piece where cast off for armholes = 163-183-203 (223-243) sts. Continue back and forth on needle as follows: P 1 row from WS, AT THE SAME TIME dec 7-11-7 (11-7) sts evenly (do not dec on front bands) = 156-172-196 (212-236) sts. Work 0-1-2 (3-4) cm stocking st with light brown mix and work next row as follows from RS: 4 front band sts in garter st, M.2A on the next 144-160-184 (200-224) sts, M.2B (= 4 sts) and finish with 4 front band sts in garter st. Continue in pattern like this, AT THE SAME TIME dec sts in M.2 as per pattern diagram. After M.2 there are 81-89-101 (109-121) sts left on needle. P 1 row from WS with front band sts as before. Change to circular needle size 3.5 mm/ US 4 and work next row as follows from RS: 4 front band sts, * K1/P3 *, repeat from *-* and finish with K1 and 4 front band sts. When rib measures 1 cm dec all P3 to P2 and when rib measures 2 cm dec all P2 to P1 = 45-49-55 (59-65) sts on needle. Jacket now measures 28-30-34 (38-41) cm from cast on row to shoulder. Continue in rib K1/P1 for turtle neck (front bands as before). When rib measures 5-6-6 (7-7) cm from beg of rib make 1 buttonhole in line with the others on front band. When rib measures 6-7-7 (8-8) cm cast off with K over K and P over P. ASSEMBLY: Sew openings under sleeves. Sew on buttons. _________________________________________________________ HAT: PATTERN: See diagram M.3. Pattern is worked in stocking st. --------------------------------------------------------- --------------------------------------------------------- HAT: Worked in the round on needle from bottom up. Cast on 88-94-98 (104-106) sts on circular needle size 3.5 mm with light brown mix. Work rib, K1/P1, until piece measures 4-5-5 (6-6) cm. K 1 round, AT THE SAME TIME dec 10-10-14 (14-16) sts evenly = 78-84-84 (90-90) sts. Change to circular needle size 4.5 mm. Insert 6 markers in piece with 13-14-14 (15-15) sts between each marker. Work M.3A and then continue in stocking st and light brown mix - AT THE SAME TIME dec 1 st to the right of all markers by K2 tog (= 6 dec sts per round). Repeat the dec (with 1 less st between each dec each time) on every other round another 3 times = 54-60-60 (66-66) sts. After the last round with dec work M.3B and then continue in stocking st and light brown mix, AT THE SAME TIME dec 1 st to the right of all markers (= 6 dec sts). K 1 round and work another round with dec as before = 42-48-48 (54-54) sts. Work M.3C and then continue in stocking st and light brown mix until finished measurements, AT THE SAME TIME dec 1 st to the right off all markers as before. Repeat the dec on every other round a total of 3-3-4 (4-5) times = 24-30-24 (30-24) sts on needle. K2 tog all the way round, cut the thread, pull it through remaining sts, tighten and fasten. POMPOM: Make 1 pompom in off-white with a diameter of approx 4 cm. Attach it to the top of hat. ____________________________________________________________________ SOCK: PATTERN: See diagram M.4. The pattern is worked in stocking st. HEEL DECREASES: ROW 1 (= RS): work row until 5-5-5 (6-6) sts remain, slip next st as if to K, K1, psso, turn piece. ROW 2 (= WS): work row until 5-5-5 (6-6) sts remain, slip next st as if to P, P1, psso, turn piece. ROW 3 (= RS): work until 4-4-4 (5-5) sts remain, slip next st as if to K, K1, psso, turn piece. ROW 4 (= WS): work row until 4-4-4 (5-5) sts remain, slip next st as if to P, P1, psso, turn piece. Continue dec like this with 1 less st between each dec until there are 7-9-9 (9-9) sts on needle. DECREASING TIP: Dec as follows before marker: K2 tog. Dec as follows after marker: slip 1 st as if to K, K1, psso. --------------------------------------------------------- --------------------------------------------------------- SOCK: Worked in the round on double pointed needles from top down. Cast on 34-34-40 (40-40) sts on double pointed needles size 3 mm with light brown mix. Work rib, K1/P1, for 4-4-5 (5-6) cm. K 1 round, AT THE SAME TIME dec 4 sts evenly = 30-30-36 (36-36) sts. Continue in M.4. After M.4 work 4 rounds stocking st with light brown mix, AT THE SAME TIME on first round (after M.4) dec 2-0-4 (2-0) sts evenly = 28-30-32 (34-36) sts. After the 4 rounds stocking st keep the first 15-17-17 (19-19) sts on needle for heel, and slip the remaining 13-13-15 (15-17) sts on a stitch holder (= mid upper foot). Work stocking st back and forth on heel sts for 3-3.5-4 (4-4.5) cm – insert a marker. Now work HEEL DECREASES – SEE ABOVE! After heel dec pick up 7-8-9 (9-10) new sts each side of heel and slip sts from stitch holder back on needle = 34-38-42 (42-46) sts. Continue in stocking st in the round on all sts with light brown mix, AT THE SAME TIME on first round dec as follows: K2 tog into back of loop before the 13-13-15 (15-17) sts mid upper foot and K2 tog after the 13-13-15 (15-17) sts mid upper foot. Repeat the dec on every other round a total of 4-6-6 (6-6) times = 26-26-30 (30-34) sts. When piece measures approx 8-9-9.5 (11.5-12.5) cm from marker on heel (approx 2-2-2.5 (2.5-3.5) cm remain) insert a new marker each side with 13-13-15 (15-17) sts on upper foot and under foot. Now dec for toes on each side of both markers – SEE DECREASING TIP – on every other round 2-2-3 (3-5) times and then on every round 3-3-3 (3-2) times = 6 sts left on needle. Cut the thread, pull it through remaining sts, tighten and fasten. Foot measures approx 10-11-12 (14-16) cm. |
||||||||||||||||
Diagram explanations |
||||||||||||||||
|
||||||||||||||||
 |
||||||||||||||||
 |
||||||||||||||||
Have you finished this pattern?Tag your pictures with #dropspattern #firstsnowset or submit them to the #dropsfan gallery. Do you need help with this pattern?You'll find 23 tutorial videos, a Comments/Questions area and more by visiting the pattern on garnstudio.com. © 1982-2026 DROPS Design A/S. We reserve all rights. This document, including all its sub-sections, has copyrights. Read more about what you can do with our patterns at the bottom of each pattern on our site. |
||||||||||||||||


With over 40 years in knitting and crochet design, DROPS Design offers one of the most extensive collections of free patterns on the internet - translated to 17 languages. As of today we count 324 catalogues and 12290 patterns translated into English (UK/cm). 12290
We work hard to bring you the best knitting and crochet have to offer, inspiration and advice as well as great quality yarns at incredible prices! Would you like to use our patterns for other than personal use? You can read what you are allowed to do in the Copyright text at the bottom of all our patterns. Happy crafting!
Post a comment to pattern DROPS Baby 19-2
We would love to hear what you have to say about this pattern!
If you want to leave a question, please make sure you select the correct category in the form below, to speed up the answering process. Required fields are marked *.