
Popular categories
Looking for a yarn?


Comments / Questions (137)
![]() Corny wrote:
Corny wrote:
Hallo, vielen Dank für die schnelle Antwort :-) Zum besseren Verständnis: ich hatte M2 so interpretiert, dass dort nur die Hinreihen angezeigt werden. In den Rückreihen habe ich die Maschen so gestrickt, wie sie kommen. Zeigt das Muster auch die Rückreihen? Fände ich etwas verwirrend, weil dann das Symbol X einmal eine rechte und einmal eine linke Masche darstellen würde. Herzliche Grüße, Corny
07.01.2019 - 13:19DROPS Design answered:
Liebe Corny, also alle Reihen sind im Diagram gezeigt, 1 Kästchen = 1 Reihe x 1 Masche, so muss Ihr M.2 etwas weniger in der Höhe messen :) Viel Spaß beim stricken!
07.01.2019 - 14:44
![]() Cirny wrote:
Cirny wrote:
Hallo, ich komme leider mit dem langen Ärmel in Größe M nicht weiter. Die Arbeit misst vom Anfang bis zum Einziehen des Markierungsfadens 31cm. Nach weiteren 31 cm vom Markierungsfaden, also in einer Höhe von insgesamt schon 62 cm, soll ich erst mit der Armkugel beginnen. Der gesamte Ärmel soll jedoch nur 58 cm messen. Könnten Sie bitte die Angaben und Maße in der Anleitung überprüfen und mir eine kurze Rückmeldung geben? Viele Grüße, Corny
05.01.2019 - 20:18DROPS Design answered:
Liebe Corny, der Markierer ist nach M.2 eingesetzt (M.2 = 51 Reihe = ca 16 cm + die 7 ersten Reihen mit dünneren Nadeln), = ca 18 cm + 31 cm = ca 49 cm Begin der Armausschnitt. 18 cm + 39 cm = ca 57 cm: 4 M auf beiden Seiten abketten = ca 58 cm gesamte Länge. viel Spaß beim stricken!
07.01.2019 - 10:54
![]() GILBERT DUHAMEL wrote:
GILBERT DUHAMEL wrote:
Bonjour, Je suis en train de tricoter le pull modéle 114-8,j\'ai fait le dos sans problème a présent je suis sur le devant a 34 cm de haut je commence le dessin au 3éme rang je fait les 2 jetés sur l\'endroit sur le rang envers j\'ai tricoter les jetés en mailles torses pour évité le trou ,par contre le rang suivant j\'ai 2 mailles en plus sur le shéma il y a 6 m. a l\'endroit mais moi j\'en ai 8. Pouvez-vous m\' aider ,je vous remercie d\'avance
05.12.2018 - 13:50DROPS Design answered:
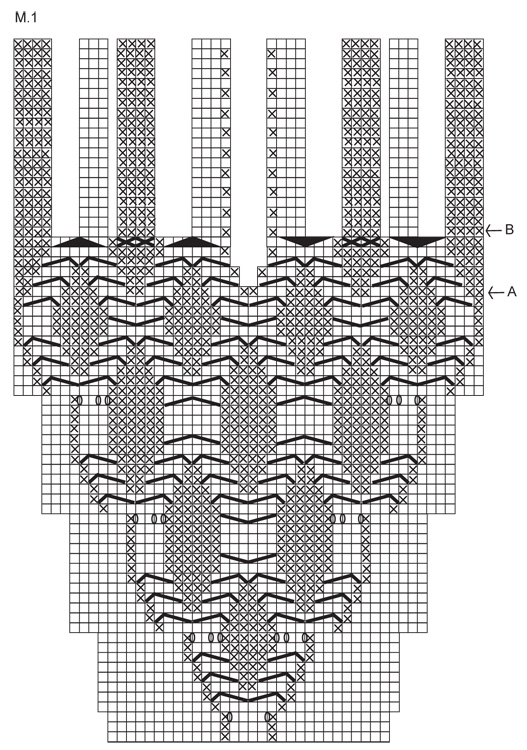
Bonjour Mr Duhamel, le 1er rang de M.1 se tricote sur l'endroit, donc le 3ème rang sera également sur l'endroit et vous augmenterez ainsi: 12 m end, 1 m env, 1 jeté, 4 m end, 1 jeté, 1 m env, 12 m end. Au rang suivant (= Rang 4), tricotez M.1 ainsi: 12 m env, 1 m end, 6 m end (tricotez les 2 jetés torse pour éviter les trous), 1 m end, 12 m env. Au 5ème rang, on va tricoter 11 m end, les 2 torsades sur 8 m, 1 m env, 11 m end. Lisez bien le diagramme de droite à gauche sur l'endroit et de gauche à droite sur l'envers. Bon tricot!
05.12.2018 - 15:22Evelyn Pinkham wrote:
So that I can knit this pattern, I tried to print it. But the entire pattern will not print (the edge is cut off, bottom of the page is overprinted by the cookies notice, etc.) . Can you please send it to me in a printable format (in American English), including the errata. I will be making the largest size.
08.11.2018 - 14:48DROPS Design answered:
Dear Mrs Pinkham, clean your cache and try again - make sure to print all pages - try if necessary with A.4 format - It should work. Happy knitting!
08.11.2018 - 15:45Jackie Marriott wrote:
Hi I persuaded my Mum to knit this jumper. She is 86 an experienced knitter and has been struggling with the way the pattern is written. I am also an experienced knitter and I too have had difficulty with its interpretation. I can see that others have had problems with how you are describing to decrease particularly the sleeves. If you decrease as it is written you do not have enough stitches to finish the decreasing. We are having to work it out ourselves.
03.07.2018 - 14:06
![]() Debora wrote:
Debora wrote:
Buonasera vorrei un chiarimento sulle diminuzioni nelle maniche a livello degli scalfi. Vanno fatte ogni ferro quindi anche sui ferri a rovescio? Grazie mille
16.06.2018 - 22:39DROPS Design answered:
Buongiorno Debora. Sì le diminuzioni vanno fatte all'inizio di ogni ferro, quindi anche sul rovescio. Buon lavoro!
17.06.2018 - 07:55
![]() Claudia Wächtler wrote:
Claudia Wächtler wrote:
Vielen Dank für die Hilfe.Hat mir sehr weiter geholfen auf in das Strickvergnügen.Danke
26.02.2018 - 13:10
![]() Claudia Wächtler wrote:
Claudia Wächtler wrote:
Hilfe ich komm nicht weiter.Wie muss ich am V Ausschnitt die Maschen abnehmen?????
24.02.2018 - 19:27DROPS Design answered:
Liebe Frau Wächtler, es wird 1 M bei 2 M rechts zusammen/1 M abheben, 1 M stricken, die abgehobene M über die gestrickte M ziehen (wie Sie am meisten möchten). Viel Spaß beim stricken!
26.02.2018 - 08:46
![]() Claudia Wächtler wrote:
Claudia Wächtler wrote:
Hallo Können Sie mir genau sagen wann die 4 x1 Masche abgenommen wird damit ich 38 Maschen habe. Danke
24.02.2018 - 08:42DROPS Design answered:
Liebe Frau Wächtler, die 4x 1 M werden in jeder 4. Reihe vor den 15 M Bündchen (beim linken Vorderteil) und nach den 15 M Bündchen (beim rechten Vorderteil) abgenommen. Viel Spaß beim stricken!
26.02.2018 - 07:55
![]() Claudia Wächtler wrote:
Claudia Wächtler wrote:
Hallo Ich möchte gerne wissen,ob das Diagramm am V-Ausschnitt ob da alle Reihen oder nur die vorderen Reihen gezeigt werden.Vielen Dank für Eure Hilfe Claudia
14.02.2018 - 22:55DROPS Design answered:
Liebe Claudia, das Diagram zeigt alle Reihen dh die Hin sowie die Rückreihen. Bei Hinreihen lesen Sie von rechts nach links und bei Rückreihen lesen Sie von links nach rechts. Viel Spaß beim stricken!
15.02.2018 - 09:44
|
||||||||||||||||||||||||||||||||||
Viking Knots#vikingknotssweater |
||||||||||||||||||||||||||||||||||
 |
 |
|||||||||||||||||||||||||||||||||
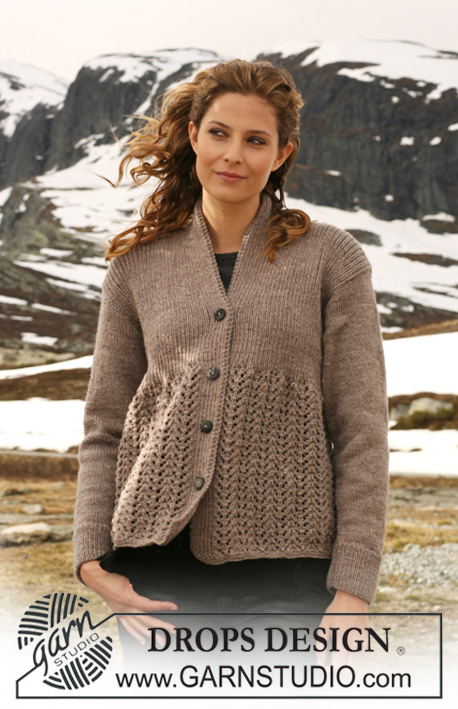
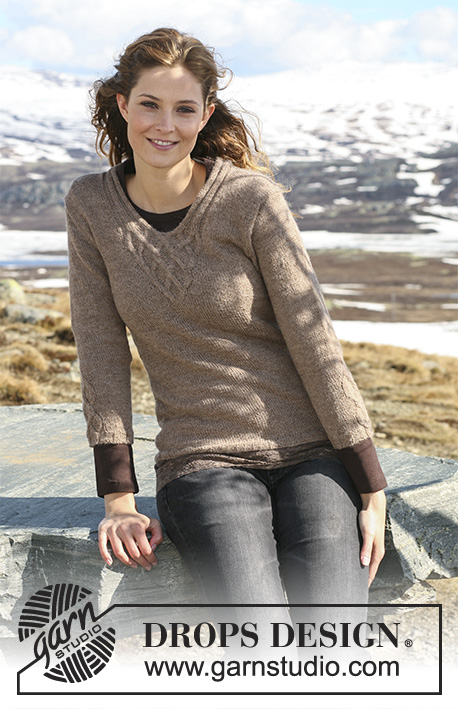
DROPS jumper with cables in ”Alpaca” with 3/4 sleeves or long sleeves. Size S - XXXL.
DROPS 114-8 |
||||||||||||||||||||||||||||||||||
|
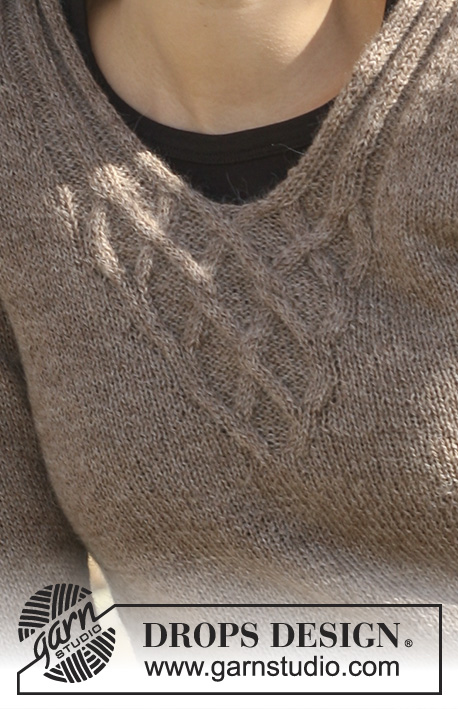
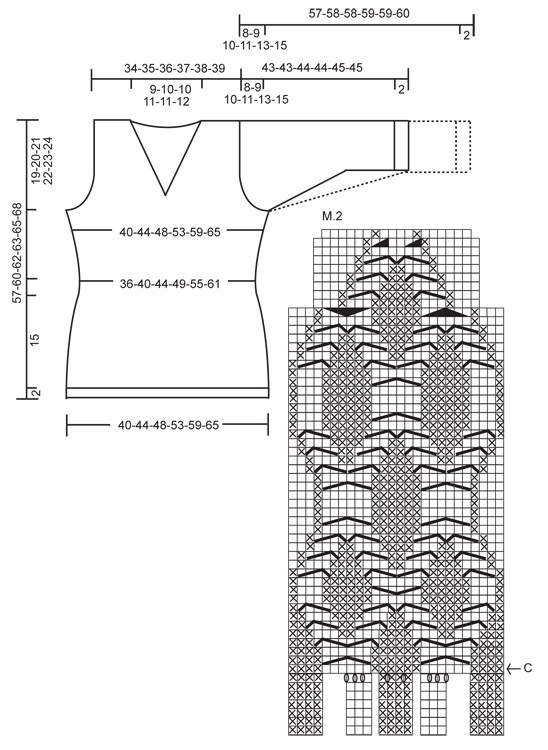
PATTERN: See diagram M.1 and M.2. Diagram shows the pattern from RS. -------------------------------------------------------- BACK PIECE: Worked back and forth on needle. Cast on 107-121-135-142-163-177 sts (includes 1 edge st each side) on needle size 2.5 mm with Alpaca. Work rib as follows (first row = RS): 1 edge st, * K3, P4 *, repeat from *-* and finish with 1 edge st. When rib measures 2 cm K 1 row from RS, AT THE SAME TIME dec 9-13-17-12-19-19 sts evenly = 98-108-118-130-144-158 sts. Change to needle size 3 mm. P 1 row from WS and continue in stocking st with 1 edge st each side. When piece measures 9 cm dec 1 st each side, repeat the dec on every 2 cm a total of 5 times = 88-98-108-120-134-148 sts. When piece measures 20-21-21-20-20-21 cm inc 1 st each side, repeat the inc on every 3-3-3.5-4-4.5-4.5 cm a total of 5 times = 98-108-118-130-144-158 sts. When piece measures 38-40-41-41-42-44 cm cast off 4 sts each side for armhole and cast off for armhole each side on every other row: 4 sts 0-0-0-1-1-2 times, 2 sts 2-3-5-6-8-9 times and 1 st 0-2-2-1-2-2 times = 82-84-86-88-92-94 sts. Continue in stocking st on all sts. When piece measures 54-57-59-60-62-65 cm cast off the middle 32-34-34-36-38-40 sts for neck and complete each shoulder separately. Cast off 1 st on neckline on every other row 2 times = 23-23-24-24-25-25 sts left on shoulder. Cast off loosely when piece measures 57-60-62-63-65-68 cm. FRONT PIECE: Cast on and work like back piece until piece measures 20-21-21-20-20-21 cm. On next row inc 1 st each side, repeat the inc on every 3-3-3.5-4-4.5-4.5 cm a total of 5 times = 98-108-118-130-144-158 sts. Continue in stocking st with 1 edge st each until piece measures 33-34-35-36-39-40 cm. Now continue as follows (from RS): 1 edge st, 33-38-43-49-56-63 stocking sts, M.1 (= 30 sts), 33-38-43-49-56-63 stocking sts and 1 edge st. AT THE SAME TIME when piece measures 38-40-41-41-42-44 cm cast off for armhole each side as described for back piece. Continue up to arrow-A in M.1. On next row from RS cast off for neck as follows: work the first 24 sts of M.1, cast off 2 sts (= mid front) and work the remaining 24 sts of M.1 (work remaining sts in stocking st as before). Insert a marker in piece, and now complete each side separately. LEFT FRONT PIECE: Continue back and forth on needle in stocking st and M.1 as before – remember to cast off for armhole at the side! AT THE SAME TIME on next row from mid front dec 1 st for neck. Continue to arrow-B in diagram for M.1. Now continue with 15 sts rib as shown in M.1, work remaining sts in stocking st as before. AT THE SAME TIME dec 1 st for neck inside the 15 sts in rib, and repeat the dec on every 4th row 3-4-4-5-6-7 times = 38-38-39-39-40-40 sts. Continue until piece measures 11-12-12-13-13-14 cm from marker (adjust to length of armhole on back piece). Now cast off 23-23-24-24-25-25 sts from shoulder towards neckline = 15 sts left on needle. Continue back and forth on needle in rib as before on these 15 sts. Cast off loosely with K over K and P over P after approx 7-7-7-8-8-8 cm (measured from shoulder). RIGHT FRONT PIECE: Like left front piece but mirrored. ASSEMBLY: Sew shoulder seams. 3/4 SLEEVES: Worked back and forth on needle. LEFT SLEEVE: Cast on 65-65-72-72-72-79 sts on needle size 2.5 mm with Alpaca. Work rib as follows (first row = RS): 1 edge st, * P4, K3 *, repeat from *-* on 21-21-28-28-28-28 sts, M.2 (= 18 sts), K3, *P4, K3 *, repeat from *-* on the next 21-21-21-21-21-28 sts and 1 edge st. Continue like this up to Arrow-C in M.2. There are now 73-73-80-80-80-87 sts on needle. Change to needle size 3 mm. Continue as follows (from RS): 1 edge st, 21-21-28-28-28-28 stocking sts, M.2 (= 26 sts), 24-24-24-24-24-31 stocking sts and 1 edge st. Work 1 vertical repeat of M.2 like this = 65-65-72-72-72-79 sts on needle. Insert a marker, and now measure piece from here. Continue in stocking st with 1 edge st each side. AT THE SAME TIME when piece measures approx 2 cm from marker inc 1 st each side, repeat the inc on every 1.5-1-1-0.5-0.5-0.5 cm a total of 8-11-11-14-17-17 times = 81-87-94-100-106-113 sts. When piece measures 17-16-16-15-14-12 cm from marker (less for the larger sizes because of longer sleeve cap and wider shoulder) cast off 4 sts each side. Cast off for sleeve cap at the beg of every row: 2 sts 4-5-5-5-4-4 times each side and 1 st 3-3-5-5-11-14 times each side, then 2 sts each side until piece measures 24-24-25-25-26-26 cm, now cast off 4 sts each side 1 time, and cast off remaining sts. Piece measures a total of approx 43-43-44-44-45-45 cm. RIGHT SLEEVE: Cast on 65-65-72-72-72-79 sts on needle size 2.5 mm with Alpaca. Work rib as follows (first row = from RS): 1 edge st, * K3, P4 *, repeat from *-* on 21-21-21-21-21-28 sts, K3, M.2 (= 18 sts), * K3, P4 *, repeat from *-* on the next 21-21-28-28-28-28 sts and 1 edge st. Continue like this up to Arrow-C in M.2. There are now 73-73-80-80-80-87 sts on needle. Change to needle size 3 mm and continue as follows (from RS): 1 edge st, 24-24-24-24-24-31 stocking sts, M.2 (= 26 sts), 21-21-28-28-28-28 stocking sts and 1 edge st. Work 1 vertical repeat of M.2 like this = 65-65-72-72-72-79 sts on needle. Insert a marker, and now measure piece from here. Continue as described for Left Sleeve. LONG SLEEVES: Worked back and forth on needle. LEFT SLEEVE: Cast on 58-58-65-65-65-72 sts on needle size 2.5 mm with Alpaca. Work rib as follows (first row = RS): 1 edge st, * P4, K3 *, repeat from *-* on 21-21-21-21-21-28 sts, M.2 (= 18 sts), K3, * P4, K3 *, repeat from *-* on the next 14-14-21-21-21-21 sts and 1 edge st. Continue like this up to Arrow-C in M.2. There are now 66-66-73-73-73-80 sts on needle. Change to needle size 3 mm and continue as follows (from RS): 1 edge st, 21-21-21-21-21-28 stocking sts, M.2 (= 26 sts), 17-17-24-24-24-24 stocking sts and 1 edge st. Work 1 vertical repeat of M.2 like this = 58-58-65-65-65-72 sts on needle. Insert a marker, and now measure piece from here. Continue in stocking st with 1 edge st each side. AT THE SAME TIME when piece measures approx 1-2-2-1-1-1 cm from marker inc 1 st each side, repeat the inc on every 2.5-1.5-1.5-1.5-1-1 cm a total of 12-15-15-18-21-21 times = 82-88-95-101-107-114 sts. When piece measures 31-31-30-30-28-27 cm from marker (less for the larger sizes because of longer sleeve cap and wider shoulder) cast off for 4 sts each side for sleeve cap and cast off for sleeve cap at the beg of every row: 2 sts 4-5-5-5-4-4 times each side and 1 st 3-3-5-5-11-14 times each side, then cast off 2 sts each side until piece measures 38-39-39-40-40-41 cm, now cast off 4 sts each side 1 time, and cast off remaining sts. Piece measures a total of approx 57-58-58-59-59-60 cm. RIGHT SLEEVE: Cast on 58-58-65-65-65-72 sts on needle size 2.5 mm with Alpaca. Work rib as follows (first row = RS): 1 edge st, * K3, P4 *, repeat from *-* on 14-14-21-21-21-21 sts, K3, M.2 (= 18 sts), * K3, P4 *, repeat from *-* on the next 21-21-21-21-21-28 sts and 1 edge st. Continue like this up to Arrow-C in M.2. There are now 66-66-73-73-73-80 sts on needle. Change to needle size 3 mm and continue as follows (from RS): 1 edge st, 17-17-24-24-24-24 stocking sts, M.2 (= 26 sts), 21-21-21-21-21-28 stocking sts and 1 edge st. Work 1 vertical repeat of M.2 like this = 58-58-65-65-65-72 sts on needle. Insert a marker, and now measure piece from here. Continue as described for Left Sleeve. ASSEMBLY: Sew shoulder seams. Set in sleeves. Sew sleeve and side seams inside 1 edge st. Sew rib on neck tog mid back and sew to back piece. |
||||||||||||||||||||||||||||||||||
Diagram explanations |
||||||||||||||||||||||||||||||||||
|
||||||||||||||||||||||||||||||||||
 |
||||||||||||||||||||||||||||||||||
 |
||||||||||||||||||||||||||||||||||
Have you finished this pattern?Tag your pictures with #dropspattern #vikingknotssweater or submit them to the #dropsfan gallery. Do you need help with this pattern?You'll find 18 tutorial videos, a Comments/Questions area and more by visiting the pattern on garnstudio.com. © 1982-2026 DROPS Design A/S. We reserve all rights. This document, including all its sub-sections, has copyrights. Read more about what you can do with our patterns at the bottom of each pattern on our site. |
||||||||||||||||||||||||||||||||||


With over 40 years in knitting and crochet design, DROPS Design offers one of the most extensive collections of free patterns on the internet - translated to 17 languages. As of today we count 324 catalogues and 12290 patterns translated into English (UK/cm). 12290
We work hard to bring you the best knitting and crochet have to offer, inspiration and advice as well as great quality yarns at incredible prices! Would you like to use our patterns for other than personal use? You can read what you are allowed to do in the Copyright text at the bottom of all our patterns. Happy crafting!
Post a comment to pattern DROPS 114-8
We would love to hear what you have to say about this pattern!
If you want to leave a question, please make sure you select the correct category in the form below, to speed up the answering process. Required fields are marked *.