
Popular categories
Looking for a yarn?


Comments / Questions (17)
![]() Wietske wrote:
Wietske wrote:
Hallo, ik snap het stuk met de 6x 8st op een hulpdraad zetten niet. In het patroon zie ik vanuit beide kanten, maar in twee comments zie ik weer andere dingen staat. Mijn vraag is nu eigenlijk waar moeten meer toeren zitten? Aan de onderkant (achterpand gedeelte) of bij de hals (voorpand gedeelte) of toch midden in als ik aan beide kanten st op een hulpdraad moet zetten
30.04.2025 - 00:13DROPS Design answered:
Dag Wietske,
De 6x8 steken die je op een hulpdraad zet zitten aan de achterkant, dus op het achterpand.
27.05.2025 - 21:08
![]() Jo wrote:
Jo wrote:
I have reached the end of initial shaping with 68 sts (large size) . I am trying to understand the following section. It says leave 8sts from lower edge on holder and from neck edge every other row 6 times= 20sts left. I cannot understand the second part how many stitches from neck edge are left each time, and how does this leave 20sts?
30.03.2025 - 23:05DROPS Design answered:
Dear Jo, you have to slip the 8 stitches at the beginnining of every row starting with back piece a total of 6 times = work the first 8 sts from back piece and slip them on a stitch holder, work row to the end, turn and work return row; work these 2 rows a total of 6 times = 48 sts are now on a thread/stitch holder, so that 20 sts remain on needle for top of piece -towards neck. Happy knitting!
31.03.2025 - 09:39
![]() Stefanie Dauser wrote:
Stefanie Dauser wrote:
Guten Tag, wo finde ich denn die Anleitung für die schönen Pulswärmer? Vielen Dank für Ihre Antwort!
02.03.2025 - 12:47DROPS Design answered:
Liebe Frau Dauser, hier finden Sie die Anleitung für die Pulswärmer (nach der Anleitung für den Schal). Viel Spaß beim Stricken!
03.03.2025 - 10:03
![]() Silvia wrote:
Silvia wrote:
Mein Problem hat sich erledigt. Ich habe eine neue Maschenprobe angefertigt und die Fadenspannung beim Stricken verringert - somit bin ich auf die in der Anleitung angegebene Maschen und Reihenzahl gekommen.
29.12.2023 - 21:22
![]() Silvia wrote:
Silvia wrote:
Bei meiner Maschenprobe kam ich auf 24 M x 30 R (10 x 10 cm) mit der angegebenen Nadelstärke Nr. 4. Danach habe ich eine neue Maschenprobe mit Nadel Nr. 5 angefertigt. Das Strickstück wurde dann aber viel zu locker und das Maschenbild war nicht mehr schön. Dann versuchte ich, die Anleitung komplett umzurechnen. Bei anderen Anleitungen hat das gut funktioniert aber hier bin ich an den Zu- und Abnahmen gescheitert. Gibt es dennoch eine Möglichkeit, den Bolero zu realisieren?
28.12.2023 - 21:03DROPS Design answered:
Liebe Silvia, beachten Sie, daß dieser Bolero wird mit 2 Fäden Alpaca gestrickt, die Maschenprobe soll stimmen, damit die fertigen Maßen richtig sind. Viel Spaß beim stricken!
02.01.2024 - 09:43
![]() Ève Lyne Marchand wrote:
Ève Lyne Marchand wrote:
À la deuxième manche, reprendre l'aiguille circulaire 6 (comme pour la première) et non 5? Ensuite, répartir des diminutions (au lieu des augmentations), pour passer de 56-58-60-62-62 m à 44-44-44-50-50 m? Et enfin, la 1re manche mesure 18 cm de hauteur totale, et la 2e 20? Merci.
02.12.2019 - 21:44DROPS Design answered:
Bonjour Mme Marchand, la taille des aiguilles a été corrigée, votre question sur la longueur des manches va être transmise à nos stylistes. Merci.
03.12.2019 - 10:50
![]() Mishka Meunier wrote:
Mishka Meunier wrote:
Je voudrais savoir si je fais toujours les premières mailles en point mousse pour tout le patron? Merci
31.10.2019 - 14:46DROPS Design answered:
Bonjour Mme Meunier, vous tricotez d'abord en côtes avec 1 m au point mousse de chaque côté, puis continuez en jersey avec 1 maille lisière de chaque côté que vous pouvez également tricoter au point mousse. Bon tricot!
04.11.2019 - 14:12
![]() Ève Lyne Marchand wrote:
Ève Lyne Marchand wrote:
À 5 cm de hauteur du marqueur milieu dos, augmenter pour le devant (= le côté des augmentations sur la 1re moitié). Cela ne devrait-il pas être = le côté des diminution?
20.09.2019 - 02:37DROPS Design answered:
Bonjour Mme Marchand, effectivement, la correction a été faite, merci! Bon tricot!
20.09.2019 - 09:10
![]() Ève Lyne Marchand wrote:
Ève Lyne Marchand wrote:
À 53 cm de hauteur totale [...] Pour le devant, rabat 3 m, puis tous les deux rangs : 2 fois 3 m, etc. Faut-il réellement rabattre comme on le ferait à la fin d'un ouvrage ou diminuer en tricotant ensemble le nombre de mailles demandé. Selon la méthode, ça ne donnera pas le même nombre de mailles à relever à la fin pour faire la bordure. Merci.
20.09.2019 - 02:31DROPS Design answered:
Bonjour Mme Marchand, on va d'un côté d'abord rabattre (3 mailles, puis 2 mailles et ensuite 1 seule maille) pour le devant et monter les mailles de l'autre côté (pour le dos). Pour la 2ème partie, on va monter les mailles du devant et rabattre celles du dos (= en sens inverse). Bon tricot!
20.09.2019 - 09:01
![]() Ève Lyne Marchand wrote:
Ève Lyne Marchand wrote:
Bonjour, On commence avec deux rangs de Jersey et on termine avec deux rangs endroits, donc point mousse. Est-ce voulu? Et quand on dit Jersey envers, ne faudrait-il pas que le 1er rang soit envers? Merci.
31.08.2019 - 00:42DROPS Design answered:
Bonjour Mme Marchand, on doit commencer le côté droit par 2 rangs envers (1er rang = sur l'endroit), on va ainsi avoir 1 côte mousse, on terminera par 2 rangs endroit (= 1 côte mousse). La correction sera bientôt ajoutée, merci. Bon tricot!
02.09.2019 - 09:11
|
|
DROPS 86-36 |
|
|
|
|
Shrug and Wristwarmers in Alpaca
DROPS 86-36 |
|
|
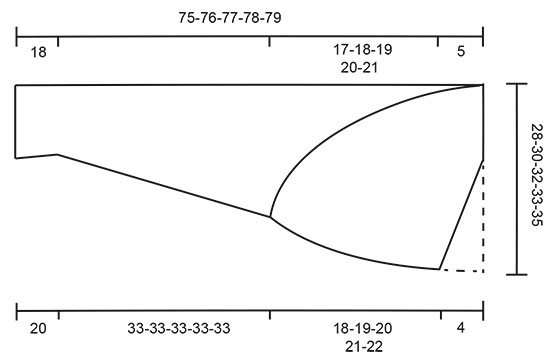
Gauge: 21 sts x 27 rows in stockinette st = 10 x 10 cm. Rib: *K 3, P 4*, repeat *-* Right side: Loosely cast on 51-51-51-58-58 sts on larger circular needles with 1 strand charcoal grey + 1 strand black (= 2 strands). Purl 2 rows (row 1 = right side), then knit rib, keeping 1 edge st at each side in garter st. When the piece measures 10 cm dec all P 4 to P 3 = 44-44-44-50-50 sts. When the piece measures 18 cm K 2 rows (1st row = right side). Change to smaller needles, take away black strand and continue in stockinette st with 1 strand charcoal grey, increasing 12-14-16-12-12 sts evenly distributed on first row = 56-58-60-62-62 sts. When the piece measures 21-21-24-24-21 cm inc 1 st at each side every 2-2-1.5-1.5-1.5 cm a total of 15-16-17-18-20 times = 86-90-94-98-102 sts. When the piece measures 53 cm put a marker at each side – measure the piece from here. Now bind off at one side of piece (= the front) and at the same time cast on new sts at the other side of piece (= the back): At front: bind off 3 sts, then bind off every other row: 3 sts 2 times, 2 sts 15-16-17-18-19 times and 1 st 2-2-1-1-1 times, then every 4th row: 1 st 2-2-3-3-3 times. At back: inc every other row: 2 sts 2 times, 1 st 8-11-13-12-15 times, and then every 4th row: 1 st 5-4-4-5-4 times. After all shaping is complete, there are 60-64-68-70-74 sts. When the piece measures 18-19-20-21-22 cm put 8 sts on a st holder from lower edge and from neck edge every other row: 6 times = 12-16-20-22-26 sts remain. The shrug is now at center back, that is, halfway – put a new marker at neck edge. Knit the other half, reversing shaping as follows: after the last 8 sts are put on the st holder, knit 1 row stockinette st, and then put 8 sts from st holder back on needles every other row: 6 times = 60-64-68-70-74 sts. When you put sts back on needle pick up 1 st between the last st on needle and first st on st holder, K this st tog with the 1st st on st holder. This prevents a hole. When the piece measures 5 cm from the marker at back of the neck increase at front (= the side where you decd before) every 4th row: 1 st 2-2-3-3-3 times, then every other row: 1 st 2-2-1-1-1 times, 2 sts 15-16-17-18-19 times and 3 sts 3 times. When the piece measures 8 cm (measured from the marker at back of the neck dec at back (= the side where you incd before) every 4th row: 1 st 5-4-4-5-4 times, then every other row: 1 st 8-11-13-12-15 times and 2 st 2 times. After all shaping is complete 86-90-94-98-102 sts. Put 1 marker at each side – measure the piece from here. When the piece measures 4-2-5-3.5-3.5 cm dec 1 st at each side with every 2-2-1.5-1.5-1.5 cm a total of 15-16-17-18-20 times = 56-58-60-62-62 sts. When the piece measures 33 cm change to larger circular needles, add 1 strand black (= 2 strands) and P 1 right side row and then K 1 wrong side rowdecreasing 12-14-16-12-12 sts evenly distributed on the 2nd row = 44-44-44-50-50 sts. Now knit rib (K 3, P 3), keeping 1 edge st at each side in garter st. When rib measures 10 cm inc all P 3 to P 4 = 51-51-51-58-58 sts. When rib measures 20 cm K 1 right side row, then K 1 wrong side row, then bind off all sts. Assembly: Sew sleeve seams up to markers, using edge sts as seam allowance. Pick up sts on larger circular needles around outer edge of the garment – up along right front, at back of the neck, down along left front and around back: 162-180-198-198-216 sts (divisible by 18) with 1 strand black + 1 strand charcoal grey (= 2 strands). Join and knit as follows (1st row is the right side): P 1 row, K 1 row, and then knit rib (K 3, P 3). When edge measures 2 cm inc every third P 3 to P 4 (as seen from right side) = 171-190-209-209-228 sts. When edge measures 5 cm and 8-8-8-9-9 cm repeat inc, so that the next P 3 is incd to P 4 = 189-210-231-231-252 sts. After the last row with incs the rib is K 3, P 4 over all sts (seen from the right side). Bind off in rib. |
|
 |
|
Have you finished this pattern?Tag your pictures with #dropspattern or submit them to the #dropsfan gallery. Do you need help with this pattern?You'll find 24 tutorial videos, a Comments/Questions area and more by visiting the pattern on garnstudio.com. © 1982-2026 DROPS Design A/S. We reserve all rights. This document, including all its sub-sections, has copyrights. Read more about what you can do with our patterns at the bottom of each pattern on our site. |


With over 40 years in knitting and crochet design, DROPS Design offers one of the most extensive collections of free patterns on the internet - translated to 17 languages. As of today we count 324 catalogues and 12290 patterns translated into English (UK/cm). 12290
We work hard to bring you the best knitting and crochet have to offer, inspiration and advice as well as great quality yarns at incredible prices! Would you like to use our patterns for other than personal use? You can read what you are allowed to do in the Copyright text at the bottom of all our patterns. Happy crafting!
Post a comment to pattern DROPS 86-36
We would love to hear what you have to say about this pattern!
If you want to leave a question, please make sure you select the correct category in the form below, to speed up the answering process. Required fields are marked *.