
Popular categories
Looking for a yarn?


|
|||||||||||||||||||
DROPS 83-5 |
|||||||||||||||||||
|
|
|||||||||||||||||||
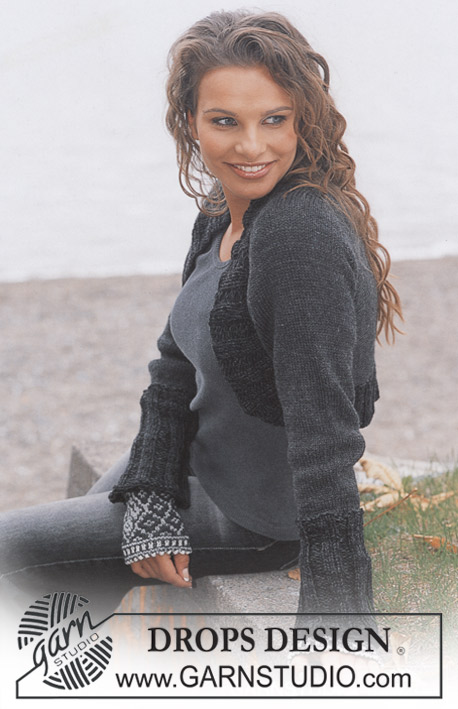
DROPS Pullover and scarf in Karisma Superwash
DROPS 83-5 |
|||||||||||||||||||
|
PULLOVER: Gauge: 21 sts x 28 rows on larger needles in stockinette st = 10 x 10 cm. Rib: * K 4, P 4 *, repeat * - *. Pattern: See charts. The pattern is knit entirely in stockinette st. Body: Cast on 176-192-208-232-248 sts on smaller circular needles with black. Knit 3 rows stockinette st, then knit rib – see instructions above. When the piece measures 5 cm change to larger circular needles, knit 2 rows garter st, then knit stockinette st, adjusting (inc/dec) on the first row to 172-190-210-232-248 sts. Put a marker at each side. When the piece measures 6-6-8-8-8 cm inc 1 st at each side of each marker every 5-5-6-6-6 cm a total of 5-5-4-4-4 times = 192-210-226-248-264 sts. When the piece measures 32-33-34-35-36 cm bind off 10 sts at each side for armhole (5 sts at each side of each marker) = 86-95-103-114-122 sts on body. Lay piece aside and knit the sleeves. Right sleeve: Cast on 66-66-75-75-75 sts on smaller needles with black and knit 3 rows stockinette st (1st row = wrong side). Then knit rib as follows: K 4 (edge sts knit in garter st), * K 4, P 5 *, repeat * - * and finish with K 4 and K 4 (edge sts knit in garter st). On the next row dec all P 5 to P 4 = 60-60-68-68-68 sts. When the rib measures 18 cm place a marker after 30-30-34-34-34 sts and cut yarn. Put cuff together – lay the 4 garter sts on the left side over the 4 garter sts on the right side as when the garment is worn. Divide sts onto 4 larger double-pointed needles and begin row at the marker. Knit 4 rows rib as before, but P the overlapping sts through both layers. Then knit 2 rows garter st over all sts and then knit stockinette st. After the 1st row of stockinette st inc 1 st each side of marker a total of 11-13-11-14-16 times: Sizes S + L: alternately every 5th and 6th rows Size M: every 5 rows Size XL: every 4 rows Size XXL: alternately every 3rd and 4th rows = 78-82-86-92-96 sts. When the piece measures 44-44-44-43-43 cm bind off 5 sts each side of marker = 68-72-76-82-86 sts. Put sts on a st holder and knit a second sleeve, reversing cuff overlap. Yoke: Put the sleeves in on the same circular needles as body where you bound off for armholes = 308-334-358-392-416 sts. Place a marker in each transition between body and the sleeves = 4 markers. Continue with stockinette st over all sts and knit 1-0-2-1-2 rounds before beginning raglan shaping, then: Dec 1 st as follows before markers: K 2 tog. Dec 1 st as follows after markers: Slip 1 st as if to knit, K 1, psso. Dec every other row 9-11-11-13-14 times = 236-246-270-288-304 sts. After raglan dec knit 1 round with black, decreasing evenly distributed across the round to 231-242-264-286-297 sts, then knit and dec following the chart for Pattern 1. After the last dec 126-132-144-156-162 sts remain on needles. Complete Pattern 1. Then knit 1 round with black, decreasing evenly distributed across round to 90-90-90-96-96 sts (divisible by 6). Neckband: Change to smaller double pointed needles and knit Pattern 2 once (the neckband measures approx. 5 cm). Change to coral and knit 1 round, then knit the next round as follows: * K 2 tog, yo *, repeat * - * around round (= folding edge). Continue until edge measures 5 cm from folding edge, change to black, knit 2 rounds and bind off. Fold neckband to wrong side and stitch in place loosely. Assembly: Sew opening under the sleeve. Sew overlap on cuffs from wrong side. Sew on 6 buttons as decoration along each cuff (through both layers). SCARF: Measurements: approx. 18 x 150 cm Materials: Garnstudio SNOW from Garnstudio 150 gr nr 14, charcoal grey DROPS 12 mm needles, or size needed to obtain correct gauge. Gauge: 7 sts in pattern = approx. 10 cm in width Lace pattern: Row 1 (= wrong side): K 1 (edge st knit in garter st), * K 1, yo, sl 1 as if to P *, repeat * - * to last 2 sts, end with K 2. Row 2 (= right side): K 1 (edge st knit in garter st), * yo, sl 1 as if to P, K tog the next st and the yo from previous row *, repeat * - * to last 2 sts and end with yo, sl 1 as if to P, and K 1 (edge st knit in garter st). Row 3 (= wrong side): K 1 (edge st knit in garter st), * K tog the next st and the yo from previous row, yo, sl 1 as if to P *, repeat * - * and end with K tog the next st and the yo from previous row, K 1 (edge st knit in garter st). Repeat rows 2 and 3. Scarf: Loosely cast on 13 sts and knit Lace pattern – see instructions above. Bind off when the piece measures approx. 150 cm. |
|||||||||||||||||||
Diagram explanations |
|||||||||||||||||||
|
|||||||||||||||||||

|
|||||||||||||||||||

|
|||||||||||||||||||
|
Have you made this or any other of our designs? Tag your pictures in social media with #dropsdesign so we can see them! Do you need help with this pattern?You'll find tutorial videos, a Comments/Questions area and more by visiting the pattern on garnstudio.com. © 1982-2024 DROPS Design A/S. We reserve all rights. This document, including all its sub-sections, has copyrights. Read more about what you can do with our patterns at the bottom of each pattern on our site. |
|||||||||||||||||||


With over 40 years in knitting and crochet design, DROPS Design offers one of the most extensive collections of free patterns on the internet - translated to 17 languages. As of today we count 304 catalogues and 11422 patterns - 11422 of which are translated into English (UK/cm).
We work hard to bring you the best knitting and crochet have to offer, inspiration and advice as well as great quality yarns at incredible prices! Would you like to use our patterns for other than personal use? You can read what you are allowed to do in the Copyright text at the bottom of all our patterns. Happy crafting!
Comments / Questions (40)
How do I decrease evenly from 162 stitches to 96 for start of neck band? Even knit 1 knit 2tog isn’t enough?! Maths is not my strongpoint!
11.01.2024 - 15:17DROPS Design answered:
Dear Carol, in this lesson we explain how to decrease evenly, this might help. Happy knitting!
11.01.2024 - 15:44Passe, bei den 4 Makierungsfäden wird die Abnahme am Vorderteil oder am Ärmel gemacht? lt Anleitung nicht deutlich beschrieben. Nur vor und danach??? Wie starte ich ? sieht man die Abnahme am Vorderteil oder am Ärmel?
25.08.2023 - 13:00DROPS Design answered:
Liebe Heike, es wird beideseitig von den 4 Markierungen abgenommen, dh vor + nach jeder Markierung = 8 Maschen werden jeweils abgenommen, je 2 Maschen pro Ärmel und am Vorder- sowie am Rückenteil. Viel Spaß beim stricken!
25.08.2023 - 13:54Hi after completing all the decreases for third size I should have 144 sts left after dec 1st every 6th st, I actually have 151 and don't understand why as all the decreases leading up to the neck was correct
30.08.2022 - 00:13DROPS Design answered:
Dear Torrain, it's correct. You have 264 stitches before starting to work Pattern 1. Since pattern 1 is composed of 11 stitches initially, you will have 264/11 = 24 repeats of Pattern 1 on the round. In each repeat, you decrease from 11 stitches to 6 stitches (i.e 5 stitches decreased). 5 stitch x 24 repeats of Pattern 1 = 120 stitches decreased in the round. 264 initial stitches - 120 decreases = 144 stitches remain. Happy knitting!
30.08.2022 - 01:14Hello! I am working the coral part on the neckband. The pattern says "continue until edge measures 5 cm from folding edge." Does this mean continue the K2 tog. yo as in the preceding row, or continue in stockinette? Many thanks!
04.08.2022 - 02:01DROPS Design answered:
Hi Sharon, You continue with stockinette. Happy knitting!
04.08.2022 - 07:14I’m making 3rd size. Body has 102 sts, 2 sleeves @ 76 =255. How do you get 358 sts when joining for the yoke
08.03.2022 - 02:57DROPS Design answered:
Hi Ann, You have 103 stitches on both the front and back pieces = 206 stitches in total. 76 stitches on each sleeve = 152 stitches in total. 206 + 152 = 358 stitches. Happy knitting!
08.03.2022 - 06:57Wie strickt man an der Halskante mit der Farbe rotrosa die Faltkante? LG
03.03.2022 - 21:39DROPS Design answered:
Liebe Andrea, nach 5 cm wechseln Sie zu rotrosa und stricken Sie 2 Reihen (damit das Lochmuster), dann stricken Sie wieder mit schwarz - es gibt hier einige Typo, Anleitung wird korrigiert, danke für den Hinweis. Viel Spaß beim stricken!
04.03.2022 - 10:58Wofür ist das Muster M2? auch das findet in der Anleitung keine Erwähnung
16.01.2022 - 15:42DROPS Design answered:
Lieber Herr Spiegelhoff, M.2 wird bei der Halskante gestrickt. Viel Spaß beim stricken!
17.01.2022 - 09:12Hallo Drops Team\r\nWann fange ich mit dem Muster an? Das wird irgendwie nicht erwähnt.
15.01.2022 - 22:58DROPS Design answered:
Lieber Herr Spiegelhoff, es wird zuerst für Raglan abgenommen, dann stricken Sie Diagram M.1 nach den ersten Raglanabanhmen, dh wenn 126-132-144-156-162 M auf der Nadel übrig sind. Viel Spaß beim stricken!
17.01.2022 - 08:50Begrijp ik het goed dat de halsboord niet in boordsteek gebreid wordt?
03.01.2022 - 23:18DROPS Design answered:
Dag Janetta,
Dat klopt, de halsboord wordt in M.2 gebreid, daarna wordt er een vouw gebreid en nog eens 5 cm in tricotsteek voor het deel van de halsboord dat daar binnen gevouwen wordt.
06.01.2022 - 09:45Begrijp ik het goed dat de halsboord niet in boordsteek gebreid wordt?
03.01.2022 - 22:52