
Popular categories
Looking for a yarn?


Comments / Questions (60)
![]() Elisa wrote:
Elisa wrote:
Ich verstehe nicht ganz, ob die ganze Arbeit mit zwei Fäden gleichzeitig, also 1 Faden alpaca und 1 Faden Safran, gestrickt werden muss? Kann man statt safran auch einen zweiten Faden Alpaca nehmen?
14.01.2026 - 13:08DROPS Design answered:
Liebe Elisa, ja genau, die ganze Arbeit wird mit 2 Fäden gestrickt, 1 x Alpaca + 1 x Safran, gerne können Sie auch 2 Fäden Alpaca anstatt stricken, beachten Sie nur, daß es etwas unterschiedlich aussehen wird, da beide Garne unterschiedlich sind. Viel Spaß beim Stricken!
15.01.2026 - 09:55
![]() Elisa wrote:
Elisa wrote:
Ich würde dieses Kleid gerne nur mit der Alpaca-Wolle stricken und brauche Gr. 42, locker sitzend. Was muss ich da beachten? Wie viel Wolle brauche ich dann und welche Grösse muss ich in der Anleitung auswählen?
10.01.2026 - 23:35DROPS Design answered:
Liebe Elisa, hier lesen Sie, wie Sie Ihre Größe wählen können. Viel Spaß beim Stricken!
12.01.2026 - 16:32
![]() Aisa wrote:
Aisa wrote:
Går det an å stikke denne med lange ermer? Hvor mange garnnøster trengs i så fall til str. XS?
03.12.2023 - 18:25DROPS Design answered:
Hei Aisa. Du kan fint strikke den med lange ermer, ta en titt på oppskrift 95-8 og gjør tilpassninger til både lengde og maskeantall. Siden vi ikke har strikket den med lange ermer har vi ikke en nøyaktig garnmengde, men vil tippe 2-3 nøster mer. mvh DROPS Design
04.12.2023 - 10:27
![]() Melanie wrote:
Melanie wrote:
Ich verstehe diesen Satz nicht: Gleichzeitig auf der 2. und 4. R nach M.1 wird M.2 über jeden Markierungsfaden gestrickt. Soll ich eine Runde rechts Stricken, dann mit dem M.2 Muster beginnen und in der 4. Runde ebenfalls das Muster M.2 beginnen, obwohl das erste Mal M.2 noch nicht abgeschlossen ist? Vielen Dank für die Unterstützung!
02.04.2023 - 08:45DROPS Design answered:
Liebe Melanie, wenn M.1 fertig ist, stricken Sie M.2 so daß die Markierung in jedem M.1 die mittelre Masche in M.2 wird (so wird man 2 Maschen in jedem M.1 abnehmen). dann stricken Sie 3 Runden rechts, und bei der nächsten Runde stricken Sie M.2 wie zuvor (es sind 2 Maschen in jedem M.2 abgenommen). Viel Spaß beim stricken!
11.04.2023 - 10:36
![]() Miriam wrote:
Miriam wrote:
Buon pomeriggio, volevo sapere se questo modello è lavorato topdown, grazie
06.03.2023 - 16:29DROPS Design answered:
Buonasera Miriam, il vestito è lavorato dal basso verso l'alto. Buon lavoro!
06.03.2023 - 20:44
![]() Nova wrote:
Nova wrote:
Hi, The recommended size needles for Safran and Alpaca yarn is 3mm yet this dress is knitted in 6mm. That makes it a very loose knitted dress yet in the photo it doesn’t look that way.
12.02.2021 - 03:39Nova answered:
Please disregard my last comment I did not read the instructions correctly. I can see that a yarn of each is required which makes sense. Thank you!
12.02.2021 - 03:42
![]() Charlene Pettit wrote:
Charlene Pettit wrote:
Can this pattern be knitted in a single yarn? I would like to knit it in a cotton if you could suggest one
16.11.2020 - 21:21DROPS Design answered:
Dear Mrs Petit, you can replace 2 strands yarn group A (= Alpaca + Safran here) with 1 strand yarn group C - like DROPS Paris for example - read more about alternatives here. Happy knitting!
17.11.2020 - 10:36
![]() Anx wrote:
Anx wrote:
Cześć, ppdzieliłam pracę sześcioma markerami. Prze których markerach zamyka sie oczka na początku?
09.03.2020 - 21:51DROPS Design answered:
Witaj! Najpierw zamykamy oczka przy 2 markerach na bokach sukienki: zmknąć po 1 o. z 2 stron markerów (nie zamykać o. w miejscu 2 markerów przodu i 2 tyłu) – PATRZ ZAMYKANIE OCZEK powyżej - 8-9-9-9-9-9 razy co 5-5-5-6-6-7 okr. Od wys. 31-32-33-35-36-37 cm od dołu robótki zacząć zamykać 1 o. za 1-szym i 3-cim markerem i przed 2-gim i 4-tym markerem (przód i tył) i powtarzać to 4-4-5-5-5-5 razy co 6-6-8-8-8 okr. Pozdrawiamy!
10.03.2020 - 17:48
![]() Magda wrote:
Magda wrote:
Cześć, robie sukienke w rozm s i chciałbym ja przedłużyć. Zrobiłam według schematu i jest zby krótka, nawet jeśli by się wydłużyła od ciężaru. W którym miejscu dodać cm? Myślę, że miedzy schematem M2 a 6 markerami, ale nią mam pewności. Czy tak bedzie dobrze? Inne wymiary są ok.
05.03.2020 - 12:05DROPS Design answered:
Witaj Magdo, dokładnie tak. Jak skończysz schemat, przerabiaj dalej bez schematu tyle ile chcesz przedłużyć sukienkę. Dopiero później dodaj markery i zamykaj oczka. Pozdrawiamy!
05.03.2020 - 17:02
![]() Magda wrote:
Magda wrote:
Dzień dobry, czy na pewno oczka na przód i tył zamyka się za 1 i 3 markerem, a przed 2 i 4, a nie odwrotnie? Czy te 28 oczek miedzy markerami nie powinno zostać bez zmian, a zmniejszać sie na bokach? Przy robieniu od góry tak właśnie robiłam.
10.01.2020 - 16:24DROPS Design answered:
Witaj Magdo! Tak trzeba zamykać te oczka, powstaną kliny z przodu i tyłu, postępuj zgodnie z opisem. Koniecznie zamieść zdjęcie gotowej sukienki na naszej grupie DROPS Workshop na facebooku. Miłej pracy!
10.01.2020 - 18:08
|
||||||||||||||||
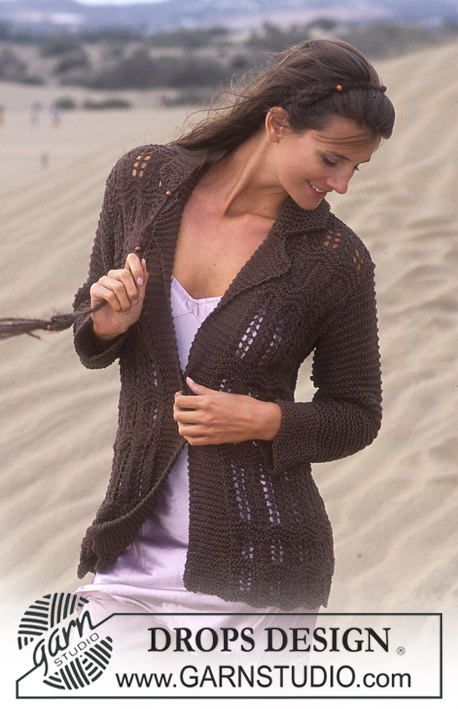
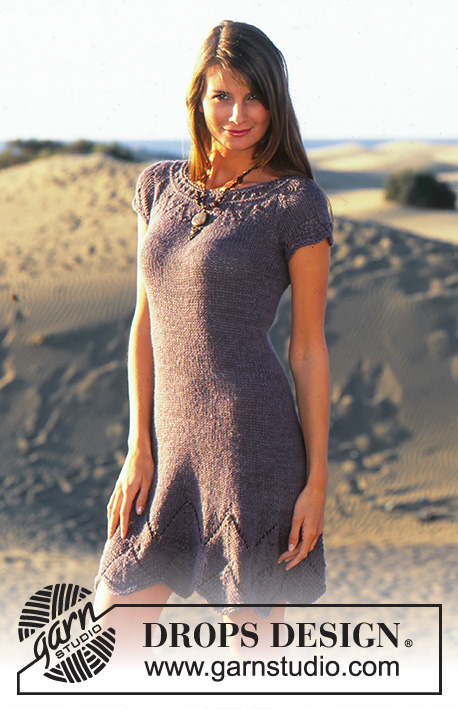
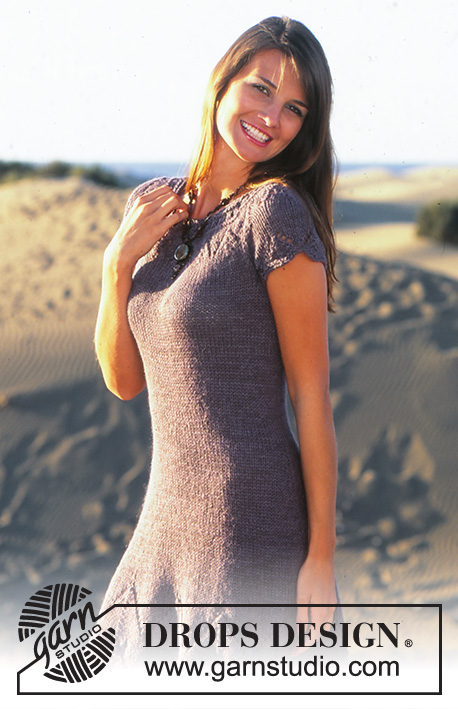
Desert Delight |
||||||||||||||||
 |
 |
|||||||||||||||
DROPS Dress in Safran and Alpaca
DROPS 95-10 |
||||||||||||||||
|
Knitting tension: 15 sts x 19 rows on needle size 6mm with 1 thread of each quality in stocking st = 10 x 10 cm. Pattern: see diagrams M.1 to M.4. The diagrams show the pattern from the RS. Decreasing tips (applies to the cuts and sides): Dec as follows after 1st and 3rd marking thread + marking thread at side: K2 tog. Dec as follows before 2nd and 4th marking thread + marking thread at side: slip 1 st as if to knit, K1, psso Increasing tips: Inc 1 st by picking up a st in st from previous row and K it. Measuring tips: Make all measurements when piece is lying flat. BODY Worked in the round on circular needles. Read the entire pattern before you begin! Cast on 180-200-220-240-260-280 sts using both ends of the circular needle (to make sure the edge becomes elastic) with 1 thread of each quality (= double thread). Remove 1 needle and K1 round, P 1 round and K 1 round. Now work M.1 (start at the side). After 2 repeats of M.1 – piece measures approx 21 cm - insert a marking thread (MT) in the middle of each repeat (see arrow in M.1 = 9-10-11-12-13-14 MT). Continue in stocking st, at the same time on 2nd and 4th round after M.1 work M.2 over each MT = 144-160-176-192-208-224 sts left. Remove all MT after the last dec. When piece measures 25-25-25-26-26-26 cm insert 6 new MT as follows: K 22-26-28-31-34-37 sts, insert MT before next st (= MT-1), K 28-28-32-34-36-38 sts, insert MT before next st (= MT-2), K 22-26-28-31-34-37 sts, insert MT before next st (= side), K 22-26-28-31-34-37 sts, insert MT (= MT-3), K 28-28-32-34-36-38 sts, insert MT before next st (= MT-4), K remaining 22-26-28-31-34-37 sts and insert a MT (= side). Now dec 1 st on both sides of the MT at sides (do not dec by the other MT on front and back) – see decreasing tips – on every 5-5-5-6-6-7 round a total of 8-9-9-9-9-9 times. At the same time when piece measures 31-32-33-35-36-37 cm dec 1 st for cut after MT-1 and MT-3 and before MT-2 and MT-4 – see Decreasing tips – on every 6-6-8-8-8-8 round a total of 4-4-5-5-5-5 times. After all dec are complete there are 96-108-120-136-152-168 sts left. When piece measures 50-51-52-54-56-58 cm inc 1 st after MT-1 and MT-3 and before MT-2 and MT-4 - see Increasing tips above - on every 2-2-2-3-3-3 round row a total of 6-6-6-5-5-5 times = 120-132-144-156-172-188 sts. After last inc remove markers on front and back. When piece measure 67-69-71-73-75-77 cm cast off 8-8-8-10-10-10 sts each side for armhole (i.e. 4-4-4-5-5-5 sts on both sides of MT) = 52-58-64-68-76-84 sts left for front and back piece. Put the piece aside and knit the sleeves. Sleeve: Cast on 40-42-44-48-50-54 sts using 2 double pointed needles size 6 mm with 1 thread of each yarn quality (= double thread). Remove 1 needle and K 1 round on double pointed needles, P 1 round and K 1 round. Work next round as follows: 0-1-2-4-0-2 stocking sts, M.3 on the next 40-40-40-40-50-50 sts and 0-1-2-4-0-2 stocking sts. Work 1 repeat of M.3 (piece measures approx 5 cm). K 1 round, at the same time cast off 8-8-8-10-10-10 sts mid under arm for armhole = 32-34-36-38-40-44 sts left. Put sts on a thread and knit the other sleeve. Yoke: Put the sleeves in on the same circular needle as body where cast off for armholes = 168-184-200-212-232-256 sts. Now dec as follows: Size XS: Work 5 cm stocking sts, at the same time dec 14 sts evenly on the 3rd and 7th round = 140 sts. Size S: Work 6 cm stocking sts, at the same time dec 12 sts evenly on the 3rd and 8th round = 160 sts Size M: Work 7 cm stocking sts, at the same time dec 10 sts evenly on the 4th and 9th round = 180 sts. Size L: Work 8 cm stocking sts, at the same time dec 8 sts evenly on the 3rd, 6th, , 9th and 12th round = 180 sts. Size XL: Work 9 cm stocking sts, at the same time dec 8 sts evenly on the 3rd , 7th , 10th , and 14th round = 200 sts. Size XXL: Work 10 cm stocking sts, at the same time dec 9 sts evenly on the 4th , 8th , 12th ,and 16rh round = 220 sts. All sizes: When yoke measures 5-6-7-8-9-10 cm work M.4. After 1 repeat of M.4 there are 112-128-144-144-160-176 sts on needle. Work 2 rounds stocking sts, at the same time adjust no of sts to 111-123-144-144-159-171 on the last round. P 1 round, K 2 rounds and work next row as follows: *1 YO, K3 tog*, repeat from *-* = 74-82-96-96-106-114 sts left. K 2 rounds, at the same time adjust no of sts to 74-82-86-90-94-98 on the last row. P 1 round, Knit 1 round and cast off in P sts on next round – dress measures approx 83-86-89-92-95-98 cm when lying flat. Assembly: Sew the openings under the arms. |
||||||||||||||||
Diagram explanations |
||||||||||||||||
|
||||||||||||||||
 |
||||||||||||||||
Have you finished this pattern?Tag your pictures with #dropspattern or submit them to the #dropsfan gallery. Do you need help with this pattern?You'll find 23 tutorial videos, a Comments/Questions area and more by visiting the pattern on garnstudio.com. © 1982-2026 DROPS Design A/S. We reserve all rights. This document, including all its sub-sections, has copyrights. Read more about what you can do with our patterns at the bottom of each pattern on our site. |
||||||||||||||||


With over 40 years in knitting and crochet design, DROPS Design offers one of the most extensive collections of free patterns on the internet - translated to 17 languages. As of today we count 325 catalogues and 12298 patterns translated into English (UK/cm). 12298
We work hard to bring you the best knitting and crochet have to offer, inspiration and advice as well as great quality yarns at incredible prices! Would you like to use our patterns for other than personal use? You can read what you are allowed to do in the Copyright text at the bottom of all our patterns. Happy crafting!
Post a comment to pattern DROPS 95-10
We would love to hear what you have to say about this pattern!
If you want to leave a question, please make sure you select the correct category in the form below, to speed up the answering process. Required fields are marked *.