
Popular categories
Looking for a yarn?


Comments / Questions (10)
![]() Elena wrote:
Elena wrote:
In row 3 of the button band, I don't understand where the increases happen. Is it 3 on each side or 3 total along the back of the neck? Thank you.
05.12.2024 - 00:13
![]() Elena wrote:
Elena wrote:
Is the bind off for the neckline of the back piece on the wrong side? Also the decrease tip states for the neckband to do it inside 1 garter st edge st, but the instructions for the back do not mention any garter st, so where does the decrease happen? Thank you.
14.04.2024 - 18:52DROPS Design answered:
Dear Elena, the pattern does not state on which side you should cast off the middle stitches for the neck, you can do on whichever side you get to the appropriate measurements. However, the next decrease sould be done on rows that start at the neckline (on both sides). The instructions for the back mention edge stitches at the cast on, and you should knit the edge stitches with garter stitch through the whole piece, thus decrease inside the edge stitch. Happy Knitting!
14.04.2024 - 22:16
![]() KristinSkavern Gulbrandsøy wrote:
KristinSkavern Gulbrandsøy wrote:
Hei, Det står at man skal bruke DROPS Glitter fra Garnstudio 2 spoler til alle str i f.nr 04, rosa, men den kan jeg ikke finne i utvalget hos dere. Hva bruker jeg da?
24.08.2022 - 10:30DROPS Design answered:
Hej Kristin. Du kan antingen välja DROPS Glitter guld eller silver om du önskar det, eller så kan du sticka den med kun DROPS Muskat. Mvh DROPS Design
24.08.2022 - 13:23
![]() Laure wrote:
Laure wrote:
R3 de bande de boutonnage : le rang est fait de mailles serrées. Pourquoi les augmentations vers l encolure sont de brides alors que le reste du rang est fait de mailles serrés? A quel moment ca change et comment? Merci pour votre aide.
18.05.2022 - 20:11DROPS Design answered:
Bonjour Laure, il faut en fait juste crocheter des brides au 3ème rang de la bordure, ce rang a été corrigé, merci pour votre retour; bonne continuation!
19.05.2022 - 08:57
![]() Carole wrote:
Carole wrote:
Bonjour, Je vous prie de m'excuser pour n'avoir dit ni bonjour ni merci dans la question que j'ai postée hier , je n'avais juste pas assez de caractères ! Bonne journée et merci d'avance pour votre aide.
18.10.2020 - 08:06DROPS Design answered:
Bonjour Carole, quand vous avez rabattu de chaque côté 1x3 m, 4x2 m et 2x 1 m, vous rabattez 2 m de chaque côté (= au début de chaque rang sur l'endroit et sur l'envers) jusqu'à ce que la manche mesure 55 cm de hauteur totale (veillez à bien avoir rabattu le même nombre de fois 2 m de chaque côté), rabattrez ensuite 3 m au début des 2 rangs suivants et rabattez les mailles restantes, la manche doit mesurer 56 cm de hauteur totale (1ère et 2ème taille). Bon tricot!
19.10.2020 - 08:42
![]() Carole wrote:
Carole wrote:
Jai fait les diminutions des manches 1x 3 mailles , 4x2 mailles , 2x 1 maille de chaque côté mais je ne comprends pas la suite. Je continue jusqu à 55 cm de hauteur totale et je rabats 2 mailles , puis 3 mailles de chaque côté avant de rabattre les autres mailles quand j arrive à 56 cm de hauteur totale ? Ou je diminue deux mailles de chaque coté jusqu à 55 cm de hauteur totale puis je diminue 3 mailles de chaque côté jusqu à 56 cm de hauteur totale après quoi je rabats tout?
17.10.2020 - 18:38
![]() Ines wrote:
Ines wrote:
Hi, the pattern for the sleeves in the smallest size does not work as stated: When the piece measures 11-11-13-14-10 cm inc 1 st at each side every 3.5-3-2.5-2-2 cm a total of 11-12-13-15-17 times = 70-74-78-84-90 sts. When sleeve measures 48-47-47-46-44 cm bind off If you increase 11 times every 3.5cm, that takes 38.5 cm, after the initial 11 makes it 39.5cm, but the bind off is supposed to start at 48 cm. Which of the numbers should I adjust? Thank you.
13.02.2013 - 16:41DROPS Design answered:
Dear Ines, first inc starts when piece measures 11 cm, then you repeat 10 more times every 3.5 cm = 35 cm + 11 cm = 46 cm. You will work 2 more cm before casting off for cap. Happy knitting !
13.02.2013 - 17:17
![]() Elizabeth Millar wrote:
Elizabeth Millar wrote:
Would it be appropriate to knit this cardigan with just Alpaca, without the glitter yarn? Thank you.
30.10.2012 - 16:58DROPS Design answered:
Dear Mrs Millar, Glitter brings here just a touche of shiny, glitter effect, so that you may knit without Glitter, with Muskat or any other alternative yarn from same group. Happy Knitting!
13.11.2012 - 15:56
![]() DROPS/Gun wrote:
DROPS/Gun wrote:
Aivan niin, neulot siis sileää neuletta, mutta etureunan uloin silmukka neulotaan jokaisella kerroksella oikein.
29.04.2010 - 14:42
![]() Anna wrote:
Anna wrote:
Haluaisin tietää, mitä tarkoittaa lause "Neulo 1 krs oikein nurjalta puolelta, jatka sitten neulomalla sileää neuletta 1:llä ainaoikeinneulotulla s:lla kohti etureunaa." Tämä lause on siis kohdassa vasen etukappale, 2. lause. Onko tarkoitus, että etureunassa neulotaan aina yksi silmukka ainaoikein-neuleella ja lopuilla silmukoilla sileää?
27.04.2010 - 22:19
|
|
DROPS 87-13 |
|
|
|
|
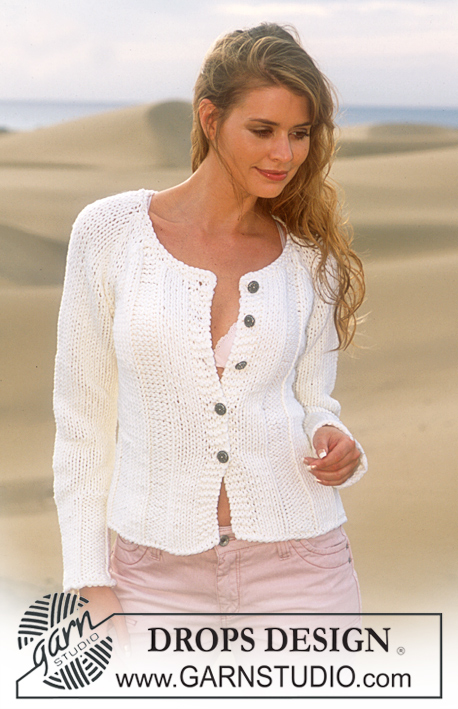
DROPS jacket with crochet borders in "Muskat" and "Glitter"
DROPS 87-13 |
|
|
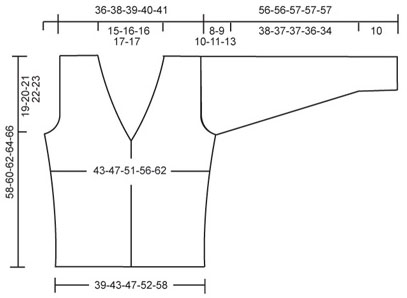
Garter st (back and forth on needle): 1 ridge = 2 rows. 1st row: K, 2nd row: K. Decrease tip (for armholes and neck): Dec on inside of 4 edge sts stocking st in armholes and 1 edge st garter st along neckline. All dec from RS. Dec as follows after edge sts: Slip 1 st K-wise, K 1, lift slip st over. Dec as follows before edge sts: K 2 tog. Back piece: Cast on 80-88-96-106-118 sts (incl 1 edge st in each side) with needle size 4.5 mm and 1 strand Muskat + 1 strand Glitter. Work 1 row K from WS, then continue with stocking st. Remember knitting tension! When piece measures 10 cm inc 1 st in each side every 7-7-8-8-8 cm in total 4 times = 88-96-104-114-126 sts. When piece measures 39-40-41-42-43 cm cast off 3-3-4-5-7 sts in each side for armholes. Continue dec for armholes in each side every 2nd row – see Decrease tip: 1 st 5-7-9-12-15 times = 72-76-78-80-82 sts. When piece measures 56-58-60-62-64 cm cast off middle 28-30-30-32-32 sts for neck. Continue to dec 1 st on next row towards neck – see Decrease tip = 21-22-23-23-24 sts remain on each shoulder. Cast off when piece measures 58-60-62-64-66 cm. Left front piece: Cast on 41-45-49-54-60 sts (incl 1 edge st in each side) with needle size 4.5 mm and 1 strand Muskat + 1 strand Glitter. Work 1 row K from WS, then continue with stocking st and 1 st garter st towards mid front. When piece measures 10 cm inc in side as for back piece. At same time when piece measures 21-22-23-24-25 cm dec for neck mid front – see Decrease tip: Every 4th row: 1 st 7-8-8-10-10 times, then every 6th row: 1 st 9-9-9-8-8 times. At same time when piece measures 39-40-41-42-43 cm cast off for armhole in side as for back piece. After all inc and dec there are 21-22-23-23-24 sts remaining on shoulder. Cast off when piece measures 58-60-62-64-66 cm. Right front piece: Cast on and work as for left but reversed. Sleeve: Cast on 48-50-52-54-56 sts (incl 1 edge st in each side) with needle size 4.5 mm and 1 strand Muskat + 1 strand Glitter. Work 1 row K from WS, then continue with stocking st. When piece measures 11-11-13-14-10 cm inc 1 st in each side every 3.5-3-2.5-2-2 cm in total 11-12-13-15-17 times = 70-74-78-84-90 sts. When sleeve measures 48-47-47-46-44 cm cast off for sleeve cap in each side every 2nd row: 3 st 1 time, 2 st 3-4-4-4-5 times and 1 st 2-2-3-4-5 times, continue to cast off 2 sts in each side until piece measures 55-55-56-56-56 cm, then cast off 3 sts 1 time in each side. Cast off remaining sts when piece measures approx. 56-56-57-57-57 cm. Assembly: Sew shoulder seams. Crochet border at bottom of sleeves: Crochet with hook size 3.5 mm and 1 strand Muskat + 1 strand Glitter as follows (start from WS and work round sts): Work 46-49-52-55-58 dc (i.e. approx. 1 dc around each st, no. of dc should be divisible by 3 + 1), turn piece. Next row worked as follows: 3 ch (= 1 tr), * skip 2 dc, 3 tr in next dc *, repeat from *-* and finish with 1 tr in last dc. Sew side seams inside 1 edge st. Crochet border at bottom of body: Work border as for sleeves – adjust so that no. of dc divisible by 3 + 1. Band: Start from WS and crochet up along left front piece, back of neck and down along right front piece with hook size 3.5 mm and 1 strand Muskat + 1 strand Glitter (work around ridge) as follows: 1st row: 1 dc in approx. every st – adjust so that no. of dc divisible by 3 + 1 - NOTE: Important not to crochet too many dc at back of neck as this will make neck wider. Turn piece. 2nd row: 3 dc (= 1 tr), * skip 2 dc, 3 tr in next dc *, repeat from *-* and finish with 1 tr in last st, turn piece. 3rd row: 3 dc (= 1 tr), continue to work 1 tr in every tr from previous row but where neckline starts in each side inc 3 tr evenly by working 1 extra tr in 3 tr from previous row so that edge does not become tight, turn piece. 4th row: 3 ch (= 1 tr), * skip 2 tr, 3 tr in next tr *, repeat from *-* and finish with 1 tr in last tr, turn piece. 5th row: 3 ch (= 1 tr), 2 tr before first tr-group, continue to work 3 tr between every tr-group from previous row, finish row with 3 tr after last tr-group, turn piece. 6th row: 3 ch (= 1 tr), skip 1st tr-group, continue to work 3 tr between every tr-group from previous row, finish row with 1 tr in last tr, cut strand. Sew sleeve seams inside 1 edge st and sew in sleeves. Jacket fastened with a brooch. |
|
 |
|
Have you finished this pattern?Tag your pictures with #dropspattern or submit them to the #dropsfan gallery. Do you need help with this pattern?You'll find 19 tutorial videos, a Comments/Questions area and more by visiting the pattern on garnstudio.com. © 1982-2026 DROPS Design A/S. We reserve all rights. This document, including all its sub-sections, has copyrights. Read more about what you can do with our patterns at the bottom of each pattern on our site. |


With over 40 years in knitting and crochet design, DROPS Design offers one of the most extensive collections of free patterns on the internet - translated to 17 languages. As of today we count 324 catalogues and 12290 patterns translated into English (UK/cm). 12290
We work hard to bring you the best knitting and crochet have to offer, inspiration and advice as well as great quality yarns at incredible prices! Would you like to use our patterns for other than personal use? You can read what you are allowed to do in the Copyright text at the bottom of all our patterns. Happy crafting!
Post a comment to pattern DROPS 87-13
We would love to hear what you have to say about this pattern!
If you want to leave a question, please make sure you select the correct category in the form below, to speed up the answering process. Required fields are marked *.