
Popular categories
Looking for a yarn?







































Comments / Questions (64)
 Marie-france Altmayer wrote:
Bonjour Je suis prête à la division de mes 303 mailles, mais le paragraphe du haut de la page 5 ne nous éclaire pas sur les diagrammes . je comprend sur le segond que nous partons A1 puis A4 et fin A5 mais le reste des 15 mailles est confus? Les 11 mailles sous la manche ne se tricotent elle pas en jersey ? Merci de bien vouloir m'éclairer ! Cordialement le reste des quinze mailles
04.11.2026 - 00:30DROPS Design answered:
Bonjour Mme Altmayer, après avoir mis les mailles des manches en attente et monté 11 m sous chaque manche, vous continuez le point fantaisie comme avant sur toutes les mailles (même les 11 m des côtés et les mailles des raglans); ainsi: les mailles de bordure devant comme avant, 1 m jersey, A.1 (7 m = début du motif devant gauche), vous répétez ensuite A.4 jusqu'à ce qu'il reste 15 m avant la fin du rang et vous terminez par les 8 m de A.5 (fin du motif ajouré, devant droit) et les mailles de bordure devant comme avant. Bon tricot!
04.11.2026 - 08:50
 Petra wrote:
Hallo, ich habe eine Frage zur Fertigstellung der Passe in Grösse xxxl: Nach welchen Diagrammen soll die zusätzliche 3. Höhe samt Raglan-Zunahmen gestrickt werden? Die bisherigen Diagramme passen ja von der Maschenzahl nicht mehr. Also, ab der folgenden Stelle der Anleitung komme ich nicht weiter: Es sind 223-239-239-239-255-255-255 Maschen auf der Nadel. In Gr. xxxl die Diagramme noch 1x in der Höhe stricken.
31.10.2026 - 17:05DROPS Design answered:
Liebe Petra, davor hatten Sie 255 Maschen, dann sollen Sie noch 8 Mal wie zuvor zunehmnen, dh alle Diagramme noch einmal in der Höhe stricken, so nehmen Sie 8 Maschen x 8 Mal = 64+255=319 Maschen wenn alle Zunahmen fertig sind. Viel Spaß beim Stricken!
02.11.2026 - 08:11
 Martine wrote:
Foutje opgemerkt bij het plaatsen van de markeerders, in de pas: Linker- en rechtervoorpand bestaat NIET uit hetzelfde aantal steken, idem voor beide mouwen. In de Nederlandse instructies is het aantal steken verschillend in de Franstalige versie staat het wél correct.
27.10.2026 - 12:57
Martine wrote:
Beste, Dit model in maat Large geselecteerd. Na de hals 111 steken 4cm, wil in de markeerders zetten. De Nederlandse beschrijving geeft voor markeerder 4 : 21st + resterend 20st - de franse beschrijving 19st + 21 resterend.
24.10.2026 - 17:38
 Sara wrote:
Når I skriver, at man i bærestykket skal strikke fra første linje i diagrammerne, når man kun skal tage ud på forstykkerne og ryg, skal man så også strikke fra første linje på ærmet i diagram A4 fx?
23.10.2026 - 20:27DROPS Design answered:
Hei Sara. Fint om du kan opplyse under hvilket avsnitt du tenker på, og oppgi gjerne hvilken str. du strikker. mvh DROPS Design
26.10.2026 - 10:45
Marie-france Altmayer wrote:
Bonjour merci bien éclairée mon demi diagramme est terminé, bon travail pour les cerveaux mais je ne suis pas sur que tout se passe sans vos éclairages !!
03.10.2026 - 18:15DROPS Design answered:
Merci pour votre retour et bonne continuation, si vous avez d'autres questions, n'hésitez pas à revenir nous voir.
05.10.2026 - 07:52
Marie-france Altmayer wrote:
Bonjour Merci pour vore réponse J'ai bien 239 m en taille M mon problème : première ligne du demi diagramme : A1 7m A416 m A2 10m, soit 33m alors que la ligne précédente était a 29 m J' ai repris A2 avec 6m et ligne correct, mais la suivante les dessins ne sont plus cohérents A3 9m et A2 10 m incomprises dans l'explication . Merci Marie-France Altmayer
30.09.2026 - 16:33DROPS Design answered:
Bonjour Mme Altmayer, vous aviez 37 m pour le devant: 7 m bordure devant, 1 m jersey, 7 m de A.1, 8 m de A.4, 6 m de A.2+ 8 augmentations pour le raglan = 7+1+7+8+6+8= 37 que vous tricotez désormais ainsi: 7 m bordure devant, 1 m jersey, 7 m A.1, 16 m A.4 et 6 m A.2 = 7+1+7+16+6=37 et vous augmentez 4 m (= 1/2 motif) qui vous donnera = 7+1+16+6+4=41 m + 1m du raglan = 42 m pour le devant droit. De même pour les manches vous tricotez désormais: 5 m de A.3, 40 m de A.4 et 6 m de A.2 (= 51 m pour les manches) et vous augmentez au début de A.3 et à la fin de A.2 - 4 fois = 59 m pour les manches. Est-ce plus clair ainsi?
01.10.2026 - 09:10
Marie-france Altmayer wrote:
Bonjour je tricote taille M j'arrive augmentation encore 8 fois = 239 Mailles= 1×37+51+61+51+1+37 Explications =devant gauche A1 7m+A4 16m+A2 10= 41 manches A6 5m+A4 48 m+A7 6m= 59 dos A3 9m + A4 48 m + A6 10m = 67 devant droit A3 5m+A4 16 m +A5 8 m=29 m Je pense que la correction n'est pas la Merci Marie-France Ma
27.09.2026 - 22:59DROPS Design answered:
Bonjour Mme Altmayer, lorsque vous avez 239 m en taille M vous allez encore augmenter 4 fois (encore 1 demi-motif en hauteur), vous aurez alors 239+(4x8m)=271 m réparties ainsi : 59 m pour chaque manche, 69 pour le dos et 42 pour les devants. Ou peut être que je ne comprends pas votre question? La taille M est la 3ème taille, c'ezt bien celle que vous tricotez? N'hésitez pas à nous en dire plus, merci d'avance.
29.09.2026 - 08:22
 Eelin wrote:
Regarding this instruction for Sleeve Decreases: "Decrease 2 stitches every 1-1-1-1-1-1½-1½ cm a total of 7-7-7-7-7-11-11 times" If this is followed, there will be a decreases in the first 7cm of the sleeves. I was wondering if there might be an error? Perhaps a decrease every 5-6 cm of the sleeve might result in a more gradual taper of the sleeves? Look forward to your clarification. Thanks!
21.09.2026 - 04:52DROPS Design answered:
Dear Eelin, that's how the jacket on the picture has been written and worked, but feel free to decrease another way if you like this better. Happy knitting!
22.09.2026 - 08:06
Karin wrote:
Auch bei dem zusätzlichen halben Rapport mit Zunahmen für sowohl Ärmel als auch Vorder- und Rückenteil muss es lauten : A3 (5M), 5 mal A4 (8M), A2 (6M). Sonst würde man ja nicht zunehmen. Erst wenn der halbe Rapport beendet ist und man dann nur noch an Vorder- und Rückenteil zunehmen muss, muss man auf ein anderes Muster wechseln. Oder mache ich da etwas falsch?
13.09.2026 - 15:46
|
||||||||||||||||
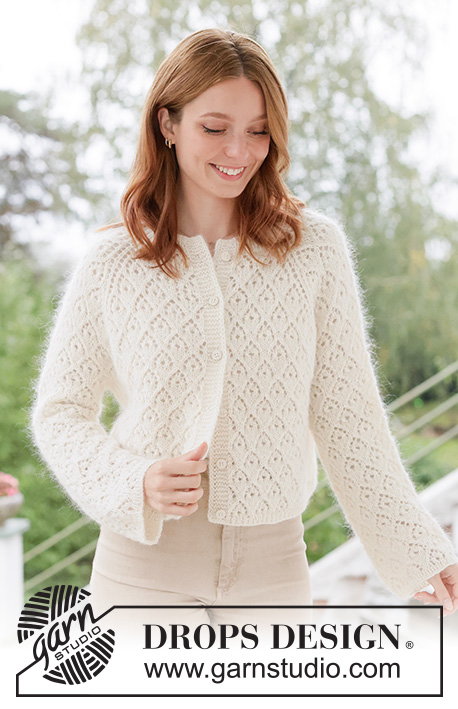
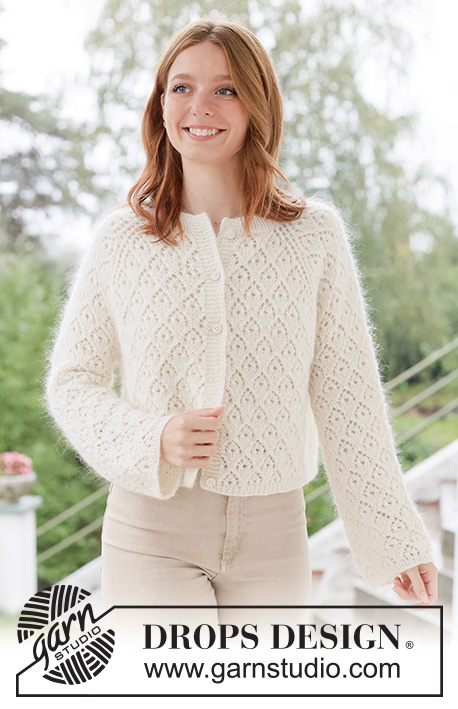
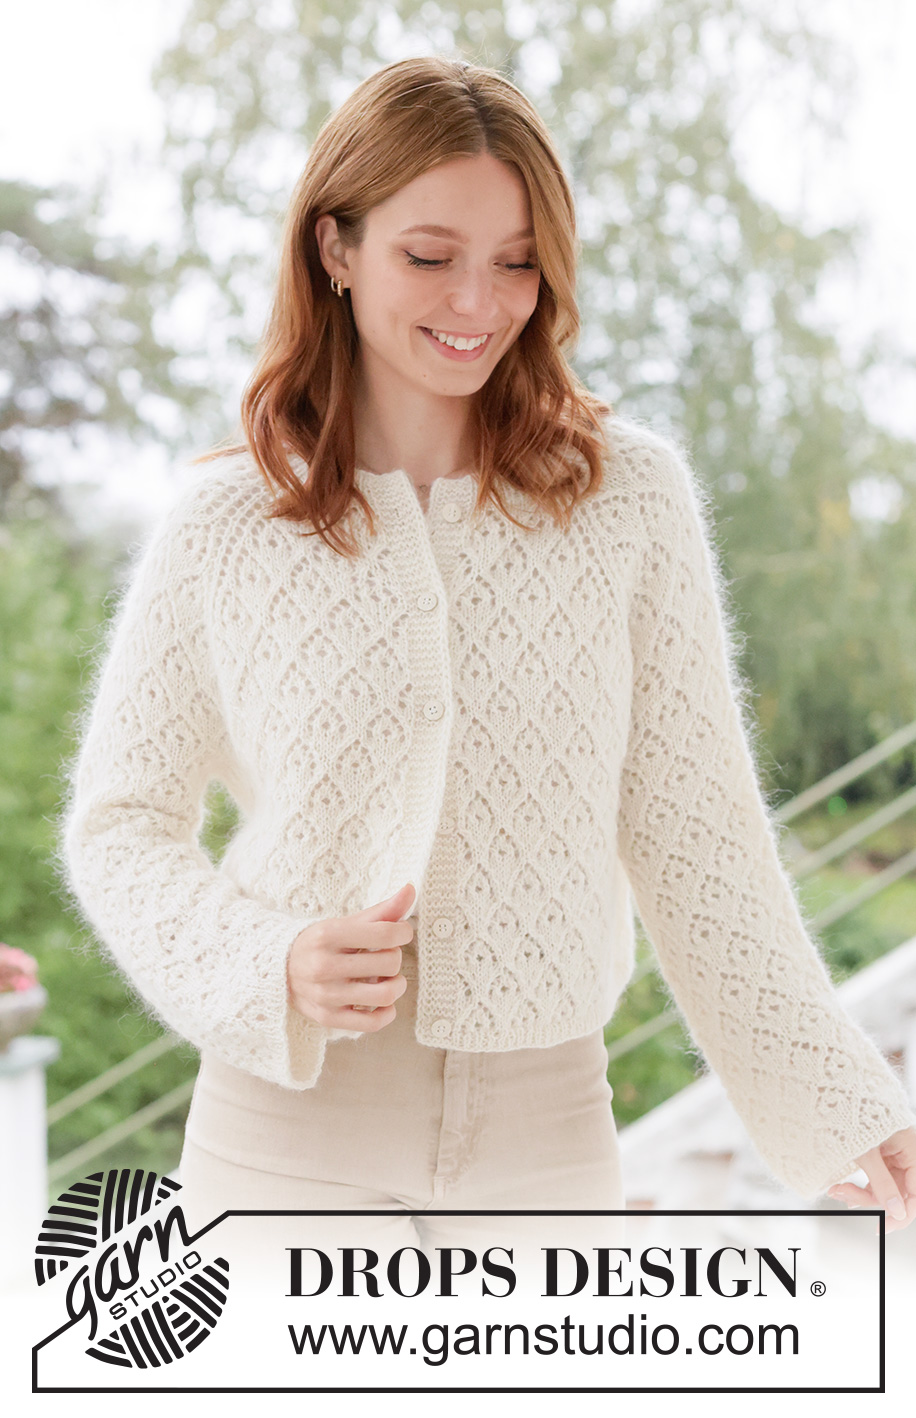
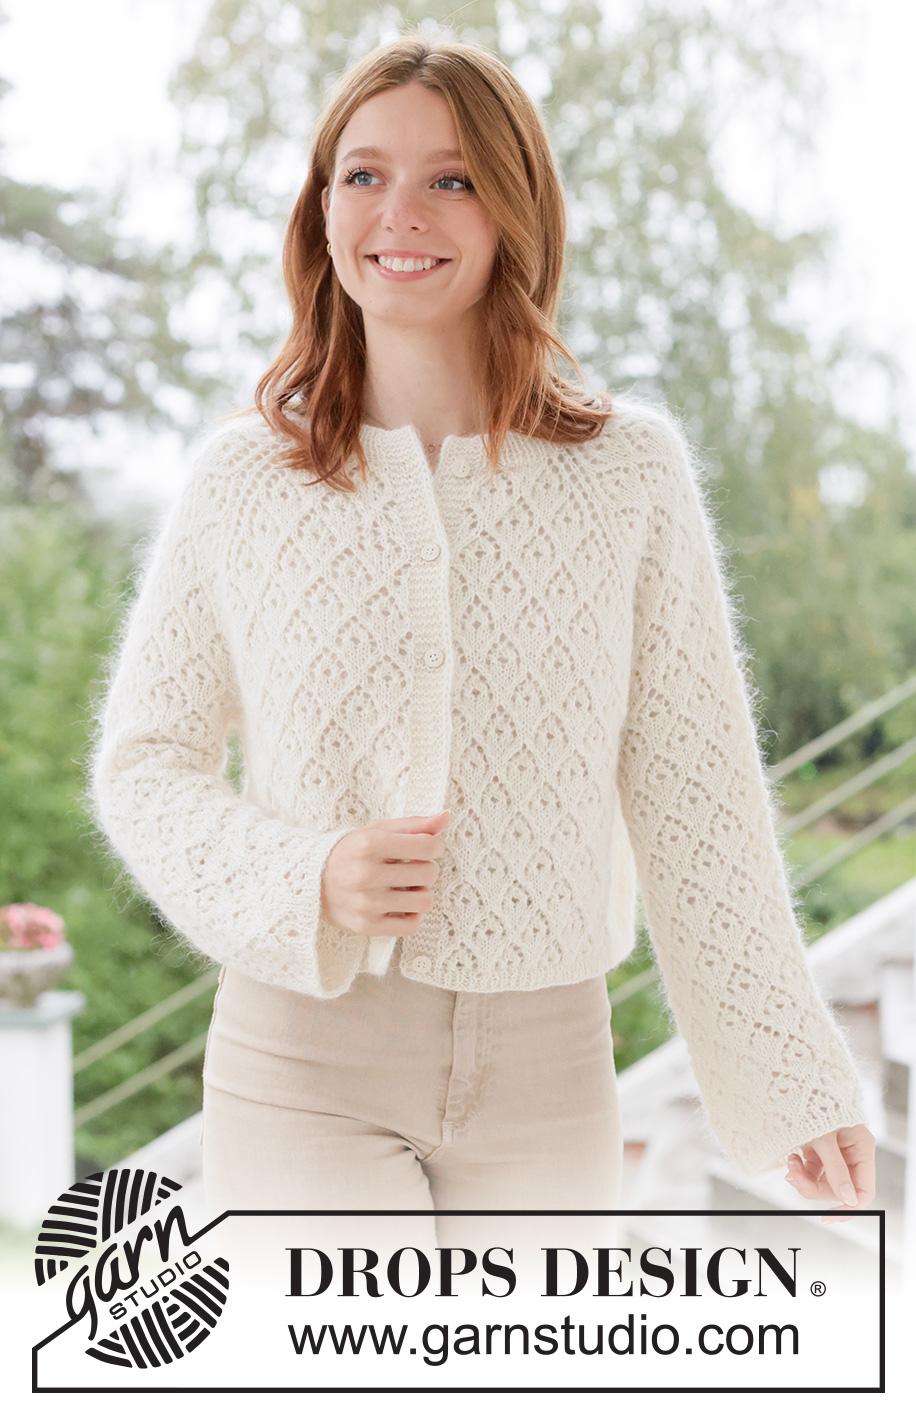
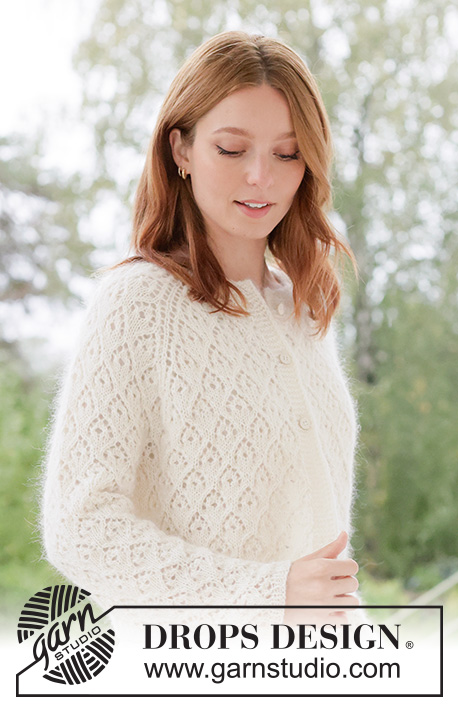
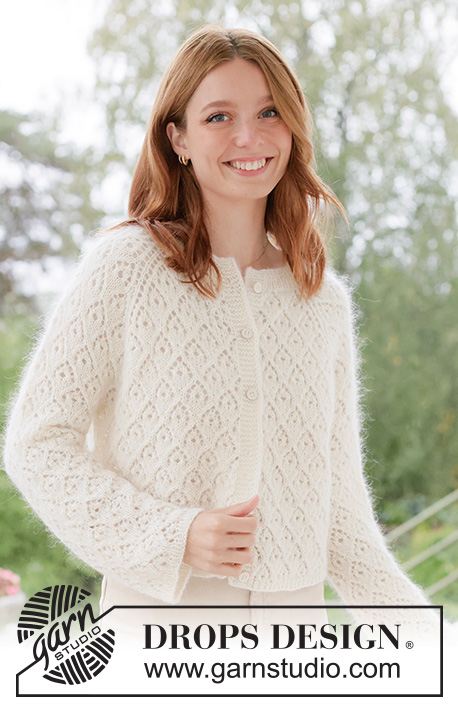
Lace Diamond Cardigan#lacediamondcardigan |
||||||||||||||||
 |
 |
|||||||||||||||
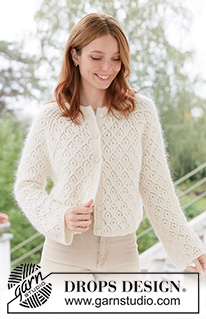
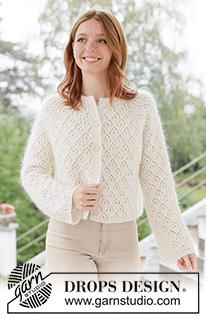
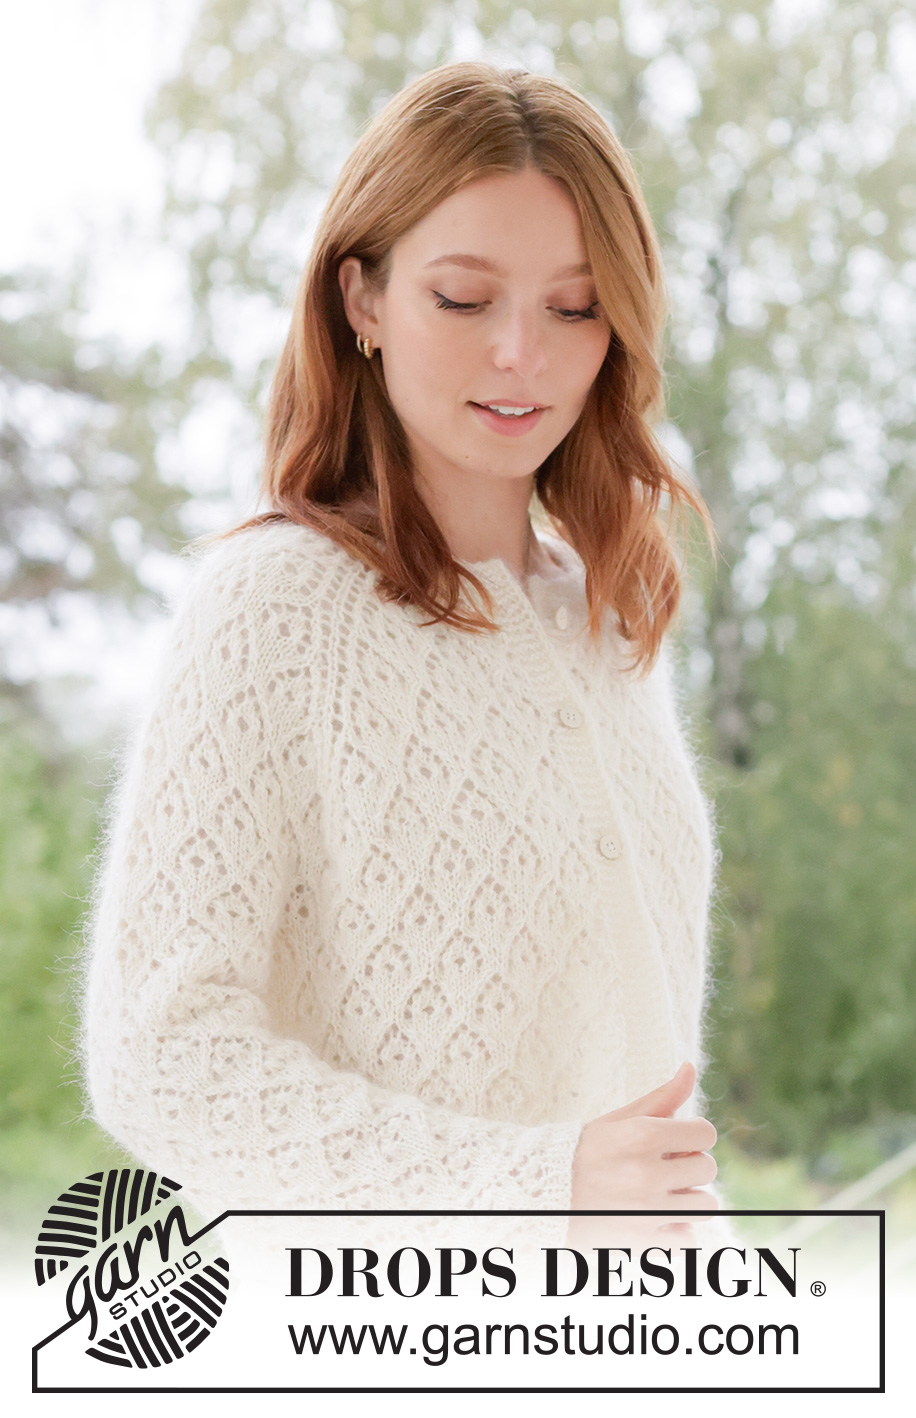
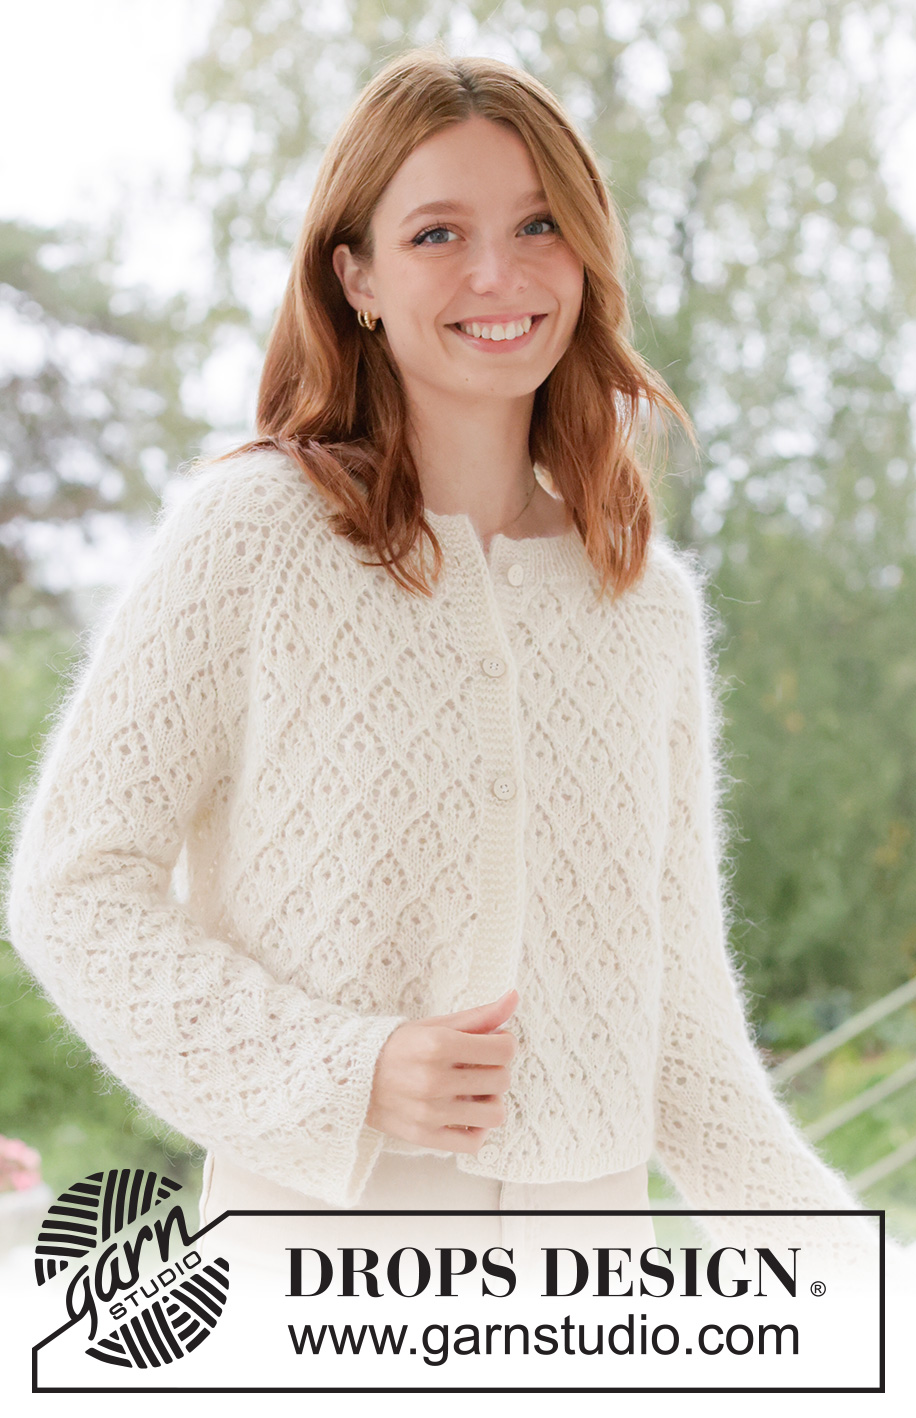
Knitted jacket in DROPS Alpaca and DROPS Kid-Silk. The piece is worked top down with raglan, lace pattern and bands with I-cord. Sizes XS - XXXL.
DROPS 266-2 |
||||||||||||||||
|
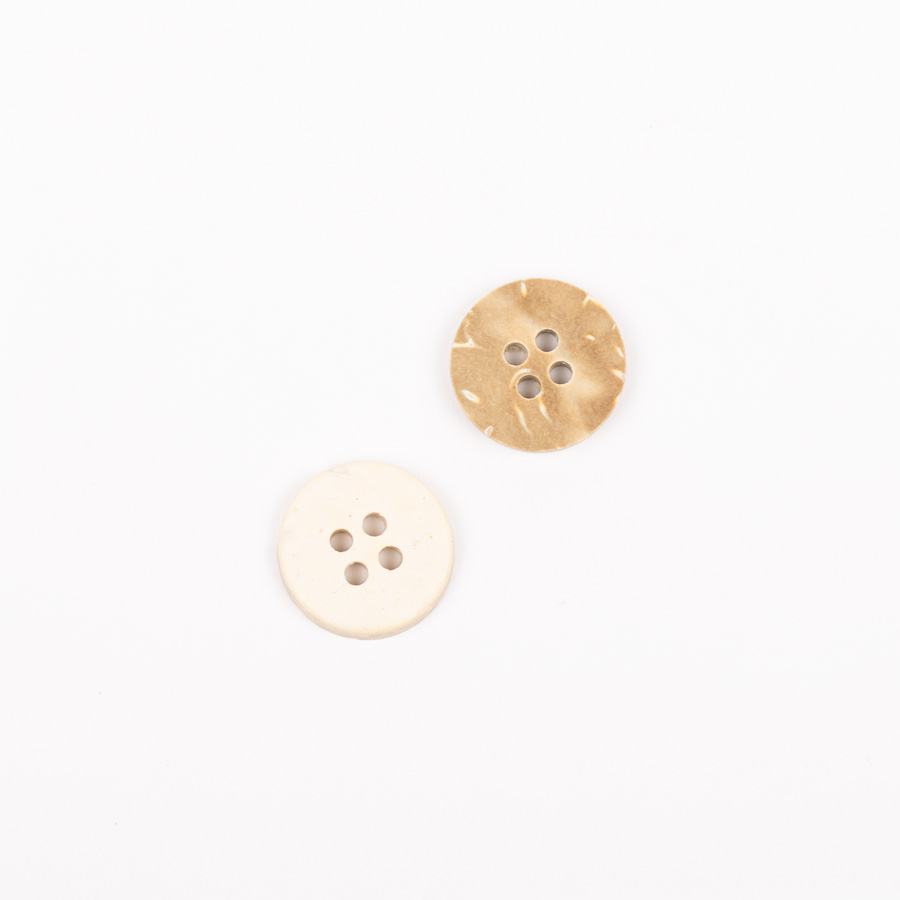
------------------------------------------------------- EXPLANATIONS FOR THE PATTERN: ------------------------------------------------------- GARTER STITCH (worked back and forth): Knit all rows, from both the right and wrong side. 1 ridge in height = knit 2 rows. BANDS WITH I-CORD: BEGINNING OF ROW: Work the band as follows (7 stitches): Slip 1 stitch purl-wise with yarn in front, knit 1, work 5 garter stitches. END OF ROW: Work the band as follows (7 stitches): Work until there are 7 stitches left on the row, work 5 garter stitches, slip 1 stitch purl-wise with yarn in front, knit 1. Work like this from both the right and wrong side. BUTTONHOLES: Work the buttonholes on the right band (when the garment is worn) from the right side, when there are 5 stitches left on the row as follows: ROW 1 (right side): Make 1 yarn over, knit 2 together, knit 1, slip 1 purl-wise with strand in front, knit 1. ROW 2 (wrong side): Work the band as before, knit the yarn over to leave a hole. The first buttonhole is worked on the first row from the right side after the neck is finished. Then work the other 5-5-5-5-5-6-6 buttonholes with 7-7-7½-8-8-7-7½ cm between each one. PATTERN: See diagrams A.1 to A.7. Choose diagram for your size (applies to diagrams A.1 and A.5). The diagrams show all rows in the pattern from the right side. RAGLAN: The raglan-stitches are worked in stocking stitch. Increase 1 stitch by making 1 yarn over. On the next row purl the yarn over from the wrong side to leave a hole, then work the new stitch into the pattern as shown in the diagrams. SLEEVE TIP: When knitting up stitches under the sleeve, you can get a small hole in the transition between stitches on the body and sleeve. This hole can be closed by picking up the strand between 2 stitches and working this strand twisted together with the first stitch between body and sleeve. DECREASE TIP: Decrease 1 stitch on each side of the marker-thread as follows: Work until there are 3 stitches left before the marker-thread, knit 2 together, knit 2 (marker-thread sits between these 2 stitches), slip 1 stitch knit-wise, knit 1 and pass the slipped stitch over the knitted stitch (2 stitches decreased). ------------------------------------------------------- START THE PIECE HERE: ------------------------------------------------------- JACKET – SHORT OVERVIEW OF THE PIECE. The pattern uses both long and short needles; start with the length which fits the number of stitches and change when necessary. The neck and yoke are worked back and forth with circular needle, from mid front and top down. When the yoke is finished, it is divided for body and sleeves and the body continued back and forth, while the sleeves wait. The sleeves are worked in the round, top down. If there is a «0» in your chosen size, skip the information and go straight to the next instruction. NECK: Cast on 95-111-111-111-127-127-127 stitches with circular needle size 3.5 mm, 1 strand DROPS Alpaca and 1 strand DROPS Kid-Silk (2 strands). Work the first row from the wrong side: 7 stitches according to BANDS WITH I-CORD – read explanation above, work rib (purl 1, knit 1) until there are 8 stitches left, purl 1 and 7 stitches according to bands with I-cord. Continue this rib for 3-3-3-4-4-4-4 cm, finishing after a row from the wrong side. Insert 1 marker inside 1 band (mid-front). The piece is measured from here. YOKE: Change to circular needle size 4.5 mm. Insert 4 markers, without working the stitches and each marker inserted in a knitted stitch (raglan-stitch). You increase for raglan on each side of the raglan-stitches. Count 17-21-21-21-25-25-25 stitches (= left front piece), insert marker-1 in the next stitch, count 19-19-19-19-19-19-19 stitches (= sleeve), insert marker-2 in the next stitch, count 19-27-27-27-35-35-35 stitches (= back piece), insert marker-3 in the next stitch, count 19-19-19-19-19-19-19 stitches (= sleeve), insert marker-4 in the next stitch. There are 17-21-21-21-25-25-25 stitches left (= right front piece). Work PATTERN back and forth with the bands as before on each side. AT THE SAME TIME increase for RAGLAN on each side of the raglan-stitches– read descriptions above for pattern and how to increase for raglan. Work as follows from the right side: The band as before, work 1 stitch in stocking stitch, A.1 across 3-7-7-7-11-11-11 stitches, A.2 across 6 stitches (= left front piece), increase for raglan before and after the raglan-stitch, work A.3 across 5 stitches, A.4 across 8 stitches and A.2 across 6 stitches (= sleeve), increase for raglan before and after the raglan-stitch, work A.3 across 5 stitches, A.4 across the next 8-16-16-16-24-24-24 stitches (1-2-2-2-3-3-3 times in width), A.2 across 6 stitches (= back piece), increase for raglan before and after the raglan-stitch, work A.3 across 5 stitches, A.4 across 8 stitches, A.2 across 6 stitches (= sleeve), increase for raglan before and after the raglan-stitch, work A.3 across 5 stitches, A.5 across 4-8-8-8-12-12-12 stitches, 1 stitch in stocking stitch – read BUTTONHOLES, see explanation above and work the band as before. (= right front piece). Continue the pattern and increase for raglan as above every 2nd row, on each side of the raglan-stitches until the diagrams are finished in height. Remember to maintain the knitting tension. You have increased a total of 8 times for raglan = 159-175-175-175-191-191-191 stitches. There are 35 stitches on each sleeve, 37-45-45-45-53-53-53 stitches on the back piece and 26-30-30-30-34-34-34 stitches on each front piece (the raglan-stitches are included in the stitch count for the front and back pieces). Continue increasing for raglan every 2nd row and continue the pattern as follows: Work the band as before, 1 stitch in stocking stitch, A.1 across 3-7-7-7-11-11-11 stitches, A.4 across 8 stitches, A.2 across 6 stitches (= left front piece), increase for raglan before and after the raglan-stitch, work A.3 across 5 stitches, A.4 across 24 stitches A.2 across 6 stitches (= sleeve), increase for raglan before and after the raglan-stitch, work A.3 across 5 stitches, A.4 across the next 24-32-32-32-40-40-40 stitches (3-4-4-4-5-5-5 times in width), A.2 across 6 stitches (= back piece), increase for raglan before and after the raglan-stitch, work A.3 across 5 stitches, A.4 across 24 stitches, A.2 across 6 stitches (= sleeve), increase for raglan before and after the raglan-stitch, work A.3 across 5 stitches, A.4 across 8 stitches, A.5 across 4-8-8-8-12-12-12 stitches, 1 stitch in stocking stitch, and the band as before (= right front piece). Continue the pattern and increase for raglan as above every 2nd row on each side of the raglan-stitches until the diagrams are finished in height. You have increased a total of 16 times for raglan and the diagrams twice in height in all sizes = 223-239-239-239-255-255-255 stitches. In sizes XS and S the sleeve-increases are finished. In sizes M and L continue increasing as before another 4 times (i.e., ½ repeat of the diagrams in height) and in sizes XL, XXL and XXXL increase another 8 times (i.e. 1 more repeat of the diagrams in height). A total of 16-16-20-20-24-24-24 increases for raglan (the diagrams have been worked 2-2-2½-2½-3-3-3 times in height) = 223-239-271-271-319-319-319 stitches: 51-51-59-59-67-67-67 stitches on each sleeve, 53-61-69-69-85-85-85 stitches on the back piece and 34-38-42-42-50-50-50 stitches on each front piece (the raglan-stitches are included in the stitch count for the front and back pieces). The sleeve-increases are finished in all sizes. Now continue to increase only on the front and back pieces. In sizes M and L you are in the middle of a repeat in height. When continuing, the pattern should continue as before on the front and back pieces, but on the sleeves, the pattern should start on the 1st row of the diagrams, as in the other sizes. Continue the pattern and increase for raglan every 2nd row as follows: Work the band as before, 1 stitch in stocking stitch, A.1 across 3-7-7-7-11-11-11 stitches, A.4 across 16-16-16-16-24-24-24 stitches, A.2 across 6-6-10-10-6-6-6 stitches (= left front piece), increase for raglan, knit the raglan-stitch, work A.6 across 5 stitches, A.4 across 40-40-48-48-56-56-56 stitches, A.7 across 6 stitches (= sleeve), knit the raglan-stitch, increase for raglan, work A.3 across 5-5-9-9-5-5-5 stitches, A.4 across 40-48-48-48-72-72-72 stitches (5-6-6-6-9-9-9 times in width), A.2 across 6-6-10-10-6-6-6 stitches (= back piece), increase for raglan, knit the raglan-stitch, work A.6 across 5 stitches, A.4 across 40-40-48-48-56-56-56 stitches, A.7 across 6 stitches (= sleeve), knit the raglan-stitch increase for raglan, work A.3 across 5 stitches, A.4 across 16-16-16-16-24-24-24 stitches, A.5 across 4-8-8-8-12-12-12 stitches, 1 stitch in stocking stitch and the band as before (right front piece). Continue this pattern and increase 8 times for raglan on the front and back pieces (a total of 24-24-28-28-32-32-32 increases for raglan on the front and back pieces) = 255-271-303-303-351-351-351 stitches. In sizes XS, S, M, XL and XXL the raglan-increases on the front and back pieces are finished. In sizes L and XXXL continue the raglan-increases as above another 4 times (i.e., ½ repeat of the diagrams in height). All sizes: A total of 24-24-28-32-32-32-36 increases for raglan on the front and back pieces. The diagrams are worked 3-3-3½-4-4-4-4½ times in height. In some sizes you have worked a ½ repeat in height of the diagrams. Make sure you continue the pattern on the correct row. There are 255-271-303-319-351-351-367 stitches: 51-51-59-59-67-67-67 stitches on each sleeve, 69-77-85-93-101-101-109 stitches on the back piece and 42-46-50-54-58-58-62 stitches on the front pieces. The piece measures approx. 20-20-23-27-27-27-30 cm from the marker mid-front. Now divide for the body and sleeves. DIVIDE FOR BODY AND SLEEVES: Continue the band and pattern across the first 42-46-50-54-58-58-62 stitches (= front piece), place the next 51-51-59-59-67-67-67 stitches on a stitch holder for the sleeve, cast on 11-11-11-11-11-19-19 stitches (mid-under the sleeve), continue the pattern across the next 69-77-85-93-101-101-109 stitches (= back piece), place the next 51-51-59-59-67-67-67 stitches on a stitch holder for the sleeve, cast on 11-11-11-11-11-19-19 stitches (mid-under the sleeve), continue the pattern and band across the last 42-46-50-54-58-58-62 stitches (= front piece). BODY: = 175-191-207-223-239-255-271 stitches. Purl 1 row from the wrong side, with the bands as before. On the next row from the right side, continue the pattern and the bands. The raglan-stitches and the cast-on stitches under each sleeve are worked into the pattern, as follows: Work the band as before, 1 stitch in stocking stitch, A.1 across 3-7-7-7-11-11-11 stitches, A.4 until there are 11-15-15-15-19-19-19 stitches left, work A.5 across 4-8-8-8-12-12-12 stitches, 1 stitch in stocking stitch and the band as before. Continue this pattern until the piece measures 35-37-39-41-42-44-46 cm from the marker mid-front. Finish after a complete or a half repeat of the diagrams in height. Work 2 rows of stocking stitch with the bands as before. On the next row from the right side begin the rib. AT THE SAME TIME increase 18-20-22-24-26-28-30 stitches evenly on the row (do not increase across the bands) = 193-211-229-247-265-283-301 stitches. Work as follows: Change to circular needle size 3.5 mm. Work the band as before, rib (knit 1, purl 1 – remember to increase) until there are 8 stitches left, knit 1 and work the band as before. When the rib measures 1-1-1-1-2-2-2 cm, cast off slightly loosely with knit above knit and purl above purl. The jacket measures approx. 37-39-41-43-45-47-49 cm from the marker mid-front and 42-44-46-48-50-52-54 cm from the shoulder. SLEEVES: Place the 51-51-59-59-67-67-67 sleeve-stitches from one stitch holder onto circular needle size 4,5 mm. Knit up 1 stitch in each of the 11-11-11-11-11-19-19 cast-on stitches under the sleeve - read SLEEVE TIP, and continue the pattern across the sleeve-stitches (making sure you begin on the correct row in the diagrams) = 62-62-70-70-78-86-86 stitches. Insert a marker in the middle stitch of the knitted-up stitches under the sleeve. Work to the marker-stitch (the round begins here). Continue as follows: Knit 5-5-5-5-5-9-9, continue A.6 from the yoke across 5 stitches, A.4 across the next 40-40-48-48-56-56-56 stitches, A.7 across 6 stitches and knit 6-6-6-6-6-10-10. Continue this pattern in the round. AT THE SAME TIME, when the sleeve measures 1 cm from the division, decrease mid-under the sleeve – read DECREASE TIP as follows: Decrease 2 stitches every 1-1-1-1-1-1½-1½ cm a total of 7-7-7-7-7-11-11 times = 48-48-56-56-64-64-64 stitches. After the last decrease, A.4 will fit on the round. Start the round before the marker-stitch and work A.4 in the round until the sleeve measures 44-44-42-39-37-38-36 cm from the division. Finish after a complete or a half repeat of the diagram in height. Knit 2 rounds Change to double pointed needles size 3.5 mm. Work rib (knit 1, purl 1), AT THE SAME TIME increase 6 stitches evenly on the first round = 54-54-62-62-70-70-70 stitches. When the rib measures 1-1-1-1-2-2-2 cm, cast off slightly loosely with rib. The sleeve measures approx. 46-46-44-41-40-41-39 cm from the division. ASSEMBLY: Sew the buttons onto the left band. |
||||||||||||||||
Diagram explanations |
||||||||||||||||
|
||||||||||||||||
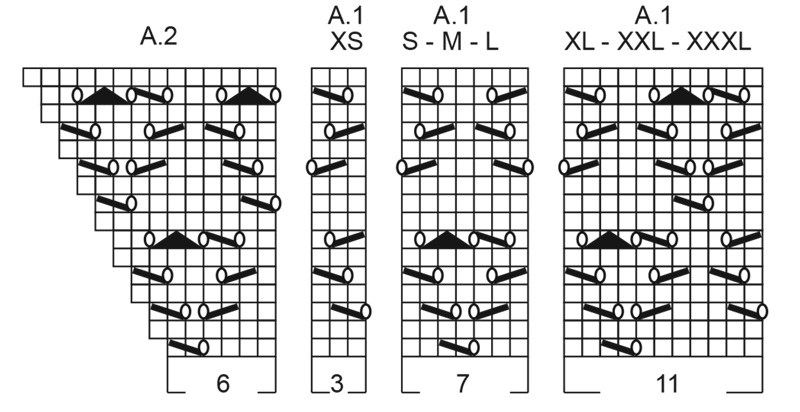 |
||||||||||||||||
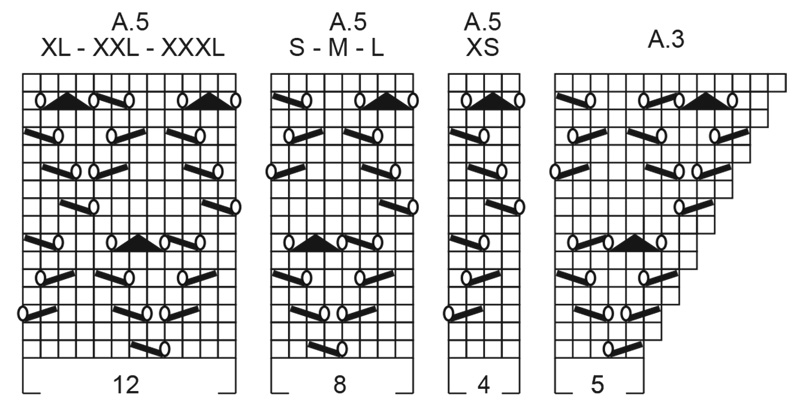 |
||||||||||||||||
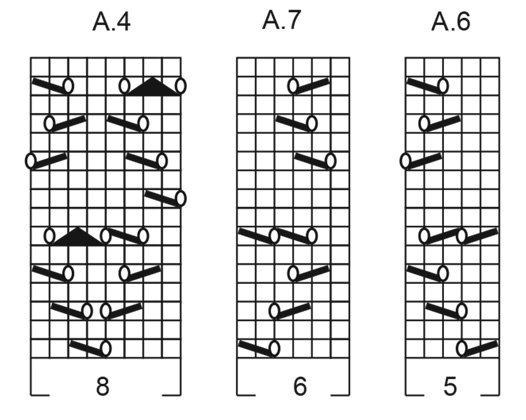 |
||||||||||||||||
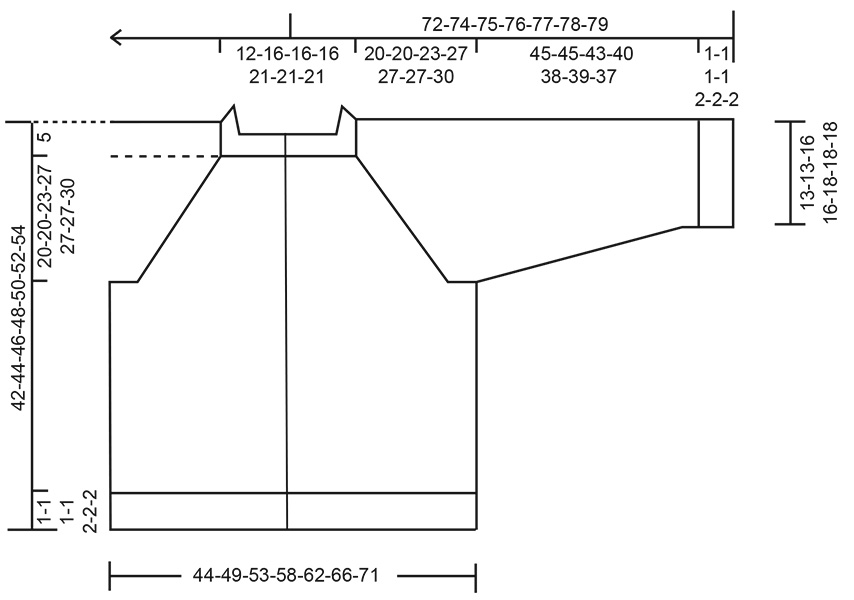 |
||||||||||||||||
Have you finished this pattern?Tag your pictures with #dropspattern #lacediamondcardigan or submit them to the #dropsfan gallery. Do you need help with this pattern?You'll find 23 tutorial videos, a Comments/Questions area and more by visiting the pattern on garnstudio.com. © 1982-2026 DROPS Design A/S. We reserve all rights. This document, including all its sub-sections, has copyrights. Read more about what you can do with our patterns at the bottom of each pattern on our site. |
||||||||||||||||






With over 40 years in knitting and crochet design, DROPS Design offers one of the most extensive collections of free patterns on the internet - translated to 17 languages. As of today we count 333 catalogues and 12532 patterns translated into English (UK/cm). 12532
We work hard to bring you the best knitting and crochet have to offer, inspiration and advice as well as great quality yarns at incredible prices! Would you like to use our patterns for other than personal use? You can read what you are allowed to do in the Copyright text at the bottom of all our patterns. Happy crafting!
Post a comment to pattern DROPS 266-2
We would love to hear what you have to say about this pattern!
If you want to leave a question, please make sure you select the correct category in the form below, to speed up the answering process. Required fields are marked *.