
Popular categories
Looking for a yarn?


Comments / Questions (47)
![]() Lilian wrote:
Lilian wrote:
Nadat het patroon A1 is gebreid van de pas, staat er: brei nu verder tot 20 cm na de opzetrand voor maat S. Kijk je in het patroon dan zie je dat het 20 cm na de boord moet zijn. De opzetrand is voor mij de eerste toer . Klopt dat?
04.06.2026 - 06:29DROPS Design answered:
Dag Lilian,
Het is 20 cm vanaf de opzetrand. Als je de horizontale stippellijn vlak onder de schouder in de maattekening door zou trekken dan kom je ook uit bij de opzetrand midden voor.
04.06.2026 - 20:49
![]() Blanca wrote:
Blanca wrote:
Cuando en A-1 dice:deslizar 1 punto como de dcho. ,1dcho. y pasar el punto deslizado sobre el punto trabajado. Deberia decir, deslizar 1 punto como de dcho."retorcido", 1 dcho.,y pasar el punto deslizado sobre el punto trabajado.
06.05.2026 - 12:00DROPS Design answered:
Hola Blanca, parece que hay una errata en la traducción, debería ser deslizar 1 punto como de derecho retorcido, 1 derecho retorcido y pasar el punto deslizado sobre el punto trabajado.
17.05.2026 - 20:07
![]() Vilmantė wrote:
Vilmantė wrote:
Hello, what size should i choose for 98cm size L or XL?
06.05.2026 - 09:36DROPS Design answered:
Dear Mrs Vilmantè, read more on sizing and ease here - this will help you choosing the best appropriate size. Happy knitting!
06.05.2026 - 16:40
![]() Sharon Hunt wrote:
Sharon Hunt wrote:
Hello, the pattern says 17 sts per inch. I am a bit confused by the response that it is “quite an unusual tension for Paris” when that is the tension given in the pattern. I got that gauge, as in “spi. What I did not achieve is the rows per inch so maybe that is what is unusual. Is it possible for one of your test knitters to take a look at this or do a test swatch again? Thank you.
24.04.2026 - 16:00DROPS Design answered:
Dear Mrs Hunt, 17 sts is a usual tension for Paris - see shadecard, not an "unusual" for the width, about height, you might have to adjust if you get more/less rows, this can happen and can be easily adjusted working more/less row (but right you might need more yarn if you need to work more rows than 22 rows), but with the tension recommanded you will get the finished measurements. Feel free to ask your DROPS Store even per mail or telephone, they might have some tipps to help you further. Hope it can help. Happy knitting!
24.04.2026 - 16:51
![]() Sharon Hunt wrote:
Sharon Hunt wrote:
Made this and did not get rows per inch on either 5 or 5,5 so I had to purchase more yarn. I am making it again and decided to work swatch on 6 mm. Am getting 4,5 sts per inch and very lose sts. Which means I have to knit this with a 5,5 needle to get sts per inch and not rpi. The first sweater is ok but rpi is 3.5. Why is that?
24.04.2026 - 07:34DROPS Design answered:
Dear Mrs Hunt, you should get 17 sts for 4" in width, this means approx. 4,25 stitches per inch; this is quite a usual tension for DROPS Paris; but note that the needle size has to be fixed depending on your own knitting tension (read more here) as long as you get the correct number of stitches in width for 4" then you will get the correct finished measurements using same tension. Happy knitting!
24.04.2026 - 09:29
![]() Donna Rosander wrote:
Donna Rosander wrote:
How do you do? “Slip 1 stitch as if to knit {I know how to do this), slip the next stitch and place it back twisted on the left needle (this what I do not understand)
25.02.2026 - 20:52DROPS Design answered:
Hi Donna, This second stitch is knitted twisted (so you can either turn it around on the left needle, which is what this instruction is describing) and knit it as usual through the front, or you can knit through the back stitch loop (without slipping it off and turning it) if this is easier for you. Regards, Drops Team.
26.02.2026 - 06:05
![]() Agnieszka wrote:
Agnieszka wrote:
Dzień dobry, Czy gdzieś znajdę tutorial video do tej bluzeczki ? Oczywiście może być płatny. Pozdrawiam
26.10.2025 - 10:08DROPS Design answered:
Witaj Agnieszko, niestety nie mamy na naszej stronie video na cały ten wzór, tylko na wykonanie poszczególnych oczek/ściegów/technik. Wpisz na YT Echo Mountain Top i wydaje mi się, że był wykonywany na kanale Anny Cierniak. Pozdrawiamy!
27.10.2025 - 15:33
![]() Merete Petersen wrote:
Merete Petersen wrote:
Jeg mangler målskema for de enkelte størrelser
03.09.2025 - 07:54DROPS Design answered:
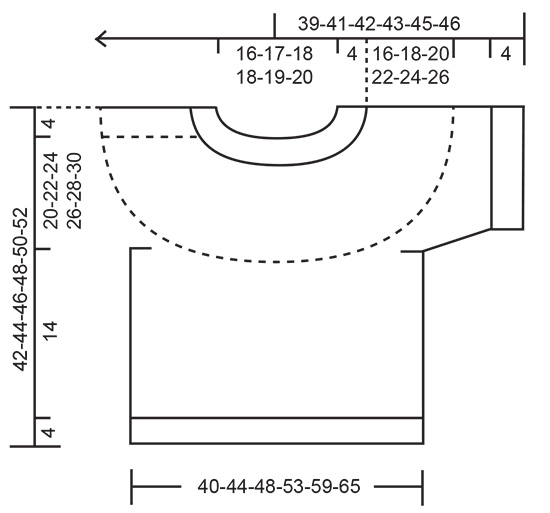
Hej Merete. Du hittar en målskisse längst ned på opskriften , med plaggets mål i cm i alla storlekar. Mvh DROPS Design
03.09.2025 - 09:33
![]() Mirka wrote:
Mirka wrote:
Hi, bij breien van patroon A.1. voor maat M is er meerdering in rij 7 aan het begin en einde van het herhaalen patroon. Ik snap niet waar ik moet de omslag plaatsen, want in de rij 6 begin je met averechtse steek en in rij 7 met recht, omslag en ga je door met gedraaid rechts. Moet ik gewoon de averechtse steek als recht breien, omslag doen en dan verder in het patroon? Alvast bedankt voor de antwoord.
03.08.2025 - 08:35DROPS Design answered:
Dag Mieke,
In rij 7 begin je inderdaad met een rechte steek (dus een rechte steek boven een averechte steek van de vorige naald) en dan een omslag. Aan het eind maak je ook weer een omslag. Op de naald 8 brei je de eerste 2 steken van de herhaling recht en de laatste steek ook.
03.08.2025 - 09:40
![]() Anne Dahlgren wrote:
Anne Dahlgren wrote:
Efter A1 har jeg strikket 12 x19 masker det giver 228, men i opskriften står 216, hvilket er forkert. Når jeg del til for og bagstykke samt ærmer fordeler jeg så 2 x 66 og 2 x 48 i stedet for 62 og 46? Og skal jeg stadig slå 6 masker ekstra op efter at have sat 46 til side til hvert ærme?
19.05.2025 - 18:50DROPS Design answered:
Hej Anne, i størrelse small skal du kun have 18 masker (ikke 19) når du er færdig med diagrammet. 12 x 18 = 216 masker :)
22.05.2025 - 11:38
|
|||||||||||||||||||||||||
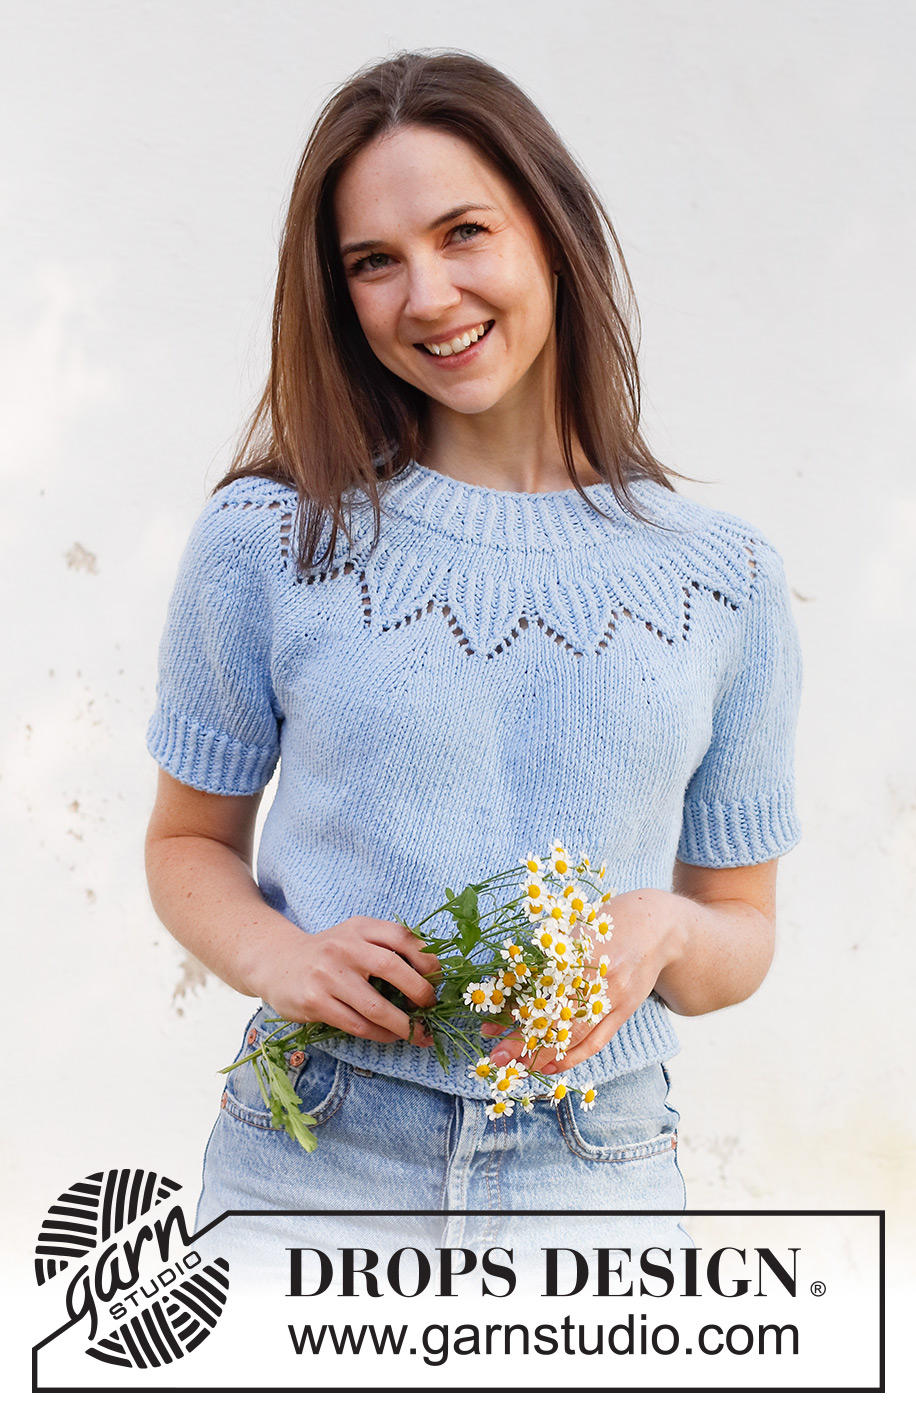
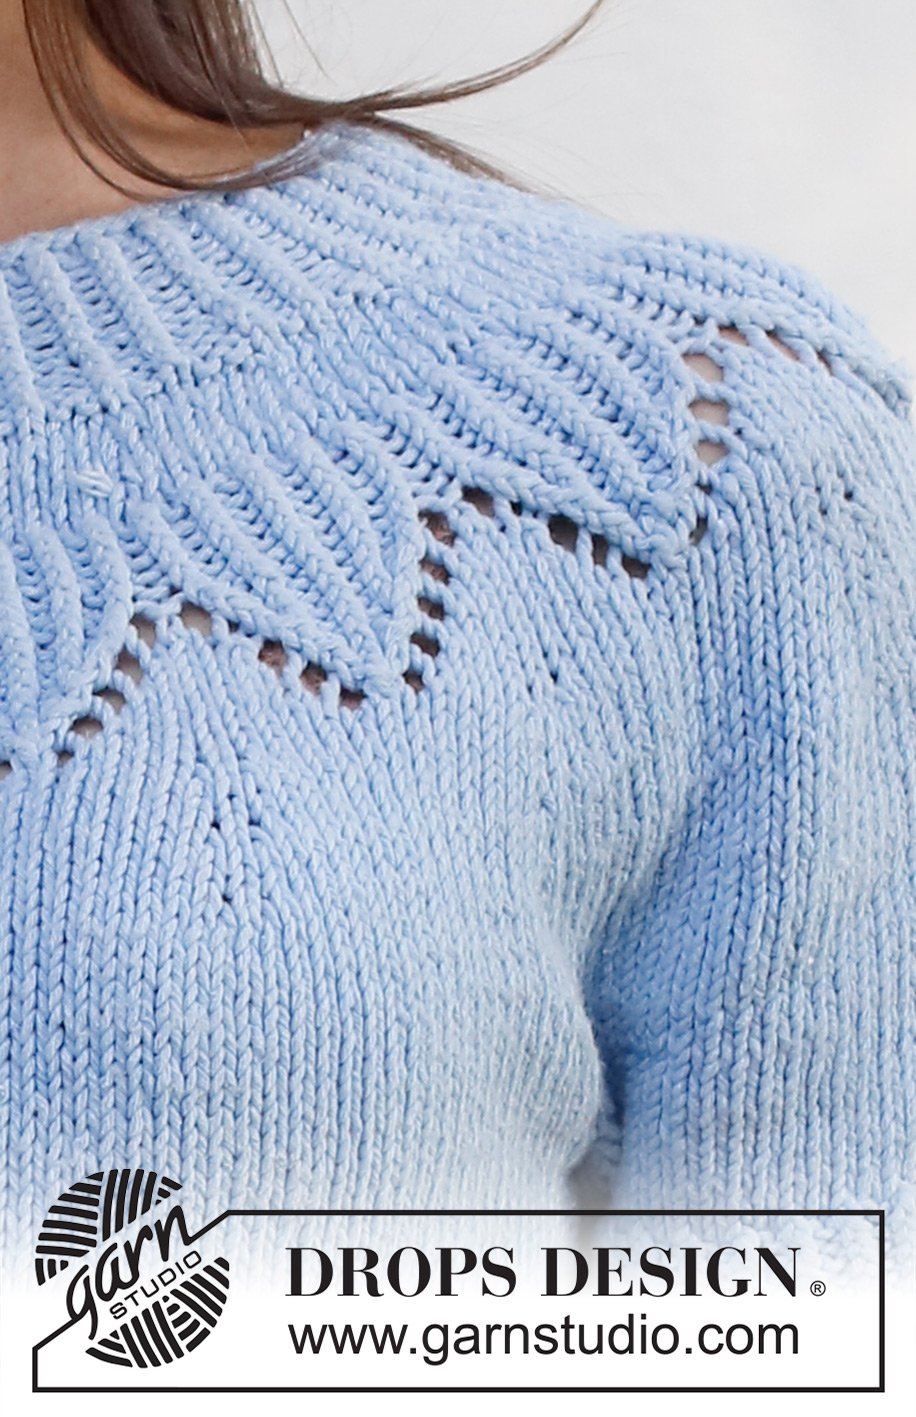
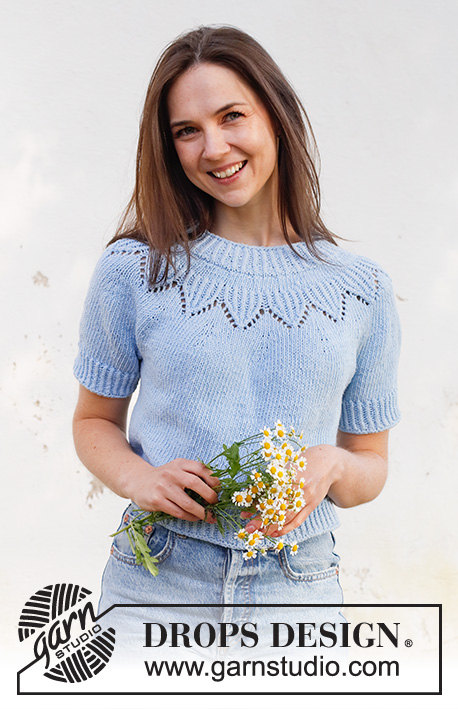
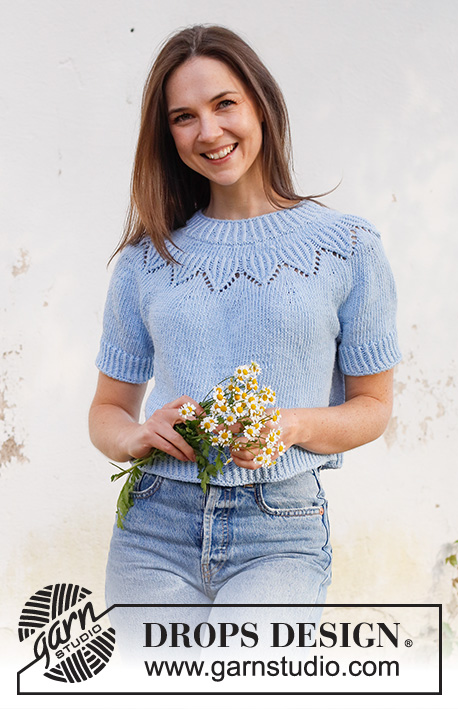
Echo Mountain Top#echomountaintop |
|||||||||||||||||||||||||
 |
 |
||||||||||||||||||||||||
Knitted jumper in DROPS Paris. The piece is worked top down, with round yoke, lace pattern and short sleeves. Sizes S - XXXL.
DROPS 230-19 |
|||||||||||||||||||||||||
|
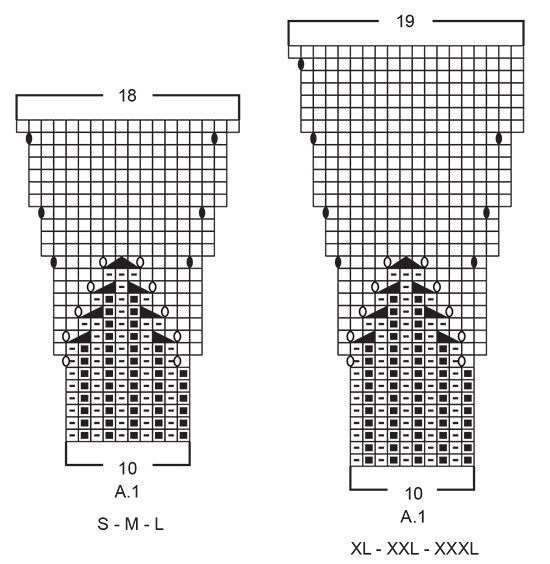
------------------------------------------------------- EXPLANATIONS FOR THE PATTERN: ------------------------------------------------------- PATTERN: See diagram A.1. Choose diagram for your size. DECREASE TIP (for sleeves): Decrease 1 stitch on either side of the marker thread as follows: Work until there are 3 stitches left before the marker thread, knit 2 together, knit 2 (marker thread sits between these 2 stitches), slip 1 stitch as if to knit, knit 1 and pass the slipped stitch over the knitted stitch (2 stitches decreased). ------------------------------------------------------- START THE PIECE HERE: ------------------------------------------------------- JUMPER – SHORT OVERVIEW OF THE PIECE: The neck and yoke are worked in the round with circular needle, from mid back and top down. The yoke is divided for body and sleeves and the body is continued in the round with circular needle. The sleeves are worked in the round, with double pointed needles/short circular needle. NECK: Cast on 80-84-88-88-92-96 stitches with short circular needle size 4 mm and DROPS Paris. Knit 1 round, then work rib (knit 1 twisted, purl 1) in the round for 3 cm. On the next round increase every other purl-1 to purl-2 by making 1 yarn over after every 2nd purled stitch = 100-105-110-110-115-120 stitches. Continue this rib. NOTE: On the first round purl the yarn overs twisted to avoid holes. When the rib measures 4 cm, knit 1 round where you increase 8-9-10-14-17-20 stitches evenly spaced = 108-114-120-124-132-140 stitches. YOKE: Change to circular needle size 5 mm. Work stocking stitch for 2-3-3-4-4-5 cm – AT THE SAME TIME on the last round increase 12-16-20-26-28-30 stitches evenly spaced = 120-130-140-150-160-170 stitches. REMEMBER THE KNITTING TENSION! Work A.1, 12-13-14-15-16-17 times on the round and increase as shown in the diagram. When A.1 has been completed in height there are 216-234-252-285-304-323 stitches. Continue with stocking stitch – AT THE SAME TIME on the first round increase 0-2-8-3-4-1 stitches evenly spaced = 216-236-260-288-308-324 stitches. Work until the piece measures 20-22-24-26-28-30 cm from the cast-on edge. Now divide for the body and sleeves as follows: Work 31-34-37-41-45-49 stitches (½ back piece), place the next 46-50-56-62-64-64 stitches on a thread for the sleeve, cast on 6-6-8-8-10-12 stitches (in side under sleeve), work 62-68-74-82-90-98 stitches (front piece), place the next 46-50-56-62-64-64 stitches on a thread for the sleeve, cast on 6-6-8-8-10-12 stitches (in side under sleeve), work 31-34-37-41-45-49 stitches (½ back piece). The body and sleeves are finished separately. THE PIECE IS NOW MEASURED FROM HERE! BODY: = 136-148-164-180-200-220 stitches. Continue with stocking stitch for 14 cm. Knit 1 round where you increase 14-14-16-18-20-22 stitches evenly spaced = 150-162-180-198-220-242 stitches. Change to circular needle size 4 mm. Work rib (knit 1 twisted, purl 1) for 4 cm. Cast off with knit, a little loosely. The jumper measures approx. 42-44-46-48-50-52 cm from the shoulder down. SLEEVES: Place the 46-50-56-62-64-64 stitches from the thread on the one side of the piece on short circular needle/double pointed needles size 5 mm and knit up 1 stitch in each of the 6-6-8-8-10-12 stitches cast on under the sleeve = 52-56-64-70-74-76 stitches. Insert a marker thread in the middle of the 6-6-8-8-10-12 stitches under the sleeve. Allow the thread to follow your work onwards; it will be used when decreasing under the sleeve. Start at the marker thread and work stocking stitch in the round for 3 cm. Now decrease 2-2-2-2-0-0 stitches under the sleeve – read DECREASE TIP = 50-54-62-68-74-76 stitches. Continue working until the sleeve measures 7-6-5-4-3-2 cm from the division. Change to double pointed needles size 4 mm and work rib (knit 1 twisted, purl 1) for 4 cm. Cast off with knit, a little loosely. The sleeve measures approx. 11-10-9-8-7-6 cm. Work the other sleeve in the same way. |
|||||||||||||||||||||||||
Diagram explanations |
|||||||||||||||||||||||||
|
|||||||||||||||||||||||||
 |
|||||||||||||||||||||||||
 |
|||||||||||||||||||||||||
Have you finished this pattern?Tag your pictures with #dropspattern #echomountaintop or submit them to the #dropsfan gallery. Do you need help with this pattern?You'll find 31 tutorial videos, a Comments/Questions area and more by visiting the pattern on garnstudio.com. © 1982-2026 DROPS Design A/S. We reserve all rights. This document, including all its sub-sections, has copyrights. Read more about what you can do with our patterns at the bottom of each pattern on our site. |
|||||||||||||||||||||||||


With over 40 years in knitting and crochet design, DROPS Design offers one of the most extensive collections of free patterns on the internet - translated to 17 languages. As of today we count 325 catalogues and 12298 patterns translated into English (UK/cm). 12298
We work hard to bring you the best knitting and crochet have to offer, inspiration and advice as well as great quality yarns at incredible prices! Would you like to use our patterns for other than personal use? You can read what you are allowed to do in the Copyright text at the bottom of all our patterns. Happy crafting!
Post a comment to pattern DROPS 230-19
We would love to hear what you have to say about this pattern!
If you want to leave a question, please make sure you select the correct category in the form below, to speed up the answering process. Required fields are marked *.