
Popular categories
Looking for a yarn?


Comments / Questions (36)
![]() Maria Chiara wrote:
Maria Chiara wrote:
La risposta è del tutto insifficiente e non spiega nulla
01.11.2025 - 10:55
![]() Maria Chiara wrote:
Maria Chiara wrote:
Le diminuzioni per gli scalfi per le taglie piccole sono di 2 maglie: non capisco come sono sufficienti solo 2 maglie per il giro scalfo grazie
28.10.2025 - 14:04DROPS Design answered:
Buonasera Maria Chiara, al momento non sono riportate correzioni per il modello. Buon lavoro!
31.10.2025 - 18:21
![]() Marilyn wrote:
Marilyn wrote:
Looking for a Cricket sweater pattern. Do you have one? Thank you!
04.07.2025 - 20:05DROPS Design answered:
Dear Marilyn, we don't have the specific pattern you indicated but you can search for our sweaters (for men or women) with V-neck to find a similar pattern and adjust it yourself. Happy knitting!
06.07.2025 - 23:02
![]() Delia Köhler wrote:
Delia Köhler wrote:
In der Beschreibung wird das Diagramm a1 nicht angezeigt
11.06.2025 - 15:02DROPS Design answered:
Liebe Frau Köhler, das Diagram A.1 finden Sie bei der Maßskizze, unter den Ärmel, es wird über 2 Maschen und 4 Reihen gestrickt. Viel Spaß beim Stricken!
11.06.2025 - 16:05
![]() Cindy wrote:
Cindy wrote:
Goedemiddag! Ik nader de verkorte schouders in het patroon maat xxl. Nu staat er : NlD 2 brei tot-8 steken over zijn op de naald. NlD 3: Keer het werk, trek de draad aan en brei terug. NlD 4: Brei tot er 4 steken meer over zijn dan de vorige keer. Betekent dit dat ik in rij 4 stop wanneer er nog 12steken op de naald staan? Dat zijn er dan 4 meer dan de 8 vd vorige toer. Of interpreteer ik dit verkeerd? Mvg Cindy
27.03.2025 - 15:11DROPS Design answered:
Dag Cindy,
Je breit steeds tot er nog het aantal aangegeven steken op de linker naald staan. Dus je hoeft het vorige aantal steken er niet bij op te tellen. Gewoon het aantal steken dat in de beschrijving staat aanhouden.
30.03.2025 - 10:28
![]() Sabine Fiedler wrote:
Sabine Fiedler wrote:
Bitte wo finde ich das Diagramm für diese Anleitung ?
16.02.2025 - 16:54DROPS Design answered:
Liebe Frau Fiedler, das Diagram A.1 finden Sie rechts der Maßskizze, unter den Ärmel. Viel Spaß beim Stricken!
17.02.2025 - 09:54
![]() Eva Eriksson wrote:
Eva Eriksson wrote:
Hej igen! Om jag förstod dig rätt så ska jag fortsätta sticka rätstickning över de 6 maskorna även när jag börjar sticka hålmönstret A1?
20.12.2024 - 15:15DROPS Design answered:
HEi Eva. Når du begynner med diagram A.1 strikkes det slätstickning over alle maskene. Om du ser på bildet der modellen holder armene over hodet, ser du kun A.1 (som en sidesøm). mvh DROPS Design
02.01.2025 - 10:05
![]() Eva Eriksson wrote:
Eva Eriksson wrote:
Hej! Jag undrar om man ska fortsätta med rätstickning över de 6 maskorna där hålmönstret A1 är, eller ska jag övergå till slätstickning här?
20.12.2024 - 13:24DROPS Design answered:
Hej Eva, du strikker ret over alle de andre masker :)
20.12.2024 - 14:41
![]() Cornelia wrote:
Cornelia wrote:
Det står att man ska sticka fram och tillbaka på ärmkullen. Men hur många maskor består ärmkullen av ?
14.04.2024 - 17:02DROPS Design answered:
Hei Cornelia. Det kommer an på hvilken str. du strikker (har du fulgt oppskriften og økningene har du 76-80-84-88-92 eller 96 masker). mvh DROPS Design
15.04.2024 - 14:26
![]() Lyn wrote:
Lyn wrote:
Hi, I'm working on Drops 231-37 at the binding off for armhole stage for size large. Instructions say to 'bind off (3 in my size) stitches before beginning the round. Does that mean the 3 stitches just before the 6 stitch lace pattern? Thank you!
24.01.2024 - 08:47DROPS Design answered:
Dear Lyn, in size L you will cast off for the armholes the 3 sts before A.1 + the 2 sts A.1 + the 3 sts after A.1 = 8 sts for each armhole. Happy knitting!
25.01.2024 - 07:56
|
||||||||||||||||
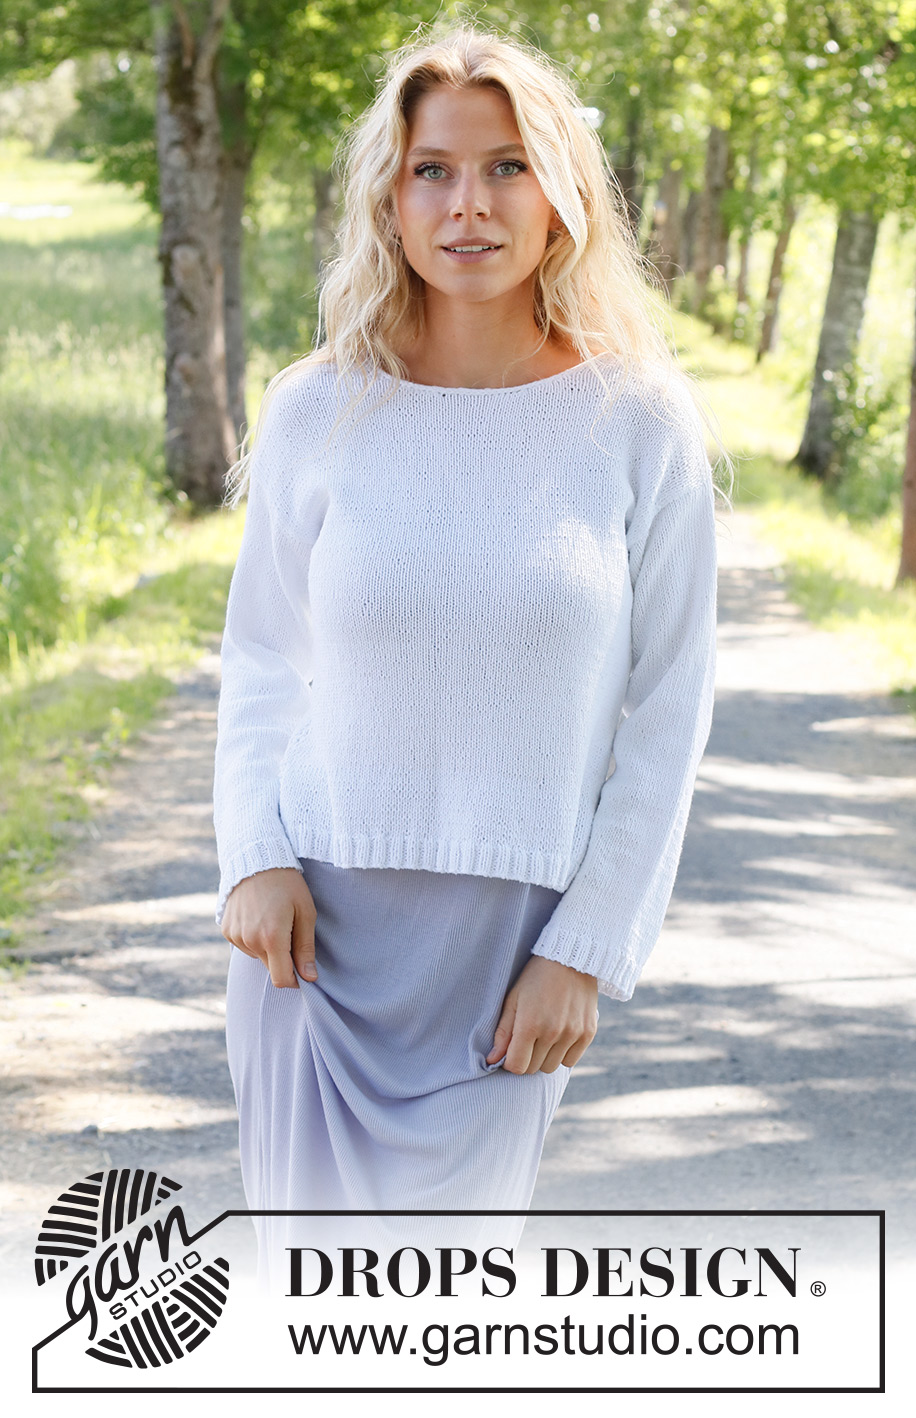
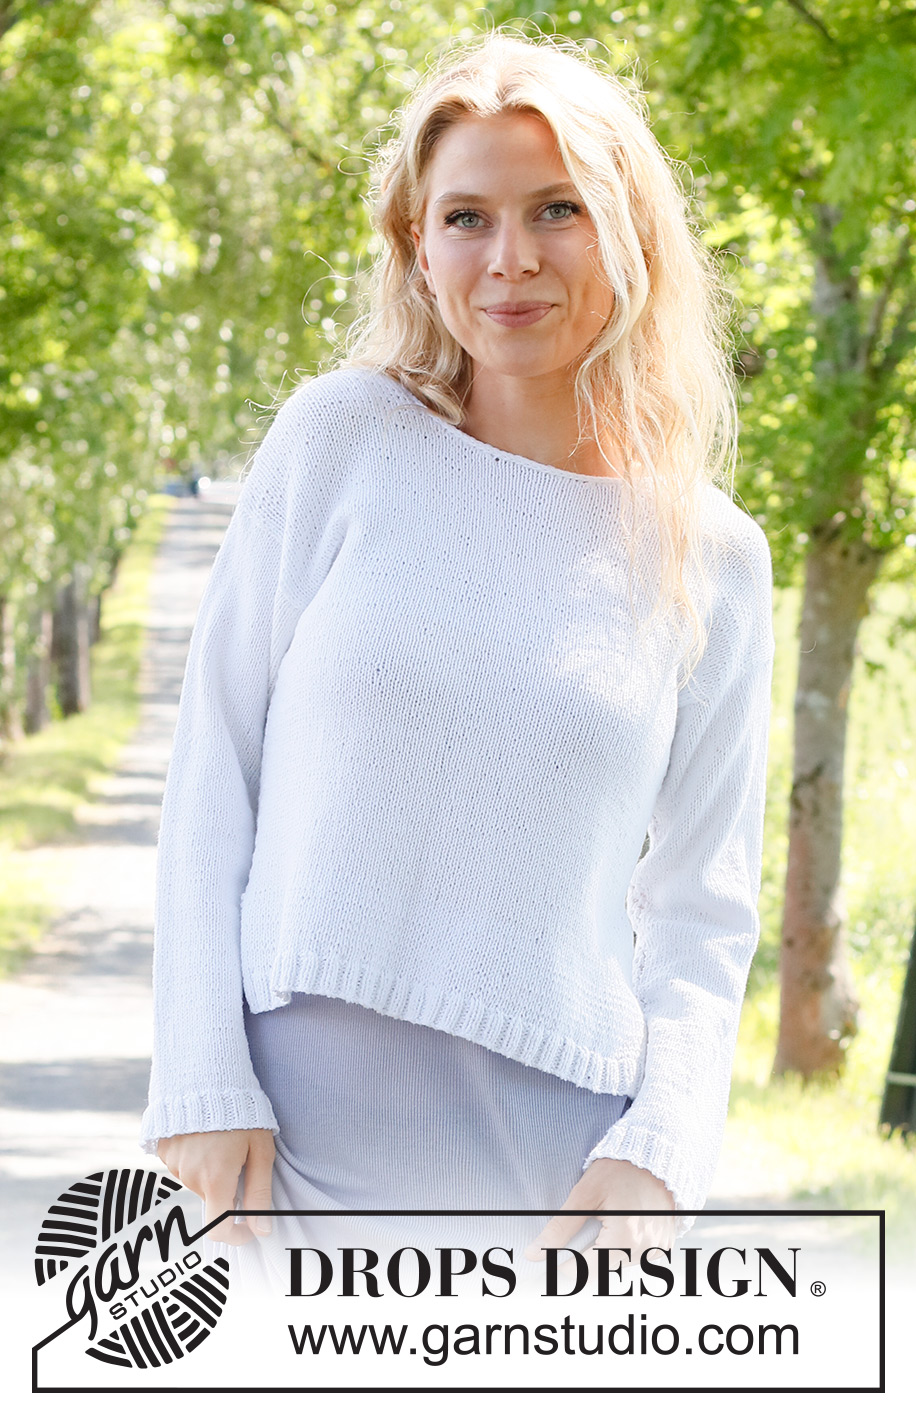
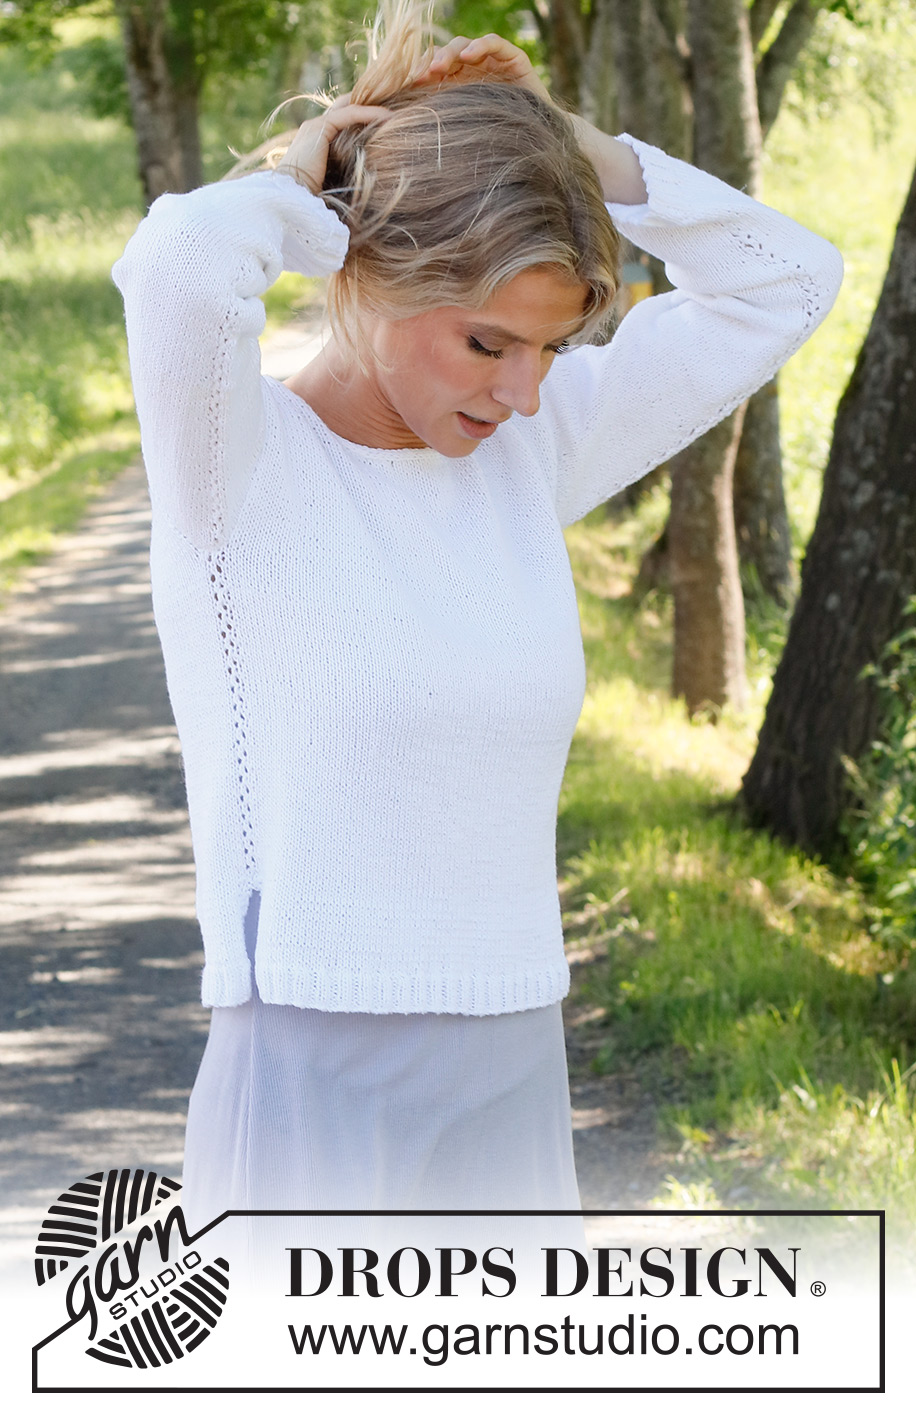
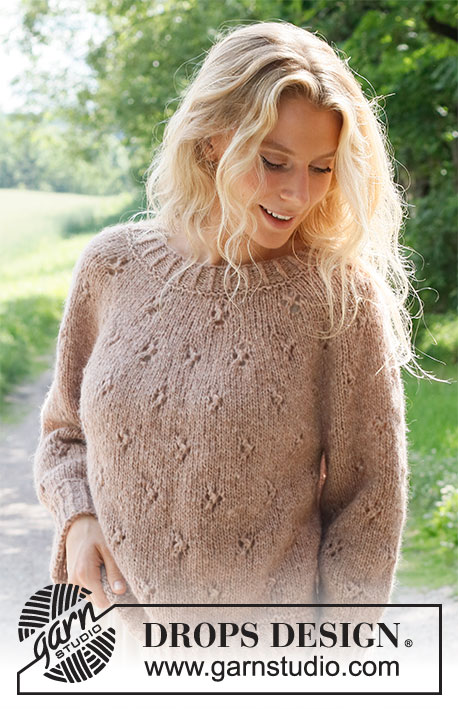
Time to Unwind#timetounwindsweater |
||||||||||||||||
 |
 |
|||||||||||||||
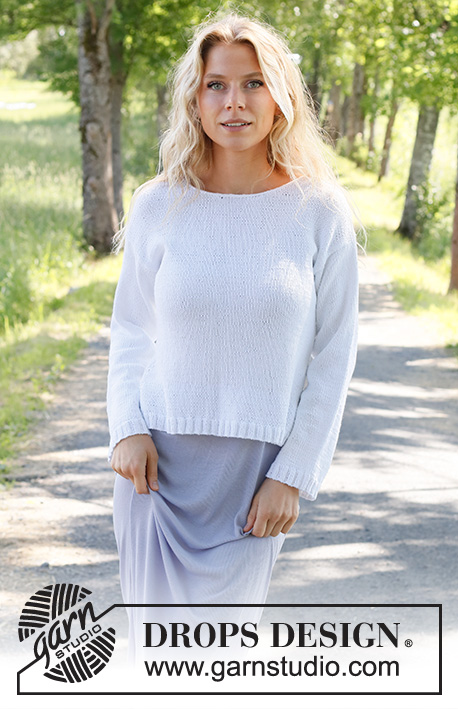
Knitted jumper in DROPS Belle. Piece is knitted bottom up with lace pattern. Size: S - XXXL
DROPS 231-37 |
||||||||||||||||
|
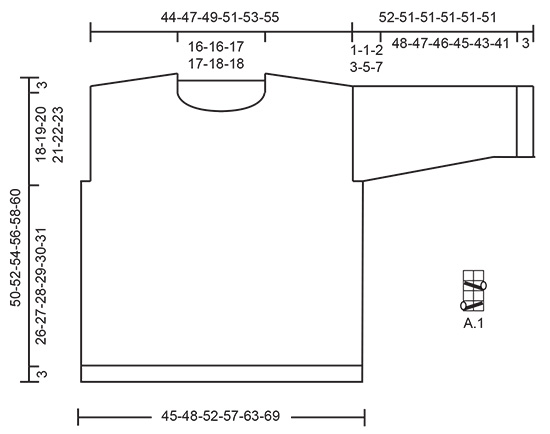
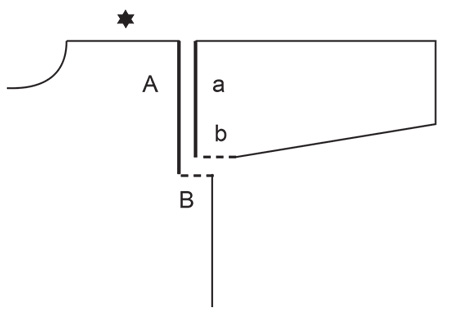
---------------------------------------------------------- EXPLANATION FOR THE PATTERN: ---------------------------------------------------------- GARTER STITCH (back and forth): Knit all rows. 1 ridge vertically = knit 2 rows. PATTERN: See diagram A.1. Diagrams show all rows in pattern seen from the right side. DECREASE TIP (evenly): To calculate how to decrease evenly, use number of stitches on needle (e.g. 106 stitches) and divide stitches by number of decreases to be done (e.g. 18) = 5,8. In this example decrease by knitting approx. every 5th and 6th stitch together. INCREASE TIP (applies to under sleeves): Work until 2 stitches remain before A.1 thread, make 1 yarn over, knit 2, A.1, knit 2, make 1 yarn over (= 2 stitches increased). On next round knit yarns over twisted to avoid holes. Then work the new stitches in stocking stitch. ---------------------------------------------------------- START THE PIECE HERE: ---------------------------------------------------------- JUMPER - SHORT OVERVIEW OF THE PIECE: Work back piece and front piece first back and forth on circular needle separately until vent is done. Then work body in the round on circular needle up to armholes. Then work front piece and back piece back and forth separately. Work sleeves in the round on double pointed needles/circular needle up to sleeve, then work the rest of sleeve back and forth. Finish with a edge with i-cord. BACK PIECE: Cast on 112-124-136-148-164-180 stitches on circular needle size 3 mm with DROPS Belle. Purl 1 row from wrong side. Then work rib as follows: Work 3 stitches in GARTER STITCH - read explanation above, work rib (knit 2/purl 2) until 5 stitches remain on needle, knit 2, work 3 stitches in garter stitch. Continue rib back and forth like this until piece measures 3 cm. Work next row from right side as follows: Work 3 stitches in garter stitch, knit the next 106-118-130-142-158-174 stitches and decrease at the same time 18-24-26-28-32-36 stitches evenly – read DECREASE TIP, work 3 stitches in garter stitch = 94-100-110-120-132-144 stitches. Switch to circular needle size 4 mm. Purl 1 row with 3 stitches in garter stitch in each side. Now work in stocking stitch with 3 stitches in garter stitch in each side until piece measures 8 cm, adjust so that next row is worked from right side. REMEMBER THE KNITTING TENSION! Cut the yarn. Put piece aside. FRONT PIECE: Work the same way as on back piece but do not cut the yarn. BODY: Now insert front piece and back piece on to same circular needle size = 188-200-220-240-264-288 stitches. Work in stocking stitch in the round and continue with GARTER STITCH - read explanation above (= 6 stitches in garter stitch in each side). When 2 ridges have been worked over the 6 stitches, work pattern as follows: Knit 1 stitch. Insert a marker thread here (after this stitch). This is now the beginning of round. Knit over the first 92-98-108-118-130-142, A.1 over the next 2 stitches (= over the middle 2 stitches over the 6 stitches in garter stitch), knit over the next 92-98-108-118-130-142 stitches, work A.1 over the last 2 stitches (= over the middle 2 stitches of the 6 stitches in garter stitch). Continue in the round like this until piece measures 29-30-31-32-33-34 cm from cast-on edge. Now cast off stitches for armholes in each side as follows: Begin 0-0-3-5-9-13 stitches before beginning of round, cast off the next 2-2-8-12-20-28 stitches for armhole, work until 0-0-3-5-9-13 stitches remain before next A.1, cast off the next 2-2-8-12-20-28 stitches for armhole, work the rest of round = 92-98-102-108-112-116 stitches both for front piece and back piece. BACK PIECE: = 92-98-102-108-112-116 stitches. Work back and forth in stocking stitch and with 1 edge stitch in garter stitch in each side. When piece measures 46-48-50-52-54-56 cm, slip the middle 38-38-40-40-42-42 stitches on a thread for neck, and finish each shoulder separately. Then on next row from the neck, cast off 1 stitch = 26-29-30-33-34-36 stitches for shoulder. Continue back and forth with stocking stitch and 1 edge stitch in garter stitch in each side, at the same time on next row from right side work short rows on shoulders as follows: Right shoulder: ROW 1 (= right side): Work over all stitches. ROW 2 (= wrong side): Turn, work until 6-6-7-7-8-8 stitches remain on needle. ROW 3: Turn, tighten yarn and work back. ROW 4: Work until 3-3-3-4-4-4 stitches more remain than on previous time. ROW 5: Turn, tighten yarn and work back. ROW 6: Work until 3-3-3-4-4-4 stitches more remain than on previous time. ROW 7: Turn, tighten yarn and work back. ROW 8: Work until 3-3-3-4-4-4 stitches more remain than on previous time. ROW 9: Turn, tighten yarn and work back. When short rows are done, cast off all stitches by purling from wrong side. Jumper measures approx. 50-52-54-56-58-60 cm from shoulder and down. Left shoulder: ROW 1 (= right side): Work until 6-6-7-7-8-8 stitches remain on needle. ROW 2: Turn, tighten yarn and work back. ROW 3: Work until 3-3-3-4-4-4 stitches more remain than on previous time. ROW 4: Turn, tighten yarn and work back. ROW 5: Work until 3-3-3-4-4-4 stitches more remain than on previous time. ROW 6: Turn, tighten yarn and work back. ROW 7: Work until 3-3-3-4-4-4 stitches more remain than on previous time. ROW 8: Turn, tighten yarn and work back. When short rows are done, cast off all stitches by knitting from right side. Jumper measures approx. 50-52-54-56-58-60 cm from shoulder and down. FRONT PIECE: Work as on back piece. When piece measures 43-45-46-48-49-51 cm, slip the middle 22-22-24-24-26-26 stitches on a thread for neck, and finish each shoulder separately. Then cast off stitches on every row from neck as follows: Cast off 2 stitches 3 times and 1 stitch 3 times = 26-29-30-33-34-36 stitches for shoulder. Continue back and forth with stocking stitch and 1 edge stitch in garter stitch towards the armhole, at the same time when piece measures 47-49-51-53-55-57 cm, work short rows on shoulders the same way as on back piece: I.e. work right shoulder as left shoulder on back piece, and left shoulder as right shoulder on back piece. When short rows are done, cast off. Jumper measures approx. 50-52-54-56-58-60 cm from shoulder and down. SLEEVES: Cast on 64-68-72-72-76-76 stitches on double pointed needles size 3 mm with Belle. Knit 1 round. Then work rib (= knit 2/purl 2) in the round for 3 cm. Knit 1 round while decreasing 12-14-16-14-16-14 stitches evenly - remember DECREASE TIP = 52-54-56-58-60-62 stitches. Switch to double pointed needles size 4 mm. Work pattern as follows: A.1 over the first 2 stitches, knit the remaining stitches on round. When piece measures 8-8-8-8-6-7 cm, increase 1 stitch on each side of A.1 - read INCREASE TIP. Increase like this approx. every 3½-3-3-2½-2½-2 cm 12-13-14-15-16-17 times in total = 76-80-84-88-92-96 stitches. When sleeve measures 51-50-49-48-46-44 cm, work sleeve cap back and forth on circular needle until finished measurements. Continue to work in stocking stitch from the middle of A.1 until sleeve measures approx. 52-51-51-51-51-51 cm. Cast off. Work the other sleeve the same way. ASSEMBLY: Sew shoulder seams inside cast-off edge. Sew sleeve cap to armhole. Then sew vent at the top of sleeve to bottom of armhole - see chart. NECK EDGE: Begin from right side at one shoulder seam and pick up approx. 86 to 98 stitches (including stitches from thread) around the neck with circular needle size 3 mm, cast on 3 stitches at the end of needle. Move the 3 stitches on to left needle so that the last stitch cast on on needle becomes the outermost stitch on left needle. Now work an i-cord in these stitches from right side, as follows: Knit 2, knit next stitch twisted together with the first/next stitch picked up around the neck edge. Move the 3 stitches from right needle back on to left needle (in the order they have). Continue like this along the entire neck edge on back piece until there are no stitches left to work. Cast off the remaining stitches. Sew the last 3 stitches together with the 3 stitches cast on at the beginning of neck edge. Fasten off. |
||||||||||||||||
Diagram explanations |
||||||||||||||||
|
||||||||||||||||
 |
||||||||||||||||
 |
||||||||||||||||
Have you finished this pattern?Tag your pictures with #dropspattern #timetounwindsweater or submit them to the #dropsfan gallery. Do you need help with this pattern?You'll find 32 tutorial videos, a Comments/Questions area and more by visiting the pattern on garnstudio.com. © 1982-2026 DROPS Design A/S. We reserve all rights. This document, including all its sub-sections, has copyrights. Read more about what you can do with our patterns at the bottom of each pattern on our site. |
||||||||||||||||


With over 40 years in knitting and crochet design, DROPS Design offers one of the most extensive collections of free patterns on the internet - translated to 17 languages. As of today we count 324 catalogues and 12290 patterns translated into English (UK/cm). 12290
We work hard to bring you the best knitting and crochet have to offer, inspiration and advice as well as great quality yarns at incredible prices! Would you like to use our patterns for other than personal use? You can read what you are allowed to do in the Copyright text at the bottom of all our patterns. Happy crafting!
Post a comment to pattern DROPS 231-37
We would love to hear what you have to say about this pattern!
If you want to leave a question, please make sure you select the correct category in the form below, to speed up the answering process. Required fields are marked *.