


Komentáře / Otázky (34)
![]() Marilyn napsala:
Marilyn napsala:
Looking for a Cricket sweater pattern. Do you have one? Thank you!
04.07.2025 - 20:05Odpověď DROPS Design :
Dear Marilyn, we don't have the specific pattern you indicated but you can search for our sweaters (for men or women) with V-neck to find a similar pattern and adjust it yourself. Happy knitting!
06.07.2025 - 23:02
![]() Delia Köhler napsala:
Delia Köhler napsala:
In der Beschreibung wird das Diagramm a1 nicht angezeigt
11.06.2025 - 15:02Odpověď DROPS Design :
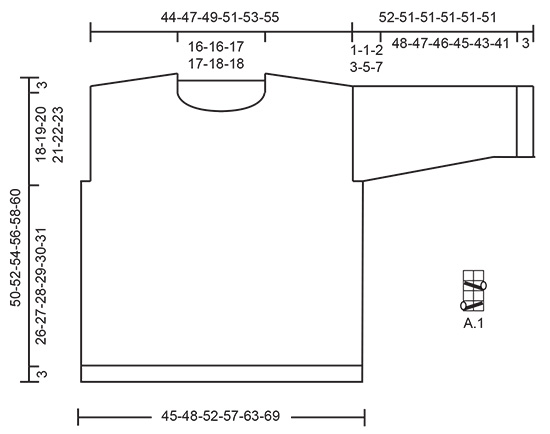
Liebe Frau Köhler, das Diagram A.1 finden Sie bei der Maßskizze, unter den Ärmel, es wird über 2 Maschen und 4 Reihen gestrickt. Viel Spaß beim Stricken!
11.06.2025 - 16:05
![]() Cindy napsala:
Cindy napsala:
Goedemiddag! Ik nader de verkorte schouders in het patroon maat xxl. Nu staat er : NlD 2 brei tot-8 steken over zijn op de naald. NlD 3: Keer het werk, trek de draad aan en brei terug. NlD 4: Brei tot er 4 steken meer over zijn dan de vorige keer. Betekent dit dat ik in rij 4 stop wanneer er nog 12steken op de naald staan? Dat zijn er dan 4 meer dan de 8 vd vorige toer. Of interpreteer ik dit verkeerd? Mvg Cindy
27.03.2025 - 15:11Odpověď DROPS Design :
Dag Cindy,
Je breit steeds tot er nog het aantal aangegeven steken op de linker naald staan. Dus je hoeft het vorige aantal steken er niet bij op te tellen. Gewoon het aantal steken dat in de beschrijving staat aanhouden.
30.03.2025 - 10:28
![]() Sabine Fiedler napsala:
Sabine Fiedler napsala:
Bitte wo finde ich das Diagramm für diese Anleitung ?
16.02.2025 - 16:54Odpověď DROPS Design :
Liebe Frau Fiedler, das Diagram A.1 finden Sie rechts der Maßskizze, unter den Ärmel. Viel Spaß beim Stricken!
17.02.2025 - 09:54
![]() Eva Eriksson napsala:
Eva Eriksson napsala:
Hej igen! Om jag förstod dig rätt så ska jag fortsätta sticka rätstickning över de 6 maskorna även när jag börjar sticka hålmönstret A1?
20.12.2024 - 15:15Odpověď DROPS Design :
HEi Eva. Når du begynner med diagram A.1 strikkes det slätstickning over alle maskene. Om du ser på bildet der modellen holder armene over hodet, ser du kun A.1 (som en sidesøm). mvh DROPS Design
02.01.2025 - 10:05
![]() Eva Eriksson napsala:
Eva Eriksson napsala:
Hej! Jag undrar om man ska fortsätta med rätstickning över de 6 maskorna där hålmönstret A1 är, eller ska jag övergå till slätstickning här?
20.12.2024 - 13:24Odpověď DROPS Design :
Hej Eva, du strikker ret over alle de andre masker :)
20.12.2024 - 14:41
![]() Cornelia napsala:
Cornelia napsala:
Det står att man ska sticka fram och tillbaka på ärmkullen. Men hur många maskor består ärmkullen av ?
14.04.2024 - 17:02Odpověď DROPS Design :
Hei Cornelia. Det kommer an på hvilken str. du strikker (har du fulgt oppskriften og økningene har du 76-80-84-88-92 eller 96 masker). mvh DROPS Design
15.04.2024 - 14:26
![]() Lyn napsala:
Lyn napsala:
Hi, I'm working on Drops 231-37 at the binding off for armhole stage for size large. Instructions say to 'bind off (3 in my size) stitches before beginning the round. Does that mean the 3 stitches just before the 6 stitch lace pattern? Thank you!
24.01.2024 - 08:47Odpověď DROPS Design :
Dear Lyn, in size L you will cast off for the armholes the 3 sts before A.1 + the 2 sts A.1 + the 3 sts after A.1 = 8 sts for each armhole. Happy knitting!
25.01.2024 - 07:56
![]() Dossin Catherine napsala:
Dossin Catherine napsala:
Bonjour, Je ne comprends pas ce qu'il faut faire pour l'encolure pour les 3 mailles que l'on doit rajouter? Faut-il tricoter l'encolure en rond ou en allers-retours?
09.11.2023 - 15:41Odpověď DROPS Design :
Bonjour Mme Dossin, lorsque vous avez relevé les mailles autour de l'encolure, montez 3 mailles, puis rabattez maintenant les mailles avec la technique du I-cord - comme dans cette vidéo ou bien celle-ci. Autrement dit, tricotez toujours ensemble à l'endroit la 3ème de ces 3 mailles avec la maille suivante autour de l'encolure jusqu'à ce que toutes les mailles relevées autour de l'encolure aient été tricotées; assemblez les 3 dernières mailles aux 3 mailles montées au début. Bon tricot!
09.11.2023 - 16:08
![]() Sandra Van Oosten-van Der Weijden napsala:
Sandra Van Oosten-van Der Weijden napsala:
Ik ga starten met het heen en weer breien van de mouwkop op de rondbreinaald, echter in de beschrijving staat 'brei.....tot de gewenste afmetingen'. Dit snap ik niet. Wat is de gewenste afmeting? Ik brei maat M, maar geen idee hoeveel cm ik nu nog zou moeten breien. Ik kan het ook niet uit de afbeelding opmaken. Graag uw hulp hierin. Dank alvast.
19.10.2023 - 10:04Odpověď DROPS Design :
Dag Sandra,
Voor maat M is dit dus totdat de mouw 51 cm meet. (Staat in de zin eronder)
19.10.2023 - 19:54
|
||||||||||||||||
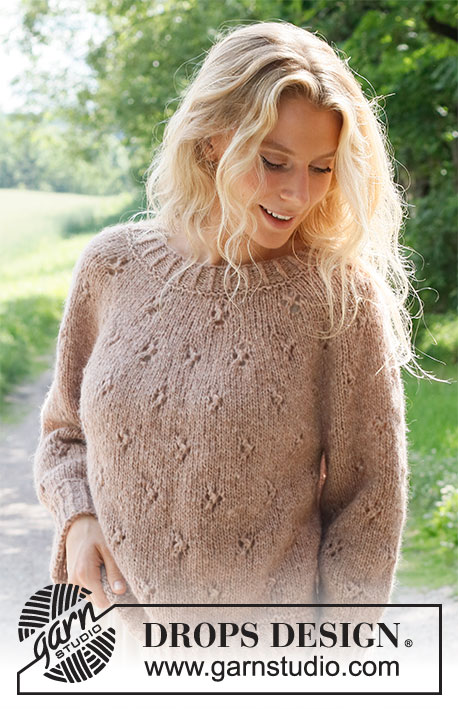
Time to Unwind#timetounwindsweater |
||||||||||||||||
 |
 |
|||||||||||||||
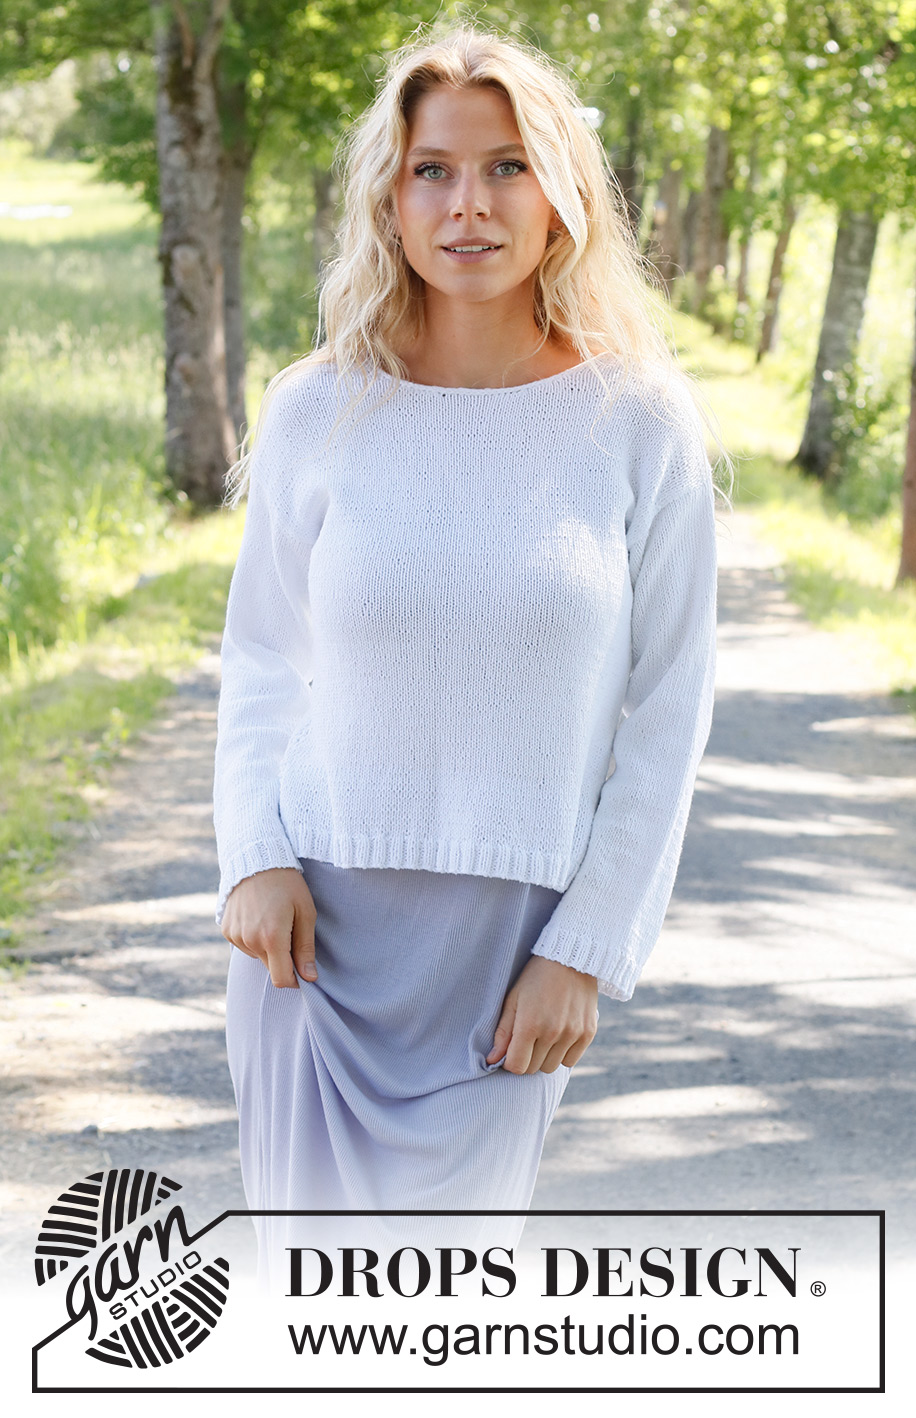
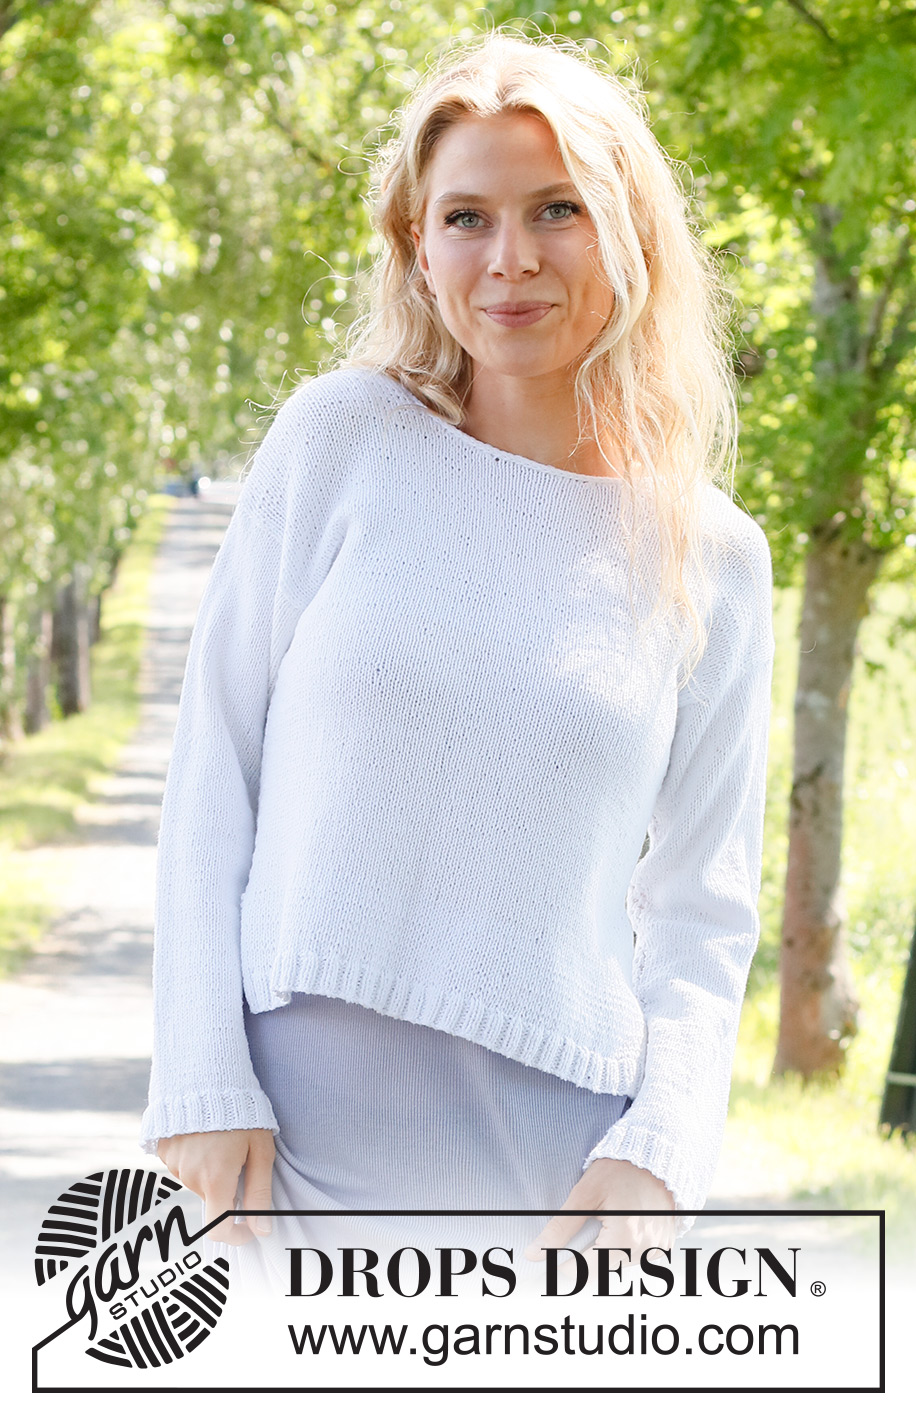
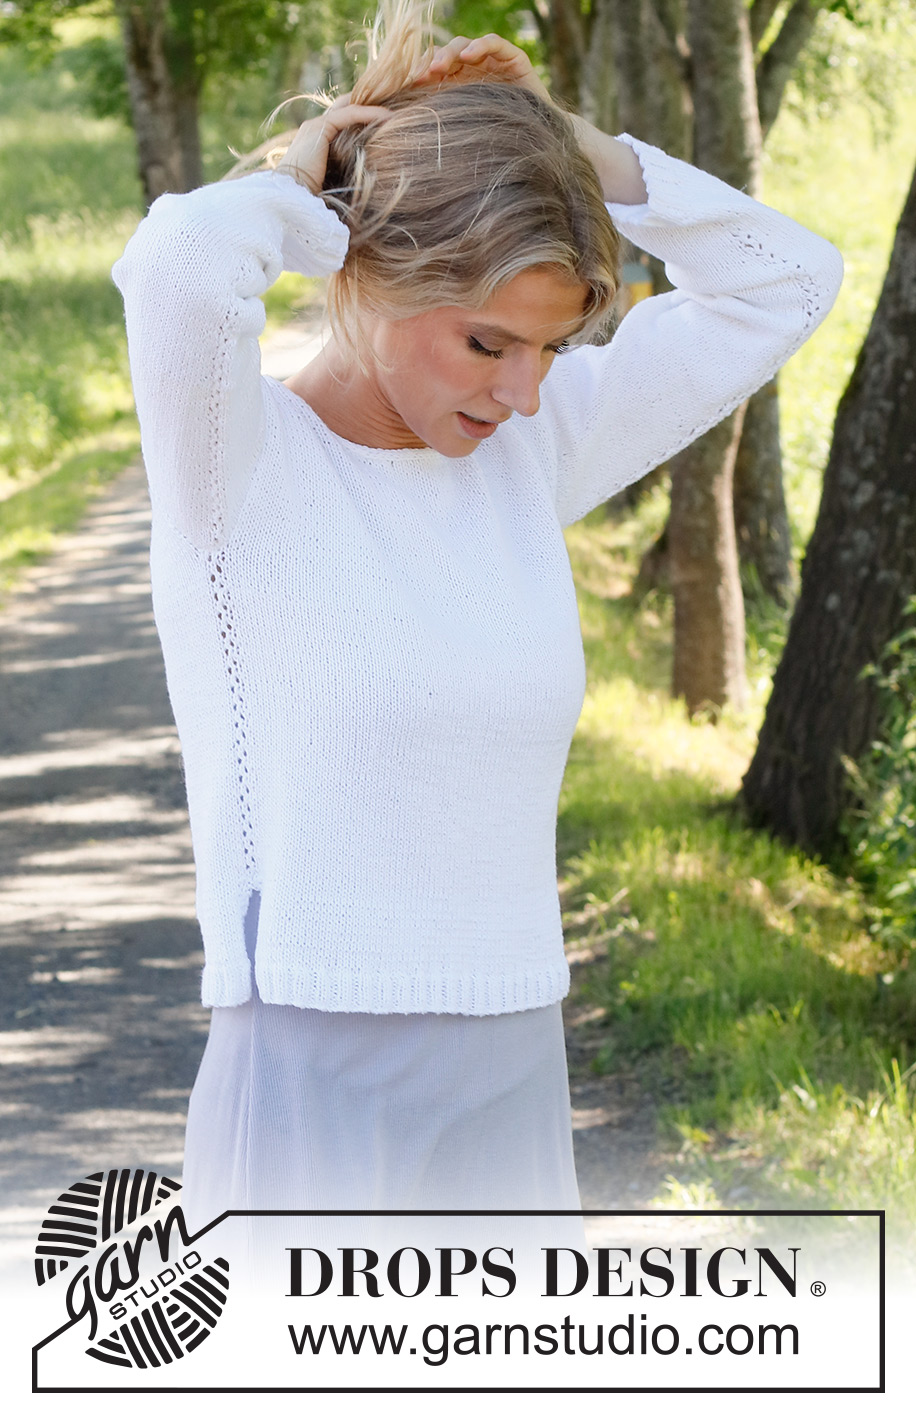
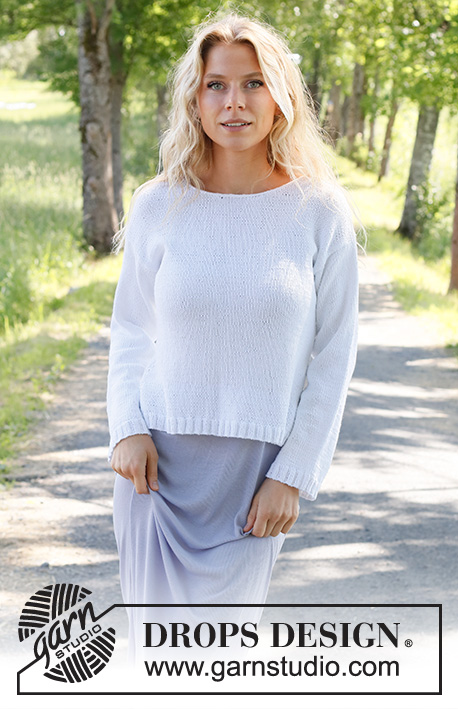
Pulovr s ažurovým vzorem pletený zdola nahoru z příze DROPS Belle. Velikost: S - XXXL.
DROPS 231-37 |
||||||||||||||||
|
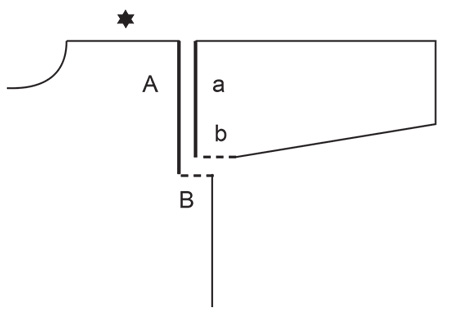
---------------------------------------------------------- VYSVĚTLIVKY K NÁVODU: ---------------------------------------------------------- VROUBKOVÝ VZOR: Pleteme stále hladce, lícové i rubové řady. 1 vroubek = 2 řady hladce. VZOR: Viz schéma A.1. Zobrazeny jsou všechny řady vzoru nahlížené z lícové strany. TIP – UJÍMÁNÍ: Abychom vypočítali, v jakých rozestupech máme ujímat, vydělíme celkový počet ok na jehlici (např. 106 ok) počtem ok, která potřebujeme ujmout (např. 18) = 5,8. Podle tohoto příkladu spleteme každé zhruba 5. a 6. oko. TIP PŘIDÁVÁNÍ (platí pro rukávy): Začínáme 2 oka před vzorem A.1, 1x nahodíme, upleteme 2 oka hladce, pleteme vzor A.1, pak 2 oka hladce a 1x nahodíme (= přidali jsme 2 oka). V následující kruhové řadě pleteme nahození hladce za zadní nit, aby se v pletenině netvořily dírky. Přidaná oka pak pleteme lícovým žerzejem. ---------------------------------------------------------- PRÁCE ZAČÍNÁ ZDE: ---------------------------------------------------------- PULOVR - JAK BUDEME POSTUPOVAT: Zadní a přední díl pleteme odděleně v řadách na kruhové jehlici až po rozparky. Potom díly spojíme a pokračujeme v kruhových řadách až k průramkům. Práci rozdělíme a dopleteme přední a zadní díl odděleně v řadách. Rukávy pleteme v kruhových řadách na ponožkových jehlicích / krátké kruhové jehlici. Nakonec upleteme dutinkový lem průkrčníku. ZADNÍ DÍL: Na kruhovou jehlici č. 3 nahodíme přízí DROPS Belle 112-124-136-148-164-180 ok a upleteme 1 rubovou řadu obrace. Následující řadu pleteme takto: 3 oka VROUBKOVÝM VZOREM - viz popis výše, pružný vzor 2/2 (tj. střídáme 2 oka hladce, 2 oka obrace) až po posledních 5 ok, 2 oka hladce a 3 oka vroubkovým vzorem. V tomto rozvržení pleteme pružný lem do výše 3 cm. Další lícovou řadu pleteme takto: 3 oka vroubkovým vzorem, následujících 106-118-130-142-158-174 ok upleteme hladce a SOUČASNĚ rovnoměrně ujmeme 18-24-26-28-32-36 ok – viz TIP UJÍMÁNÍ, poslední 3 oka vroubkovým vzorem = máme 94-100-110-120-132-144 ok. Pleteninu převedeme na kruhovou jehlici č. 4 a upleteme 1 řadu obrace, na každé straně 3 oka vroubkovým vzorem. Nyní pleteme lícovým žerzejem, na každé straně 3 oka vroubkovým vzorem, do výšky 8 cm - končíme rubovou řadou. Odstřihneme přízi a odložíme práci. PŘEDNÍ DÍL: Pleteme stejným způsobem jako zadní díl, ale přízi nestříháme. TRUP: Teď převedeme zadní a přední díl na společnou kruhovou jehlici = 188-200-220-240-264-288 ok. Pleteme v kruhových řadách lícovým žerzejem, na každé straně pleteme 6 ok VROUBKOVÝM VZOREM - viz popis výše. Nad těmito 6 oky upleteme na obou stranách 2 vroubky a pokračujeme takto: Upleteme 1 oko hladce a vložíme za toto oko značku - toto je teď začátek kruhové řady. Prvních 92-98-108-118-130-142 ok upleteme hladce, následující 2 oka vzor A.1 (= prostřední 2 oka ze 6 ok vroubkového vzoru), následujících 92-98-108-118-130-142 ok hladce, poslední 2 oka vzor A.1 (= prostřední 2 oka ze 6 ok vroubkového vzoru). Takto pokračujeme v kruhových řadách až do výše 29-30-31-32-33-34 cm od nahozeného okraje. Nyní uzavřeme na obou stranách oka pro průramky takto: Začínáme 0-0-3-5-9-13 oka před začátkem kruhové řady, uzavřeme následujících 2-2-8-12-20-28 ok (= průramek), pleteme po 0-0-3-5-9-13 ok před dalším vzorem A.1, uzavřeme následujících 2-2-8-12-20-28 ok (= průramek), a pleteme zbytek kruhové řady = 92-98-102-108-112-116 ok pro přední i zadní díl. ZADNÍ DÍL: = 92-98-102-108-112-116 ok. Pleteme v řadách lícovým žerzejem a na každé straně 1 krajové oko vroubkovým vzorem. Ve výši 46-48-50-52-54-56 cm odložíme prostředních 38-38-40-40-42-42 ok na pomocnou jehlici (= průkrčník) a každou náramenici dokončíme odděleně. V následující řadě uzavřeme na každé straně u průkrčníku ještě 1 oko = máme 26-29-30-33-34-36 ok na náramenici. Pleteme v řadách lícovým žerzejem, na každé straně 1 krajové oko vroubkovým vzorem a SOUČASNĚ v další lícové řadě pleteme náramenice zkrácenými řadami takto: Pravá náramenice: 1. ŘADA (= lícová): Upleteme všechna oka. 2. ŘADA (= rubová): Otočíme práci, pleteme po posledních 6-6-7-7-8-8 ok na jehlici. 3. ŘADA: Práci otočíme, přízi utáhneme a řadu přepleteme. 4. ŘADA: Pleteme, dokud nám nezbyde o 3-3-3-4-4-4 oka více než v předchozí řadě. 5. ŘADA: Práci otočíme, přízi utáhneme a řadu přepleteme. 6. ŘADA: Pleteme, dokud nám nezbyde o 3-3-3-4-4-4 oka více než v předchozí řadě. 7. ŘADA: Práci otočíme, přízi utáhneme a řadu přepleteme. 8. ŘADA: Pleteme, dokud nám nezbyde o 3-3-3-4-4-4 oka více než v předchozí řadě. 9. ŘADA: Práci otočíme, přízi utáhneme a řadu přepleteme. Po dopletení zkrácených řad uzavřeme na rubové straně všechna oka obrace. Pulovr měří asi 50-52-54-56-58-60 cm od ramene. Levá náramenice: 1. ŘADA (= lícová): Pleteme po posledních 6-6-7-7-8-8 ok na jehlici. 2. ŘADA: Práci otočíme, přízi utáhneme a řadu přepleteme. 3. ŘADA: Pleteme, dokud nám nezbyde o 3-3-3-4-4-4 oka více než v předchozí řadě. 4. ŘADA: Práci otočíme, přízi utáhneme a řadu přepleteme. 5. ŘADA: Pleteme, dokud nám nezbyde o 3-3-3-4-4-4 oka více než v předchozí řadě. 6. ŘADA: Práci otočíme, přízi utáhneme a řadu přepleteme. 7. ŘADA: Pleteme, dokud nám nezbyde o 3-3-3-4-4-4 oka více než v předchozí řadě. 8. ŘADA: Práci otočíme, přízi utáhneme a řadu přepleteme. Po dopletení zkrácených řad uzavřeme na lícové straně všechna oka hladce. Pulovr měří asi 50-52-54-56-58-60 cm od ramene. PŘEDNÍ DÍL: Pleteme stejným způsobem jako zadní díl. Ve výši 43-45-46-48-49-51 cm odložíme prostředních 22-22-24-24-26-26 ok na pomocnou jehlici (= průkrčník) a každou náramenici dokončíme odděleně. Nyní tvarujeme průkrčník - v každé řadě u průkrčníku uzavíráme oka takto: 2 oka 3x a 1 oko 3x = 26-29-30-33-34-36 ok náramenice. Pokračujeme v řadách lícovým žerzejem, u průramku pleteme 1 krajové oko vroubkovým vzorem; SOUČASNĚ ve výši 47-49-51-53-55-57 cm pleteme náramenice zkrácenými řadami jako u zadního dílu - tj. pravou náramenici pleteme jako stejným způsobem jako levou náramenici u zadního dílu, a levou náramenici jako pravou náramenici u zadního dílu. Po dopletení zkrácenými řadami oka uzavřeme. Pulovr měří asi 50-52-54-56-58-60 cm od ramene. RUKÁVY: Na ponožkové jehlice č. 3 nahodíme přízí Belle 64-68-72-72-76-76 ok a upleteme 1 kruhovou řadu hladce. Pak pleteme v kruhových řadách pružným vzorem 2/2. Ve výši 3 cm upleteme 1 kruhovou řadu hladce a SOUČASNĚ rovnoměrně ujmeme 12-14-16-14-16-14 ok - viz TIP UJÍMÁNÍ = 52-54-56-58-60-62 ok. Převedeme pleteninu na ponožkové jehlice č. 4 a pleteme v tomto rozvržení: první 2 oka vzor A.1, zbývající oka v kruhové řadě pleteme hladce. Ve výši 8-8-8-8-6-7 cm přidáme 1 oko na obou stranách vzoru A.1 – viz TIP – PŘIDÁVÁNÍ. Takto přidáváme každých asi 3,5-3-3-2,5-2,5-2 cm, celkem 12-13-14-15-16-17x = 76-80-84-88-92-96 ok. Ve výšce rukávu 51-50-49-48-46-44 cm pleteme v řadách rukávovou hlavici, pleteme až do požadované délky. Pokračujeme lícovým žerzejem od středu vzoru A.1 až do výše rukávu asi 52-51-51-51-51-51 cm. Potom všechna oka uzavřeme. Stejným způsobem upleteme i druhý rukáv. DOKONČENÍ: Sešijeme náramenice. Rukávovou hlavici všijeme do průramku, rozparek v horní části rukávu přišijeme ke spodní části průramku - viz náčrt. LEM PRŮKRČNÍKU: Začínáme na lícové straně u jedné náramenice a kruhovou jehlicí č. 3 nabereme kolem průkrčníku asi 86 až 98 ok (včetně odložených ok z pomocné jehlice), na konci jehlice nahodíme ještě 3 oka. Tato 3 oka přesuneme z pravé jehlice na levou, poslední nahozené oko je nyní krajní oko na levé jehlici. Z lícové strany pleteme dutinku takto: Upleteme 2 oka hladce, následující oko spleteme hladce za zadní nit s dalším okem nabraným kolem okraje průkrčníku. Tato 3 oka přesuneme z pravé jehlice zpět na levou, přičemž zachováme pořadí ok. Takto postupujeme až na konec zadního dílu, potom zbylá oka uzavřeme. Poslední 3 oka sešijeme se 3 oky nahozenými na začátku průkrčníku a přízi zapošijeme. |
||||||||||||||||
Vysvětlivky ke schématu |
||||||||||||||||
|
||||||||||||||||
|
||||||||||||||||
|
||||||||||||||||
Dokončili jste tento model?Pak označte své fotky tagem #dropspattern #timetounwindsweater nebo je pošlete do galerie #dropsfan. Potřebujete s tímto návodem poradit?Otevřete-li si návod na stránce garnstudio.com, najdete tam 27 výukových video-ukázek, Komentáře/Dotazy a další užitečné informace. © 1982-2025 DROPS Design A/S. Vyhrazujeme si veškerá práva. Tento dokument, včetně všech jeho dílčích částí, podléhá autorským právům. Podrobnější komentář k možnostem užití našich návodů najdete dole pod každým návodem na našich stránkách. |
||||||||||||||||


V oblasti pletené a háčkované módy působí DROPS Design více než 40 let. Díky tomu vám můžeme nabídnout jednu z nejrozsáhlejších kolekcí modelů s bezplatnými návody dostupnými na internetu - navíc v 17 jazycích. K dnešnímu dni máme na 314 katalogů a 11822 návodů celkem - z nich je už 7048 dostupných v [češtině].
Přidejte komentář k návodu DROPS 231-37
Rádi bychom věděli, co si o tomto modelu myslíte!
Pokud se chcete na něco zeptat, dbejte prosím na to, abyste ve formuláři níže vybrali správnou kategorii - díky tomu se dříve dozvíte, co potřebujete vědět. Povinná pole jsou označena *.