
Popular categories
Looking for a yarn?


Comments / Questions (26)
![]() Sharon Hunt wrote:
Sharon Hunt wrote:
Hello Worked the elevation for the back which added more rows. My question 🙋🏾♀️ is where do I measure from to get to 4 cm. I assume one would measure the front?
07.04.2026 - 21:30DROPS Design answered:
Hi Sharon, You work 4 cm stocking stitch, which is measured from the end of the ribbed neck mid-front. Regards, Drops Team.
08.04.2026 - 12:13
![]() Sharon Hunt wrote:
Sharon Hunt wrote:
Hello! Have started this pattern and there are to diagrams to be followed. A1 and A2. I am making size XXL. I have read the pattern a few times, but I haven’t seen any mention of A2 and where to start. Not sure what am missing. Thanks for your response.
05.04.2026 - 22:10DROPS Design answered:
Hi Sharon, A.2 is worked at the bottom of the sleeves. Regards, Drops Team.
06.04.2026 - 15:13
![]() Sofia wrote:
Sofia wrote:
Bonjour lorsque je tricote un top down mon ouvrage est plus long devant que sous les emmanchures De ce fait le tricot ne forme pas une ligne horizontale a la base au niveau des cotes mais un arrondi très prononcé relevé sur les cotés Comment y remédier merci
07.12.2025 - 21:40DROPS Design answered:
Bonjour Sofia, retrouvez sous les onglets Vidéos/Leçons en haut de page, une vidéo/une leçon montrant comment tricoter un pull de haut en bas (avec raglan, mais la technique sera la même), cela pourra peut-être vous aider à en déceler la raison. Vous pouvez aussi demander à votre magasin/ d'autres tricoteuses via notre DROPS Workshop. Bon tricot!
08.12.2025 - 10:08
![]() Van Hende Mireille wrote:
Van Hende Mireille wrote:
Ik begrijp de meerdering na de 4cm niet kan mij iemand uitleg geven
23.08.2025 - 11:44
![]() Iwona wrote:
Iwona wrote:
Chodzi o schemat A1 dla rozmiaru od XL rzad 11 Wprawdzie zrobilam caly wzor ale nie wyglada tak ladny jak na zdjeciu, wiec mysle ze cos przekrecilam.
07.04.2025 - 11:41DROPS Design answered:
Iwono, możesz wysłać mi zdjęcie tego motywu na poland@dropsproject.com? Będzie mi łatwiej zdiagnozować problem.
07.04.2025 - 13:10
![]() Iwona wrote:
Iwona wrote:
Czy moge gdzies znalesc filmik w ktorym moge zobaczyc jak sie robi ze schematu od gory znaczej 6,7 i 8? Bo nie mige sobie z tym poradzic. Przyklad punkt 6 "zdjac 1 oczko jak do przerobienia oczka przekreconego na prawo...i kolejne 2 punkty ponizej
06.04.2025 - 18:54DROPS Design answered:
Witaj Iwono, niestety nie ma jeszcze filmu na ten schemat. Napisz o który schemat chodzi i dokładnie o który rząd tego schematu. Pozdrawiamy!
07.04.2025 - 08:44
![]() Sonia wrote:
Sonia wrote:
Hallo, hoe maak ik de mededelingen aan de hals voor de nieuwe boordsteek aub. Video ?
24.11.2024 - 05:54DROPS Design answered:
Dag Sonja,
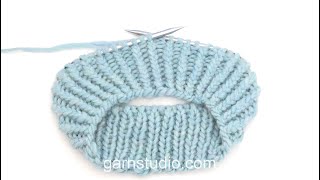
Eerst brei je steeds 1 gedraaid recht en 1 averecht om boordsteek te maken. Dan meerder je door steeds na elke averechte steek een omslag te maken. Op de volgende naald brei je 1 gedraaid recht, 1 averecht en de omslagen gedraaid averecht. De daarop volgende naald brei je 1 gedraaid recht, 2 averecht.
24.11.2024 - 11:49
![]() Rosita Johansson wrote:
Rosita Johansson wrote:
Jag får inte ihop längden på tröjan. 27cm till delningen på oket. 22 cm till resåren, sen 5 cm resår blir inte 58 cm har jag tänkt fel någon stans?
01.10.2024 - 18:59DROPS Design answered:
Hei Rosita. I str. XL måler genseren fra oppleggskanten 54 cm (vrangbord 4 cm + 23 cm bærestykket + 22 cm bol + 5 cm vrangbord). Dersom du strikken en forhøyning bak legger du til 4 cm = 58 cm. Om du ser på målskissen er forhøyningen medregnet. mvh DROPS Design
15.10.2024 - 07:50
![]() Emily wrote:
Emily wrote:
Non mi è chiaro questo passaggio “”” passare la maglia successiva e metterla a ritorto sul ferro sinistro “” come la metto a ritorto sul ferro sinistro? Scusate ma non l’ho mai fatto 😅 Grazie mille
23.08.2024 - 12:06DROPS Design answered:
Buonasera Emily, deve semplicemente "girarla": il filo dietro diventa quello davanti e viceversa. Buon lavoro!
26.08.2024 - 21:18
![]() Agnieszka wrote:
Agnieszka wrote:
W opisie rekawa przy przejsciu na sciagacz trzeba dodac oczko w co 2 oczko lewe, czy to oznacza ze sciagacz nie bedzie jeden na jeden tylko 1 op, 1 ol , 1 op I 2 ol?Bo wczoraj A2 juz konczy sie sciagaczem 1 na 1
01.02.2024 - 12:10DROPS Design answered:
Witaj Agnieszko, po dodaniu 1 oczka w co drugie oczko lewe, ściągacz będzie wyglądał następująco: 1 op przekręcone, 1 ol , 1 op przekręcone, 2 ol, itd. Zobacz na zdjęciu gdzie jest widoczny mankiet rękawa. Pozdrawiamy!
03.02.2024 - 08:04
|
|||||||||||||||||||||||||||||||
Echo Mountain#echomountainsweater |
|||||||||||||||||||||||||||||||
 |
 |
||||||||||||||||||||||||||||||
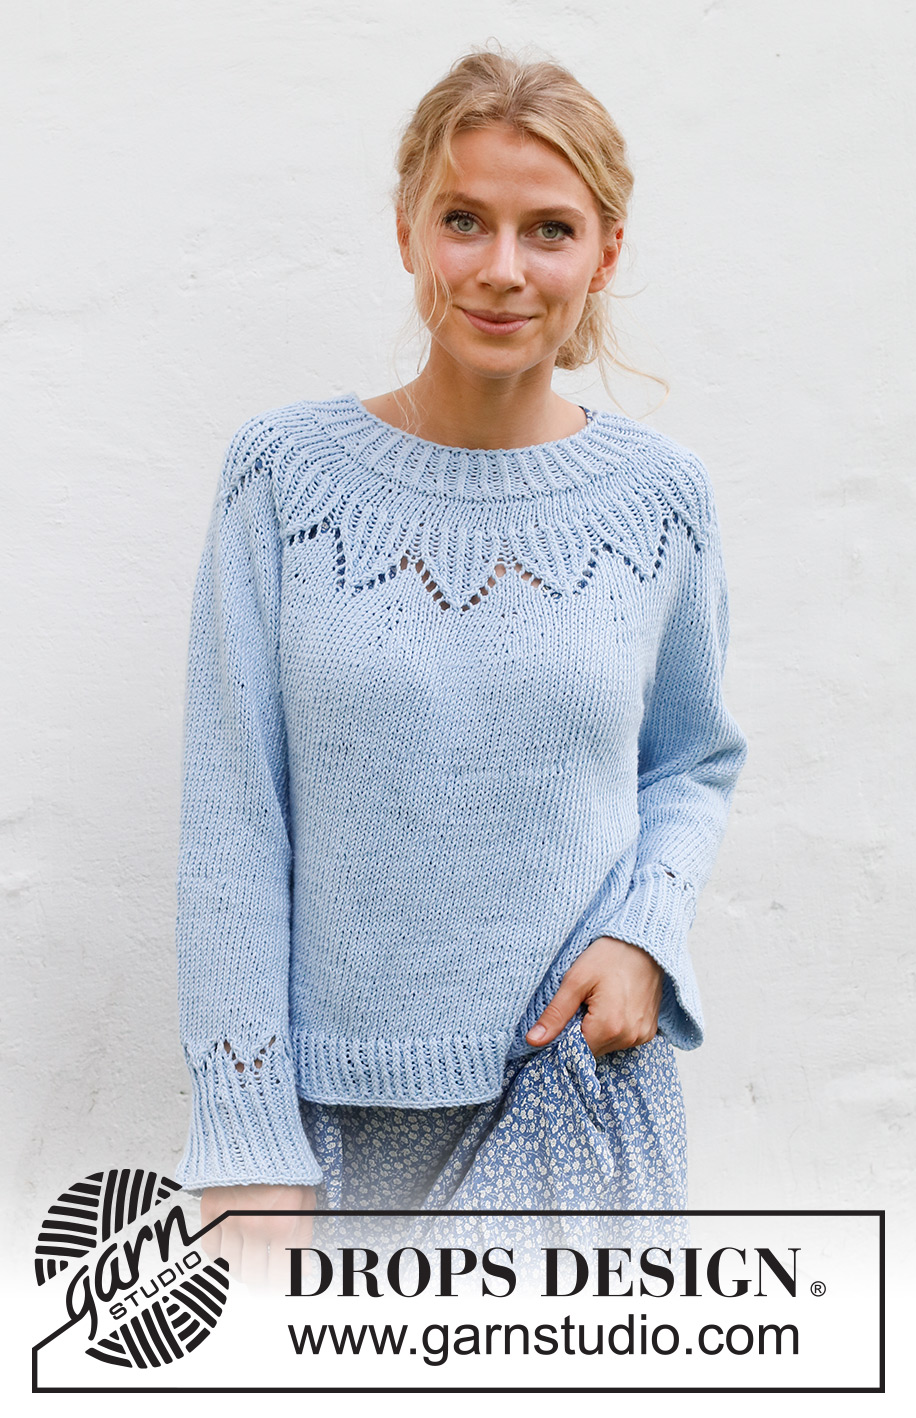
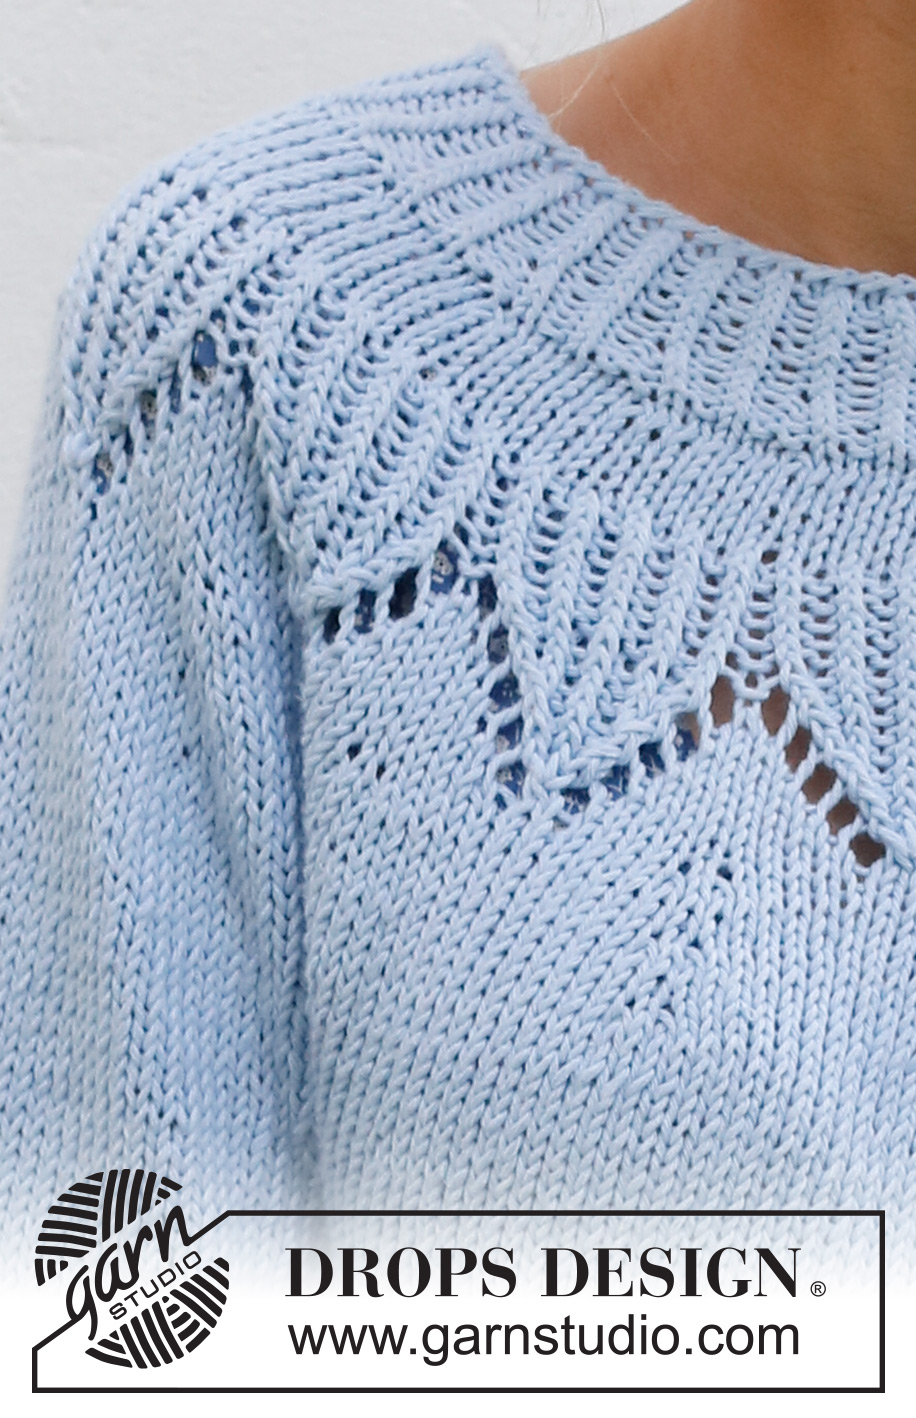
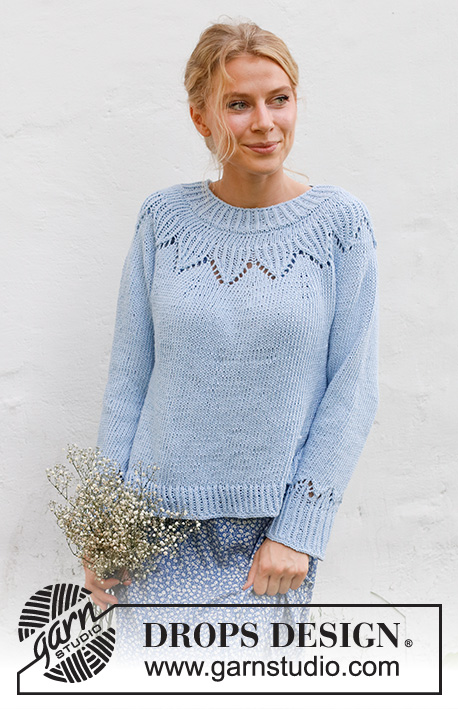
Knitted jumper in DROPS Paris. The piece is worked top down, with round yoke and lace pattern. Sizes S - XXXL.
DROPS 230-18 |
|||||||||||||||||||||||||||||||
|
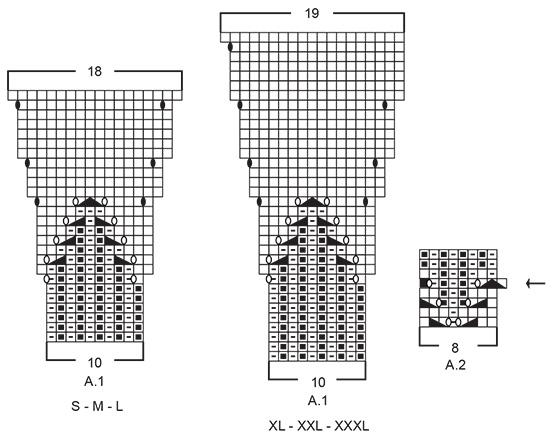
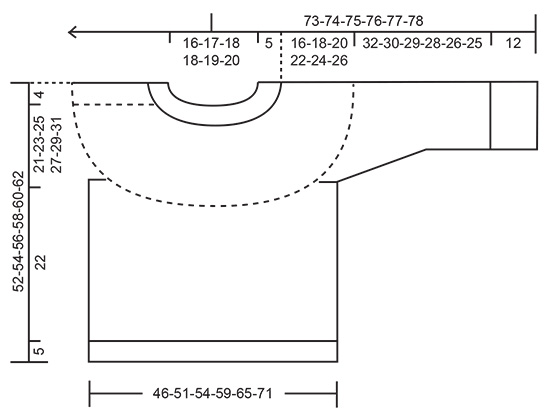
------------------------------------------------------- EXPLANATIONS FOR THE PATTERN: ------------------------------------------------------- ELEVATION: To make the jumper slightly higher at the back of the neck, you can work an elevation. Skip this section if you do not want an elevation. Insert 1 marker at the beginning of the round = mid-back. Start from the right side, at the marker, and knit 16-17-18-18-19-20, turn, tighten the strand and purl 32-34-36-36-38-40 back. Turn, tighten the strand and knit 48-51-54-54-57-60, turn, tighten the strand and purl 64-68-72-72-76-80 back. Turn, tighten the strand and knit 80-85-90-90-95-100, turn, tighten the strand and purl 96-102-108-108-114-120 back. Turn, tighten the strand and knit to the marker on mid back. Continue the yoke as described in the text. PATTERN: See diagrams A.1 and A.2. Choose diagram for your size (applies to A.1). DECREASE TIP (sleeves): Decrease 1 stitch on either side of the marker as follows: Work until there are 3 stitches left before the marker, knit 2 together, knit 2 (marker sits between these 2 stitches), slip 1 stitch as if to knit, knit 1 and pass the slipped stitch over the knitted stitch. ------------------------------------------------------- START THE PIECE HERE: ------------------------------------------------------- JUMPER – SHORT OVERVIEW OF THE PIECE: The neck and yoke are worked in the round with circular needle, from mid back and top down. An elevation can be worked at the back of the neck. The yoke is divided for body and sleeves and the body is continued in the round with circular needle. The sleeves are worked with double pointed needles/short circular needle, top down. NECK: Cast on 80-84-88-88-92-96 stitches with short circular needle size 3.5 mm and DROPS Paris. Knit 1 round, then work rib (knit 1 twisted, purl 1) for 4 cm. On the next round increase every other purl-1 to purl-2 by making 1 yarn over after the purled stitch = 100-105-110-110-115-120 stitches. Continue the new rib – NOTE: On the first round purl the yarn overs twisted to avoid holes. When the neck measures 5 cm, knit 1 round where you increase 14-15-16-20-23-26 stitches evenly spaced = 114-120-126-130-138-146 stitches. Change to circular needle size 5 mm. You can now work an ELEVATION at the back of the neck – read description above. If you do not want an elevation go straight to YOKE below. YOKE: Work stocking stitch for 2-3-3-4-4-5 cm – AT THE SAME TIME on the last round increase 16-20-24-30-32-34 stitches evenly spaced = 130-140-150-160-170-180 stitches. REMEMBER THE KNITTING TENSION! Now work A.1 a total of 13-14-15-16-17-18 times on the round. Continue the pattern and increase as shown in the diagram. When A.1 has been completed in height there are 234-252-270-304-323-342 stitches. Continue with stocking stitch – AT THE SAME TIME on the first round increase 6-12-10-8-5-6 stitches evenly spaced = 240-264-280-312-328-348 stitches. Work until the piece measures 21-23-25-27-29-31 cm from the cast-on edge. Now divide for the body and sleeves as follows: Knit 36-40-42-46-50-54 (½ back piece), place the next 48-52-56-64-64-66 stitches on a thread for the sleeve, cast on 6-6-8-8-10-12 stitches (in side under sleeve), knit 72-80-84-92-100-108 (front piece), place the next 48-52-56-64-64-66 stitches on a thread for the sleeve, cast on 6-6-8-8-10-12 stitches (in side under sleeve), knit the last 36-40-42-46-50-54 stitches (½ back piece). The body and sleeves are finished separately. THE PIECE IS NOW MEASURED FROM HERE! BODY: = 156-172-184-200-220-240 stitches. Work stocking stitch until the body measures 22 cm from the division. Knit 1 round where you increase 36-40-42-46-50-56 stitches evenly spaced = 192-212-226-246-270-296 stitches. Change to circular needle size 3.5 mm and work rib (knit 1 twisted, purl 1) for 5 cm. Cast off with knit, a little loosely. The jumper measures approx. 52-54-56-58-60-62 cm from the shoulder down. SLEEVES: Place the 48-52-56-64-64-66 stitches from the thread on the one side of the piece on short circular needle/double pointed needles size 5 mm and knit up 1 stitch in each of the 6-6-8-8-10-12 stitches cast on under the sleeve = 54-58-64-72-74-78 stitches. Insert a marker in the middle of the 6-6-8-8-10-12 stitches under the sleeve. Allow the marker to follow your work onwards; it will be used when decreasing under the sleeve. Start at the marker and work stocking stitch in the round. When the sleeve measures 3-3-2-2-2-2, decrease 2 stitches under the sleeve – read DECREASE TIP. Decrease like this every 4-3-2-2-1½-1½ cm a total of 3-5-8-8-9-11 times = 48-48-48-56-56-56 stitches. Continue working until the sleeve measures 32-30-29-28-26-25 cm from the division. There is approx. 12 cm left to finished length. Try the jumper on and work to desired length. Work A.2 a total of 6-6-6-7-7-7 times on the round. When A.2 is finished, change to double pointed needles size 3.5 mm and continue the rib (knit 1 twisted, purl 1) – AT THE SAME TIME on the first round increase every other purl-1 to purl-2 = 60-60-60-70-70-70 stitches. Work until the sleeve measures 44-42-41-40-38-37 cm. Cast off with knit, a little loosely. Work the other sleeve in the same way. |
|||||||||||||||||||||||||||||||
Diagram explanations |
|||||||||||||||||||||||||||||||
|
|||||||||||||||||||||||||||||||
 |
|||||||||||||||||||||||||||||||
 |
|||||||||||||||||||||||||||||||
Have you finished this pattern?Tag your pictures with #dropspattern #echomountainsweater or submit them to the #dropsfan gallery. Do you need help with this pattern?You'll find 30 tutorial videos, a Comments/Questions area and more by visiting the pattern on garnstudio.com. © 1982-2026 DROPS Design A/S. We reserve all rights. This document, including all its sub-sections, has copyrights. Read more about what you can do with our patterns at the bottom of each pattern on our site. |
|||||||||||||||||||||||||||||||


With over 40 years in knitting and crochet design, DROPS Design offers one of the most extensive collections of free patterns on the internet - translated to 17 languages. As of today we count 324 catalogues and 12290 patterns translated into English (UK/cm). 12290
We work hard to bring you the best knitting and crochet have to offer, inspiration and advice as well as great quality yarns at incredible prices! Would you like to use our patterns for other than personal use? You can read what you are allowed to do in the Copyright text at the bottom of all our patterns. Happy crafting!
Post a comment to pattern DROPS 230-18
We would love to hear what you have to say about this pattern!
If you want to leave a question, please make sure you select the correct category in the form below, to speed up the answering process. Required fields are marked *.