
Popular categories
Looking for a yarn?


Comments / Questions (6)
![]() Agnes wrote:
Agnes wrote:
Bonjour, pour les petits sapins, faut il faire suivre le fil vert derrière l'ouvrage ou faut il faire plusieurs petites pelotes de vert?
31.10.2024 - 19:35DROPS Design answered:
Bonjour Agnès, faites suivre les fils sur l'envers en veillant à bien à ne pas trop les serrer pour ne pas perdre la tension et resserrer l'ouvrage. Bon tricot!
01.11.2024 - 08:21
![]() Jillian wrote:
Jillian wrote:
I have two questions. Thank you for your response. 1. When I did a gauge, I required 5.5 mm needles to get the appropriate tension. Should I also increase the 4mm needles used for the collar and sleeves to 4.5 mm? 2. For the trees, could I use duplicate stitch for the yellow stars since they will have a decorative knot on top of them? I think it wouldn't matter if they looked a little bit "raised" from the rest of the design, and duplicate stitch is much easier than fair isle.
15.02.2024 - 18:32DROPS Design answered:
Hi Jillian, Yes, increase the smaller needle size to 4.5 mm to avoid the rib being tight. As regards the stars you are welcome to work them as you wish and as you suggest. Happy crafting!
16.02.2024 - 06:55
![]() Mari wrote:
Mari wrote:
Una domanda prima di iniziare: per avere i disegni degli abeti simmetrici sulle spalle (che si veda un albero su ogni spalla in modo simmetrico) il numero delle ripetizioni devono essere pari? Ad esempio 12 ripetizioni di A1.
15.10.2023 - 11:33DROPS Design answered:
Buonasera Mari, il n° di ripetizioni di A.1 è indicato nel modello. Buon lavoro!
19.10.2023 - 23:43
![]() Catherine wrote:
Catherine wrote:
Bonjour, je réalise le modèle "merry trees" et je ne comprends pas bien comment réaliser les noeuds ni leur finalité. Sont ils supposés représenter l'éclat des étoiles ? Merci.
13.12.2021 - 00:20DROPS Design answered:
Bonjour Catherine, tout à fait, cette vidéo montre comment réaliser ce nœud (sur un modèle similaire où il fait office de pompon). Bonne continuation!
13.12.2021 - 10:18
![]() Jane Gallagher wrote:
Jane Gallagher wrote:
I’m struggling to understand what this means: KNOT: Make a knot at the top of each tree. Cut 2 strands of yellow, each 10 cm long. Put the strands together and thread them through the top yellow stitch on each tree, with both ends on the right side. Tie a knot, then another knot in the opposite direction – see sketch. Cut the strands leaving 1 cm ends.
07.12.2021 - 12:41DROPS Design answered:
Dear Mrs Gallagher, this video shows for another pattern (santas) how to make a similar knot - and should help you there. Happy knitting!
07.12.2021 - 15:43
![]() Marica wrote:
Marica wrote:
Salve , sto realizzando questo pullover in 3 taglue diverse, mi sono chiesta se gli aumenti dello sorone non risulterebbero meno evidenti facendo un aumento intercalare (M1L) e se è necessario diminuire le m alka fine dello schema Grazie
24.11.2021 - 01:44DROPS Design answered:
Buonasera Marica, gli aumenti sono realizzati con gettati lavorati a ritorto sul ferro successivo e alla fine dei motivi sono previste delle diminuzioni. Buon lavoro!
26.11.2021 - 00:22
|
||||||||||||||||
Merry Trees#merrytreessweater |
||||||||||||||||
 |
 |
|||||||||||||||
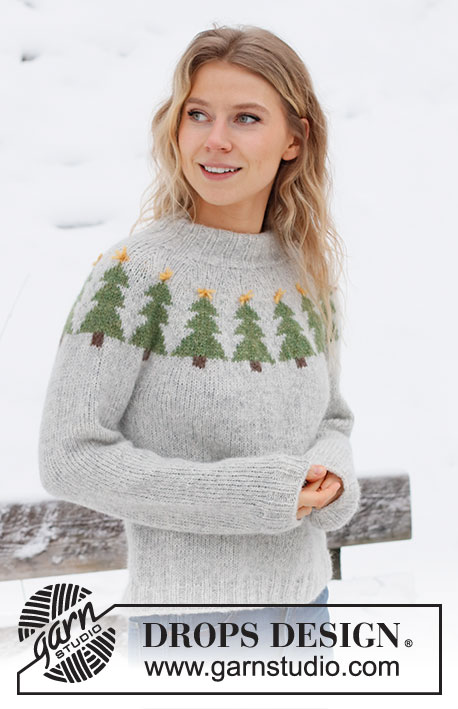
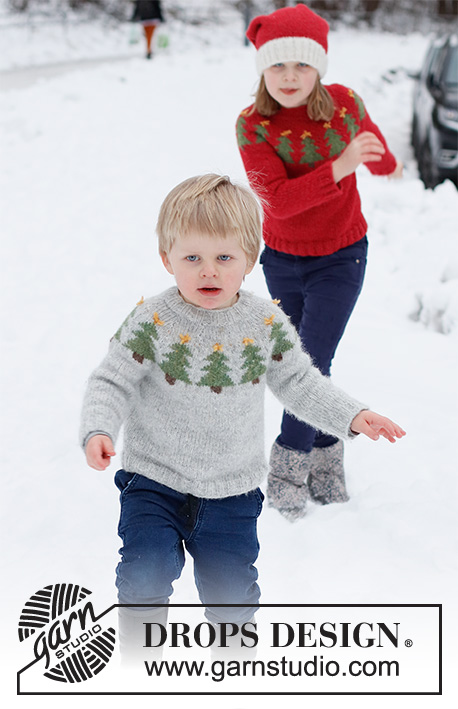
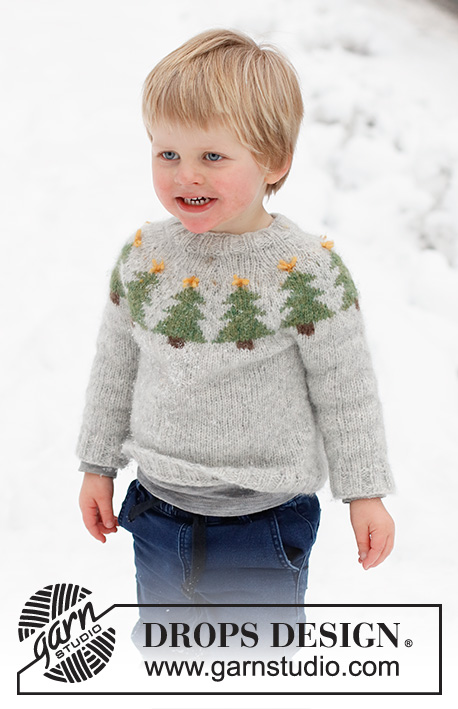
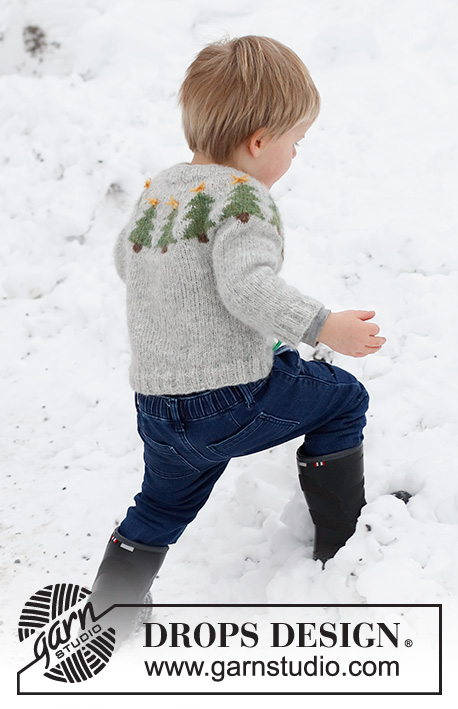
Knitted Christmas jumper for children in DROPS Air. The jumper is worked top down with round yoke and Christmas tree pattern. Sizes 2 - 14 years. Theme: Christmas.
DROPS Children 41-2 |
||||||||||||||||
|
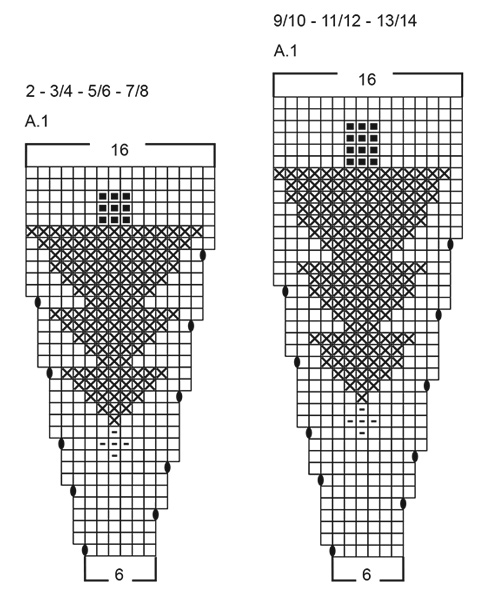
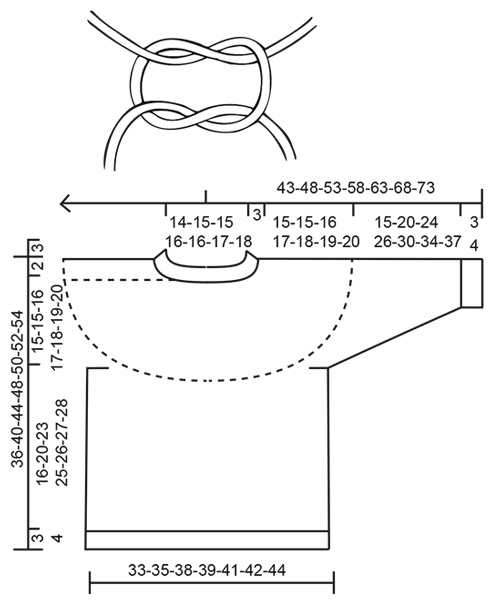
------------------------------------------------------- EXPLANATIONS FOR THE PATTERN: ------------------------------------------------------- INCREASE/DECREASE TIP (evenly spaced): To work out how to increase/decrease evenly, count the total number of stitches on needle (e.g. 60 stitches), and divide by the number of increases/decreases to be made (e.g. 6) = 10. In this example, increase by making 1 yarn over after each 10th stitch. On the next round knit the yarn overs twisted to avoid holes. When decreasing, knit together each 9th and 10th stitch. PATTERN: See diagram A.1. Choose the diagram for your size. The pattern is worked in stocking stitch. KNITTING TIP: To avoid the garment losing its elasticity when working pattern, it is important that the strands at the back are not tight. Use a larger size needle when working pattern if the piece becomes tight. DECREASE TIP (for sleeves): Decrease 1 stitch on either side of the marker thread as follows: Work until there are 3 stitches left before the marker thread, knit 2 together, knit 2 (marker thread sits between these 2 stitches), slip 1 stitch as if to knit, knit 1 and pass the slipped stitch over the knitted stitch. CASTING-OFF TIP: To avoid the cast-off edge being tight you can cast off with a larger size needle. If the edge is still tight, make 1 yarn over after approx. each 4th stitch at the same time as casting off; the yarn overs are cast off as normal stitches. ------------------------------------------------------- START THE PIECE HERE: ------------------------------------------------------- JUMPER – SHORT OVERVIEW OF THE PIECE: The neck and yoke are worked in the round with circular needle, from mid back and top down. The yoke is divided for body and sleeves and the body is continued in the round with circular needle. The sleeves are worked with double pointed needles/short circular needle, top down. NECK: Cast on 60-64-64-68-68-72-76 stitches with double pointed needles/short circular needle size 4 mm and colour pearl grey DROPS Air. Knit 1 round. Then work rib in the round (knit 2, purl 2) for 3 cm. Change to circular needle size 5 mm. YOKE: Insert 1 marker at the beginning of the round; the yoke is measured from this marker! Knit 1 round where you increase 6-8-14-10-16-12-14 stitches evenly spaced – read INCREASE/DECREASE TIP = 66-72-78-78-84-84-90 stitches. Now work according to diagram A.1 (= 11-12-13-13-14-14-15 repeats of 6 stitches). NOTE! Choose diagram for your size. Read KNITTING TIP! REMEMBER THE KNITTING TENSION! When A.1 is finished in height there are 176-192-208-208-224-224-240 stitches. Knit 1 round with pearl grey where you decrease 4-8-12-8-12-4-8 stitches evenly spaced = 172-184-196-200-212-220-232 stitches. Continue with stocking stitch and pearl grey until the yoke measures 15-15-16-17-18-19-20 cm from the marker. Now divide for the body and sleeves: Knit 25-27-29-30-32-33-34 (= half back piece), place the next 36-38-40-40-42-44-48 stitches on 1 thread, cast on 6 stitches (= in side under sleeve), knit 50-54-58-60-64-66-68 (= front piece), place the next 36-38-40-40-42-44-48 stitches on 1 thread, cast on 6 stitches (= in side under sleeve), knit the last 25-27-29-30-32-33-34 stitches (= half back piece). The body and sleeves are finished separately. THE PIECE IS NOW MEASURED FROM HERE! BODY: There are now 112-120-128-132-140-144-148 stitches on needle. Continue in the round with stocking stitch and pearl grey for 16-20-23-25-26-27-28 cm (or to desired length; there is approx. 3-3-3-4-4-4-4 cm left to finished length). Change to circular needle size 4 mm. Work rib (knit 2, purl 2) for 3-3-3-4-4-4-4 cm. Loosely cast off with knit over knit and purl over purl – read CASTING-OFF TIP. Cut and fasten the strand. The jumper measures approx. 36-40-44-48-50-52-54 cm from the shoulder down. SLEEVES: Place the 36-38-40-40-42-44-48 stitches from the thread on the one side of the piece on double pointed needles/short circular needle size 5 mm and knit up 1 stitch in each of the 6 stitches cast on under the sleeve = 42-44-46-46-48-50-54 stitches. Insert a marker thread in the middle of the 6 stitches under the sleeve. Allow the thread to follow your work onwards; it will be used when decreasing under the sleeve. Start at the marker thread and work stocking stitch in the round, with pearl grey, for 3 cm. Now decrease 2 stitches under the sleeve – read DECREASE TIP. Decrease like this every 3-5-6-7-8-9-10 cm a total of 4 times = 34-36-38-38-40-42-46 stitches. Continue working until the sleeve measures 15-20-24-26-30-34-37 cm from the division. There is approx. 3-3-3-4-4-4-4 cm left to finished length; try the jumper on and work to desired length. Knit 1 round where you increase 6-4-6-6-4-6-2 stitches evenly spaced = 40-40-44-44-44-48-48 stitches. Change to double pointed needles size 4 mm. Work rib (knit 2, purl 2) for 3-3-3-4-4-4-4 cm. Cast off with knit over knit and purl over purl – remember CASTING-OFF TIP! The sleeve measures approx. 18-23-27-30-34-38-41 cm from the division. Work the other sleeve in the same way. KNOT: Make a knot at the top of each tree. Cut 2 strands of yellow, each 10 cm long. Put the strands together and thread them through the top yellow stitch on each tree, with both ends on the right side. Tie a knot, then another knot in the opposite direction – see sketch. Cut the strands leaving 1 cm ends. |
||||||||||||||||
Diagram explanations |
||||||||||||||||
|
||||||||||||||||
 |
||||||||||||||||
 |
||||||||||||||||
Have you finished this pattern?Tag your pictures with #dropspattern #merrytreessweater or submit them to the #dropsfan gallery. Do you need help with this pattern?You'll find 29 tutorial videos, a Comments/Questions area and more by visiting the pattern on garnstudio.com. © 1982-2026 DROPS Design A/S. We reserve all rights. This document, including all its sub-sections, has copyrights. Read more about what you can do with our patterns at the bottom of each pattern on our site. |
||||||||||||||||


With over 40 years in knitting and crochet design, DROPS Design offers one of the most extensive collections of free patterns on the internet - translated to 17 languages. As of today we count 324 catalogues and 12290 patterns translated into English (UK/cm). 12290
We work hard to bring you the best knitting and crochet have to offer, inspiration and advice as well as great quality yarns at incredible prices! Would you like to use our patterns for other than personal use? You can read what you are allowed to do in the Copyright text at the bottom of all our patterns. Happy crafting!
Post a comment to pattern DROPS Children 41-2
We would love to hear what you have to say about this pattern!
If you want to leave a question, please make sure you select the correct category in the form below, to speed up the answering process. Required fields are marked *.