The yarn cost is calculated from the pattern’s smallest size and the yarn’s cheapest product type. Looking for an even better price? You might find it on the DROPS Deals!
Merry Trees / DROPS Children 41-17
Change language:
English (UK/cm), Bulgaria#merrytreessweater
DROPS Design: Pattern no ai-025-bn
-------------------------------------------------------
Alternative Yarn – See how to change yarns here
Yarn Groups A to F – Use the same pattern and change the yarn here
Yarn usage using an alternative yarn – Use our yarn converter here
-------------------------------------------------------
The yarn cost is calculated from the pattern’s smallest size and the yarn’s cheapest product type. Looking for an even better price? You might find it on the DROPS Deals!
= raspberry | |
= yellow | |
= moss green | |
= brown | |
= between 2 stitches make 1 yarn over, on the next round work the yarn over twisted to avoid a hole |
Each of our patterns has specific tutorial videos to help you.
These step-by-step tutorials might also help you:
Why is the knitting/crochet tension so important?
Knitting tension is what determines the final measurements of your work, and is usually measured per 10 x 10 cm. It is provided like so: number of stitches in width x number of rows in height - eg: 19 stitches x 26 rows = 10 x 10 cm.
The knitting tension is very individual; some people knit/crochet loosely while others work tightly. You adjust the knitting tension with the needle size, which is why the suggested needle size is only meant as a guide! You need to adjust this (up or down) to ensure that YOUR knitting tension matches the knitting tension provided in the pattern. If you work with a different knitting tension than provided you will have a different yarn consumption, and your work will have different measurements than what the pattern suggests.
The knitting tension also determines which yarns can replace each other. As long as you achieve the same knitting tension you can replace one yarn with another.
See DROPS lesson: How to measure your tension/gauge
See DROPS video: How to make a gauge tension swatch
How do I know how many balls of yarn I need?
The required amount of yarn is provided in grams, eg: 450 g. To calculate how many balls you’ll need you first need to know how many grams are in 1 ball (25g, 50g or 100g). This information is available if you click on the individual yarn quality on our pages. Divide the amount required with the amount of each ball. For example, if each ball is 50g (the most common amount), the calculation will be as follows: 450 / 50 = 9 balls.
Can I use a different yarn than what the pattern suggests?
The important thing when changing from one yarn to another is that the knitting/crochet tension remains the same. This is so that the measurements of the finished piece will be the same as on the sketch provided. It is easier to achieve the same knitting tension using yarns from the same yarn group. It is also possible to work with multiple strands of a thinner yarn to achieve the knitting tension of a thicker one. Please try our yarn converter. We recommend you to always work a test swatch.
Please NOTE: when changing yarn the garment might have a different look and feel to the garment in the photo, due to individual properties and qualities of each yarn.
See DROPS lesson: Can I use a different yarn than the one mentioned in the pattern?
What are the yarn groups?
All our yarns are categorised into yarn groups (from A to F) according to thickness and knitting tension – group A contains the thinnest yarns and group F the thickest. This makes it easier for you to find alternative yarns to our patterns, should you wish to switch yarn. All yarns within the same group have a similar knitting tension and can easily replace each other. However, different yarn qualities have different structures and properties which will give the finished work a unique look and feel.
How do I use the yarn calculator?
At the top of all our patterns you’ll find a link to our yarn calculator, which is a helpful tool should you wish to use a different yarn than suggested. By filling in the yarn quality you wish to replace, the amount (in your size) and number of strands, the calculator will present good alternative yarns with the same knitting tension. Additionally it will tell you how much you’ll require in the new qualities and whether you’ll need to work with multiple strands. Most skeins are 50g (some are 25g or 100g).
If the pattern is worked with multiple colours, every colour will have to be calculated separately. Similarly, if the pattern is worked with several strands of different yarns (for example 1 strand Alpaca and 1 strand Kid-Silk) you will have to find alternatives for each, individually.
Why do you show discontinued yarns in the patterns?
Since different yarns have different qualities and textures we have chosen to keep the original yarn in our patterns. However, you can easily find options among our available qualities by using our yarn calculator, or simply pick a yarn from the same yarn group.
It is possible that some retailers still have discontinued yarns in stock, or that someone has a few skeins at home that they would like to find patterns for.
The yarn calculator will provide both alternative yarn as well as required amount in the new quality.
What size should I knit?
If you think it's hard to decide what size to make, it can be a good idea to measure a garment you own already and like the size of. Then you can pick the size by comparing those measures with the ones available in the pattern's size chart.
You'll find the size chart at the bottom of the pattern.
See DROPS lesson: How to read size chart
Why do I get the wrong knitting tension with the suggested needle size?
The needle size provided in the pattern serves only as a guide, the important thing is to follow the knitting tension. And since knitting tension is very individual, you will have to adjust the needle size to ensure that YOUR tension is the same as in the pattern – maybe you’ll have to adjust 1, or even 2 needle sizes, up or down to achieve the correct tension. For this, we recommend that you work test swatches.
Should you work with a different knitting tension than the one provided, the measurements of the finished garment might deviate from the measurement sketch.
See DROPS lesson: How to measure your tension/gauge
See DROPS video: How to make a tension/gauge swatch
Why is the pattern worked top-down?
Working a garment top-down provides more flexibility and room for personal adjustment. For example it is easier to try the garment on while working, as well as making adjustments to length of yoke and shoulder caps.
The instructions are carefully explaining every step, in the correct order. Diagrams are adjusted to the knitting direction and are worked as usual.
How do I work according to a knitting diagram?
The diagram depicts all rows/rounds, and every stitch seen from the right side. It is read from bottom to top, from right to left. 1 square = 1 stitch.
When working back and forth, every other row is worked from the right side and every other row is worked from the wrong side. When working from the wrong side, the diagram will have to be worked reversed: from left to right, knit stitches are purled, purl stitches are knit etc.
When working in the round every round is worked from the right side and the diagram are worked from right to left on all rounds.
See DROPS lesson: How to read knitting diagrams
How do I work according to a crochet diagram?
The diagram depicts all rows/rounds, and every stitch seen from the right side. It is worked from bottom to top, from right to left.
When working back and forth every other row is worked from the right side: from right to left and every other row is worked from the wrong side: from left to right.
When working in the round, every row in the diagram are worked from the right side, from right to left.
When working a circular diagram you start in the middle and work your way outwards, counter clockwise, row by row.
The rows usually start with a given number of chain stitches (equivalent to the height of the following stitch), this will either be depicted in the diagram or explained in the pattern.
See DROPS lesson: How to read crochet diagrams
How do I work several diagrams simultaneously on the same row/round?
Instructions for working several diagrams after each other on the same row/round, will often be written like so: “work A.1, A.2, A.3 a total of 0-0-2-3-4 times". This means you work A.1 once, then A.2 is worked once, and A.3 is repeated (in width) the number of times provided for your size – in this case like so: S = 0 times, M = 0 times, L=2 times, XL= 3 times and XXL = 4 times.
The diagrams are worked as usual: begin with the first row in A.1, then work the first row in A.2 etc.
See DROPS lesson: How to read knitting diagrams
See DROPS lesson: How to read crochet diagrams
Why are the sleeves shorter in larger sizes?
The total width of the garment (from wrist-to-wrist) will be larger in the larger sizes, despite the actual sleeves being shorter. The larger sizes have longer sleeve caps and wider shoulders, so there will be a good fit in all sizes.
Where on the garment is the length measured?
The measurement sketch/schematic drawing provides information regarding the full length of the garment. If it’s a jumper or a jacket the length is measured from the highest point on the shoulder closest to the neckline, and straight down to the bottom of the garment. It is NOT measured from the tip of shoulder. Similarly, the length of yoke is measured from the highest point on the shoulder and down to where yoke is split into body and sleeves.
On a jacket measures are never taken along bands, unless specifically stated. Always measure inside band stitches when measuring the length.
See DROPS lesson: How to read a schematic drawing
What is a repeat?
Diagrams are often repeated on the round or in height. 1 repeat is the diagram the way it appears in the pattern. If it says to work 5 repeats of A.1 in the round, then you work A.1 a total of 5 times after/next to each other in the round. If it says to work 2 repeats of A.1 vertically/in height you work the entire diagram once, then begin again at the start and work the entire diagram one more time.
Why does the piece start with more chain stitches than it’s worked with?
Chain stitches are slightly narrower than other stitches and to avoid working the cast-on edge too tight, we simply chain more stitches to begin with. The stitch count will be adjusted on the following row to fit the pattern and measurement sketch.
Why increase before the rib edge when the piece is worked top-down?
The rib edge is more elastic and will contract slightly compared to, for example, stocking stitch. By increasing before the rib edge, you avoid a visible difference in width between the rib edge and the rest of the body.
Why increase in the cast-off edge?
It’s very easy to cast off too tightly, and by making yarn overs while casting off (and simultaneously casting these off) you avoid a too tight cast off edge.
See DROPS video: How to bind off with yarn overs (yo)
How do I increase/decrease on every 3rd and 4th row/round alternately?
To achieve an even increase (or decrease) you can increase on, for example: every 3rd and 4th row alternately, like so: work 2 rows and increase on the 3rd row, work 3 rows and increase on the 4th. Repeat this until the increase is complete.
See DROPS lesson: Increase or decrease 1 st on every 3rd and 4th row alternately
How can I work a jacket in the round instead of back and forth?
Should you prefer to work in the round instead of back and forth, you may of course adjust the pattern. You’ll need to add steeks mid-front (usually 5 stitches), and follow the instructions. When you would normally turn and work from the wrong side, simply work across the steek and continue in the round. At the end you’ll cut the piece open, pick up stitches to work bands, and cover the cut edges.
See DROPS video: How to knit steeks and cut open
Can I work a jumper back and forth instead of in the round?
Should you prefer to work back and forth instead of in the round, you may of course adjust the pattern so you work the pieces separately and then assemble them at the end. Divide the stitches for the body in 2, add 1 edge stitch in each side (for sewing) and work the front and back pieces separately.
See DROPS lesson: Can I adapt a pattern for circular needles into straight needles?
Why is the pattern slightly different than what I see in the photo?
Pattern repeats can vary slightly in the different sizes, in order to get the correct proportions. If you’re not working the exact same size as the garment in the photo, yours might deviate slightly. This has been carefully developed and adjusted so that the complete impression of the garment is the same in all sizes.
Make sure to follow instructions and diagrams for your size!
How do I make a women’s size garment into a men’s size one?
If you have found a pattern you like which is available in women’s size it’s not very difficult to convert it to men’s size. The biggest difference will be the length of sleeves and body. Start working on the women size that you think would fit across the chest. The additional length will be worked right before you cast off for the armhole/sleeve cap. If the pattern is worked top-down you can add the length right after the armhole or before the first decrease on sleeve.
Regarding additional yarn amount, this will depend on how much length you add, but it is better with a skein too many than too few.
How do I prevent a hairy garment from shedding?
All yarns will have excess fibres (from production) that might come off as lint or shedding. Brushed yarns (ie hairier yarns) have more of these loose, excess fibres, causing more shedding.
Shedding also depends on what is worn under or over the garment, and whether this pulls at the yarn fibres. It’s therefore not possible to guarantee that there will be no shedding
Below are some tips on how to get the best result when working with hairier yarns:
1. When the garment is finished (before you wash it) shake it vigorously so the looser hairs come off. NOTE: do NOT use a lint roller, brush or any method that pulls at the yarn.
2. Place the garment in a plastic bag and put it in your freezer - the temperature will cause the fibres to become less attached to each other, and excess fibres will come off easier.
3. Leave in the freezer for a few hours before taking it out and shaking it again.
4. Wash the garment according to the instructions on the yarn label.
Why does my garment pill?
Pilling is a natural process that happens to even the most exclusive of fibers. It's a natural sign of wear and tear that is hard to avoid, and that is most visible in high friction areas of your garment like a sweater's arms and cuffs.
You can make your garment look as new by removing the pilling, using a fabric comb or a pill/lint remover.
Cornelia wrote:
Hello, my son who is now 14 yrs old would like me to knit this sweater for him, but would like a size bigger that 14 as he wants to be able to wear the sweater next year also. Could you help me figure out the math for a bigger size than what you have offered in the pattern? Thank you
03.11.2024 - 21:14DROPS Design answered:
Dear Cornelia, we don't make custom patterns but you can do a "rule of three" to calculate the pattern for a larger size, according to your gauge and desired measurements; here is a lesson on how to calculate it: https://www.garnstudio.com/lesson.php?id=25&cid=19. You can also use the sweater version for men in the smallest size as a guide; you can see it here: https://www.garnstudio.com/pattern.php?id=10555&cid=19. Happy knitting!
03.11.2024 - 22:38Nikki wrote:
Kan ik deze trui ook breien met Drops Karisma? Zo ja, hoe moet ik het garen dan uitrekenen? Alvast bedankt!
30.09.2023 - 21:33DROPS Design answered:
Dag Nikki,
DROPS Karisma valt in garencategorie B en is dus dunner, waarmee het een andere stekenverhouding heeft. Om een garen te vervangen kun je het beste in dezelfde garencategorie blijven.
03.10.2023 - 06:09Verena wrote:
Hallo liebes Drops Team, liegt es nur bei mir? Oder kann nur ich das Muster zum stricken des Weihnachtbaums nicht sehen? LG Verena
21.12.2021 - 12:56DROPS Design answered:
Liebe Verena, das Diagram kann ich sehen, leeren Sie den Cache und versuchen Sie noch mal - oder versuchen Sie mit einem anderen Browser. Viel Spaß beim stricken!
21.12.2021 - 15:43Marie wrote:
Bonjour je suis entrain de faire le Christmas Kal. Dans le modèle vous conseillez de diviser par le nombre d’augmentation par le nombre de mailles sur l’aiguille afin de répartir équitablement les augmentations. J’ai 68 mailles sur mes aiguilles et je dois faire 10 augmentations, afin d’obtenir 78 mailles pour le diagramme. Hors 68/10 = 6,8 Je ne peux donc faire les augmentations de façon à ce qu’elles soient juste. Comment faire ?
12.11.2021 - 22:28DROPS Design answered:
Bonjour Marie, cette leçon explique comment répartir des augmentations (ou diminutions) en fonction du résultat et devrait vous aider à placer ainsi vos augmentations. Bon tricot!
15.11.2021 - 07:16
Merry Trees |
||||||||||||||||
|
|
|||||||||||||||
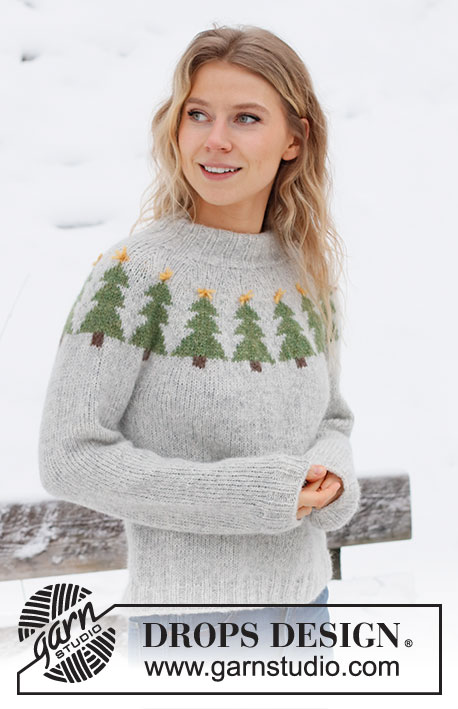
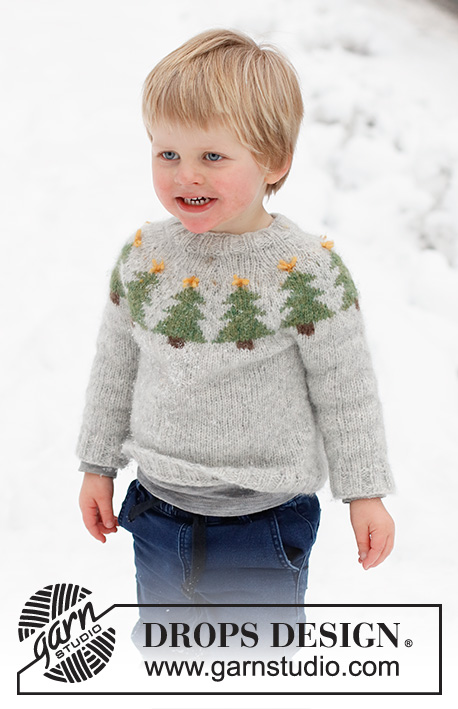
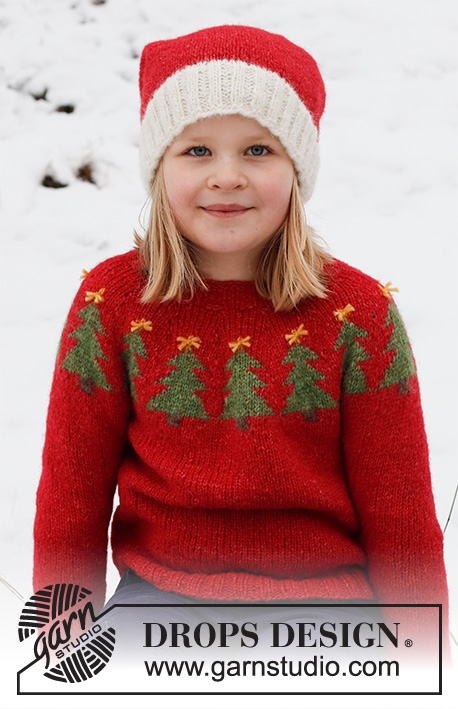
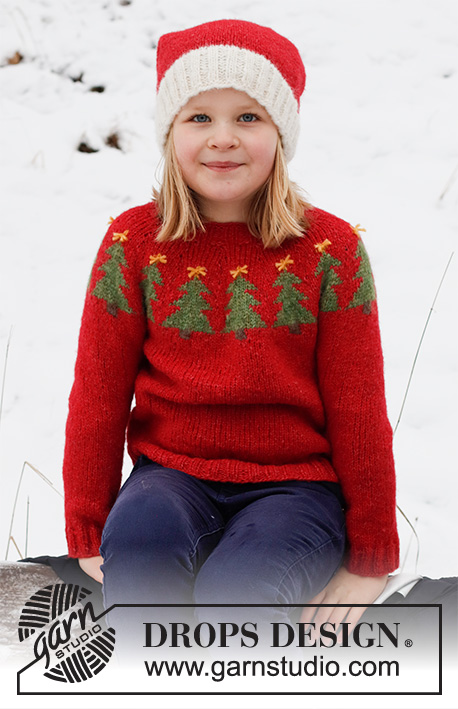
Knitted Christmas jumper and hat for children in DROPS Air. The jumper is worked top down with round yoke and Christmas tree pattern. The hat is worked in the round, bottom up. Sizes 2 - 14 years. Theme: Christmas.
DROPS Children 41-17 |
||||||||||||||||
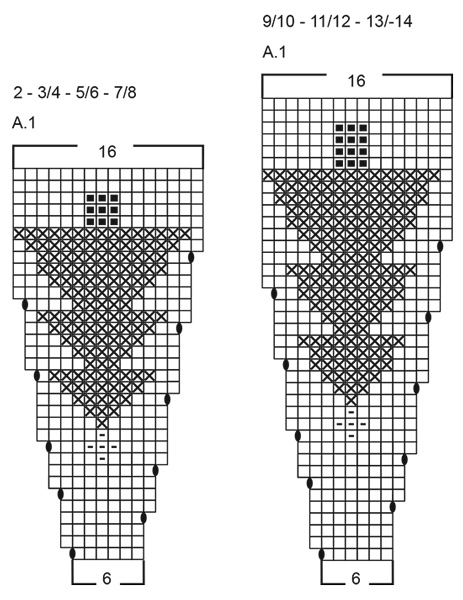
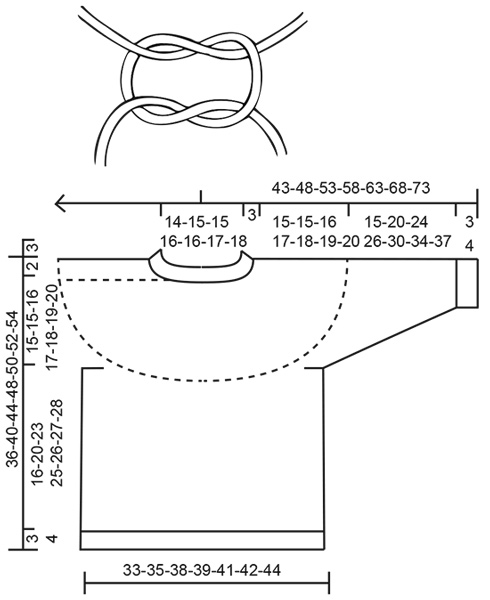
------------------------------------------------------- EXPLANATIONS FOR THE PATTERN: ------------------------------------------------------- INCREASE/DECREASE TIP (evenly spaced): To work out how to increase/decrease evenly, count the total number of stitches on needle (e.g. 60 stitches), and divide by the number of increases/decreases to be made (e.g. 6) = 10. In this example, increase by making 1 yarn over after each 10th stitch. On the next round knit the yarn overs twisted to avoid holes. When decreasing, knit together each 9th and 10th stitch. PATTERN: See diagram A.1. Choose the diagram for your size. The pattern is worked in stocking stitch. KNITTING TIP: To avoid the garment losing its elasticity when working pattern, it is important that the strands at the back are not tight. Use a larger size needle when working pattern if the piece becomes tight. DECREASE TIP-2 (for sleeves): Decrease 1 stitch on either side of the marker thread as follows: Work until there are 3 stitches left before the marker thread, knit 2 together, knit 2 (marker thread sits between these 2 stitches), slip 1 stitch as if to knit, knit 1 and pass the slipped stitch over the knitted stitch. DECREASE TIP-3 (for hat): Work until there are 2 stitches left before the marker, knit 2 together (= 1 stitch decreased). Repeat at each marker. CASTING-OFF TIP: To avoid the cast-off edge being tight you can cast off with a larger size needle. If the edge is still tight, make 1 yarn over after approx. each 4th stitch at the same time as casting off; the yarn overs are cast off as normal stitches. ------------------------------------------------------- START THE PIECE HERE: ------------------------------------------------------- JUMPER – SHORT OVERVIEW OF THE PIECE: The neck and yoke are worked in the round with circular needle, from mid back and top down. The yoke is divided for body and sleeves and the body is continued in the round with circular needle. The sleeves are worked with double pointed needles/short circular needle, top down. NECK: Cast on 60-64-64-68-68-72-76 stitches with double pointed needles/short circular needle size 4 mm and raspberry DROPS Air. Knit 1 round. Then work rib in the round (knit 2, purl 2) for 3 cm. Change to circular needle size 5 mm. YOKE: Insert 1 marker at the beginning of the round; the yoke is measured from this marker! Knit 1 round where you increase 6-8-14-10-16-12-14 stitches evenly spaced – read INCREASE/DECREASE TIP = 66-72-78-78-84-84-90 stitches. Now work according to diagram A.1 (= 11-12-13-13-14-14-15 repeats of 6 stitches). NOTE! Choose diagram for your size. Read KNITTING TIP! REMEMBER THE KNITTING TENSION! When A.1 is finished in height there are 176-192-208-208-224-224-240 stitches. Knit 1 round with raspberry where you decrease 4-8-12-8-12-4-8 stitches evenly spaced = 172-184-196-200-212-220-232 stitches. Continue with stocking stitch and raspberry until the yoke measures 15-15-16-17-18-19-20 cm from the marker. Now divide for the body and sleeves: Knit 25-27-29-30-32-33-34 (= half back piece), place the next 36-38-40-40-42-44-48 stitches on 1 thread, cast on 6 stitches (= in side under sleeve), knit 50-54-58-60-64-66-68 (= front piece), place the next 36-38-40-40-42-44-48 stitches on 1 thread, cast on 6 stitches (= in side under sleeve), knit the last 25-27-29-30-32-33-34 stitches (= half back piece). The body and sleeves are finished separately. THE PIECE IS NOW MEASURED FROM HERE! BODY: There are now 112-120-128-132-140-144-148 stitches on needle. Continue in the round with stocking stitch and raspberry for 16-20-23-25-26-27-28 cm (or to desired length; there is approx. 3-3-3-4-4-4-4 cm left to finished length). Change to circular needle size 4 mm. Work rib (knit 2, purl 2) for 3-3-3-4-4-4-4 cm. Loosely cast off with knit over knit and purl over purl – CASTING-OFF TIP. Cut and fasten the strand. The jumper measures approx. 36-40-44-48-50-52-54 cm from the shoulder down. SLEEVES: Place the 36-38-40-40-42-44-48 stitches from the thread on the one side of the piece on double pointed needles/short circular needle size 5 mm and knit up 1 stitch in each of the 6 stitches cast on under the sleeve = 42-44-46-46-48-50-54 stitches. Insert a marker thread in the middle of the 6 stitches under the sleeve. Allow the thread to follow your work onwards; it will be used when decreasing under the sleeve. Start at the marker thread and work stocking stitch in the round, with raspberry, for 3 cm. Now decrease 2 stitches under the sleeve – read DECREASE TIP-2. Decrease like this every 3-5-6-7-8-9-10 cm a total of 4 times = 34-36-38-38-40-42-46 stitches. Continue working until the sleeve measures 15-20-24-26-30-34-37 cm from the division. There is approx. 3-3-3-4-4-4-4 cm left to finished length; try the jumper on and work to desired length. Knit 1 round where you increase 6-4-6-6-4-6-2 stitches evenly spaced = 40-40-44-44-44-48-48 stitches. Change to double pointed needles size 4 mm. Work rib (knit 2, purl 2) for 3-3-3-4-4-4-4 cm. Cast off with knit over knit and purl over purl – remember CASTING-OFF TIP! The sleeve measures approx. 18-23-27-30-34-38-41 cm from the division. Work the other sleeve in the same way. KNOT: Make a knot at the top of each tree. Cut 2 strands of yellow, each 10 cm long. Put the strands together and thread them through the top yellow stitch on each tree, with both ends on the right side. Tie a knot, then another knot in the opposite direction – see sketch. Cut the strands leaving 1 cm ends. ------------------------------------------------------- HAT – SHORT OVERVIEW OF THE PIECE: The piece is worked with circular needle, in the round and bottom up. Change to double pointed needles when necessary, after decreasing stitches at the top. HAT: Cast on 96-100-104-108-112 stitches with circular needle size 3.5 mm and off-white DROPS Air. Purl 1 round. Then work rib in the round (knit 2, purl 2) for 4-5-5-6-6 cm. Change to circular needle size 4.5 mm and knit 1 round where you decrease 12-12-12-12-12 stitches evenly spaced – read INCREASE/DECREASE TIP = 84-88-92-96-100 stitches. Change to raspberry and continue with stocking stitch. REMEMBER THE KNITTING TENSION! When the piece measures 18-19-19-19-20 cm from the cast-on edge, decrease 0-4-2-0-4 stitches evenly spaced = 84-84-90-96-96 stitches. Insert 6 markers with 14-14-15-16-16 stitches between each one. On the next round decrease 1 stitch before each marker – read DECREASE TIP-3 (= 6 stitches decreased). Decrease like this every 2nd round a total of 2-2-2-3-3 times. Then every 6th-7th-7th-7th-7th round 10-10-11-11-11 times = 12 stitches. Work until the hat measures 50-52-54-56-58 cm, then knit all stitches together 2 and 2 = 6 stitches. Cut the strand and pull it through the remaining stitches, tighten and fasten well. POM-POM: Make a pom-pom of 5 cm in diameter with off white. Sew it to the top of the hat. |
||||||||||||||||
Diagram explanations |
||||||||||||||||
|
||||||||||||||||
Have you made this or any other of our designs? Tag your pictures in social media with #dropsdesign so we can see them! Do you need help with this pattern?You'll find 32 tutorial videos, a Comments/Questions area and more by visiting the pattern on garnstudio.com. © 1982-2025 DROPS Design A/S. We reserve all rights. This document, including all its sub-sections, has copyrights. Read more about what you can do with our patterns at the bottom of each pattern on our site. Have you finished this pattern? |
With over 40 years in knitting and crochet design, DROPS Design offers one of the most extensive collections of free patterns on the internet - translated to 17 languages. As of today we count 309 catalogues and 11671 patterns translated into English (UK/cm). 11671
We work hard to bring you the best knitting and crochet have to offer, inspiration and advice as well as great quality yarns at incredible prices! Would you like to use our patterns for other than personal use? You can read what you are allowed to do in the Copyright text at the bottom of all our patterns. Happy crafting!
Post a comment to pattern DROPS Children 41-17
We would love to hear what you have to say about this pattern!
If you want to leave a question, please make sure you select the correct category in the form below, to speed up the answering process. Required fields are marked *.