
Popular categories
Looking for a yarn?


Comments / Questions (37)
![]() Monique wrote:
Monique wrote:
Na op internet diverse video”’s te hebben bekeken lukt het mij nu om de diamant steek op de goede manier te haken!
22.06.2022 - 14:24
![]() Monique wrote:
Monique wrote:
PS en zijn de 3 keerlossen van toer 2 het 1e stokje van toer 3? Hier begint al wat ik niet terug vind in de beschrijving . Dank u.
21.06.2022 - 14:06DROPS Design answered:
Dag Monique,
Nee de 3 keerlossen worden aanvullend gehaakt, daarna haak je nog het eerste stokje van de volgende toer.
26.06.2022 - 10:10
![]() Monique wrote:
Monique wrote:
Kunt u het muts patroon in geschreven vorm uitleggen? Ik heb alles geprobeerd en ben een ervaren haakster maar dit telpatroon is wel verwarrend door die schuine strepen tussen de toeren….en heel moeilijk te begrijpen! dank u voor hulp.
21.06.2022 - 11:23DROPS Design answered:
Dag Monique,
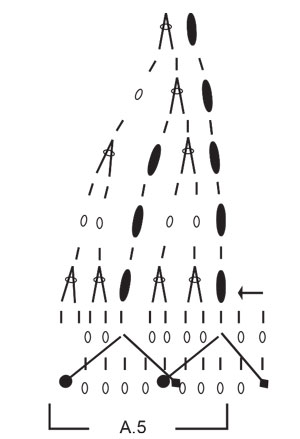
We hebben helaas alleen het telpatroon en geen uitgeschreven versie. Bij het patroon staan een aantal video's die je wellicht verder kunnen helpen. De schuine strepen met de bolletjes/vierkantjes eraan geven aan in welke steek van een vorige toer je de driedubbele stokjes moet haken.
26.06.2022 - 10:13
![]() Gosia wrote:
Gosia wrote:
Dzień dobry, czy mogę prosić o podpowiedź, jak tę czapkę zrobić dla obwodu głowy 57-59 cm?
28.02.2022 - 19:41DROPS Design answered:
Witaj Gosiu, należy albo odpowiednio zwiększyć obwód, albo użyć grubszego szydełka. Pozdrawiamy!
01.03.2022 - 14:21
![]() Iliana wrote:
Iliana wrote:
È sicuramente un problema mio ma ho provato a capirci qualcosa e sono riuscita a fare soltanto il primo giro malgrado gli sforzi. Gli schemi dovrebbero aiutare e invece mi hanno confuso ancora di più.
08.02.2022 - 20:08DROPS Design answered:
Buonasera Iliana, se ci spiega quale passo del modello non le è chiaro, possiamo aiutarla in modo più preciso. Buon lavoro!
08.02.2022 - 23:26
![]() Sylvie wrote:
Sylvie wrote:
Bonjour J'ai une précision à demander lorsque l'on commence A2, A3 et A4 : pour A2, on fait une bride en relief incomplète et on a donc 2 mailles sur le crochet. Ensuite, on fait 3 brides normales et donc on a toujours 2 mailles sur le crochet. Sur la maille suivante, on fait une triple bride en "éliminant la maille restée sur le crochet" lors du dernier jeté. Et sur cette même maille, on fait une bride incomplète....s Est ce cela? Merci de votre aide
28.12.2021 - 20:54DROPS Design answered:
Bonjour Sylvie, quand on fait A.2, on ne crochète que la triple bride en relief car il n'y a qu'une seule maille - cf NOTE à la fin de la légende; ensuite, dans A.3/A.4, vous crochetez le 6ème symbole (= 1 triple-bride relief) sans la terminer (= 2 boucles sur le crochet) et vous enchaînez avec le 7ème symbole (1 triple-bride en relief en écoulant à la fin les 2 premières boucles sur le crochet). Bon crochet!
03.01.2022 - 09:29
![]() Sina wrote:
Sina wrote:
Hallo, ich verstehe leider nicht, ob die erste Reihe mit A3 und A4 nur Stäbchen sind oder schon Reliefstäbchen. Wo beginnen die Reliefstäbchen, in der 3.Reihe? Vielen Dank
20.12.2021 - 20:19DROPS Design answered:
Liebe Sina, die 1. Reihe in A.3 und A.4 ist mit Stäbchen gehäkelt (siehe Pfeil + 2. Symbol), die Reliefstäbchen beginnen bei der 3. Reihe. Viel Spaß beim häkeln!
21.12.2021 - 10:22
![]() Sabrina wrote:
Sabrina wrote:
Buongiorno, non riesco a capire il modello...ad esempio nel primo punto di A2 indicato dalla freccia va lavorata una maglia alta nella maglia sotto o una maglia alta in rilievo? E poi come si continua?
07.12.2021 - 05:35DROPS Design answered:
Buonasera Sabrina, deve lavorare una maglia alta nella maglia sotto, Buon lavoro!
07.12.2021 - 21:48
![]() Crissi wrote:
Crissi wrote:
Hallo, ich verstehe leider dieses Muster nicht. Wie beginne ich dieses Überkreuz-Muster mit den Dreifach-Reliefstäbchen? Ich habe schon viel probiert, aber leider klappt es nicht. Könnt ihr mir helfen? Liebe Grüße Crissi
22.11.2021 - 21:13DROPS Design answered:
Liebe Crissi, die Runden beginnen mit A.2, dann wiederholen Sie A.3 und enden Sie - in Runden - mit den 3 ersten Maschen A.4 (die 4. Masche A.4 häkeln Sie nicht in Runden, diese Masche ist die Masche von A.2, dh bei der 3. und 5. Runde häkeln Sie das Reliefstäbchen in A.4 um die erste Masche der Runde = A.2. Viel Spaß beim häkeln!
23.11.2021 - 08:22
![]() Laurent wrote:
Laurent wrote:
Dans les explications du diagramme, pour le 5ieme symbole (losange vide), vous écrivez "1 bride en relief autour d'1 bride du rang/tour précédent", c'est plutôt une triple bride non ?
12.10.2021 - 14:25DROPS Design answered:
Bonjour Laurent, sauf erreur de ma part, le 5ème symbole n'est présent qu'une seule fois dans le diagramme: lorsque que l'on commence A.2-A.3-A.4, au premier rang de triple-brides en relief que l'on va crocheter autour des brides du tour/rang précédent, par la suite, vous crochetez effectivement autour des triple-brides du rang/tour précédent (7ème et 8ème symbole). Bon crochet!
13.10.2021 - 07:36
|
||||||||||||||||||||||||||||
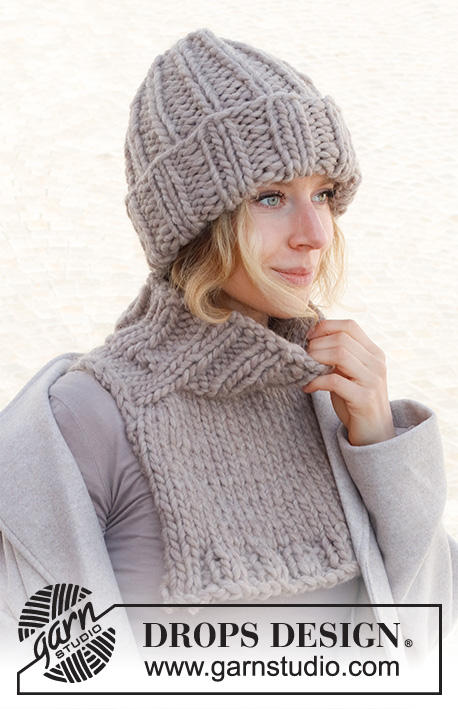
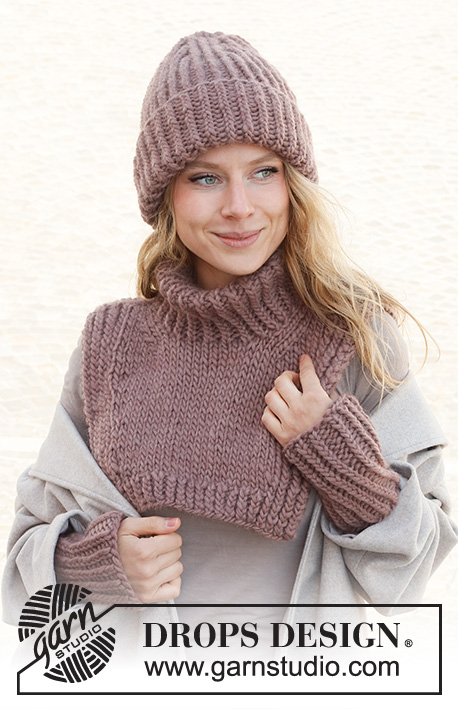
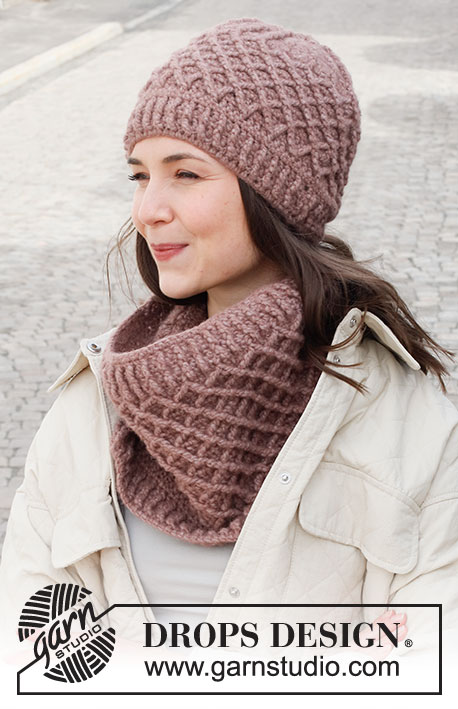
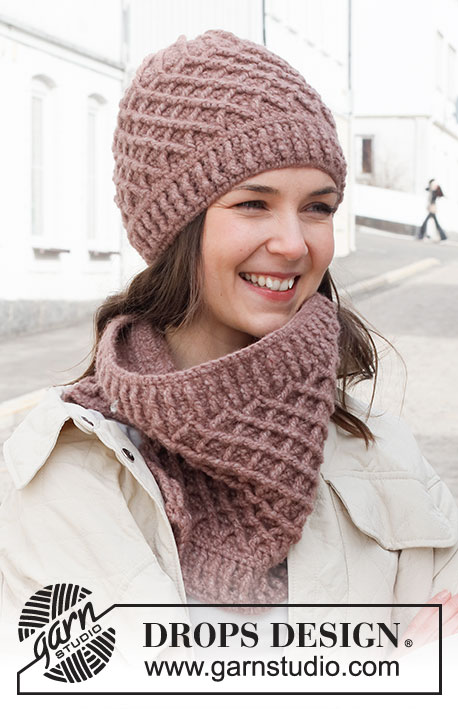
Pinecone Set#pineconeset |
||||||||||||||||||||||||||||
 |
 |
|||||||||||||||||||||||||||
Crochet hat and neck-warmer in DROPS Air. The piece is worked with relief-pattern.
DROPS 225-20 |
||||||||||||||||||||||||||||
|
------------------------------------------------------- EXPLANATIONS FOR THE PATTERN: ------------------------------------------------------- CHAIN STITCH: If you work outermost on the hook the chain stitch will often be too tight; 1 chain stitch should be as long as 1 double/treble crochet is wide. CROCHET INFORMATION: When working in the round (and turning after each round): At the beginning of each round of treble crochets, work 3 chain stitches which do not replace the first treble crochet but are worked in addition. Finish the round with 1 slip stitch in the 3rd chain stitch from the beginning of the round. At the beginning of each round of double crochets, work 1 chain stitch which does not replace the first double crochet but is worked in addition. Finish the round with 1 slip stitch in the first chain stitch from the beginning of the round. When working back and forth (applies to neck-warmer): At the beginning of each row of treble crochets, work 3 chain stitches which do not replace the first treble crochet but are worked in addition. At the beginning of each row of double crochets, work 1 chain stitch which does not replace the first double crochet but is worked in addition. PATTERN: Hat: See diagrams A.1 to A.5. Neck-warmer: See diagrams A.1 to A.4. DECREASE TIP-1: Work 2 double crochets together as follows: Insert the hook through the first stitch and pick up the strand, insert the hook through the second stitch and pick up the strand (= 3 loops on the hook), make 1 yarn over and pull it through all 3 loops on the hook (= 1 stitch decreased). DECREASE TIP-2: Work 2 treble crochets together as follows: * Make 1 yarn over, insert the hook through the next stitch and pick up the strand, make 1 yarn over and pull it through the first 2 loops on the hook *, work from *-* a total of 2 times, make 1 yarn over and pull it through all 3 loops on the hook (= 1 stitch decreased). ------------------------------------------------------- START THE PIECE HERE: ------------------------------------------------------- HAT – SHORT OVERVIEW OF THE PIECE: The piece is worked bottom up in the round and turned after each round, so rounds are alternately worked from the right and wrong side. HAT: Work 81 chain stitches – read CHAIN STITCH with hook size 4.5 mm and DROPS Air, form them into a ring with 1 slip stitch in the first chain stitch. Work 3 chain stitches – read CROCHET INFORMATION, work 1 treble crochet in each chain stitch and finish with 1 slip stitch in the 3rd chain stitch at the beginning of the round = 80 treble crochets and 3 chain stitches to turn with. Turn and work from the round with an arrow in A.1 (first round = right side) – turn after each round, so each round of double crochets is worked from the wrong side and each round of treble crochets and relief-pattern is worked from the right side. When A.1 has been completed the piece measures approx. 4 cm. Now work from the round marked with an arrow in A.2 as follows: Work A.2 over the first stitch, A.3 over the next 76 stitches (= 19 repeats of 4 stitches), work the first 3 stitches in A.4 – last stitch in A.4 is equivalent to the stitch in A.2 (at the beginning of the round) and shows where relief-stitches will be worked, finish with 1 slip stitch in the 3rd chain stitch at the beginning of the round. Turn and work the next round from the wrong side and continue back and forth like this, alternately from the right and wrong side, repeating A.x in height. On rounds 3 and 7 work the last relief-stitch on the round around the treble crochet/relief-stitch at the beginning of the round (so the pattern continues all the way round). REMEMBER THE CROCHET TENSION! Continue the pattern until the piece measures 16 cm – finish after the first round in A.x, i.e. a round of double crochets from the wrong side, finish the round with 1 slip stitch in the first chain stitch at the beginning of the round, then work 1 slip stitch in each of the 2 first double crochets. This is now the beginning of the round. Work from the round with an arrow in A.5 = 10 repeats (the first rounds in the diagram show where the relief-stitches are worked). When A.5 has been completed in height there are 20 stitches. Work 1 round where all double crochets are worked together 2 and 2 – read DECREASE TIP-1 = 10 stitches. Work 1 round where all treble crochets are worked together 2 and 2 – read DECREASE TIP-2 = 5 treble crochets. Cut the strand, tack it through the remaining stitches, pull tight and fasten well. The hat measures approx. 25 cm from the top down. ------------------------------------------------------- NECK-WARMER – SHORT OVERVIEW OF THE PIECE: The piece is started back and forth in 2 sections until the split is finished. Then it is continued in the round, turning after each round so the texture remains the same as when working back and forth. NECK-WARMER: Work 46-50 chain stitches (including 3 chain stitches to turn with) – read CHAIN STITCH with hook size 5 mm DROPS Air. Turn and work the first row from the wrong side as follows: 1 treble crochet in the 4th chain stitch from the hook (= 1 treble crochet + 3 chain stitches to turn with) – read CROCHET INFORMATION, work 1 treble crochet in each of the remaining 42-46 stitches = 43-47 treble crochets + 3 chain stitches. Now work pattern as follows: Start on the row with an arrow in A.1 and work A.1 until there is 1 treble crochet left, work the first stitch in A.1 so the pattern is symmetrical. Continue the pattern back and forth. On the last row in A.1 decrease 1-1 double crochet by working 2 double crochets together – read DECREASE TIP-1 = 42-46 double crochets + 3 chain stitches. The piece measures approx. 4 cm. Continue as follows: ROW 1 (right side): Work A.2 over the first stitch, A.3 over the next 36-40 stitches (= 9-10 repeats of 4 stitches), A.4 over the next 4 stitches, 1 treble crochet in the last stitch. ROW 2 (wrong side): Work 1 double crochet in the first stitch, pattern as before over the next 41-45 stitches. Continue this pattern until there are 2 rows left in A.2 to A.4. REMEMBER THE CROCHET TENSION! On the next row of double crochets decrease 1 double crochet at the beginning and end of the row (= 2 stitches decreased) – read DECREASE TIP = 40-44 double crochets + 1 chain stitch. Lay the piece to one side and work another section in the same way. Now work the 2 sections together, working pattern from the last row in A.2 to A.4 from the right side as follows: Work A.2 over the first stitch, 9-10 repeats of A.3 and the first 2 stitches in A.3 over the last 3 stitches on the first section (the last relief-stitch is worked around the first relief-stitch on the second section), work the last stitch in A.3 over the first stitch on the second section, 1 repeat of A.3 on the second section (the first relief-stitch is worked in the last relief-stitch from the previous row at the end of the first section), work 8-9 repeats of A.3, the first 3 stitches in A.4 (the last relief-stitch is worked around the first stitch at the beginning of the first section) and finish the round with 1 slip stitch in the 3rd chain stitch at the beginning of the round. There are 80-88 stitches and 20-22 squares of relief-stitches. Turn and work the next round from the wrong side and continue back and forth like this, alternately from the right and wrong side, repeating A.x in height. On round 7 work the last relief-stitch on the round around the treble crochet/relief-stitch at the beginning of the round (so the pattern continues all the way round). When the piece measures 12-12 cm from the split – finish after a round of double crochets, work an edge as follows: Start on the round with an arrow in A.1 and work A.1 over all stitches. When A.1 has been completed in height the piece measures 16-16 cm from the split and 26-26 cm from the cast-on edge. Cut and fasten the strand. |
||||||||||||||||||||||||||||
Diagram explanations |
||||||||||||||||||||||||||||
|
||||||||||||||||||||||||||||
 |
||||||||||||||||||||||||||||
 |
||||||||||||||||||||||||||||
Have you finished this pattern?Tag your pictures with #dropspattern #pineconeset or submit them to the #dropsfan gallery. Do you need help with this pattern?You'll find 13 tutorial videos, a Comments/Questions area and more by visiting the pattern on garnstudio.com. © 1982-2026 DROPS Design A/S. We reserve all rights. This document, including all its sub-sections, has copyrights. Read more about what you can do with our patterns at the bottom of each pattern on our site. |
||||||||||||||||||||||||||||


With over 40 years in knitting and crochet design, DROPS Design offers one of the most extensive collections of free patterns on the internet - translated to 17 languages. As of today we count 324 catalogues and 12290 patterns translated into English (UK/cm). 12290
We work hard to bring you the best knitting and crochet have to offer, inspiration and advice as well as great quality yarns at incredible prices! Would you like to use our patterns for other than personal use? You can read what you are allowed to do in the Copyright text at the bottom of all our patterns. Happy crafting!
Post a comment to pattern DROPS 225-20
We would love to hear what you have to say about this pattern!
If you want to leave a question, please make sure you select the correct category in the form below, to speed up the answering process. Required fields are marked *.