
Popular categories
Looking for a yarn?


Comments / Questions (31)
![]() Madou wrote:
Madou wrote:
Bonjour, Je souhaite vous poser des questions et utilise un maximum de 500 caractères mais on me dit que ma question est trop longue ; serait-ce un bug ? Merci d'avance !
16.06.2021 - 15:37
![]() Madou wrote:
Madou wrote:
J'ai une deuxième question : les augmentations sur le côté se font-elles juste avant la maille de lisière ? Sur l'envers, faut-il tricoter toujours le même nombre de mailles jersey entre la lisière et le diag A2 ? Merci d'avance !
14.06.2021 - 13:49DROPS Design answered:
Bonjour Madou, les augmentations se font juste après la maille lisière sur le côté (= début de rang sur l'endroit pour le devant gauche) ou bien avant la maille lisière sur le côté (= fin de rang sur l'endroit pour le devant droit) et elles se tricotent en jersey - cf AUGMENTATIONS. Bon tricot!
14.06.2021 - 16:37
![]() Madou wrote:
Madou wrote:
Bonjour, comment interpréter le devant droit svp : " A.2 au-dessus des 12-18-24-24-30-36 mailles suivantes (= 2-3-4-4-5-6 motifs de 6 mailles)" ? Faut-il répéter deux fois la même ligne du diag. A2 ou les lignes vont-elles par paires : 1 et 2 sur l'endroit, puis 2 et 3 l'envers, etc? Merci d'avance !
14.06.2021 - 13:48DROPS Design answered:
Bonjour Madou, en taille S par exemple vous allez répéter 2 fois les 6 mailles de A.2 = autrement dit, vous aurez 12 mailles tricotez en A.2. Retrouvez ici comment lire les diagrammes: de bas en haut, de gauche à droite sur l'endroit (= rangs 1, 3, ...) et de droite à gauche sur l'envers (rangs 2, 4, ...). Bon tricot!
14.06.2021 - 16:36
![]() Madou wrote:
Madou wrote:
Re-bonjour, Je viens de comprendre mon erreur d'interprétation. Tout est bon pour le moment ! Merci beaucoup et bonne journée ! Madou
03.06.2021 - 16:12
![]() Madou wrote:
Madou wrote:
Bonjour, Merci de votre réponse ! J'ai une autre question regardant le diagramme A1: faut-il toujours garder les 3 m end du point mousse (+ la dernière m end de lisière), en-dehors du diagramme ? Et ne réaliser le diagramme qu'entre ces mailles au point mousse ? Merci d'avance !
03.06.2021 - 10:39DROPS Design answered:
Bonjour Madou, je ne suis pas bien sûre de saisir votre question, pour le devant droit, vous tricotez, vu sur l'endroit: 3 m point mousse (bordure devant), A.1, A.2, quelques mailles en jersey - cf taille - et 1 m lis au point mousse (côté). Pour le devant gauche: 1 m lis, des mailles jersey, A.3, A.1, 3 m de bordure au point mousse. Est-ce que ceci peut répondre à votre question?
03.06.2021 - 13:52
![]() Madou wrote:
Madou wrote:
Bonjour ! J'en suis au diagramme A1 et m'apprête à réaliser ma première nope ! Il est dit "Tricoter 1 m end, 1 m env, 1 m end dans la même maille (= on augmente 2 mailles)." Si on ne tricote qu'une seule fois "1 m end dans la même maille", n'a-t-on pas augmenté seulement 1 maille ? Merci d'avance, et bravo pour ce superbe modèle !
02.06.2021 - 19:42DROPS Design answered:
Bonjour Madou, vous tricotez 3 fois la même maille en faisant d'abord 1 maille endroit, puis 1 maille envers puis 1 maille endroit = vous avez maintenant 3 mailles sur l'aiguille droite et vous pouvez lâcher la maille de l'aiguille gauche. Bon tricot!
03.06.2021 - 08:20
![]() Birte Kessler wrote:
Birte Kessler wrote:
Going for Ice Cream
17.05.2021 - 15:48
![]() Francesca wrote:
Francesca wrote:
Bellissimo e romantico.
23.02.2021 - 11:18
![]() Laura wrote:
Laura wrote:
Beach Wedding
17.01.2021 - 22:28
![]() Laura wrote:
Laura wrote:
Cottage Dream
17.01.2021 - 22:28
|
|||||||||||||||||||||||||
Doves Bay Vest#dovesbayvest |
|||||||||||||||||||||||||
 |
 |
||||||||||||||||||||||||
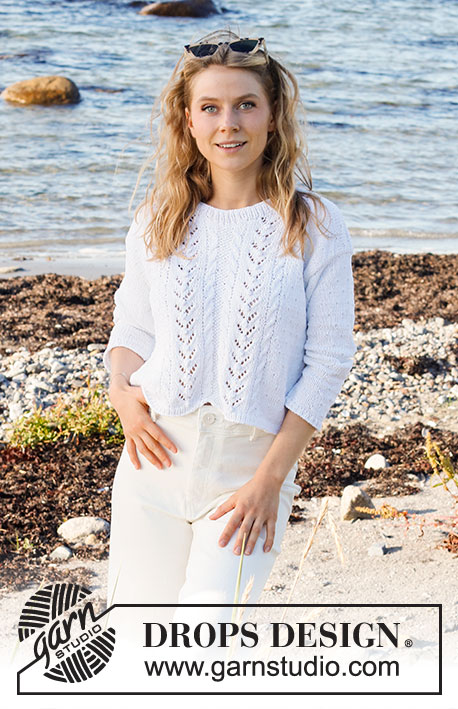
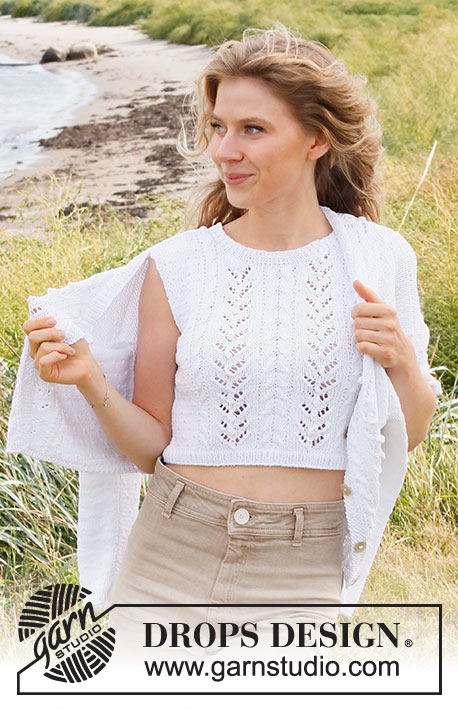
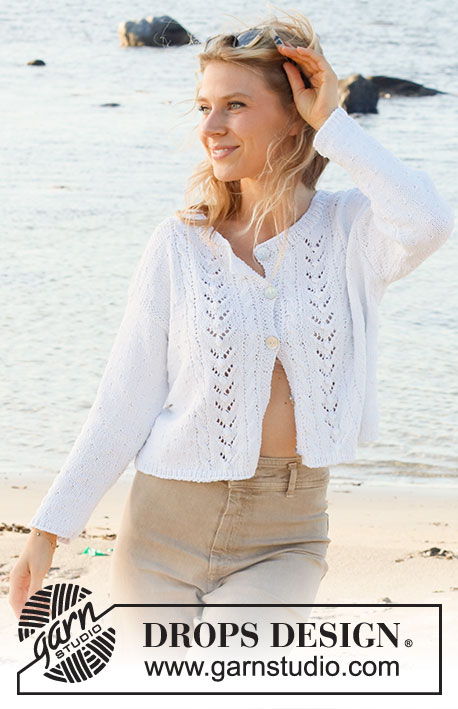
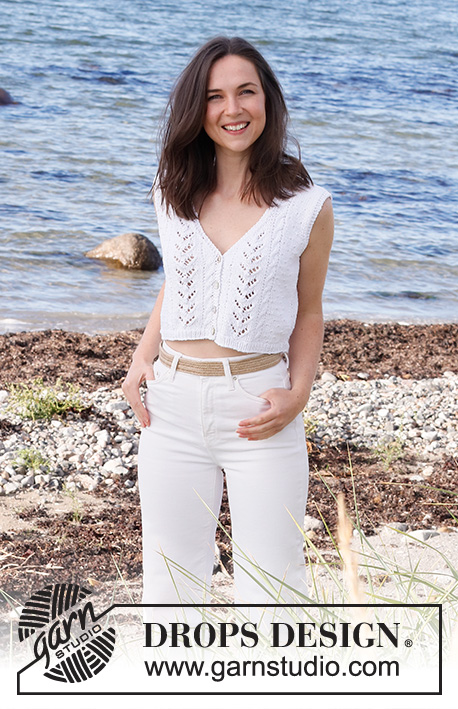
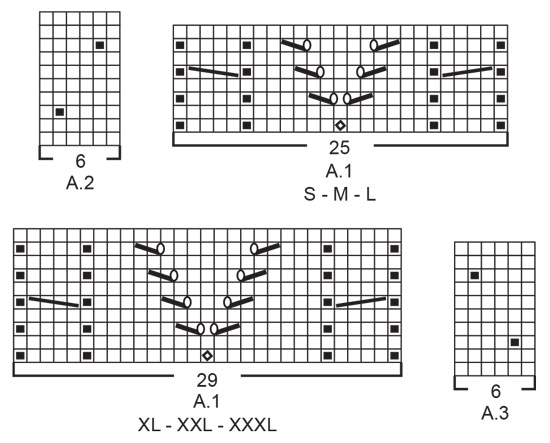
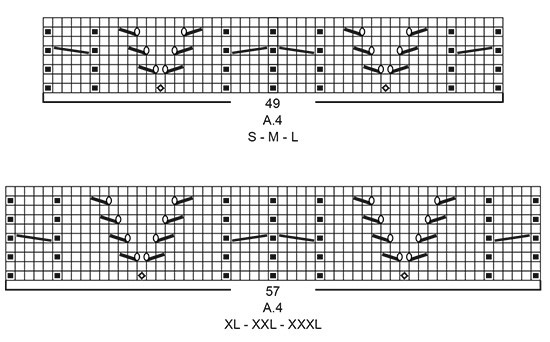
Knitted top in DROPS Cotton Light. Piece is knitted with lace pattern, cables, V-neck and closure at the front. Size: S - XXXL
DROPS 221-18 |
|||||||||||||||||||||||||
|
------------------------------------------------------- EXPLANATION FOR THE PATTERN: ------------------------------------------------------- GARTER STITCH (back and forth): Knit all rows. 1 ridge vertically = knit 2 rows. PATTERN: See diagrams A.1 to A.4. Choose diagram for your size (applies to A.2 and A.4). Diagrams show all rows in pattern seen from the right side. INCREASE TIP: Increase inside 1 edge stitch in garter stitch. All increases are done from the right side. Increase 1 stitch by making 1 yarn over, on next row work yarn over twisted to avoid holes. Work the new stitches in stocking stitch. DECREASE TIP (applies to the armholes and V-neck): Decrease inside 3 edge stitches in garter stitch. All decreases are done from the right side! DECREASE AS FOLLOWS AFTER 3 EDGE STITCHES IN GARTER STITCH: Slip 1 stitch knitwise, knit 1, pass slipped stitch over stitch worked. DECREASE AS FOLLOWS BEFORE 3 EDGE STITCHES IN GARTER STITCH: Work until 2 stitches remain before the 3 edge stitches, knit these 2 together. BUTTONHOLES: Cast off for buttonholes on right front band from right side. 1 BUTTONHOLE = knit second and third stitch from edge together and make 1 yarn over. On next row (wrong side) knit the yarn over to make a hole. Decrease for buttonholes when piece measures: S: 2, 6, 10 and 14 cm M: 1, 6, 11 and 16 cm L: 2, 7, 12 and 17 cm XL: 1, 7, 13 and 19 cm XXL: 1, 7, 13 and 19 cm XXXL: 2, 8, 14 and 20 cm ------------------------------------------------------- START THE PIECE HERE: ------------------------------------------------------- TOP - SHORT OVERVIEW OF THE PIECE: Work front pieces and back piece back and forth on circular needle separately. Sew piece together on the shoulders and in the sides. RIGHT FRONT PIECE (when garment is worn): Cast on 48-54-58-64-70-76 stitches (including 3 band stitches towards mid front and 1 edge stitch in the side) on circular needle size 3 mm with Cotton Light. Purl 1 row (= wrong side). Work next row as follows from right side: 3 band stitches in GARTER STITCH - read explanation above - * knit 1, purl 1 *, repeat from *-* until 1 stitch remains on needle, and finish with 1 edge stitch in garter stitch. Continue rib back and forth for 2 cm – finish after a row from wrong side. Switch to circular needle size 4 mm. Work 2 rows in stocking stitch with 3 band stitches in garter stitch towards mid front and 1 edge stitch in garter stitch towards the side - AT THE SAME TIME on first row decrease 0-1-1-1-1-1 stitch in approx. the middle of row = 48-53-57-63-69-75 stitches. Then work as follows (1st row = right side): 3 band stitches in garter stitch, work A.1 (= 25-25-25-29-29-29 stitches), work A.2 over the next 12-18-24-24-30-36 stitches (= 2-3-4-4-5-6 repetitions of 6 stitches), work 7-6-4-6-6-6 stitches in stocking stitch, and finish with 1 edge stitch in garter stitch towards the side. Continue pattern back and forth like this. REMEMBER THE KNITTING TENSION and remember BUTTONHOLES on band - see explanation above. Then increase in the side, decrease for V-neck towards mid front and decrease for armholes towards the side. This happens at the same time and is explained below: INCREASE IN THE SIDE: When piece measures 4-4-4-5-5-5 cm, increase 1 stitch in the side – read INCREASE TIP. Increase like this every 3½-4-4-4½-4½-4½ cm 4 times in total. V-NECK: When piece measures 15-17-18-20-20-21 cm (approx. 1 cm after last buttonhole on band), decrease 1 stitch for V-neck – read DECREASE TIP. Decrease for V-neck on every other row (i.e. every row from right side) 17-17-16-18-17-16 times in total, and then every 4th row (i.e. every other row from right side) 3-3-4-4-5-6 times in total. ARMHOLE: When piece measures 17-18-19-20-21-22 cm, work 2 ridges over the outermost 6-6-7-9-11-13 stitches towards the side (work first row from right side and the other stitches as before). After the 2 ridges cast off 3-3-4-6-8-10 stitches for armhole at beginning of the next row from the side. Continue pattern back and forth as before with 3 band stitches in garter stitch towards mid front and 3 edge stitches in garter stitch towards the armhole. AT THE SAME TIME on next row from right side decrease 1 stitch in towards the side for armhole - read DECREASE TIP. Decrease for armhole like this every other row 3-7-9-10-12-14 times in total. After all increases and decreases, there are 26-27-28-29-31-33 stitches on needle. Work until 2 rows remain before piece measures 36-38-40-42-44-46 cm. Knit 1 row from right side while decreasing the stitches in cable towards the neck by knitting together 2 by 2 = 24-25-26-27-29-31 stitches remain. Knit 1 row from wrong side. Cast off knitting from right side. Front piece measures approx. 36-38-40-42-44-46 cm from shoulder and down. LEFT FRONT PIECE (when garment is worn): Cast on 48-54-58-64-70-76 stitches (including 1 edge stitch in side and 3 band stitches towards mid front) on circular needle size 3 mm with Cotton Light. Purl 1 row (= wrong side). Work next row as follows from right side: 1 edge stitch in garter stitch, * purl 1, knit 1 *, repeat from *-* until 3 stitches remain on needle, and finish with 3 band stitches in garter stitch towards mid front. Continue rib back and forth for 2 cm – finish after a row from wrong side. Switch to circular needle size 4 mm. Work 2 rows in stocking stitch with 1 edge stitch in garter stitch towards the side and 3 band stitches in garter stitch towards mid front - AT THE SAME TIME on first row decrease 0-1-1-1-1-1 stitch in approx. the middle of row = 48-53-57-63-69-75 stitches. Then work as follows (1st row = right side): 1 edge stitch in garter stitch, work 7-6-4-6-6-6 stitches in stocking stitch, A.3 over the next 12-18-24-24-30-36 stitches (= 2-3-4-4-5-6 repetitions of 6 stitches), work A.1 (= 25-25-25-29-29-29 stitches), and finish with 3 band stitches in garter stitch towards mid front. Continue pattern back and forth like this. Then increase in the side, decrease for V-neck towards mid front and decrease for armholes towards the side. This happens at the same time and is explained below: INCREASE IN THE SIDE: When piece measures 4-4-4-5-5-5 cm, increase 1 stitch in the side – read INCREASE TIP. Increase like this every 3½-4-4-4½-4½-4½ cm 4 times in total. V-NECK: When piece measures 15-17-18-20-20-21 cm, decrease 1 stitch for V-neck – read DECREASE TIP. Decrease for V-neck every other row 17-17-16-18-17-16 times in total, and then every 4th row 3-3-4-4-5-6 times in total. ARMHOLE: When piece measures 17-18-19-20-21-22 cm, work 2 ridges over the outermost 6-6-7-9-11-13 stitches towards the side (work first row from right side and the other stitches as before). After the 2 ridges cast off 3-3-4-6-8-10 stitches for armhole at beginning of the next row from the side. Continue pattern back and forth as before with 3 band stitches in garter stitch towards armhole and 3 band stitches in garter stitch towards mid front. AT THE SAME TIME on next row from right side decrease 1 stitch in towards the side for armhole - read DECREASE TIP. Decrease for armhole like this every other row 3-7-9-10-12-14 times in total. After all increases and decreases, there are 26-27-28-29-31-33 stitches on needle. Work until 2 rows remain before piece measures 36-38-40-42-44-46 cm. Knit 1 row from right side while decreasing the stitches in cable towards the neck by knitting together 2 by 2 = 24-25-26-27-29-31 stitches remain. Knit 1 row from wrong side. Cast off knitting from right side. Front piece measures approx. 36-38-40-42-44-46 cm from shoulder and down. BACK PIECE: Cast on 89-99-107-119-131-143 stitches (including 1 edge stitch in each side) on circular needle size 3 mm with Cotton Light. Purl 1 row (= wrong side). Work next row as follows from right side: 1 edge stitch in garter stitch, * knit 1, purl 1 *, repeat from *-* until 2 stitches remain on needle, knit 1, and finish with 1 edge stitch in garter stitch. Continue rib back and forth for 2 cm – finish after a row from wrong side. Switch to circular needle size 4 mm. Work 2 rows in stocking stitch with 1 edge stitch in garter stitch in each side. Then work as follows (1st row = right side): 1 edge stitch in garter stitch, work 7-6-4-6-6-6 stitches in stocking stitch, work A.3 over the next 12-18-24-24-30-36 stitches (= 2-3-4-4-5-6 repetitions of 6 stitches), work A.4 (= 49-49-49-57-57-57 stitches), work A.2 over the next 12-18-24-24-30-36 stitches (= 2-3-4-4-5-6 repetitions of 6 stitches), work 7-6-4-6-6-6 stitches in stocking stitch, and finish with 1 edge stitch in garter stitch. Continue pattern back and forth like this. When piece measures 4-4-4-5-5-5 cm, increase 1 stitch in each side – read INCREASE TIP. Increase like this every 3½-4-4-4½-4½-4½ cm 4 times in total in each side = 97-107-115-127-139-151 stitches. When piece measures 17-18-19-20-21-22 cm, work 2 ridges over the outermost 6-6-7-9-11-13 stitches in each side (work first row from right side and the other stitches as before). After the 2 ridges cast off 3-3-4-6-8-10 stitches for armholes at the beginning of the next 2 rows = 91-101-107-115-123-131 stitches. Continue pattern back and forth as before with 3 edge stitches in garter stitch in each side towards armholes. AT THE SAME TIME on next row from right side decrease 1 stitch in each side for armholes - read DECREASE TIP. Decrease for armholes like this on every other row from right side 3-7-9-10-12-14 times in total in each side = 85-87-89-95-99-103 stitches. When piece measures 32-34-36-38-40-42 cm, decrease 4 stitches mid back by knitting the two cables mid back together 2 by 2 (= 4 stitches decreased) = 81-83-85-91-95-99 stitches. Then work 2 ridges over the middle 33-33-33-37-37-37 stitches (work the other stitches as before). After the 2 ridges cast off the middle 27-27-27-31-31-31 stitches for neck and finish each shoulder separately. Then work as before and cast off 1 stitch for neck on next row from right side – remember DECREASE TIP = 26-27-28-29-31-33 stitches remain on shoulder. Work until 2 rows remain before piece measures 36-38-40-42-44-46 cm. Knit 1 row from right side while decreasing the stitches in cable towards the neck by knitting together 2 by 2 (= 2 stitches decreased) = 24-25-26-27-29-31 stitches. Knit 1 row from wrong side. Cast off knitting from right side. Work the other shoulder the same way. Back piece measures approx. 36-38-40-42-44-46 cm from shoulder and down. ASSEMBLY: Sew shoulder seams inside cast-off edge. Sew side seams inside 1 edge stitch in garter stitch. Sew the buttons on to the left band. |
|||||||||||||||||||||||||
Diagram explanations |
|||||||||||||||||||||||||
|
|||||||||||||||||||||||||
 |
|||||||||||||||||||||||||
 |
|||||||||||||||||||||||||
 |
|||||||||||||||||||||||||
Have you finished this pattern?Tag your pictures with #dropspattern #dovesbayvest or submit them to the #dropsfan gallery. Do you need help with this pattern?You'll find 25 tutorial videos, a Comments/Questions area and more by visiting the pattern on garnstudio.com. © 1982-2026 DROPS Design A/S. We reserve all rights. This document, including all its sub-sections, has copyrights. Read more about what you can do with our patterns at the bottom of each pattern on our site. |
|||||||||||||||||||||||||


With over 40 years in knitting and crochet design, DROPS Design offers one of the most extensive collections of free patterns on the internet - translated to 17 languages. As of today we count 324 catalogues and 12290 patterns translated into English (UK/cm). 12290
We work hard to bring you the best knitting and crochet have to offer, inspiration and advice as well as great quality yarns at incredible prices! Would you like to use our patterns for other than personal use? You can read what you are allowed to do in the Copyright text at the bottom of all our patterns. Happy crafting!
Post a comment to pattern DROPS 221-18
We would love to hear what you have to say about this pattern!
If you want to leave a question, please make sure you select the correct category in the form below, to speed up the answering process. Required fields are marked *.