
Popular categories
Looking for a yarn?


Comments / Questions (31)
![]() Gerda Verheecke wrote:
Gerda Verheecke wrote:
Met veel plezier heb ik dit model nagebreid: iets langer, de averechtse tricotstreek in het motief van de 30 steken vervangen door een gaatje, bij de 6 steken aan de zijkant ook kabelmotief gebreid en het geheel met naalden nummer 3, daar ik nog 6 bollen witte katoen had liggen om met naald nr 3 te breien! Al meer dan 200 ‘👍’ op FB bij verschillende breigroepen!
30.04.2022 - 10:26
![]() Corina wrote:
Corina wrote:
Can I use straight knitting needle instead of circular needle
08.03.2022 - 11:38DROPS Design answered:
Dear Corina, sure you can, we are working here back and forth on circular needle to get enough room for all stitches. read more here. Happy knitting!
08.03.2022 - 21:44
![]() Magali wrote:
Magali wrote:
Hola! En las instrucciones de la sisa que se refiere trabajar 2 pliegues sobre los 6-6-7-9-11-13 puntos más externos hacia el lado? Que es un pliegue es una disminución?
28.01.2022 - 01:12
![]() Irene wrote:
Irene wrote:
¿Falta una línea en los diagramas A.2 y A.3? Creo que falta una línea arriba (fila 9) con todos los puntos jersey (derecho por el derecho y revés por el revés). Tal y como está ahora, entre el primer relieve de la fila 3 y del segundo relieve de la fila 8 hay un espacio de 4 filas de punto jersey, pero al repetir el diagrama, el tercer relieve estaría en la fila 12 y por tanto habría solo un espacio de 3 filas de punto jersey con el relieve anterior de la fila 8. Gracias
22.08.2021 - 23:16DROPS Design answered:
Hola Irene, puede ser que el diseño no sea completamente simétrico, y que en uno haya un espacio de 3 filas y en otro de 4 filas. De todas formas, mandaremos el comentario al departamento de diseño para que lo comprueben.
23.08.2021 - 13:39
![]() Victoria Chan wrote:
Victoria Chan wrote:
I managed to figure out the right/wrong decrease. Have a new question about this instruction : Decrease for armhole like this every other row 3-7-9-10-12-14 times in total. Is every other row counting the wrong side row as well or alternate row of every right side. Thanks!
29.07.2021 - 16:45DROPS Design answered:
Dear Victoria, when we decrease for armhole, we count EVERY row, so we decrease in EVERY right side row (i.e. right/wrong side) in fact. Happy knitting!
29.07.2021 - 17:25
![]() Victoria Chan wrote:
Victoria Chan wrote:
Sorry, I am still a little confused. When it mentions right side. Does it mean right/left or right/wrong?
29.07.2021 - 15:23DROPS Design answered:
Dear Victoria, in this case we mean right/wrong side of garment. Happy knitting!
29.07.2021 - 17:19
![]() Victoria Chan wrote:
Victoria Chan wrote:
How do I do the decrease stitch for v neck? I see 2 methods in the instruction but do I apply both or just 1 or the other? Thanks.
28.07.2021 - 18:08DROPS Design answered:
Dear Victoria, you apply both methods as it depends if you decrease at the beginning or at the end of row, i.e. after or before 3 edge sts: DECREASE TIP (applies to the armholes and V-neck): Decrease inside 3 edge stitches in garter stitch. All decreases are done from the right side! AFTER 3 EDGE STITCHES: Slip 1 stitch knitwise, knit 1, pass slipped stitch over stitch worked. BEFORE 3 EDGE STITCHES: Work until 2 stitches remain before the 3 edge stitches, knit these 2 together. Using both these methods will give you smooth and nice result. Happy knitting!
28.07.2021 - 18:41
![]() Nina Axelsson Wallin wrote:
Nina Axelsson Wallin wrote:
Varför har diagram A2, 9 varv och diagram A1 bara 8 varv ?? Ska man ta bort varv 1 eller varv 9 på diagram A2 för att få det att passa ihop med diagram A1
04.07.2021 - 15:09DROPS Design answered:
Hej Nina. När du stickat alla varv i A.1 så börjar du bara om med det diagrammet och du stickar då sista varvet i diagram A.2. Mvh DROPS Design
08.07.2021 - 08:37
![]() Madou wrote:
Madou wrote:
Autre question concernant les emmanchures : "tricoter 2 côtes mousse au-dessus des 6 mailles sur le côté (tricoter le 1er de ces rangs sur l'endroit et tricoter les autres mailles comme avant). Après les 2 côtes mousse, rabattre 3 mailles au début du rang suivant à partir du côté." Excusez-moi mais pourriez-vous SVP détailler cette étape ? Je ne comprends pas où effectuer les "2 côtes mousse" et quand rabattre 3 m : sur l'endroit, sur l'envers ? Merci beaucoup !
16.06.2021 - 15:50DROPS Design answered:
Bonjour Madou, pour tricoter 2 côtes mousse sur ces 6 mailles, il vous faut tricoter ces 6 mailles à l'endroit pendant 4 rangs (= à l'endroit sur l'endroit et sur l'envers), en même temps, pendant ces 4 rangs , tricotez toutes les autres mailles comme avant. Quand ces 4 rangs sont faits, rabattez les 3 premières mailles au début du rang suivant sur l'envers (devant droit) / sur l'endroit (devant gauche), tricotez comme avant jusqu'à la fin du rang, tournez, continuer comme avant/comme indiqué. Bon tricot!
17.06.2021 - 08:28
![]() Madou wrote:
Madou wrote:
Bonjour, j'ai du mal à interpréter les diminutions sur l'encolure et les emmanchures. "Diminuer ainsi 17 fois au total tous les 2 rangs (c'est-à-dire tous les rangs sur l'endroit) et 3 fois au total tous les 4 rangs (c'est-à-dire tous les 2 rangs sur l'endroit)." Comment faire lorsqu'on se retrouve sur un rang où on doit, si je comprends bien, diminuer de 2 m ? faut-il répéter la diminution 2 fois ou glisser 2 m, tricoter 1 m et faire glisser les 2 m par-dessus ? Merci !
16.06.2021 - 15:38DROPS Design answered:
Bonjour Madou, pour l'encolure, vous diminuez 1 seule maille à chaque fois après 3 m point mousse (devant gauche)/avant 3 m point mousse (devant droit) - cf DIMINUTIONS, 17 fois tous les 2 rangs = *1 rang de dim, 1 rang sans dim*, tricotez de *à* 17 fois au total, puis *1 rang de dim, 3 rangs sans dim*, tricotez de *-* 3 fois au total. Les rangs de diminutions sont toujours des rangs sur l'endroit. Bon tricot!
17.06.2021 - 08:07
|
|||||||||||||||||||||||||
Doves Bay Vest#dovesbayvest |
|||||||||||||||||||||||||
 |
 |
||||||||||||||||||||||||
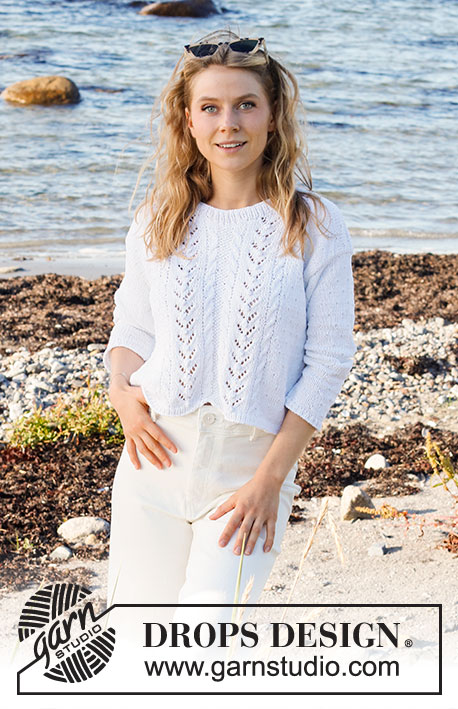
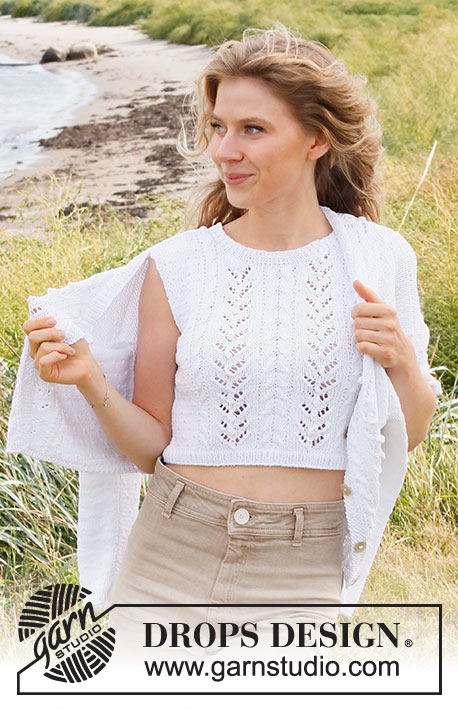
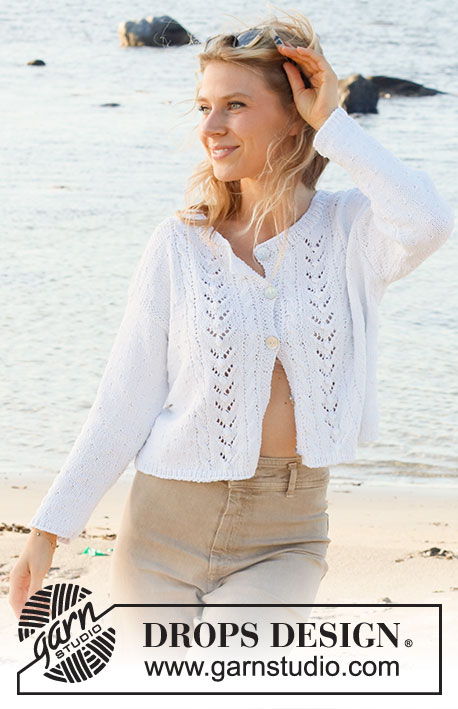
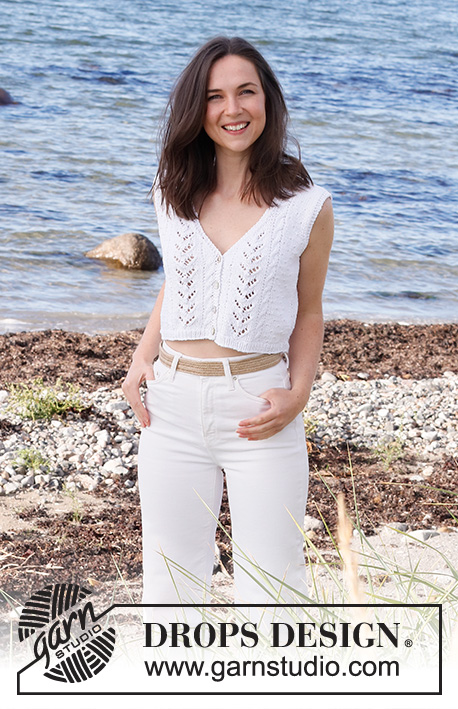
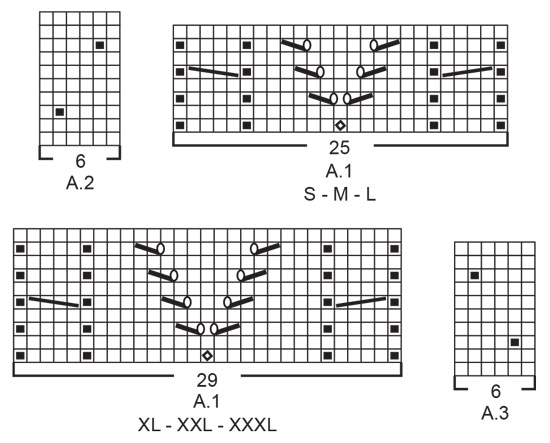
Knitted top in DROPS Cotton Light. Piece is knitted with lace pattern, cables, V-neck and closure at the front. Size: S - XXXL
DROPS 221-18 |
|||||||||||||||||||||||||
|
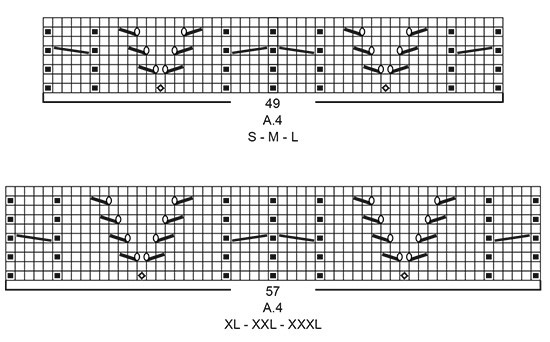
------------------------------------------------------- EXPLANATION FOR THE PATTERN: ------------------------------------------------------- GARTER STITCH (back and forth): Knit all rows. 1 ridge vertically = knit 2 rows. PATTERN: See diagrams A.1 to A.4. Choose diagram for your size (applies to A.2 and A.4). Diagrams show all rows in pattern seen from the right side. INCREASE TIP: Increase inside 1 edge stitch in garter stitch. All increases are done from the right side. Increase 1 stitch by making 1 yarn over, on next row work yarn over twisted to avoid holes. Work the new stitches in stocking stitch. DECREASE TIP (applies to the armholes and V-neck): Decrease inside 3 edge stitches in garter stitch. All decreases are done from the right side! DECREASE AS FOLLOWS AFTER 3 EDGE STITCHES IN GARTER STITCH: Slip 1 stitch knitwise, knit 1, pass slipped stitch over stitch worked. DECREASE AS FOLLOWS BEFORE 3 EDGE STITCHES IN GARTER STITCH: Work until 2 stitches remain before the 3 edge stitches, knit these 2 together. BUTTONHOLES: Cast off for buttonholes on right front band from right side. 1 BUTTONHOLE = knit second and third stitch from edge together and make 1 yarn over. On next row (wrong side) knit the yarn over to make a hole. Decrease for buttonholes when piece measures: S: 2, 6, 10 and 14 cm M: 1, 6, 11 and 16 cm L: 2, 7, 12 and 17 cm XL: 1, 7, 13 and 19 cm XXL: 1, 7, 13 and 19 cm XXXL: 2, 8, 14 and 20 cm ------------------------------------------------------- START THE PIECE HERE: ------------------------------------------------------- TOP - SHORT OVERVIEW OF THE PIECE: Work front pieces and back piece back and forth on circular needle separately. Sew piece together on the shoulders and in the sides. RIGHT FRONT PIECE (when garment is worn): Cast on 48-54-58-64-70-76 stitches (including 3 band stitches towards mid front and 1 edge stitch in the side) on circular needle size 3 mm with Cotton Light. Purl 1 row (= wrong side). Work next row as follows from right side: 3 band stitches in GARTER STITCH - read explanation above - * knit 1, purl 1 *, repeat from *-* until 1 stitch remains on needle, and finish with 1 edge stitch in garter stitch. Continue rib back and forth for 2 cm – finish after a row from wrong side. Switch to circular needle size 4 mm. Work 2 rows in stocking stitch with 3 band stitches in garter stitch towards mid front and 1 edge stitch in garter stitch towards the side - AT THE SAME TIME on first row decrease 0-1-1-1-1-1 stitch in approx. the middle of row = 48-53-57-63-69-75 stitches. Then work as follows (1st row = right side): 3 band stitches in garter stitch, work A.1 (= 25-25-25-29-29-29 stitches), work A.2 over the next 12-18-24-24-30-36 stitches (= 2-3-4-4-5-6 repetitions of 6 stitches), work 7-6-4-6-6-6 stitches in stocking stitch, and finish with 1 edge stitch in garter stitch towards the side. Continue pattern back and forth like this. REMEMBER THE KNITTING TENSION and remember BUTTONHOLES on band - see explanation above. Then increase in the side, decrease for V-neck towards mid front and decrease for armholes towards the side. This happens at the same time and is explained below: INCREASE IN THE SIDE: When piece measures 4-4-4-5-5-5 cm, increase 1 stitch in the side – read INCREASE TIP. Increase like this every 3½-4-4-4½-4½-4½ cm 4 times in total. V-NECK: When piece measures 15-17-18-20-20-21 cm (approx. 1 cm after last buttonhole on band), decrease 1 stitch for V-neck – read DECREASE TIP. Decrease for V-neck on every other row (i.e. every row from right side) 17-17-16-18-17-16 times in total, and then every 4th row (i.e. every other row from right side) 3-3-4-4-5-6 times in total. ARMHOLE: When piece measures 17-18-19-20-21-22 cm, work 2 ridges over the outermost 6-6-7-9-11-13 stitches towards the side (work first row from right side and the other stitches as before). After the 2 ridges cast off 3-3-4-6-8-10 stitches for armhole at beginning of the next row from the side. Continue pattern back and forth as before with 3 band stitches in garter stitch towards mid front and 3 edge stitches in garter stitch towards the armhole. AT THE SAME TIME on next row from right side decrease 1 stitch in towards the side for armhole - read DECREASE TIP. Decrease for armhole like this every other row 3-7-9-10-12-14 times in total. After all increases and decreases, there are 26-27-28-29-31-33 stitches on needle. Work until 2 rows remain before piece measures 36-38-40-42-44-46 cm. Knit 1 row from right side while decreasing the stitches in cable towards the neck by knitting together 2 by 2 = 24-25-26-27-29-31 stitches remain. Knit 1 row from wrong side. Cast off knitting from right side. Front piece measures approx. 36-38-40-42-44-46 cm from shoulder and down. LEFT FRONT PIECE (when garment is worn): Cast on 48-54-58-64-70-76 stitches (including 1 edge stitch in side and 3 band stitches towards mid front) on circular needle size 3 mm with Cotton Light. Purl 1 row (= wrong side). Work next row as follows from right side: 1 edge stitch in garter stitch, * purl 1, knit 1 *, repeat from *-* until 3 stitches remain on needle, and finish with 3 band stitches in garter stitch towards mid front. Continue rib back and forth for 2 cm – finish after a row from wrong side. Switch to circular needle size 4 mm. Work 2 rows in stocking stitch with 1 edge stitch in garter stitch towards the side and 3 band stitches in garter stitch towards mid front - AT THE SAME TIME on first row decrease 0-1-1-1-1-1 stitch in approx. the middle of row = 48-53-57-63-69-75 stitches. Then work as follows (1st row = right side): 1 edge stitch in garter stitch, work 7-6-4-6-6-6 stitches in stocking stitch, A.3 over the next 12-18-24-24-30-36 stitches (= 2-3-4-4-5-6 repetitions of 6 stitches), work A.1 (= 25-25-25-29-29-29 stitches), and finish with 3 band stitches in garter stitch towards mid front. Continue pattern back and forth like this. Then increase in the side, decrease for V-neck towards mid front and decrease for armholes towards the side. This happens at the same time and is explained below: INCREASE IN THE SIDE: When piece measures 4-4-4-5-5-5 cm, increase 1 stitch in the side – read INCREASE TIP. Increase like this every 3½-4-4-4½-4½-4½ cm 4 times in total. V-NECK: When piece measures 15-17-18-20-20-21 cm, decrease 1 stitch for V-neck – read DECREASE TIP. Decrease for V-neck every other row 17-17-16-18-17-16 times in total, and then every 4th row 3-3-4-4-5-6 times in total. ARMHOLE: When piece measures 17-18-19-20-21-22 cm, work 2 ridges over the outermost 6-6-7-9-11-13 stitches towards the side (work first row from right side and the other stitches as before). After the 2 ridges cast off 3-3-4-6-8-10 stitches for armhole at beginning of the next row from the side. Continue pattern back and forth as before with 3 band stitches in garter stitch towards armhole and 3 band stitches in garter stitch towards mid front. AT THE SAME TIME on next row from right side decrease 1 stitch in towards the side for armhole - read DECREASE TIP. Decrease for armhole like this every other row 3-7-9-10-12-14 times in total. After all increases and decreases, there are 26-27-28-29-31-33 stitches on needle. Work until 2 rows remain before piece measures 36-38-40-42-44-46 cm. Knit 1 row from right side while decreasing the stitches in cable towards the neck by knitting together 2 by 2 = 24-25-26-27-29-31 stitches remain. Knit 1 row from wrong side. Cast off knitting from right side. Front piece measures approx. 36-38-40-42-44-46 cm from shoulder and down. BACK PIECE: Cast on 89-99-107-119-131-143 stitches (including 1 edge stitch in each side) on circular needle size 3 mm with Cotton Light. Purl 1 row (= wrong side). Work next row as follows from right side: 1 edge stitch in garter stitch, * knit 1, purl 1 *, repeat from *-* until 2 stitches remain on needle, knit 1, and finish with 1 edge stitch in garter stitch. Continue rib back and forth for 2 cm – finish after a row from wrong side. Switch to circular needle size 4 mm. Work 2 rows in stocking stitch with 1 edge stitch in garter stitch in each side. Then work as follows (1st row = right side): 1 edge stitch in garter stitch, work 7-6-4-6-6-6 stitches in stocking stitch, work A.3 over the next 12-18-24-24-30-36 stitches (= 2-3-4-4-5-6 repetitions of 6 stitches), work A.4 (= 49-49-49-57-57-57 stitches), work A.2 over the next 12-18-24-24-30-36 stitches (= 2-3-4-4-5-6 repetitions of 6 stitches), work 7-6-4-6-6-6 stitches in stocking stitch, and finish with 1 edge stitch in garter stitch. Continue pattern back and forth like this. When piece measures 4-4-4-5-5-5 cm, increase 1 stitch in each side – read INCREASE TIP. Increase like this every 3½-4-4-4½-4½-4½ cm 4 times in total in each side = 97-107-115-127-139-151 stitches. When piece measures 17-18-19-20-21-22 cm, work 2 ridges over the outermost 6-6-7-9-11-13 stitches in each side (work first row from right side and the other stitches as before). After the 2 ridges cast off 3-3-4-6-8-10 stitches for armholes at the beginning of the next 2 rows = 91-101-107-115-123-131 stitches. Continue pattern back and forth as before with 3 edge stitches in garter stitch in each side towards armholes. AT THE SAME TIME on next row from right side decrease 1 stitch in each side for armholes - read DECREASE TIP. Decrease for armholes like this on every other row from right side 3-7-9-10-12-14 times in total in each side = 85-87-89-95-99-103 stitches. When piece measures 32-34-36-38-40-42 cm, decrease 4 stitches mid back by knitting the two cables mid back together 2 by 2 (= 4 stitches decreased) = 81-83-85-91-95-99 stitches. Then work 2 ridges over the middle 33-33-33-37-37-37 stitches (work the other stitches as before). After the 2 ridges cast off the middle 27-27-27-31-31-31 stitches for neck and finish each shoulder separately. Then work as before and cast off 1 stitch for neck on next row from right side – remember DECREASE TIP = 26-27-28-29-31-33 stitches remain on shoulder. Work until 2 rows remain before piece measures 36-38-40-42-44-46 cm. Knit 1 row from right side while decreasing the stitches in cable towards the neck by knitting together 2 by 2 (= 2 stitches decreased) = 24-25-26-27-29-31 stitches. Knit 1 row from wrong side. Cast off knitting from right side. Work the other shoulder the same way. Back piece measures approx. 36-38-40-42-44-46 cm from shoulder and down. ASSEMBLY: Sew shoulder seams inside cast-off edge. Sew side seams inside 1 edge stitch in garter stitch. Sew the buttons on to the left band. |
|||||||||||||||||||||||||
Diagram explanations |
|||||||||||||||||||||||||
|
|||||||||||||||||||||||||
 |
|||||||||||||||||||||||||
 |
|||||||||||||||||||||||||
 |
|||||||||||||||||||||||||
Have you finished this pattern?Tag your pictures with #dropspattern #dovesbayvest or submit them to the #dropsfan gallery. Do you need help with this pattern?You'll find 25 tutorial videos, a Comments/Questions area and more by visiting the pattern on garnstudio.com. © 1982-2026 DROPS Design A/S. We reserve all rights. This document, including all its sub-sections, has copyrights. Read more about what you can do with our patterns at the bottom of each pattern on our site. |
|||||||||||||||||||||||||


With over 40 years in knitting and crochet design, DROPS Design offers one of the most extensive collections of free patterns on the internet - translated to 17 languages. As of today we count 324 catalogues and 12290 patterns translated into English (UK/cm). 12290
We work hard to bring you the best knitting and crochet have to offer, inspiration and advice as well as great quality yarns at incredible prices! Would you like to use our patterns for other than personal use? You can read what you are allowed to do in the Copyright text at the bottom of all our patterns. Happy crafting!
Post a comment to pattern DROPS 221-18
We would love to hear what you have to say about this pattern!
If you want to leave a question, please make sure you select the correct category in the form below, to speed up the answering process. Required fields are marked *.