
Popular categories
Looking for a yarn?


Comments / Questions (29)
![]() Joëlle SABINE wrote:
Joëlle SABINE wrote:
Bonjour, je souhaiterais tricoter ce modèle avec des manches longues, comment puis-je faire ? Merci pour votre aide. Joëlle
06.05.2025 - 10:12DROPS Design answered:
Bonjour Mme Sabine, vous pouvez vous inspirer d'un modèle de pull (par ex) tricoté de bas en haut - retrouvez ici quelques exemples avec un échantillon de 22-20 m. Bon tricot!
06.05.2025 - 11:43
![]() Marielle wrote:
Marielle wrote:
Je viens de comprendre le patron,
08.09.2022 - 03:51
![]() Marielle wrote:
Marielle wrote:
Je termine les diminutions à 149 mailles quand je continue en tricotant et diminue encore 24 mailles. Donc 125 mailles mais vous parlez de 108 mailles, il y a une différence de 17 mailles. Expliquez-moi
08.09.2022 - 03:45DROPS Design answered:
Bonjour Marielle, dans la partie TOUTES LES TAILLES, 24 est le chiffre a diminuer dans la taille S. Dans la taille L il faut diminuer 33 mailles: 149-33=116. Bon tricot!
08.09.2022 - 09:06
![]() Marielle wrote:
Marielle wrote:
Depuis le rang de montage , est-ce au tout début. Dos et devant
04.05.2022 - 06:16DROPS Design answered:
Bonjour Marielle, tout à fait, le rang de montage correspond au tout début de l'ouvrage, lorsque vous avez monté vos mailles. Bon tricot!
04.05.2022 - 08:01
![]() Vivi Busch-Christensen wrote:
Vivi Busch-Christensen wrote:
Hej Kan den strikkes med lange ærmer? Kan den strikkes med kun det øverste hulmønster på bul og samtidig begge på det korte ærme? Vh Vivi Busch-Christensen
30.04.2022 - 06:35DROPS Design answered:
Hei Vivi. Du kan strikke denne med lange ermer, men må du selv regne ut hvordan du vil felle under ermet og hvor langt erme du ønsker. Om du ønsker mønster, må du huske å ha riktig maskeantall slik at mønstret går opp. mvh DROPS Design
02.05.2022 - 13:13
![]() Busra wrote:
Busra wrote:
Hi! Thank you for the pattern! How do I skip a stitch? Just by slipping it from the left needle to the right? My question is about the black square. Thank you!
03.04.2021 - 15:31DROPS Design answered:
Dear Busra, these black squares in the diagrams are usualy on the place of stitches that were decreased (without a corresponding increase) in the pattern, and in the row you have one (or more) stitch less than in the row/ round before. Happy Knitting!
04.04.2021 - 21:32
![]() Sonja Sarauw wrote:
Sonja Sarauw wrote:
Jeg syntes ikke det fremgår af opskriften hvor omgangen begynder når mønstret begynder. Kan jeg få hjælp?
17.09.2020 - 19:32
![]() Johanna wrote:
Johanna wrote:
Ik heb inmiddels ontdekt, dat ik zelf ben verder gegaan met de beschrijving van maat XXL i.p.v. maat L. De beschrijving klopt wel degelijk!
13.09.2020 - 19:17DROPS Design answered:
Dag Johanna,
Fijn dat je het hebt ontdekt. Bedankt voor de terugkoppeling en veel breiplezier!
15.09.2020 - 13:15
![]() Johanna wrote:
Johanna wrote:
Ik ben bezig met dit patroon in maat L. Ik werk aan de pas en heb het A.1 patroon voor de tweede keer in hoogte gebreid (=260 st op de naald). Hierna ga ik volgens beschrijving voor maat L verder, waarbij ik na 1 cm. 53 st. moet minderen. Hierna zou ik 267 st. moeten hebben, maar aangezien ik "maar" 260 st. heb vóór de mindering denk ik dat hier een fout in de beschrijving staat? Hoe moet ik verder?
13.09.2020 - 19:09
![]() Brunhilde wrote:
Brunhilde wrote:
Hallo! Ich habe das Modell nun fertig gestrickt und es gefällt mir sehr gut. Mich stört aber, dass sich der untere Rand hochrollt. Wie kann ich das künftig verhindern? Oder was kann ich mit dem fertig gestrickten Teil tun?
19.07.2020 - 19:54DROPS Design answered:
Liebe Brunhilde, Sie können den Top mit Stecknadeln auf einer geeigneten Unterlage spannen, anfeuchten (z.B. mit einer Sprühflasche für Blumen) und trocknen lassen, danach entfernen Sie die Stecknadeln, dann sollte sich der Rand nicht mehr rollen. Viel Spaß!
20.07.2020 - 10:04
|
||||||||||||||||||||||
New Beginnings#newbeginningstop |
||||||||||||||||||||||
 |
 |
|||||||||||||||||||||
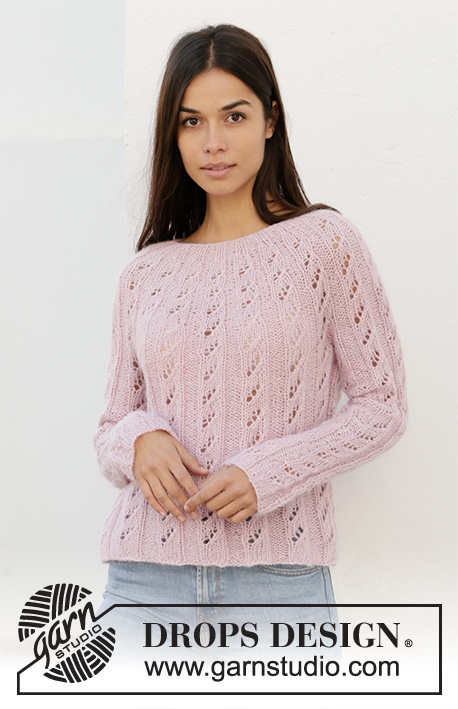
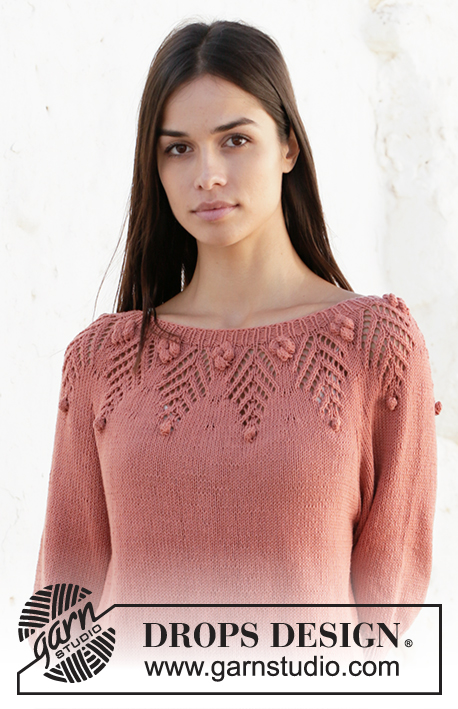
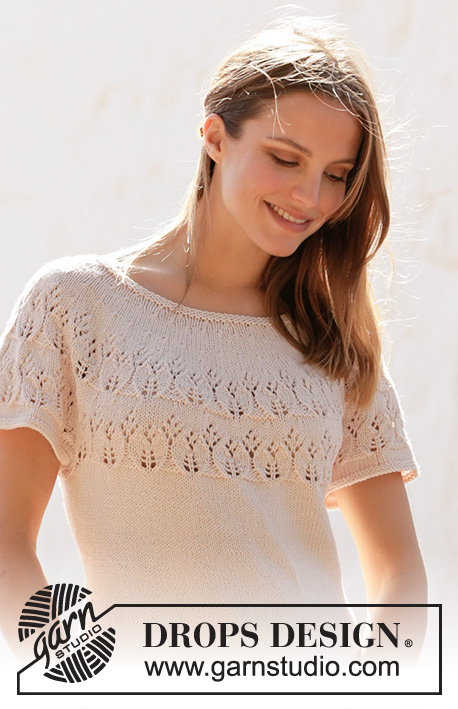
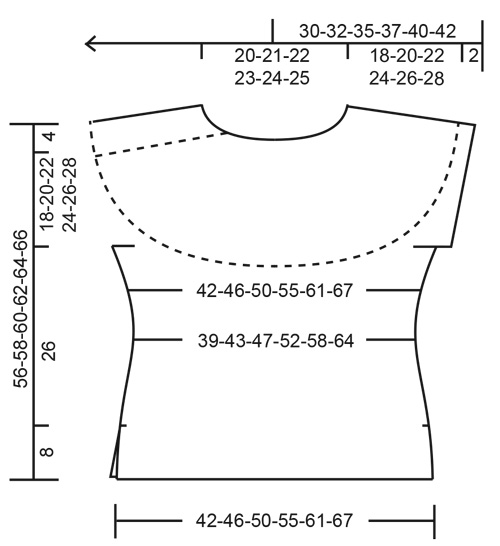
Knitted, fitted top in DROPS Cotton Merino. Piece is knitted with vents in the sides, short sleeves and round yoke with lace pattern. Size: S - XXXL
DROPS 212-38 |
||||||||||||||||||||||
|
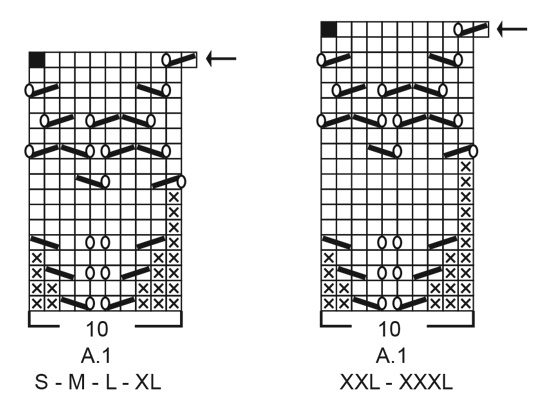
---------------------------------------------------------- EXPLANATION FOR THE PATTERN: ---------------------------------------------------------- GARTER STITCH (back and forth): Knit all rows. 1 ridge vertically = knit 2 rows. GARTER STITCH (worked in the round): 1 ridge vertically = 2 rounds, i.e. knit 1 round and purl 1 round. PATTERN: See diagram A.1. Choose diagram for your size. DECREASE TIP-1 (applies to sides of body) Decrease 1 stitch on each side of marker thread as follows: Work until 4 stitches remain before marker and knit 2 together, knit 4 (marker thread is between these 4 stitches), slip 1 stitch knitwise, stitch knit 1, pass slipped stitch over stitch worked (= 2 stitches decreased). DECREASE TIP-2 (evenly): To calculate how to decrease evenly, use the total number of stitches on row (e.g. 316 stitches) and divide stitches by number of decreases to be done (e.g. 6) = 52.7. In this example decrease by knitting approx. every 52nd and 53rd stitch together. INCREASE TIP (applies to sides of body): Work until 2 stitches remain before marker thread, make 1 yarn over, knit 4 (marker thread is in the middle of these 4 stitches), make 1 yarn over (= 2 stitches increased). On next round knit yarn overs twisted to avoid holes. Then work the new stitches in stocking stitch. ---------------------------------------------------------- START THE PIECE HERE: ---------------------------------------------------------- TOP - SHORT OVERVIEW OF THE PIECE: Work from bottom up. Work front and back piece back and forth on circular needle separately up to vent. Then slip parts together, and work body in the round on circular needle up to armholes. Then work 2 sleeve edges in the round on double pointed needles/circular needle, then slip them on to same circular needle as body. Work yoke in the round on circular needle until finished measurements. FRONT PIECE: Cast on 88-96-104-116-128-140 stitches on circular needle size 3 mm with Cotton Merino. Work 2 ridges in GARTER STITCH back and forth - read explanation above! Switch to circular needle size 4 mm and work in stocking stitch with 3 edge stitch in garter stitch in each side until piece measures 8 cm - finish after a row from wrong side. Put piece aside and work the back piece. BACK PIECE: Cast on 88-96-104-116-128-140 stitches on circular needle size 3 mm. Work 2 ridges back and forth. Switch to circular needle size 4 mm and work in stocking stitch with 3 edge stitch in garter stitch in each side until piece measures 8 cm - finish after a row from wrong side. Then work body as explained below. BODY: Slip front piece and back piece on to same circular needle size 4 mm = 176-192-208-232-256-280 stitches. Insert 1 marker thread in each side in the transitions between front piece and back piece. Move the marker threads upwards when working; they should be used for increase and decrease later in the sides. Work in stocking stitch in the round. REMEMBER THE KNITTING TENSION! When piece measures 9 cm from cast-on edge, decrease 1 stitch on each side of both marker threads - read DECREASE TIP-1 (= 4 stitches decreased). Decrease like this every 4 cm 3 times in total in each side = 164-180-196-220-244-268 stitches. When piece measures 22 cm from cast-on edge, increase 1 stitch on each side of both marker threads - read INCREASE TIP (= 4 stitches increased). Increase like this every 4 cm 3 times in total in each side = 176-192-208-232-256-280 stitches. When piece measures 34 cm from cast-on edge in all sizes, cast off 6-8-8-10-10-12 stitches in each side for armholes, i.e. cast off 3-4-4-5-5-6 stitches on each side of both marker threads = 82-88-96-106-118-128 stitches on each of the parts. Cut the yarn. Put piece aside and work the sleeve edges. SLEEVE EDGE: Cast on 60-66-70-78-86-90 stitches on double pointed needles or a short circular needle size 3 mm with Cotton Merino. Work 2 ridges in GARTER STITCH in the round - read explanation above. Switch to double pointed needles or short circular needle size 4 mm. Work 3 rounds in stocking stitch. Work next round as follows: Cast off the first 3-4-4-5-5-6 stitches, work 54-58-62-68-76-78 stitches in stocking stitch and cast off the remaining 3-4-4-5-5-6 stitches. Cut the yarn. Put piece aside and knit the other sleeve edge the same way. Then work yoke as explained below. YOKE: Slip sleeve edges on to same circular needle size 4 mm as body, where stitches for armholes were cast off = 272-292-316-348-388-412 stitches on needle. NOW MEASURE PIECE FROM HERE! Work 2-2-2-2-4-4 rounds in stocking stitch, and decrease at the same time 2-2-6-8-8-2 stitches evenly on last round – read INCREASE DECREASE TIP-2 = 270-290-310-340-380-410 stitches. Work A.1 in the round (= 27-29-31-34-38-41 repetitions of 10 stitches). When A.1 has been worked, work 4-4-6-6-10-10 rounds in stocking stitch– AT THE SAME TIME decrease 50-50-50-50-60-60 stitches evenly on last round = 220-240-260-290-320-350 stitches. Work A.1 in the round (= 22-24-26-29-32-35 repetitions of 10 stitches). When A.1 has been worked, insert 1 marker on round. Then work in stocking stitch in the round while AT THE SAME TIME decreasing evenly as explained in the different sizes below - yoke now measures from marker: S and M: When piece measures 1-1 cm from marker, decrease 44-48 stitches evenly = 176-192 stitches. When piece measures 3-4 cm from marker, decrease 44-48 stitches evenly = 132-144 stitches. Then work as explained under ALL SIZES! L, XL, XXL and XXXL: When piece measures 1-1-1-1 cm, decrease 37-47-53-58 stitches evenly = 223-243-267-292 stitches. When piece measures 3-4-4-5 cm, decrease 37-47-53-58 stitches evenly = 186-196-214-234 stitches. When piece measures 5-7-7-9 cm, decrease 37-47-53-58 stitches evenly = 149-149-161-176 stitches. Then work as explained under ALL SIZES! ALL SIZES: Continue in the round in stocking stitch until piece measures 4-6-7-9-9-11 cm from marker – i.e. 18-20-22-24-26-28 cm from where body and sleeve edges were slipped together. Knit 1 round while decreasing 24-32-33-29-35-46 stitches evenly = 108-112-116-120-126-130 stitches. Switch to a short circular needle size 3 mm. Work 2 ridges in the round. Switch back to circular needle size 4 mm and cast off by knitting. Top measures approx. 56-58-60-62-64-66 cm from shoulder and down. ASSEMBLY: Sew the openings under the sleeves. |
||||||||||||||||||||||
Diagram explanations |
||||||||||||||||||||||
|
||||||||||||||||||||||
 |
||||||||||||||||||||||
 |
||||||||||||||||||||||
Have you finished this pattern?Tag your pictures with #dropspattern #newbeginningstop or submit them to the #dropsfan gallery. Do you need help with this pattern?You'll find 25 tutorial videos, a Comments/Questions area and more by visiting the pattern on garnstudio.com. © 1982-2026 DROPS Design A/S. We reserve all rights. This document, including all its sub-sections, has copyrights. Read more about what you can do with our patterns at the bottom of each pattern on our site. |
||||||||||||||||||||||


With over 40 years in knitting and crochet design, DROPS Design offers one of the most extensive collections of free patterns on the internet - translated to 17 languages. As of today we count 324 catalogues and 12290 patterns translated into English (UK/cm). 12290
We work hard to bring you the best knitting and crochet have to offer, inspiration and advice as well as great quality yarns at incredible prices! Would you like to use our patterns for other than personal use? You can read what you are allowed to do in the Copyright text at the bottom of all our patterns. Happy crafting!
Post a comment to pattern DROPS 212-38
We would love to hear what you have to say about this pattern!
If you want to leave a question, please make sure you select the correct category in the form below, to speed up the answering process. Required fields are marked *.