
Popular categories
Looking for a yarn?


Comments / Questions (26)
![]() Agnieszka wrote:
Agnieszka wrote:
A nie, mój błąd, wszystko pasuje, przecież robimy od góry do dołu a nie odwrotnie 😉
22.10.2019 - 07:38
![]() Agnieszka wrote:
Agnieszka wrote:
Czy instrukcja wykonania dziurek jest na pewno poprawnie napisana? Jak bym sobie nie obruciła robótki, to prawe obszycie, w prawym rzędzie zawsze wykonuję na początku rzędy, a nie na końcu, czy w takim razie wykonać narzut na dziurkę na lewej stronie i przerobić ją bez przekręcenie na lewej? Czy taka zmiana w ogóle wpłynie jakoś na końcowy wygląd obszyć? Pozdrawiam
22.10.2019 - 07:32DROPS Design answered:
Witaj Agnieszko! Tutaj przerabiamy robótkę od góry do dołu, dlatego każdy rząd na prawej stronie robótki zaczyna się od lewego przodu, a kończy na prawym przodzie. Dziurki na guziki znajdują się na prawym przodzie. Pozdrawiamy!
22.10.2019 - 08:21
![]() Kathrin wrote:
Kathrin wrote:
Hallo, muss ich das Muster auf der Rückreihe dann von links nach rechts stricken? oder wie gehabt von rechts nach links? Vielen Dank
16.09.2019 - 14:20DROPS Design answered:
Liebe Kathrin, wenn Sie das Muster in Reihen stricken lesen Sie die Hinreihen rechts nach links und die Rückreihen links nach rechts (und die Diagramme von unten nach oben lesen). Viel Spaß beim stricken!
16.09.2019 - 15:23
![]() Turid Fagerland wrote:
Turid Fagerland wrote:
Jeg har øket maskeantallet fra 279 m (str. L, pil 3) med 44 m i pil 4. Jeg skal da ha 323 m og 12 rapporter a 26 m. Når jeg ganger 12 rapporter med 26 m, får jeg tallet 312, altså ikke 323. Jeg har da 11 m tilovers. Er det feil i mønsteret, eller er det jeg som har misforstått noe? Venter spent på svar.
07.09.2019 - 21:41DROPS Design answered:
Hei Turid, Når du øker maskeantallet med 44 fra 279 får du 223 masker. Som du sier 12 x 26 = 312. Med 11 stolpe masker (til å begynne med), går masketallet opp i forhold til mønsteret. God fornøyelse!
09.09.2019 - 07:22
![]() KateC wrote:
KateC wrote:
When you say “make 1 yarn over,” does this just mean Make 1, or do you then move the yarn over (to front)? Won’t this leave a hole? I am a new knitter, thank you.
04.08.2019 - 22:54DROPS Design answered:
Hi Kate, 1 yarn over means wind the strand around the right needle to make an extra stitch. The yarn over is then worked twisted (in the back of the loop rather than the front) on the next row/round to avoid a hole. Happy knitting!
05.08.2019 - 07:41
![]() Jóna Marvinsdóttir wrote:
Jóna Marvinsdóttir wrote:
Get ég keypt þetta munstur? Og hvernig ber ég mig að? Hef aldrei pantað áður.
15.07.2019 - 12:51DROPS Design answered:
Öll mynstrin eru frí. Þú getur prentað þau út.
15.07.2019 - 14:47
|
||||||||||
Idun Jacket#idunjacket |
||||||||||
 |
 |
|||||||||
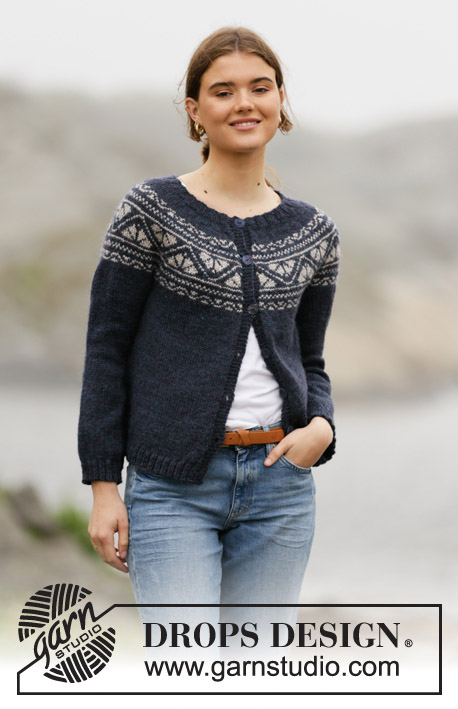
Knitted jacket in DROPS Karisma. The piece is worked top down with round yoke and Nordic pattern on the yoke. Sizes S - XXXL.
DROPS 206-3 |
||||||||||
|
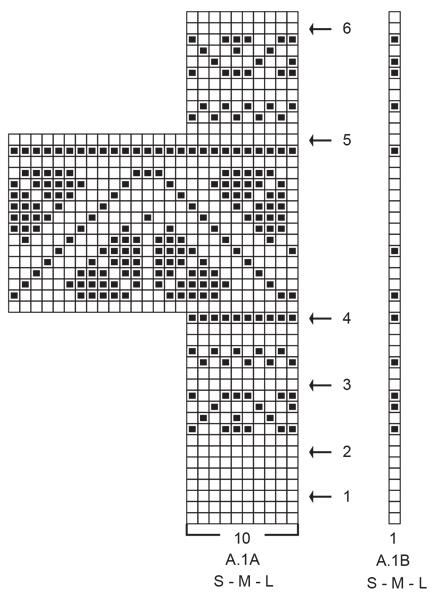
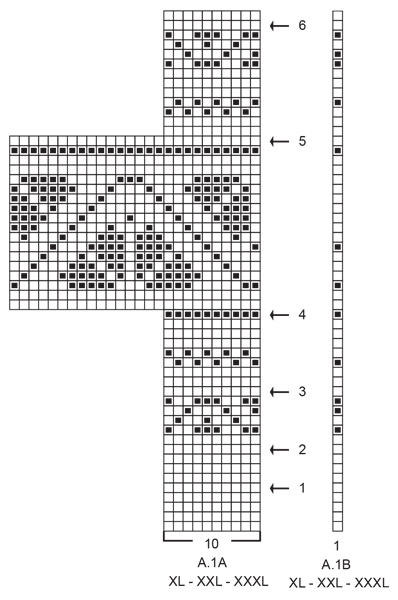
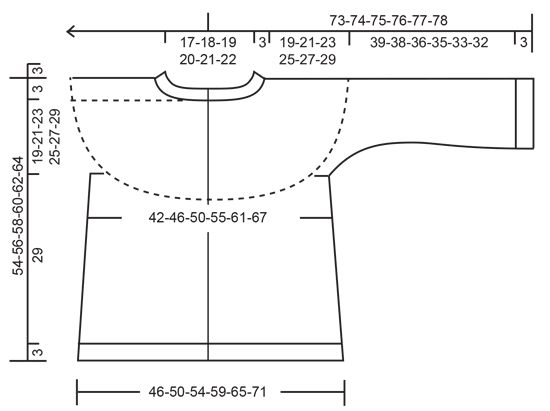
------------------------------------------------------- EXPLANATIONS FOR THE PATTERN: ------------------------------------------------------- RIDGE/GARTER STITCH (worked back and forth): Knit all rows. 1 ridge in height = Knit 2 rows. ELEVATION (back of neck): To make the jacket slightly higher at the back of the neck you can work an elevation as described here. Skip this section if you do not want an elevation. Insert 1 marker in the middle of the row (in S and XL insert the marker in the middle stitch, in M, L, XXL and XXXL insert the marker between the 2 middle stitches on the row). Start from the right side with petrol cerise and knit 13-14-15-15-16-17 stitches past the marker, turn, tighten strand and purl 27-28-30-31-32-34 stitches back. Turn, tighten strand and knit 40-42-45-46-48-51 stitches, turn, tighten strand and purl 53-56-60-61-64-68 stitches back. Turn, tighten strand and knit to end of row, work 1 row from wrong side (band worked in garter stitch). Then work YOKE as described in the text. PATTERN: See diagram A.1. Choose diagram for your size. The whole pattern is worked in stocking stitch. KNITTING TIP: To avoid the knitting tension becoming tighter when working pattern, it is important that the strands at the back are not tight. You can use a larger size needle when working pattern if this is a problem. INCREASE TIP-1 (evenly spaced): To work out how to increase evenly, count the total number of stitches on the needle (e.g. 104 stitches), minus the bands (e.g. 10 stitches) and divide the remaining stitches by the number of increases to be made (e.g. 31) = 3. In this example, increase by making 1 yarn over after each 3rd stitch. Do not increase on the bands. On the next row work the yarn overs twisted to avoid holes. INCREASE TIP-2 (for sides of body and mid under sleeves): All increases are worked from the right side! Work until there are 2 stitches left before the marker thread, make 1 yarn over, knit 4 (marker thread sits in the middle of these 4 stitches), make 1 yarn over (= 2 stitches increased at the marker thread and 4 stitches increased on the row). On the body the yarn overs are purled twisted on the next row (wrong side) to avoid holes. On the sleeves they are knitted twisted on the next round to avoid holes. Then the new stitches are worked in stocking stitch. DECREASE TIP (mid under sleeve): Work until there are 3 stitches left before the marker thread, knit 2 together, knit 2 (marker thread sits between these 2 stitches), slip 1 stitch as if to knit, knit 1 and pass the slipped stitch over the knitted stitch (= 2 stitches decreased). BUTTONHOLE: Work buttonholes on the right band (when the garment is worn). Work from the right side when there are 3 stitches left on the row as follows: Make 1 yarn over, knit 2 together and knit 1. On the next row (wrong side), knit the yarn over to leave a hole. The first buttonhole is worked when the rib on the neck measures approx. 1½-2 cm. Then work the other 5-5-6-6-7-7 buttonholes with approx. 9-9-8-8-7½-7½ cm between each one. CASTING OFF TIP: To avoid the cast-off edge being tight you can cast off with a larger size needle or make 1 yarn over after approx. each 8th stitch at the same time as casting off (yarn overs cast off as normal stitches). ------------------------------------------------------- START THE PIECE HERE: ------------------------------------------------------- JACKET – SHORT OVERVIEW OF THE PIECE: The neck and yoke are worked back and forth from mid front with circular needle, top down. Then the yoke is divided for body and sleeves and the body continued back and forth with circular needle. The sleeves are worked in the round with short circular needle/double pointed needles, top down. NECK: Cast on 104-108-112-116-120-124 stitches (including 5 band stitches on each side towards mid front) with circular needle size 3.5 mm and petrol cerise. Purl 1 row (= wrong side). The next row is worked as follows from the right side: 5 band stitches in GARTER STITCH – read description above, * knit 2, purl 2 *, repeat from *-* until there are 7 stitches left on the row, knit 2 and finish with 5 band stitches in garter stitch. Continue this rib for 3 cm – remember the BUTTONHOLE on the right band – read description above. Knit 1 row from the right side where you increase 31-32-34-35-36-38 stitches evenly spaced – read INCREASE TIP-1 = 135-140-146-151-156-162 stitches. Insert 1 marker at the beginning of the row, after band; the yoke is measured from this marker! Change to circular needle size 4.5 mm and purl 1 row from the wrong side (bands worked in garter stitch and yarn overs purled twisted). You can now work an ELEVATION in the back of the neck – read description above. If you do not want an elevation go straight to YOKE. YOKE: The first row is worked as follows from the right side: 5 band stitches in garter stitch, work A.1A until there are 6 stitches left on the row (the number of stitches does not fit to begin with as each repeat has 10 stitches, but this does not matter as the first rows are one-coloured), work A.1B (= 1 stitch) and finish with 5 band stitches in garter stitch. Continue this pattern. Read KNITTING TIP and REMEMBER THE KNITTING TENSION! AT THE SAME TIME on each row marked with an arrow in A.1A increase stitches evenly spaced as described below – remember INCREASE TIP-1: Arrow-1: Increase 41-43-45-47-49-55 stitches evenly spaced = 176-183-191-198-205-217 stitches. Arrow-2: Increase 25-28-30-33-36-44 stitches evenly spaced = 201-211-221-231-241-261 stitches (there is now room for 19-20-21-22-23-25 repeats of A.1 with 10 stitches). Arrow-3: Increase 22-30-40-48-54-58 stitches evenly spaced = 223-241-261-279-295-319 stitches. Arrow-4: Increase 22-30-36-44-54-56 stitches evenly spaced = 245-271-297-323-349-375 stitches (there is now room for 9-10-11-12-13-14 repeats of A.1 with 26 stitches). Arrow-5: Increase 16-20-24-28-22-26 stitches evenly spaced = 261-291-321-351-371-401 stitches (there is now room for 25-28-31-34-36-39 repeats of A.1 with 10 stitches). Arrow-6: Increase 12-14-8-6-10-12 stitches evenly spaced = 273-305-329-357-381-413 stitches. When A.1 has been completed the piece measures approx. 18-18-18-21-21-21 cm from the marker on the neck. Continue with stocking stitch and petrol cerise and 5 band stitches in garter stitch until the piece measures 19-21-23-25-27-29 cm from the marker on the neck. Now divide the yoke for body and sleeves on the next row as follows: Work 44-48-51-56-61-67 stitches in stocking stitch and garter stitch as before (= front piece), place the next 54-62-68-72-74-78 stitches on 1 thread for sleeve, cast on 6-6-8-8-10-10 new stitches on the needle (= in side under sleeve), work 77-85-91-101-111-123 stitches in stocking stitch as before (= back piece), place the next 54-62-68-72-74-78 stitches on 1 thread for sleeve, cast on 6-6-8-8-10-10 new stitches on the needle (= in side under sleeve) and work the remaining 44-48-51-56-61-67 stitches in stocking stitch and garter stitch as before (= front piece). Body and sleeves are finished separately. THE PIECE IS NOW MEASURED FROM HERE! BODY: = 177-193-209-229-253-277 stitches. Insert 1 marker thread 47-51-55-60-66-72 stitches in from each side (= in sides of body). There are 83-91-99-109-121-133 stitches between marker threads on the back piece. Allow the threads to follow your work onwards; they are used when increasing in the sides. Work stocking stitch back and forth with petrol cerise and 5 band stitches in garter stitch on each side towards mid front – remember the buttonholes on the right band. When the piece measures 6 cm from the division in all sizes increase 1 stitch on each side of both marker threads – read INCREASE TIP-2 (= 4 stitches increased). Increase like this every 6 cm a total of 4 times on each side = 193-209-225-245-269-293 stitches. Continue working until the piece measures 29 cm from the division in all sizes (there is approx. 3 cm left to finished length; you can try the jacket on and continue working to desired length). Purl 1 row from the wrong side where you increase 51-55-59-67-71-79 stitches evenly spaced (bands continued in garter stitch; do not increase on the bands) = 244-264-284-312-340-372 stitches; this increase is to avoid the rib being tight. Change to circular needle size 3.5 mm and work the next row from the right side as follows: 5 band stitches in garter stitch, * knit 2, purl 2 *, work from *-* until there are 7 stitches left on the row, knit 2 and finish with 5 band stitches in garter stitch. Continue this rib for 3 cm. Cast off with garter stitch over garter stitch, knit over knit and purl over purl – read CASTING OFF TIP! The jacket measures approx. 54-56-58-60-62-64 cm from the shoulder down. SLEEVE: Place the 54-62-68-72-74-78 stitches from the thread on the one side of the piece on double pointed needles/short circular needle size 4.5 mm and knit up 1 stitch in each of the 6-6-8-8-10-10 stitches cast on under the sleeve = 60-68-76-80-84-88 stitches. Insert 1 marker thread in the middle of the 6-6-8-8-10-10 stitches under the sleeve and allow the thread to follow your work onwards; it will be used when decreasing mid under sleeve. Start the round at the marker thread and work stocking stitch in the round with petrol cerise. When the sleeve measures 3-3-3-2-2-2 cm from the division decrease 2 stitches mid under sleeve – read DECREASE TIP. Decrease like this every 4-1½-1-1-1-1cm a total of 3-7-10-11-11-13 times = 54-54-56-58-62-62 stitches. When the sleeve measures 15-15-16-16-16-17 cm from the division increase 2 stitches mid under sleeve – read INCREASE TIP-2. Increase like this every 4-4-3-3-2-2 cm a total of 3 times = 60-60-62-64-68-68 stitches. Continue working until the sleeve measures 39-38-36-35-33-32 cm from the division (there is approx. 3 cm left to finished length; you can try the jacket on and continue working to desired length). NOTE: shorter measurements in larger sizes due to wider neck and longer yoke. Knit 1 round where you increase 16-16-18-20-20-20 stitches evenly spaced = 76-76-80-84-88-88 stitches. Change to double pointed needles size 3.5 mm and work rib (= knit 2 / purl 2) for 3 cm. Cast off loosely with knit over knit and purl over purl – remember CASTING OFF TIP! The sleeve measures approx. 42-41-39-38-36-35 cm from the division. Work the other sleeve in the same way. ASSEMBLY: Sew buttons onto the left band. |
||||||||||
Diagram explanations |
||||||||||
|
||||||||||
 |
||||||||||
 |
||||||||||
 |
||||||||||
Have you finished this pattern?Tag your pictures with #dropspattern #idunjacket or submit them to the #dropsfan gallery. Do you need help with this pattern?You'll find 29 tutorial videos, a Comments/Questions area and more by visiting the pattern on garnstudio.com. © 1982-2026 DROPS Design A/S. We reserve all rights. This document, including all its sub-sections, has copyrights. Read more about what you can do with our patterns at the bottom of each pattern on our site. |
||||||||||


With over 40 years in knitting and crochet design, DROPS Design offers one of the most extensive collections of free patterns on the internet - translated to 17 languages. As of today we count 324 catalogues and 12290 patterns translated into English (UK/cm). 12290
We work hard to bring you the best knitting and crochet have to offer, inspiration and advice as well as great quality yarns at incredible prices! Would you like to use our patterns for other than personal use? You can read what you are allowed to do in the Copyright text at the bottom of all our patterns. Happy crafting!
Post a comment to pattern DROPS 206-3
We would love to hear what you have to say about this pattern!
If you want to leave a question, please make sure you select the correct category in the form below, to speed up the answering process. Required fields are marked *.