
Popular categories
Looking for a yarn?


Comments / Questions (40)
![]() Alessandra Visca wrote:
Alessandra Visca wrote:
Vorrei sapere le misure dei quadrati in base alle taglie grazie
02.07.2020 - 23:34DROPS Design answered:
Buongiorno Alessandra. Per la taglia S/M il quadrato misura 40 x 40 cm; per la taglia L/XL 44 x 44 cm; per la taglia XXL/XXXL 48 x 48 cm. Buon lavoro!
03.07.2020 - 01:27
![]() Alessandra wrote:
Alessandra wrote:
Ciao, non ho capito le misure dei quadrati in base alle diverse taglie.grazie
02.07.2020 - 23:32
![]() Ina Tolbøll wrote:
Ina Tolbøll wrote:
Er ved Hals. Der står jeg skal bruge A3a start og slut og A3b i lufmaskehjørne og A3b videre rundt Igen A3b i hjørne . Hvornår skal jeg bruge A3c Højden er det kun første omgang i diagram A3 der gentages 2 gange Første gang brug for hjælp, ellers brugt mange af jeres gode opskrifter. Vh Ina
20.05.2020 - 13:52DROPS Design answered:
Hej Ina, i halsen hækler du kun A.3a og A.3b for her har du ikke noget hjørne. God fornøjelse!
29.05.2020 - 08:58
![]() Amenia wrote:
Amenia wrote:
Ahhh, ich hab gerade gesehen, dass man A.2 a-c ja für die größere Variante benötigt, deswegen mein Vorkommentar bitte ignorieren :) Ich versuch es nochmal zu verstehen!
14.04.2020 - 18:52
![]() Amenia wrote:
Amenia wrote:
Hallo, Ich hab diesen Poncho jetzt bis zur Halsblende fertig gehäkelt. Nun bin ich etwas verdutzt, da ich für den Rand ja das Diagramm A.3 a- c verwendet habe, hat auch alles super funktioniert. Aber nun soll man für die Halsblende ebenfalls Diagramm A.3 a-c verwenden. Ich denke damit ist dann Diagramm A.2 a-c gemeint, oder? Das Diagramm A.2 a-c wird auch in keinsterweise sonst erwähnt.
14.04.2020 - 18:20DROPS Design answered:
Liebe Amenia, für die Halsblende häkelt man auch A.3 a-c. A.2 ist nur in die größeren Größen gehäkelt nur um die Quadrate zu vergrössern. Viel Spaß beim häkeln!
15.04.2020 - 07:59
![]() Katharina wrote:
Katharina wrote:
Liebes Garnstudio-Team, Sehr ich das richtig, dass man anders als im Video angezeigt, beide Quadrate direkt aneinander häkelt? Werden dann die festen Maschen direkt in beide Luftmaschen geführt? Vielen Dank im voraus für die Antwort.
13.01.2020 - 21:05DROPS Design answered:
Liebe Katharina, Sie sind ja recht, hier wird man in beiden Quadraten häkeln (und nicht wie im Video mal in einem Quadrat, mal in den anderen). Die feste maschen sind um die Luftmaschen beiden Quadraten gehäkelt. Viel Spaß beim Weiterhäkeln!
14.01.2020 - 07:53
![]() Katharina wrote:
Katharina wrote:
Liebes Garnstudio-Team, ich habe gerade diesen Poncho angefangen und Frage mich, wie das gemeint ist mit der Phrase :"dann Kettenaschen bis zur Mitte des ersten Luftmaschenbogens häkeln". Könnt ihr mir da weiter helfen?
19.12.2019 - 16:24DROPS Design answered:
Liebe Katharina, am Ende von der 3. Runde z.B. sollen Sie Kettmaschen in die 2 ersten Luftmaschen vom 1. Luftmaschenbogen am Anfang der 3. Runde, damit nächste Runde in der Mitte vom 1. Luftmaschenbogen beginnt. Viel Spaß beim häkeln!
20.12.2019 - 08:37
![]() Amelie wrote:
Amelie wrote:
Hej. Hur många fasta maskor runt luftmaskringen i första varvet? Mvh Amelie
25.11.2019 - 10:39DROPS Design answered:
Hei Amelie! Etter A.1a er heklet skal A.1b hekles 4 ganger, dette tilsvarer 8 fastmasker i første omgang, Lykke til!
26.11.2019 - 08:09
![]() Elena wrote:
Elena wrote:
Mi piacerebbe usare il colore ocra al posto del grigio medio abbinato al grigio scuro, ma non so cosa usare come terzo colore. Cosa suggerite?
19.10.2019 - 09:35DROPS Design answered:
Buongiorno Elena, può lasciare il grigio più chiaro come terzo colore, oppure può provare un contrasto maggiore con il bianco. Le scelte dei colori sono sempre molto soggettive. Per un aiuto più preciso può rivolgersi al suo rivenditore DROPS di fiducia. Buon lavoro!
19.10.2019 - 09:49
![]() Pamela Smith wrote:
Pamela Smith wrote:
I really wanted to make this, but no way can I follow the diagram. I need the written pattern.
30.09.2019 - 21:27DROPS Design answered:
Dear Pamela, unfortunately, we cannot provide written instructions for this pattern, but following a diagram is not that difficult. Here is a DROPS lesson to help you through it.t. Also, don't forget, íou can always ask for help in person in the store you bought your DROPS yarn from. Happy Crafting!
30.09.2019 - 22:38
|
||||||||||||||||||||||||||||||||||||||||||||||||||||||||||||||||||||||
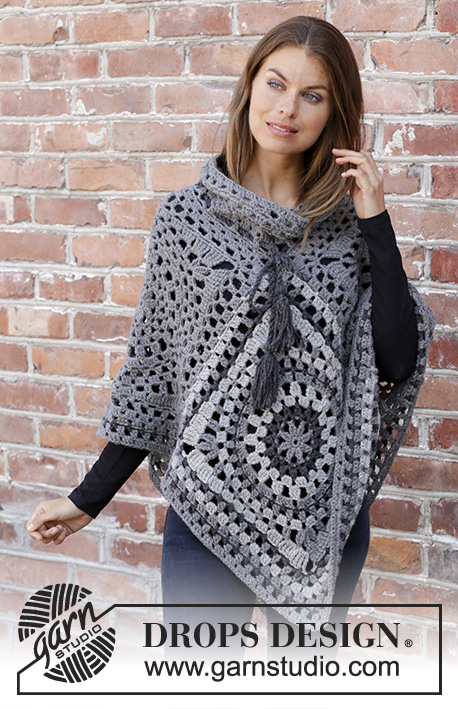
Serena#serenaponcho |
||||||||||||||||||||||||||||||||||||||||||||||||||||||||||||||||||||||
 |
 |
|||||||||||||||||||||||||||||||||||||||||||||||||||||||||||||||||||||
Crocheted poncho in DROPS Nepal. The piece is worked with crochet squares, lace pattern and stripes. Sizes S - XXXL.
DROPS 195-35 |
||||||||||||||||||||||||||||||||||||||||||||||||||||||||||||||||||||||
|
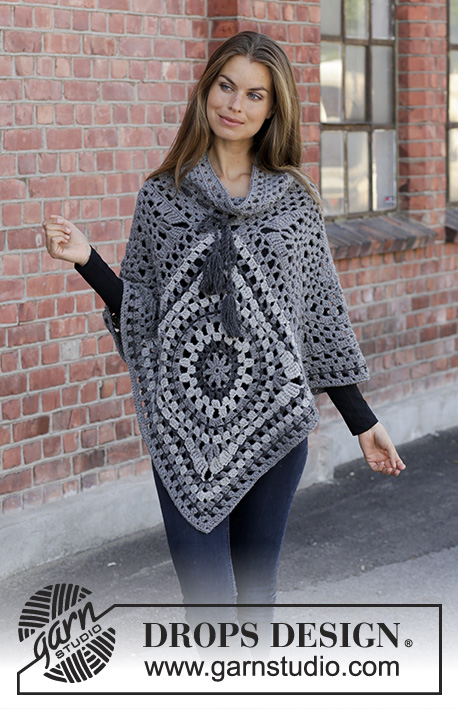
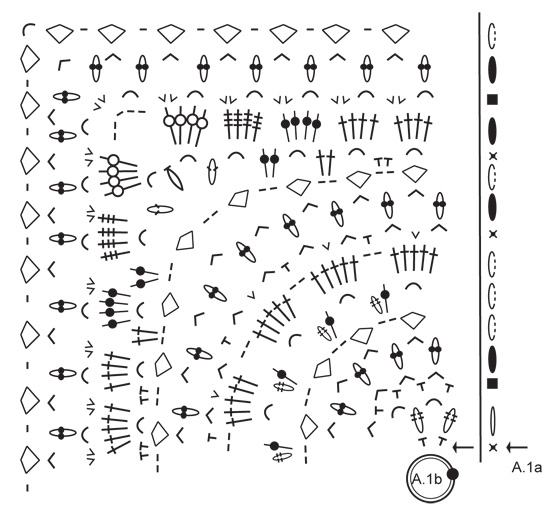
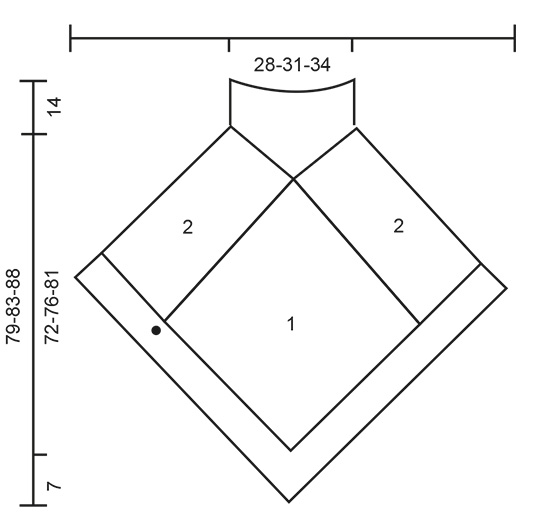
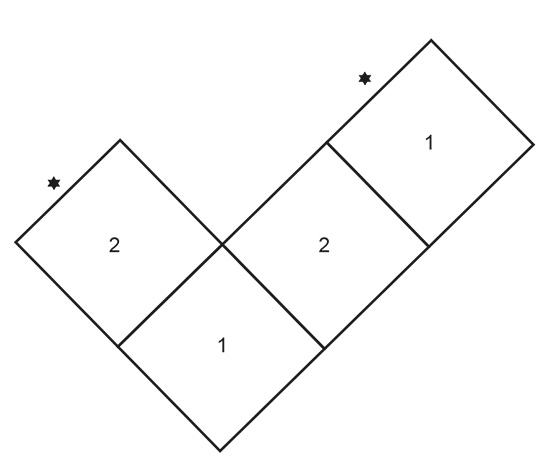
EXPLANATIONS FOR THE PATTERN: ------------------------------------------------------- PATTERN: See diagrams A.1 to A.3. STRIPES-1 (for crochet squares back and front): Chain-stitch ring at beginning of square + ROUNDS 1-2: medium grey. ROUNDS 3-4: dark grey ROUNDS 5-6: grey ROUND 7: medium grey ROUND 8: dark grey ROUND 9: medium grey ROUND 10: grey ROUND 11: medium grey ROUND 12: grey ROUND 13: dark grey ROUND 14: medium grey ROUND 15: grey Size S/M is now finished, for sizes L/XL and XXL/XXXL continue with medium grey. STRIPES-2 (for bottom edge): ROUND 1: medium grey ROUND 2: dark grey ROUND 3: medium grey ROUND 4: medium grey ------------------------------------------------------- START THE PIECE HERE: ------------------------------------------------------- PONCHO - SHORT OVERVIEW OF THE PIECE: 4 crochet squares are worked and sewn together: 2 single-coloured squares and 2 striped squares. An edge is worked at the bottom of the poncho and a neck at the top. CROCHET SQUARE: Work 4 chain stitches with hook size 5.5 mm and medium grey. Form them into a ring with 1 slip stitch in the first chain stitch. Work STRIPES-1- read description above and pattern in the round as follows: Work A.1a – start at arrow - (shows how the rounds start and finish), A.1b a total of 4 times on the round. REMEMBER THE CROCHET TENSION! When the crochet square has been completed, it measures approx. 40 x 40 cm. Size S/M is now finished. For sizes L/XL and XXL/XXXL continue as follows: Work A.2a (shows how the rounds start and finish), * A.2b until there is 1 chain stitch left before the corner. A.2c (= corner) *, work from *-* a total of 4 times on the round, then work A.2b to the end of the round. When you have worked 1 round, size L/XL is finished and the square measures approx. 44 x 44 cm. For size XXL/XXXL work the last round in the diagrams. When the last round has been worked the square measures approx. 48 x 48 cm. Work 1 more square in the same way = 2 crochet squares. Now work 2 single-coloured squares in the same way using medium grey. You have now worked a total of 4 crochet squares. ASSEMBLY: Lay the crochet squares out as shown in the illustration – see below beside the diagrams and sketch. 1 = crochet square with stripes; 2 = single-coloured square. Work the squares together through both layers from the wrong side as follows: 1 double crochet around chain-space in corner, * work 3 chain stitches, skip 3 treble crochets, 1 double crochet around the next chain stitch *, work from *-* along the whole side and finish with 1 double crochet in the next corner. Work the other squares together in the same way. Then finally work together the side marked with a star in the illustration. BOTTOM EDGE: Now work the bottom edge as follows: Start with medium grey in the transition between a single-coloured and a striped square – see black spot on sketch, work STRIPES-2 and pattern in the round as follows: Work A.3a (shows how the rounds start and finish), work A.3b as far as the corner mid front, A.3c around the chain-space in the corner, work A.3b as far as the next corner mid back, A.3c and A.3b to the start of the round. Continue in the round like this until A.3a - A.3c have been completed in height. Cut and fasten the strand. NECK: The whole neck is worked with medium grey. Start with medium grey in the chain-space in the corner of the middle crochet square (= mid back), work A.3a (shows how the rounds start and finish), work A.3b around the same chain-space in the corner, * skip the chain-space in the corner of the next square, work A.3b as far as the next corner, skip the chain-space in the corner, work A.3b around the chain-space in the crochet square mid front *, work from *-* 1 more time on the round, but finish as shown in A.3a. When A.3a and A.3b have been completed in height, repeat the last 4 rounds 2 more times (= a total of 3 times in height). Cut and fasten the strand. Make a twisted cord as follows: TWISTED CORD AND TASSELS Cut 4 strands dark grey, 5 metres in length. Twist them together until they begin to resist, fold them double and they will continue to twist. Tie a knot in each end so that the cord stays twisted. Thread the cord up and down through Round 3 on the neck; start and finish mid front. Make 1 tassel in each end of the cord: 1 tassel = Cut 11 strands dark grey, 24 cm in length. Thread them through the end of the cord and fold them so that all the ends are together (= 24 strand-ends). Cut one more strand, 20 cm in length and wind it around the strands, approx. 1 cm down from the fold and tie a knot. Trim the strands so that they are even at the bottom. Make 1 more tassel in the same way for the other end of the cord. |
||||||||||||||||||||||||||||||||||||||||||||||||||||||||||||||||||||||
Diagram explanations |
||||||||||||||||||||||||||||||||||||||||||||||||||||||||||||||||||||||
|
||||||||||||||||||||||||||||||||||||||||||||||||||||||||||||||||||||||
 |
||||||||||||||||||||||||||||||||||||||||||||||||||||||||||||||||||||||
 |
||||||||||||||||||||||||||||||||||||||||||||||||||||||||||||||||||||||
 |
||||||||||||||||||||||||||||||||||||||||||||||||||||||||||||||||||||||
 |
||||||||||||||||||||||||||||||||||||||||||||||||||||||||||||||||||||||
Have you finished this pattern?Tag your pictures with #dropspattern #serenaponcho or submit them to the #dropsfan gallery. Do you need help with this pattern?You'll find 13 tutorial videos, a Comments/Questions area and more by visiting the pattern on garnstudio.com. © 1982-2026 DROPS Design A/S. We reserve all rights. This document, including all its sub-sections, has copyrights. Read more about what you can do with our patterns at the bottom of each pattern on our site. |
||||||||||||||||||||||||||||||||||||||||||||||||||||||||||||||||||||||


With over 40 years in knitting and crochet design, DROPS Design offers one of the most extensive collections of free patterns on the internet - translated to 17 languages. As of today we count 324 catalogues and 12290 patterns translated into English (UK/cm). 12290
We work hard to bring you the best knitting and crochet have to offer, inspiration and advice as well as great quality yarns at incredible prices! Would you like to use our patterns for other than personal use? You can read what you are allowed to do in the Copyright text at the bottom of all our patterns. Happy crafting!
Post a comment to pattern DROPS 195-35
We would love to hear what you have to say about this pattern!
If you want to leave a question, please make sure you select the correct category in the form below, to speed up the answering process. Required fields are marked *.