Comments / Questions (40)
![]() Suzan wrote:
Suzan wrote:
Is there a written round by round pattern? I can’t make heads or tails of these pictures. Thanks It looks like a it could be a really pretty poncho!
28.12.2024 - 18:59
![]() Mir wrote:
Mir wrote:
Hello. I want to make this but only in one colour. How much yarn would I need for size M when only colour? Thank you.
25.10.2024 - 11:17DROPS Design answered:
Dear Mir, as we worked this poncho with 3 colours, we only have the amount with the 3 colours (and we don't have the garment anymore), so you will have to add all colours together, you might need somewhat less. Happy crocheting!
25.10.2024 - 13:15
![]() B De Kort De Kort wrote:
B De Kort De Kort wrote:
Omslag doek
19.09.2024 - 23:59
![]() Tanja wrote:
Tanja wrote:
Wie soll ich den Farbwechsel machen?
12.06.2024 - 10:57DROPS Design answered:
Liebe Tanja, in diesem Video zeigen wir, wie man den Farbwechsel häkelt. Viel Spaß beim Häkeln!
12.06.2024 - 16:21
![]() Silvia wrote:
Silvia wrote:
No entiendo bien el comienzo de la 6a vuelta en el diagrama. Según A.1a se debe "sustituir el primer punto alto con 3 puntos de cadena", sin embargo según A.1.b la fila comienza con 4 puntos de cadena seguido de 1 punto alto doble. ¿Cómo se debe comenzar? ¿ Serían en total 3+ 4 puntos de cadena? Muchas gracias por su ayuda
06.02.2023 - 14:58DROPS Design answered:
Hola Silvia, las cadenetas iniciales son 3 puntos de cadeneta (el símbolo a la derecha en el diagrama). Después, trabajar 4 puntos de cadeneta más y después trabajar el punto alto doble.
07.02.2023 - 11:50
![]() Daniela Balanza wrote:
Daniela Balanza wrote:
Me gustaría mucho que todos sus patrones tengan videos serian de mucha ayuda especialmente para principiantes también por el tema de los símbolos q son diferentes en cada país y confunden. Gracias
21.05.2022 - 16:59
![]() Carol wrote:
Carol wrote:
How do I crochet the neck, the 4 squares are together now, please help me
17.04.2022 - 19:49DROPS Design answered:
Dear Carol, you can see the instructions for the neck after the bottom edge. If you have problems with a concrete section, please tell us what you don't understand so we may help you better. Happy crocheting!
18.04.2022 - 20:16
![]() Amanda wrote:
Amanda wrote:
I just downloaded the Serena poncho and I have no clue how to read a chart. Is there any way you have the rounds for the squares written out? Thank you.
23.01.2022 - 01:48DROPS Design answered:
Dear Amanda, unfortunately, this pattern is written as a combination of written instructions and charts for the pattern, so we don't have each round written out. But you can read the following lesson; it should help you better understand crochet diagrams: https://www.garnstudio.com/lesson.php?id=69&cid=19 Happy crocheting!
23.01.2022 - 20:59
![]() Tisa wrote:
Tisa wrote:
I love patterns. My first crochet lace shawl was from a Italian pattern. Going from Europe to America isn’t easy to convert. Patterns can be used for everybody in every country.
04.12.2021 - 14:22
![]() Tisa wrote:
Tisa wrote:
How do I increase it for a larger person?
04.12.2021 - 14:14DROPS Design answered:
Dear Tisa, you need to increase the size of the square by repeating the last rows of the square, but you need to make the calculations yourself; you can also work the edge around the poncho wider to make the square larger. Happy crochetting!
05.12.2021 - 16:39
Serena#serenaponcho |
||||||||||||||||||||||||||||||||||||||||||||||||||||||||||||||||||||||
 |
 |
|||||||||||||||||||||||||||||||||||||||||||||||||||||||||||||||||||||
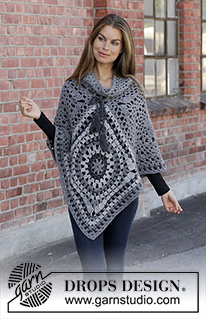
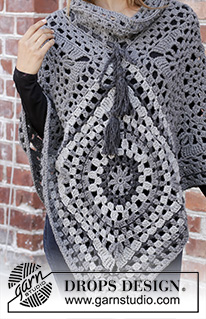
Crocheted poncho in DROPS Nepal. The piece is worked with crochet squares, lace pattern and stripes. Sizes S - XXXL.
DROPS 195-35 |
||||||||||||||||||||||||||||||||||||||||||||||||||||||||||||||||||||||
|
EXPLANATIONS FOR THE PATTERN: ------------------------------------------------------- PATTERN: See diagrams A.1 to A.3. STRIPES-1 (for crochet squares back and front): Chain-stitch ring at beginning of square + ROUNDS 1-2: medium grey. ROUNDS 3-4: dark grey ROUNDS 5-6: grey ROUND 7: medium grey ROUND 8: dark grey ROUND 9: medium grey ROUND 10: grey ROUND 11: medium grey ROUND 12: grey ROUND 13: dark grey ROUND 14: medium grey ROUND 15: grey Size S/M is now finished, for sizes L/XL and XXL/XXXL continue with medium grey. STRIPES-2 (for bottom edge): ROUND 1: medium grey ROUND 2: dark grey ROUND 3: medium grey ROUND 4: medium grey ------------------------------------------------------- START THE PIECE HERE: ------------------------------------------------------- PONCHO - SHORT OVERVIEW OF THE PIECE: 4 crochet squares are worked and sewn together: 2 single-coloured squares and 2 striped squares. An edge is worked at the bottom of the poncho and a neck at the top. CROCHET SQUARE: Work 4 chain stitches with hook size 5.5 mm and medium grey. Form them into a ring with 1 slip stitch in the first chain stitch. Work STRIPES-1- read description above and pattern in the round as follows: Work A.1a – start at arrow - (shows how the rounds start and finish), A.1b a total of 4 times on the round. REMEMBER THE CROCHET TENSION! When the crochet square has been completed, it measures approx. 40 x 40 cm. Size S/M is now finished. For sizes L/XL and XXL/XXXL continue as follows: Work A.2a (shows how the rounds start and finish), * A.2b until there is 1 chain stitch left before the corner. A.2c (= corner) *, work from *-* a total of 4 times on the round, then work A.2b to the end of the round. When you have worked 1 round, size L/XL is finished and the square measures approx. 44 x 44 cm. For size XXL/XXXL work the last round in the diagrams. When the last round has been worked the square measures approx. 48 x 48 cm. Work 1 more square in the same way = 2 crochet squares. Now work 2 single-coloured squares in the same way using medium grey. You have now worked a total of 4 crochet squares. ASSEMBLY: Lay the crochet squares out as shown in the illustration – see below beside the diagrams and sketch. 1 = crochet square with stripes; 2 = single-coloured square. Work the squares together through both layers from the wrong side as follows: 1 double crochet around chain-space in corner, * work 3 chain stitches, skip 3 treble crochets, 1 double crochet around the next chain stitch *, work from *-* along the whole side and finish with 1 double crochet in the next corner. Work the other squares together in the same way. Then finally work together the side marked with a star in the illustration. BOTTOM EDGE: Now work the bottom edge as follows: Start with medium grey in the transition between a single-coloured and a striped square – see black spot on sketch, work STRIPES-2 and pattern in the round as follows: Work A.3a (shows how the rounds start and finish), work A.3b as far as the corner mid front, A.3c around the chain-space in the corner, work A.3b as far as the next corner mid back, A.3c and A.3b to the start of the round. Continue in the round like this until A.3a - A.3c have been completed in height. Cut and fasten the strand. NECK: The whole neck is worked with medium grey. Start with medium grey in the chain-space in the corner of the middle crochet square (= mid back), work A.3a (shows how the rounds start and finish), work A.3b around the same chain-space in the corner, * skip the chain-space in the corner of the next square, work A.3b as far as the next corner, skip the chain-space in the corner, work A.3b around the chain-space in the crochet square mid front *, work from *-* 1 more time on the round, but finish as shown in A.3a. When A.3a and A.3b have been completed in height, repeat the last 4 rounds 2 more times (= a total of 3 times in height). Cut and fasten the strand. Make a twisted cord as follows: TWISTED CORD AND TASSELS Cut 4 strands dark grey, 5 metres in length. Twist them together until they begin to resist, fold them double and they will continue to twist. Tie a knot in each end so that the cord stays twisted. Thread the cord up and down through Round 3 on the neck; start and finish mid front. Make 1 tassel in each end of the cord: 1 tassel = Cut 11 strands dark grey, 24 cm in length. Thread them through the end of the cord and fold them so that all the ends are together (= 24 strand-ends). Cut one more strand, 20 cm in length and wind it around the strands, approx. 1 cm down from the fold and tie a knot. Trim the strands so that they are even at the bottom. Make 1 more tassel in the same way for the other end of the cord. |
||||||||||||||||||||||||||||||||||||||||||||||||||||||||||||||||||||||
Diagram explanations |
||||||||||||||||||||||||||||||||||||||||||||||||||||||||||||||||||||||
|
||||||||||||||||||||||||||||||||||||||||||||||||||||||||||||||||||||||
 |
||||||||||||||||||||||||||||||||||||||||||||||||||||||||||||||||||||||
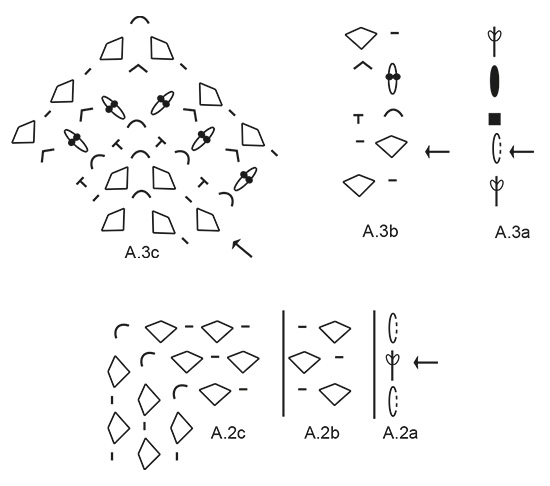 |
||||||||||||||||||||||||||||||||||||||||||||||||||||||||||||||||||||||
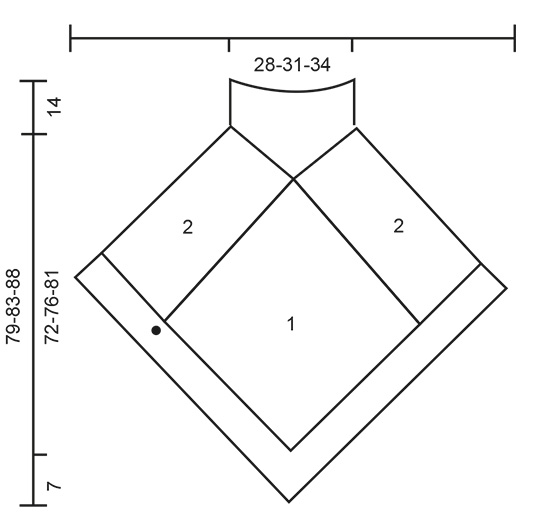 |
||||||||||||||||||||||||||||||||||||||||||||||||||||||||||||||||||||||
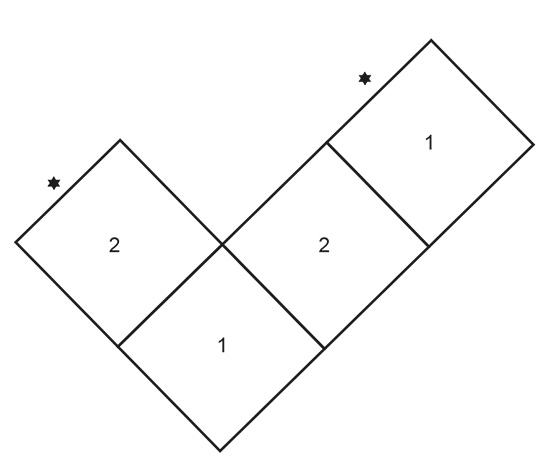 |
||||||||||||||||||||||||||||||||||||||||||||||||||||||||||||||||||||||
Have you finished this pattern?Tag your pictures with #dropspattern #serenaponcho or submit them to the #dropsfan gallery. Do you need help with this pattern?You'll find 13 tutorial videos, a Comments/Questions area and more by visiting the pattern on garnstudio.com. © 1982-2026 DROPS Design A/S. We reserve all rights. This document, including all its sub-sections, has copyrights. Read more about what you can do with our patterns at the bottom of each pattern on our site. |
||||||||||||||||||||||||||||||||||||||||||||||||||||||||||||||||||||||


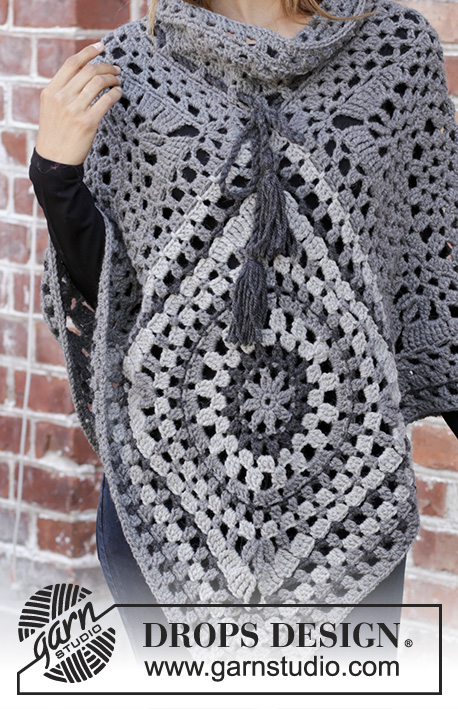



Post a comment to pattern DROPS 195-35
We would love to hear what you have to say about this pattern!
If you want to leave a question, please make sure you select the correct category in the form below, to speed up the answering process. Required fields are marked *.